Mysql your visual blueprint for creating open source databases- P7 doc
Bạn đang xem bản rút gọn của tài liệu. Xem và tải ngay bản đầy đủ của tài liệu tại đây (674.94 KB, 20 trang )
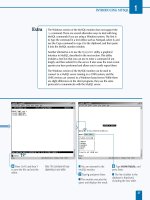
ˇ Type UPDATE mail SET
address2=address, and press
Enter.
■ You are prompted for the
next line.
Á Type city2=city,
state2=state, postal2=postal;
and press Enter.
■ This completes the
UPDATE query. All of the
rows of the table are updated.
‡ Type SELECT name,
address, address2 FROM mail;
and press Enter.
■ The values of the columns
you specified are displayed
for all rows. Verify that the
address values were copied.
UPDATE DATA IN TABLES
5
If you are working with a table that has a timestamp column, this column
is automatically updated with the current date and time in each row
modified by any UPDATE query. If you want to update a row and preserve
the current value of the timestamp column, you must explicitly set the
column to its original value.
For example, if you were to add a second address to the address table and
perform a similar update, you may want to avoid updating the timestamp
in the updatetime column. The following query accomplishes this:
Example:
UPDATE address SET address2=address,
city2=city, state2=state,
updatetime=updatetime;
While setting a column to its own value normally has no effect, in a
timestamp column this prevents the MySQL server from automatically
updating the field. You can also set the timestamp column explicitly to a
different value. For example, the following UPDATE query sets all rows to
a specified updatetime value:
Example:
UPDATE address SET address2=address,
city2=city, state2=state,
updatetime="20030101120000";
107
516922 Ch05.F 9/26/02 11:34 AM Page 107
Note: This example uses the testdb
database and creates a new table.
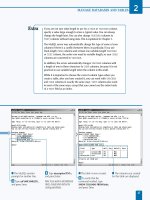
⁄ From the MySQL monitor,
type
USE testdb; and press
Enter.
■ The database is now
selected.
¤ Type CREATE TABLE exams
(name VARCHAR(80), and
press Enter.
‹ Type numtests INT,
totalscore INT, avgscore
TINYINT); and press Enter.
■ The table is created.
› Type INSERT INTO exams
(name, numtests, totalscore)
and press Enter.
■ You are prompted for the
next line.
ˇ Type VALUES ("Sam", 5,
350), and press Enter.
Á Type ("Ted",3,
220),("Sue",6, 510);
and press Enter.
■ This completes the
INSERT query and adds
three sample rows to the
table.
O
ften, you will find it useful to update a column's
value based on its existing value. The simplest
example of this is to increment a numeric column's
value. This is easy to do in an UPDATE query by referring to
the column's current value.
For example, suppose you created a table to store exam
statistics for students. The following CREATE TABLE query
creates this simple table:
CREATE TABLE exams (name VARCHAR(80),
numtests INT, totalscore INT, avgscore
TINYINT);
This creates a table called exams with four columns: name
for the student name, numtests for the number of tests the
student has taken, totalscore for the total of all test scores,
and avgscore for an average.
When a new test is administered to students, you may want
to increment the numtests column for all of the rows in the
database. You can use a simple UPDATE query to
accomplish this:
UPDATE exams
SET numtests = numtests + 1;
This query adds one to the current value of the numtests
column for each row and stores the resulting value in that
row's numtests column, replacing the original value. The net
effect is to increment the numtests column for every student.
As with other UPDATE queries, you could optionally add a
WHERE clause. Specifying a WHERE clause may be useful to
increment the number of tests for only a single student or
group of students. You can use a wide variety of arithmetic
operations on MySQL column values; these are listed in
Chapter 7.
INCREMENT A COLUMN VALUE
MySQL
108
INCREMENT A COLUMN VALUE
516922 Ch05.F 9/26/02 11:34 AM Page 108
‡ Type UPDATE exams and
press Enter.
■ You are prompted for the
next line.
° Type SET numtests =
numtests + 1; and press Enter.
■ This completes the
UPDATE query. The column is
incremented in all rows.
· Type SELECT * FROM
exams; and press Enter.
■ The contents of the table
are displayed. The number of
tests has been incremented
for each row.
UPDATE DATA IN TABLES
5
109
You can use math in UPDATE statements to do more than simply increment
columns. For example, you could use an UPDATE query to automatically set the
avgscore column for each student to be an average calculated by dividing
totalscore by numtests.
Example:
UPDATE exams
SET avgscore = totalscore / numtests;
This example uses the / (division) operator to calculate the average. Because there
is no WHERE clause, this operation will be performed on all rows of the table.
Because UPDATE can modify multiple columns at once, you could combine this
example with the previous example to increment the number of tests and
calculate the average at the same time.
Example:
UPDATE exams
SET numtests = numtests + 1,
avgscore = totalscore / numtests;
Because MySQL processes the UPDATE query from left to right, the numtests
column will be incremented for each row first, after which the new value will be
used in the calculation of the average.
516922 Ch05.F 9/26/02 11:34 AM Page 109
S
ELECT is one of the most powerful MySQL query
commands, and one you will use frequently. A SELECT
query returns one or more rows from one or more
tables. You can use SELECT from the MySQL monitor to
display data or from an application to retrieve data.
USING SELECT QUERIES
MySQL
110
The SELECT query has a specific
syntax. The various clauses and
keywords are optional, but must be
specified in this order. Many of the
clauses require that you specify a
table with FROM.
SELECT columns or expressions
FROM table or tables WHERE
conditions
GROUP BY columns ORDER BY
columns
LIMIT number;
BASIC SELECT SYNTAX
The LIMIT clause allows you to limit the
number of rows the SELECT query can return.
If you specify a single number with LIMIT,
only that number of rows will be returned. This
clause can be combined with a WHERE clause
to display a limited number of rows that match
the condition.
If you specify two numbers in the LIMIT
clause, the first is the number of the first result
row to be returned. Rows are numbered
starting with zero. The second number is the
limit. You can use this to display pages of data
from a query.
Example:
SELECT * FROM address LIMIT 10;
THE LIMIT CLAUSE
If you specify more than one table name in the FROM
clause, the SELECT query will return data from multiple
tables. This is known as a JOIN query, and requires a
WHERE clause to match a column from each table with
corresponding items in other tables.
You can also use the JOIN keyword to combine tables.
When you use INNER JOIN or simply specify multiple
tables, only rows that match between tables are displayed.
When you use LEFT JOIN, all of the rows in the left table
are displayed. If no corresponding values exist for the
right table, NULL values are returned.
Example:
SELECT * FROM address, mail
WHERE address.name = mail.name;
USING JOIN TO COMBINE TABLES
Specify Columns
You can specify one or more column names in the SELECT query. The columns
you specify will be displayed for each row returned by the query. You can use
commas to separate multiple columns or use * to return all columns.
Example:
SELECT name, city FROM address;
Specify Tables
You use the FROM keyword in SELECT to specify one or more tables from
which to retrieve rows. In most cases, a single table name is used.
516922 Ch06.F 9/26/02 11:35 AM Page 110
USING SELECT QUERIES
6
111
The ORDER BY clause specifies one or more
columns by which to sort the results of the SELECT
query. You can specify a single column name or
multiple columns separated by commas. You can
optionally specify the keyword ASC (ascending) or
DESC (descending) for each column. An ascending
sort is the default.
Example:
SELECT * FROM address ORDER BY name;
THE ORDER BY CLAUSE
The GROUP BY clause is similar to ORDER
BY, but all of the rows for each value of the
group column are combined into a single
row. You can use functions such as COUNT
to perform calculations on the combined
data.
Example:
SELECT state, COUNT(*) FROM address
GROUP BY state;
THE GROUP BY CLAUSE
Compare Numeric Values
MySQL includes a number of comparison operators you
can use with numeric values:
OPERATOR DESCRIPTION
= Is equal to
> Is greater than
< Is less than
>= Is greater than or equal to
<= Is less than or equal to
<> or != Is not equal to
Work with NULL Values
The following comparison operators work with NULL
values in columns:
OPERATOR DESCRIPTION
IS NULL Is the NULL value
IS NOT NULL Is not the NULL value
<=> Is equal to (allows NULL values)
Compare Text Strings
You can compare text values using the standard equal,
greater-than, and less-than operators. Additionally, you
can use LIKE or NOT LIKE to compare text strings.
These operators allow the wildcard values % for any
characters or no characters, and _ for one character.
Combine Conditions
You can use the AND keyword to combine two
conditions in a WHERE clause. Only the rows that match
both conditions will be returned. The OR keyword also
combines conditions. In this case, any row that matches
one condition or the other is returned. The NOT
keyword negates one or more conditions.
You can use AND, OR, and NOT to combine any number
of conditions for a WHERE clause. You can use
parentheses to indicate the conditions that should be
evaluated first.
Example:
SELECT * FROM address
WHERE (state="CA" OR state="AZ")
AND name LIKE "%Smith%";
THE WHERE CLAUSE
You can use the WHERE clause to select only the rows
that match a condition. You can use any of MySQL's
available functions and comparison operators to form a
WHERE condition.
Example:
SELECT * FROM address
WHERE name LIKE "%Smith%";
516922 Ch06.F 9/26/02 11:35 AM Page 111
Note: This example uses the testdb
database and the mail table. See
Chapter 5 or the CD-ROM for
instructions to create this table.
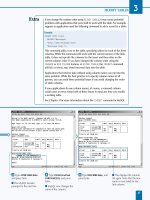
⁄ From the MySQL monitor,
type
USE testdb; and press
Enter.
■ You are prompted for the
next line.
¤ Type SELECT * FROM mail;
and press Enter.
■ All columns and rows of
the table are displayed.
T
he SELECT query is one of the most powerful options
available in MySQL. Using SELECT, you can display
data from a table or retrieve data into an application.
A basic SELECT query specifies the fields to display
followed by the FROM keyword and the table to draw them
from:
SELECT name, address FROM mail;
This example displays all of the rows of the mail table. For
each row, the name and address columns are displayed. The
columns for each row are displayed in the order you
specified in the SELECT statement. You can also use a
wildcard character (*) to select all of the table's columns:
SELECT * FROM mail;
This example displays all of the rows of the table. Each
row includes the value of all columns. The columns are
displayed in the order they were defined when the table
was created.
You can also use SELECT without the FROM keyword to
test MySQL functions and expressions. When you do not
specify a table to select data from, MySQL will evaluate the
expression in the SELECT statement and display the result.
For example, this query displays the sum of several
numbers:
SELECT 3 + 12 + 33;
When you include the FROM keyword to specify a table,
you can also combine the table's fields into functions and
expressions. For example, this SELECT query displays the
name and address of each row in the mail table, converting
all text to uppercase:
SELECT UPPER(name), UPPER(address) FROM
mail;
DISPLAY DATA WITH SELECT
MySQL
112
DISPLAY DATA WITH SELECT
516922 Ch06.F 9/26/02 11:35 AM Page 112
‹ Type SELECT name FROM
mail; and press Enter.
■ Only the name column is
displayed.
› Type SELECT city, address,
name FROM mail; and press
Enter.
■ The city, address, and
name columns are displayed
in order.
USING SELECT QUERIES
6
113
Sometimes, when you perform a function or calculation on one
or more fields of a table in a SELECT query, you want to view the
result as well as the original fields. You can do this by assigning a
name, or alias, to the calculated value. For example, the following
query displays the name field followed by its uppercase equivalent:
Example:
SELECT name, UPPER(name) AS name2 FROM mail;
The AS keyword is used to indicate an alias name for the calculated
value. This name is displayed in the results when you use a query
from the MySQL monitor. When you are using MySQL with a
language such as PHP or Perl, the alias is available to your program
as well as the columns you name directly in the SELECT query.
As another example, the CONCAT function in MySQL combines
multiple text values into a single string. This example returns the
name and an addr alias that combines the address, city, and state
columns.
Example:
SELECT name, CONCAT(address, "/", city, "/", state) AS addr
FROM mail;
516922 Ch06.F 9/26/02 11:35 AM Page 113
Note: This example uses the mail
table in the testdb database. See
Chapter 5 or the CD-ROM if you
need to create this table.
⁄ From the MySQL monitor,
type
USE testdb; and press
Enter.
■ The database is now
selected.
¤ Type SELECT * FROM mail;
and press Enter.
■ All rows of the table are
displayed.
‹ Type SELECT * FROM mail
and press Enter.
■ You are prompted for the
next line of the query.
› Type WHERE name = "John
Smith"; and press Enter.
■ The row that matches the
WHERE clause is displayed.
B
y default, when you use a SELECT query, all of the
rows of the table are returned. You can add a WHERE
clause to your SELECT queries to select one or more
specific rows. You can select rows by performing
comparisons with one or more of the table's fields. The
following is a simple example of a SELECT query with a
WHERE clause:
SELECT * FROM mail
WHERE name = "John Smith";
This example looks for a specific value within the name
field of the mail table and displays the rows that match.
Because the name field is the primary key in this case, only
one row will be displayed.
MySQL uses case-insensitive matching with text fields.
Aside from differences in case, the = operator will only
match if the name is exactly as specified. You can also use
other operators, such as less than (<) and greater than (>).
Numbers are compared numerically, and text values are
compared alphabetically. If the values you are comparing
are different types, MySQL converts them to a compatible
type if possible.
With text fields, you can use the LIKE keyword to find
partial matches. LIKE allows you to use wildcard characters.
The first wildcard, _, matches a single character. The
following example finds "John Smith", "John Smitt", or a
name with any other final character:
SELECT * FROM mail
WHERE name = "John Smit_";
The other wildcard, %, can represent any number of
characters or no characters. You can use this at the
beginning and ending of a word to find the word anywhere
in the column. The example below will find the name "John
Smith" as well as any other name containing "Smith":
SELECT * FROM mail
WHERE name LIKE "%Smith%";
USING THE WHERE CLAUSE
MySQL
114
USING THE WHERE CLAUSE
516922 Ch06.F 9/26/02 11:35 AM Page 114
ˇ Type SELECT * FROM mail
and press Enter.
■ You are prompted for the
next line.
Á Type WHERE name LIKE
"%Smith%"; and press Enter.
■ The rows that match the
WHERE clause are displayed.
‡ Type SELECT name, address
FROM mail and press Enter.
■ You are prompted for the
next line.
° Type WHERE postal >
10000; and press Enter.
■ The rows that match the
WHERE clause are displayed.
Note: The fields you use in the
WHERE
clause do not have to be
returned by the
SELECT
query.
USING SELECT QUERIES
6
115
MySQL supports a variety of operators for comparing numeric or
text values. The table below lists each operator and its purpose.
OPERATOR DESCRIPTION
= Is equal to
> Is greater than
< Is less than
>= Is greater than or equal to
<= Is less than or equal to
<> or != Is not equal to
IS NULL Is the NULL value
IS NOT NULL Is not the NULL value
<=> Is equal to (allows NULL values)
LIKE Match text strings with wildcards
NOT LIKE Text strings do not match
516922 Ch06.F 9/26/02 11:35 AM Page 115
Note: This example uses the mail
table in the testdb database. See
Chapter 5 or the CD-ROM if you
need to create this table.
⁄ From the MySQL monitor,
type
USE testdb; and press
Enter.
■ The database is now
selected.
¤ Type SELECT * FROM mail
WHERE and press Enter.
■ You are prompted for the
next line.
‹ Type name LIKE
"%Smith%" OR name LIKE
"%Jones%"; and press Enter.
■ This completes the query.
Rows that match either
condition are displayed.
O
ften, in a large database, specifying a single
condition would still return a huge number of
rows. You can combine several conditions in a
WHERE clause to make your search more specific. The
logical operators AND, OR, and NOT are used to combine
conditions.
The OR operator allows you to make a search more general.
The following example displays records from the mail table
that contain the names Smith or West:
SELECT * FROM mail WHERE
name LIKE "%Smith%" OR name LIKE "%West%";
The AND operator allows you to make a search more
specific. The following example displays only the records
with a name column containing "Smith" and a value of
"CA" in the state column:
SELECT * FROM mail WHERE
name LIKE "%Smith%" AND state = "CA";
If you have not used AND and OR with computer languages
before, they may be confusing. Remember that using OR
will allow more rows to match the query, and using AND will
allow less rows to match.
Finally, the NOT operator inverts a condition. If you use NOT
LIKE or != (not equal), rows that do not match the
condition are returned. You can use NOT to make any
existing condition into its opposite.
You can combine any number of conditions with AND, OR,
and NOT to create complex conditions. When you use AND
and OR together, often the meaning is ambiguous. You can
enclose conditions in parentheses to ensure that they are
considered first, before combining the result with the other
conditions.
SPECIFY MULTIPLE WHERE CONDITIONS
MySQL
116
SPECIFY MULTIPLE WHERE CONDITIONS
516922 Ch06.F 9/26/02 11:35 AM Page 116
› Type SELECT * FROM mail
WHERE and press Enter.
■ You are prompted for the
next line.
ˇ Type name LIKE
"%Smith%" AND state = "CA";
and press Enter.
■ This completes the query.
Only the rows that match
both conditions are
displayed.
Á Type SELECT * FROM mail
WHERE and press Enter.
■ You are prompted for the
second line.
‡ Type name LIKE "%John%"
AND and press Enter.
■ You are prompted for the
third line.
° Type (state = "CA" OR
state = "AZ"); and press Enter.
■ This completes the query.
Only the rows that match the
first condition and either of
the second or third are
displayed.
USING SELECT QUERIES
6
117
You can create very complex WHERE conditions using AND, OR, NOT,
and parentheses to combine multiple conditions. For example, here
is a complex query using the mail table:
Example:
SELECT * FROM mail WHERE
(name LIKE "%Smith%" OR name LIKE "%Jones%")
AND NOT (state = "UT" or state = "AZ");
This query will return all of the rows that have a name column
containing either "Smith" or "Jones", except for those with values
of "UT" or "AZ" in the state column.
These operators can even be useful when working with a single
field:
Example:
SELECT * FROM mail WHERE
name LIKE "%Smith%"
AND name NOT LIKE "%John%";
This example returns all rows that contain "Smith" in the name
column, except for those that contain "John".
516922 Ch06.F 9/26/02 11:35 AM Page 117
Note: This example uses the mail
table. This book's CD-ROM includes
a version of this table with a large
number of rows that you can import
into your MySQL server.
⁄ From the MySQL monitor,
type
USE testdb; and press
Enter.
■ The database is now
selected.
¤ Type SELECT * FROM mail
LIMIT 3; and press Enter.
■ The first three rows of the
table are displayed.
‹ Type SELECT * FROM mail
LIMIT 0,3; and press Enter.
■ This also displays the first
three rows.
I
n a large database, a SELECT query can return a large
number of rows. You can add the LIMIT clause to
request that only a specified number of rows should be
returned. In a basic LIMIT clause, you simply specify the
number of rows. The following example displays the first
ten rows of the mail table:
SELECT * FROM mail LIMIT 10;
If the table contains less than ten rows, all of the rows will
be returned. You can optionally specify an offset for the first
row to be included, followed by a comma and the limit.
Rows are numbered starting with zero. If you do not specify
an offset, zero is used by default.
As an example, the following queries will display the first
three groups of ten rows in the table:
SELECT * FROM mail LIMIT 0, 10;
SELECT * FROM mail LIMIT 10, 10;
SELECT * FROM mail LIMIT 20, 10;
You can use LIMIT offsets like this to display data one page
at a time. LIMIT in general is also useful if you simply want
to control the number of rows that will be displayed. Exactly
which rows are displayed depends on the order of the
primary key, or the order you specify in an ORDER BY
clause, described in the next section.
You can combine LIMIT with a WHERE clause to display a
subset of the number of rows that match the condition of
the WHERE clause. LIMIT can also be combined with the
other SELECT options described in this chapter.
USING THE LIMIT CLAUSE
MySQL
118
USING THE LIMIT CLAUSE
516922 Ch06.F 9/26/02 11:35 AM Page 118
› Type SELECT * FROM mail
LIMIT 3,3; and press Enter.
■ The second group of three
rows is displayed.
ˇ Type SELECT * FROM mail
LIMIT 6,3; and press Enter.
■ The third group of three
rows is displayed.
Á Type SELECT * FROM mail
WHERE name LIKE "%Smith%"
and press Enter.
■ You are prompted for the
next line.
‡ Type LIMIT 1; and press
Enter.
■ Only the first record
matching the WHERE clause
is displayed.
USING SELECT QUERIES
6
119
You can use LIMIT to display data in pages. To do this,
you use the same maximum value and a different offset
for each query. If you know the number of the page you
want to display and the number of rows per page, you can
calculate the offset using this formula:
offset = (page –1) * rows
In this formula, page is the page number, starting with
page 1, and rows is the number of rows per page. You can
use this formula within a Web application in a language
such as Perl or PHP to easily display one page of data at a
time.
When you are displaying paged data, the rows returned
for each page may not always be consistent. This can
happen if rows are added to or deleted from the database
between your SELECT queries. The pages will also be
inconsistent if you use a different ORDER BY clause in
subsequent SELECT queries.
516922 Ch06.F 9/26/02 11:35 AM Page 119
Note: This example uses the quotes
table. See the Extra section for
details.
⁄ From the MySQL monitor,
type
USE testdb; and press
Enter.
¤ Type SELECT * FROM
quotes; and press Enter.
■ The rows of the table are
displayed in the default order.
O
ne of the most powerful features of a database
management system like MySQL is the ability to
sort large amounts of data by different fields. You
can use the ORDER BY clause in a SELECT statement to
control the order of the rows returned.
For example, suppose you defined a table to store famous
quotations. This table would include text fields for the
quotation, named quotes, and the author, named author,
and an auto-increment column called num to act as a
primary key. You could use a simple ORDER BY clause to
list the quotations sorted by the author's name:
SELECT * FROM quotes ORDER BY author;
You can optionally follow an ORDER BY column with the
keyword DESC for descending order, or ASC, the default, for
ascending.
If you specify more than one column name in the ORDER
BY clause, the table will first be sorted by the first column,
and then the second column, and so on. The following
example would return a list of quotations sorted by author
and then by the num field:
SELECT * FROM quotes ORDER BY author, num;
The second column to sort by will only be effective if there
are multiple rows for some values of the author column. If
all of the values in this column are unique, the other
columns in ORDER BY have no effect.
If you specify one or more columns with SELECT, you can
use numbers as shorthand in ORDER BY to refer to the
columns being selected. This example orders by the author
column:
SELECT quote, author FROM quotes ORDER BY 2;
SORT DATA WITH THE
ORDER BY CLAUSE
MySQL
120
SORT DATA WITH THE ORDER BY CLAUSE
516922 Ch06.F 9/26/02 11:35 AM Page 120
‹ Type SELECT * FROM
quotes ORDER BY author; and
press Enter.
■ The rows are displayed
ordered by the author
column.
› Type SELECT * FROM
quotes ORDER BY quote; and
press Enter.
■ The rows are now ordered
by the quote column.
USING SELECT QUERIES
6
Rather than a column name or list of columns,
you can also use a MySQL function in the ORDER
BY clause. This allows you to customize the order
in a number of ways. For example, the RAND
function is useful for displaying results in random
order.
Example:
SELECT * FROM quotes
ORDER BY RAND();
When you use ORDER BY RAND(), MySQL
automatically retrieves the row for your query in
random order. While the order is random, each
row will still only be returned once. If you use
this clause with a WHERE clause, the rows that
match the WHERE condition will be returned in
random order.
You can create the quotes table for this example by
importing it from the SQL file on the CD-ROM or
with the following CREATE TABLE query. The
version on the CD-ROM includes a number of
example rows to work with.
Example:
CREATE TABLE quotes (
quote VARCHAR(100),
author VARCHAR(50),
num INT(11) AUTO_INCREMENT PRIMARY KEY);
121
516922 Ch06.F 9/26/02 11:35 AM Page 121
Note: This example uses the quotes
table in the testdb database. See the
CD-ROM for an importable SQL file
to create this table.
⁄ From the MySQL monitor,
type
USE testdb; and press
Enter.
■ The database is now
selected.
¤ Type SELECT author FROM
quotes GROUP BY author; and
press Enter.
■ A list of unique author
names in the table is
displayed.
‹ Type SELECT quote, author
FROM quotes GROUP BY
author; and press Enter.
■ One row for each unique
author name is displayed.
S
ometimes you want to look at groups of rows rather
than single rows to extract data. You can use the
GROUP BY clause in a SELECT query to combine all
of the rows for a particular value into a single row. For
example, this query displays a list of author names from the
quotes table:
SELECT author FROM quotes GROUP BY author;
The GROUP BY clause is similar to ORDER BY, but it only
returns a single row for each unique value of the grouping
field. In this case, because you are displaying only the
author field, it will display a list of authors. Even if the same
author name is included in several rows of the database, it
will be listed only once in the query with GROUP BY.
If you include fields in the SELECT query that you are not
grouping by, only a single value will be displayed even
though many rows have been grouped together. The
following query will display a single quotation for each
author, regardless of how many times the author appears in
the database:
SELECT quote, author FROM quotes
GROUP BY author;
You can optionally use an ORDER BY clause after the
GROUP BY clause. This will control the order in which the
rows are pulled from the database before they are grouped
together as specified in the GROUP BY clause.
While GROUP BY in its simple form is useful for listing the
unique values of a column in a MySQL table, you can
actually gather statistics on each group using several MySQL
functions. These are described later in this chapter, in the
section "Calculate Totals and Averages."
USING THE GROUP BY CLAUSE
MySQL
122
USING THE GROUP BY CLAUSE
516922 Ch06.F 9/26/02 11:35 AM Page 122
Note: This example uses the quotes
table in the testdb database. See
the CD-ROM for information on
importing this table onto your server.
⁄ From the MySQL monitor,
type
USE testdb; and press
Enter.
■ The database is now
selected.
¤ Type SELECT * FROM
quotes WHERE author LIKE
"%Franklin%" and press Enter.
■ You are prompted for the
next line.
‹ Type ORDER BY num
LIMIT 2; and press Enter.
■ The query is now
complete, and the results
are displayed.
123
Y
ou can make a SELECT query as simple or as
complex as necessary. The simplest version of
SELECT is used to test a function or calculation, and
does not even require a table name. This example multiplies
two numbers and displays the result:
SELECT 17 * 34;
In a more complex SELECT query, you must use the various
clauses in the correct order, or MySQL will return an error.
The following is the basic syntax and order for a SELECT
query in MySQL:
SELECT columns or expressions
FROM table or tables WHERE conditions
GROUP BY columns ORDER BY columns
LIMIT number;
The WHERE, GROUP BY, ORDER BY, or LIMIT clauses are
optional. Whichever ones you do include must be specified
in the order shown. If you include any of these clauses, you
must also include the FROM keyword to specify a table. For
example, the following query includes WHERE, ORDER BY,
and LIMIT clauses:
SELECT * FROM quotes WHERE author LIKE
"%Franklin%"
ORDER BY num LIMIT 2;
Several of the clauses in a SELECT statement allow multiple
items. The FROM TABLE clause can list multiple tables —
this is described in the section "Display Data from Multiple
Tables," later in this chapter. You can use AND and OR to
combine WHERE conditions, as described earlier in this
chapter. The ORDER BY and GROUP BY clauses can include
a list of column names, separated by commas.
Because a SELECT query that uses several complex clauses
can be quite long, it is difficult to enter it into the MySQL
monitor without an error. You can use the \e (edit) option
in the MySQL monitor to edit the query in a text editor and
then execute it with the \g (go) option. These options are
described in detail in Chapter 1.
USING MULTIPLE CLAUSES WITH SELECT
USING MULTIPLE CLAUSES WITH SELECT
USING SELECT QUERIES
6
516922 Ch06.F 9/26/02 11:35 AM Page 123
Note: This example uses the quotes
table in the testdb database. This
table is included on the CD-ROM.
⁄ From the MySQL monitor,
type
USE testdb; and press
Enter.
■ The database is now
selected.
¤ Type SELECT COUNT(*)
FROM quotes; and press Enter.
■ The count of all rows in
the table is displayed.
T
he SELECT queries you have used so far return all of
the data that matches the WHERE criteria. Rather than
the rows themselves, you can use SELECT to obtain a
count of the rows in a table or the rows that match a
condition. This is especially useful in applications that use
MySQL, because the database server can return a count to
the application rather than requiring your application to
count all of the rows it receives.
To count the number of rows in a table, you use the COUNT
function. This function accepts a column name as a
parameter or the wildcard *. The following query displays a
count of all of the rows in the quotes table:
SELECT COUNT(*) FROM quotes;
If you specify a column name rather than the wildcard, only
the rows that have a non-NULL value for that column will
be counted. The following query counts the rows that have
a non-NULL value in the author column:
SELECT COUNT(author) FROM quotes;
If you specify a WHERE clause with COUNT, MySQL counts
the rows that match the WHERE condition. The following
query returns a count of the number of rows that have a
specific value in the author column:
SELECT COUNT(*) FROM quotes
WHERE author="Mark Twain";
Because the COUNT function returns a single-row result with
the count, you cannot retrieve a count and a regular column
value using the same SELECT query. You can, however,
count values for multiple columns. The following example
displays a count of rows that have a non-NULL value in the
quote column, followed by a count of non-NULL values in
the author column:
SELECT COUNT(quote), COUNT(author)
FROM quotes;
If you are not interested in the values of a particular column
and only want a count of rows, always use COUNT(*). The
MySQL server can count the rows faster if a column is not
specified, because it does not have to examine values in
each row it counts.
COUNT DATABASE ROWS
MySQL
124
COUNT DATABASE ROWS
516922 Ch06.F 9/26/02 11:35 AM Page 124
‹ Type SELECT COUNT(*)
FROM quotes and press Enter.
■ You are prompted for the
next line.
› Type WHERE
author="Mark Twain";
and press Enter.
■ The count of rows that
match the specified author
column value is displayed.
ˇ Type SELECT
COUNT(author) FROM
quotes; and press Enter.
■ A count of rows that have
non-NULL values in the
author column is displayed.
USING SELECT QUERIES
6
125
You can use the DISTINCT keyword with COUNT to count the unique values
of a column. For example, the following query counts the number of unique
values for the author column in the quotes table. If the same value is
included in the column for several different rows, it is only counted once.
Example:
SELECT COUNT(DISTINCT author) FROM quotes;
When using DISTINCT, you can list multiple columns. In this case, the
count will be the number of rows that have a unique combination of values
in the two columns. The following query counts unique combinations of
values in the author and quote columns:
Example:
SELECT COUNT(DISTINCT author, quote) FROM quotes;
You can also use DISTINCT in a regular SELECT query to display the list of
unique values. The result is similar to using the GROUP BY clause. The
following example displays a list of unique values of the author column in
the quotes table:
Example:
SELECT DISTINCT author FROM quotes;
If you specify any columns with DISTINCT that are primary keys or unique
indexes, the result is the same as if you had not used DISTINCT, because
these columns have a unique value for each row of the table.
516922 Ch06.F 9/26/02 11:35 AM Page 125
Note: This example uses the testdb
database and creates a new table
called scores.
⁄ Type USE testdb; and
press Enter.
■ The database is now
selected.
¤ Type CREATE TABLE scores
(name VARCHAR(50), and
press Enter.
■ You are prompted for the
next line.
‹ Type score INT
UNSIGNED); and press Enter.
■ This creates the scores
table.
› Type INSERT INTO scores
(name, score) VALUES and
press Enter.
ˇ Type ("Tom",75),
("Tom",85), ("Tom",88), and
press Enter.
Á Type ("Sue",89),
("Sue",90), ("Sue",74), and
press Enter.
‡ Type ("John",54),
("John",65); and press Enter.
■ This inserts some sample
data into the table.
W
hile the COUNT function is useful for counting the
entire contents of a table, it becomes even more
useful when you use it with the GROUP BY clause.
You can use this combination to display detailed statistics
about a table's contents. For example, the following query
displays a list of author names from the quotes table, and
for each one, a count of the number of rows it appears in:
SELECT author, COUNT(*) FROM quotes
GROUP BY author;
Along with COUNT, MySQL includes several other functions
that you can use to display statistics on grouped data from a
table. The AVG function calculates the average of the values
for a column in a group. The MIN function determines the
smallest of a set of values, and MAX determines the largest
value of a group.
For example, suppose you create a table to store student
names and test scores. The scores table includes two simple
columns — name and score. After a number of rows are
stored in this table, you can use this query to display the
average, minimum, and maximum scores for each student:
SELECT name, AVG(score),
MIN(score), MAX(score)
FROM scores GROUP BY name;
You can also use the AVG, MIN, and MAX functions without
GROUP BY to calculate statistics on the entire table. Other
functions available include SUM for the sum of values and STD
for the standard deviation. The following example displays the
average score and total score for the entire scores table:
SELECT AVG(score), SUM(score)
FROM scores;
Because the SELECT query returns a single-row result for
the entire table when you use these functions, you cannot
retrieve column values using the same SELECT query.
CALCULATE TOTALS AND AVERAGES
MySQL
126
CALCULATE TOTALS AND AVERAGES
516922 Ch06.F 9/26/02 11:35 AM Page 126