Mysql your visual blueprint for creating open source databases- P9 pps
Bạn đang xem bản rút gọn của tài liệu. Xem và tải ngay bản đầy đủ của tài liệu tại đây (576.68 KB, 20 trang )
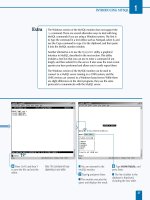
› Type SELECT author,
RIGHT(quote, 10) and press
Enter.
ˇ Type FROM quotes; and
press Enter.
■ This displays the author
column and the last ten
characters of the quote
column for each row.
Á Type SELECT author,
MID(quote, 5, 10) and press
Enter.
‡ Type FROM quotes; and
press Enter.
■ This displays the author
column and ten characters of
the quote column, starting at
the fifth character.
USING MYSQL FUNCTIONS
7
147
MySQL also includes functions that allow you to search a string for a
particular substring. The first of these, LOCATE, searches a text value
for a string you specify. If the string is found within the larger string, it
returns a number indicating the character position where it starts. If
the string is not found, LOCATE returns zero. The following query
searches the values of the quote column in the quotes table for the
string "every" and displays the results:
Example:
SELECT LOCATE("every", quote)
FROM quotes;
The LOCATE function also accepts a third optional parameter. If you
specify a number after the two strings, MySQL will only search for the
substring starting with the character index you specify. This is useful
when you want to find the second or third occurrence of a string.
MySQL also supports the INSTR function for compatibility with
other database systems. This function is similar to LOCATE, but the
parameters are in the opposite order: you first specify the larger
string, and then the substring to search for. Unlike LOCATE, INSTR
does not support a starting position for the search.
516922 Ch07.F 9/26/02 11:50 AM Page 147
M
ySQL allows you to store a date or date/time
combination in several column types, including
DATE, TIME, DATETIME, and TIMESTAMP.
MySQL also includes a number of functions that allow you
to work with dates and times and convert them into
different formats.
UNDERSTANDING DATE AND
TIME FUNCTIONS
MySQL
148
If you need to know the current date within a MySQL
query, you can use the NOW function. This function
returns the current date and time. If you use this
function as a string value, it will return a string with
the year, month, date, hour, minute, and second with
punctuation in between. If you use the result as a
numeric value, it will contain no punctuation.
The NOW function does not require any parameters. The
SYSDATE and CURRENT_TIMESTAMP functions are
synonyms for NOW.
The CURRENT_DATE function returns the current date
only. This function can be abbreviated CURDATE. The
CURRENT_TIME and CURTIME functions are similar but
return only the hours, minutes, and seconds values for
the current time.
GET THE CURRENT DATE
WORK WITH DATE COMPONENTS
MySQL includes a variety of
functions for extracting
components, such as the day of the
week or the week of the year, from
a date value. The following table
describes these functions.
The HOUR, MINUTE, and SECOND
functions work only with values
that include a time, such as
TIMESTAMP or TIME columns. The
other functions work only with
values that include a date.
FUNCTION DESCRIPTION
DAYOFWEEK Numeric day of week (1-7 for Sunday-Saturday)
WEEKDAY Numeric day of week (0-6 for Monday-Sunday)
DAYNAME Name of day of week
DAYOFMONTH Day of month (1-31)
DAYOFYEAR Day of year (1-366)
MONTH Numeric month (1-12)
MONTHNAME Name of month
QUARTER Numeric quarter (1-4)
WEEK Week of year (0-53)
YEAR Numeric year (4 digits)
YEARWEEK Year and week number (6 digits)
HOUR Hour of day (0-23)
MINUTE Minute of hour (0-59)
SECOND Second (0-59)
516922 Ch07.F 9/26/02 11:50 AM Page 148
USING MYSQL FUNCTIONS
7
149
The DATE_ADD function adds an interval to a
date value. To use this function, you specify the
date to work with as an expression or column
name, the keyword INTERVAL, a number
specifying the amount of time to add, and a
keyword indicating the type of interval. The basic
intervals are SECOND, MINUTE, HOUR, DAY,
MONTH, and YEAR.
The DATE_SUB function is similar, but subtracts
the specified interval from the date. You can use
ADDDATE and SUBDATE as synonyms for
DATE_ADD and DATE_SUB. The example below
subtracts two months from a date in the
updatetime column.
Example:
SELECT DATE_SUB(updatetime, INTERVAL 2
MONTH) FROM address;
In addition to the basic intervals, you can use various keywords
to specify multiple parts of a date, such as a year and month.
The table below lists these keywords with an example of the
syntax for each one.
KEYWORD DESCRIPTION EXAMPLE
MINUTE_SECOND Minutes and seconds "03:22"
HOUR_MINUTE Hours and minutes "12:03"
HOUR_SECOND Hours, minutes, and "12:03:22"
seconds
DAY_HOUR Days and hours "2 12"
YEAR_MONTH Years and months "2-1"
DAY_MINUTE Days, hours, and minutes "2 12:03"
DAY_SECOND Days, hours, minutes, "2 12:03:22"
and seconds
ADD AND SUBTRACT
The DATE_FORMAT function allows you to display a date
with the format you specify. The first parameter should
be a date value, and the second is a string with one or
more codes for components of the date and time. The
following codes display components of the date.
DATE_FORMAT FUNCTIONS
CODE MEANING
%d Day of month (01, 02, 03, and so on)
%e Day of month (1, 2, 3, and so on)
%D Day of month (1st, 2nd, 3rd, and so on)
%m Numeric month (01, 02, 03, and so on)
%c Numeric month (1, 2, 3, and so on)
%M Month name
%W Name of day of week
%a Name of day of week (abbreviated)
%Y Year (4 digits)
%y Year (2 digits)
The following codes can be used within the
DATE_FORMAT function to display the components
of the time. An additional function, TIME_FORMAT,
is similar to DATE_FORMAT but only allows the
following codes.
TIME_FORMAT FUNCTIONS
CODE MEANING
%H Hour (24 hours, 2 digits)
%k Hour (24 hours, 1-2 digits)
%h Hour (12 hours, 2 digits)
%i Minute (2 digits)
%S Second (2 digits)
%p AM or PM
%T Complete 24-hour time
%t Complete 12-hour time with AM or PM
FORMAT DATES
516922 Ch07.F 9/26/02 11:50 AM Page 149
Note: This example uses the address
table in the testdb database. You can
import this table from the CD-ROM.
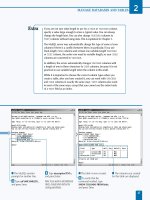
⁄ From the MySQL monitor,
type
USE testdb; and press
Enter.
■ The database is now
selected.
¤ Type INSERT INTO address
(name, updatetime) and press
Enter.
‹ Type VALUES ("John
Smith", "1998-12-22 10:05:00");
and press Enter.
■ This adds a record with a
specified date.
› Type INSERT INTO address
(name) VALUES ("Jane Doe");
and press Enter.
■ This record is assigned the
current date and time.
Y
ou can use MySQL’s date and time functions on dates
you specify within a query, or dates and times stored
in DATE, TIME, DATETIME, or TIMESTAMP columns.
If you specify a date, you can use one of two formats: a
number that combines the year, month, date, hour, minute,
and second values, or a string with punctuation. The
following two dates are equivalent:
2004-12-31 12:33:00
20041231123300
For TIME columns or functions that require only a time,
you can simply specify the hours, minutes, and seconds as a
number or string. Similarly, you can specify the year, month,
and date for DATE columns or functions that work with dates.
For example, the address table defined earlier in this book
has a TIMESTAMP column called updatetime. You can use
the MONTH and YEAR functions, which extract the
corresponding components from a date, to display
only the month and year for each row’s TIMESTAMP:
SELECT MONTH(updatetime), YEAR(updatetime)
FROM address;
When you use functions like this and are returning the data
to an application, you may find it useful to use the AS
keyword to assign an alias to the evaluated values.
You can compare dates using the = operator, as with
other data types. You can also use functions like YEAR
within a WHERE clause to compare just part of the date.
The following SELECT query displays all of the rows with
an updatetime column with the year 2002:
SELECT * FROM address
WHERE YEAR(updatetime) = 2002;
WORK WITH DATES AND TIMES
MySQL
150
WORK WITH DATES AND TIMES
516922 Ch07.F 9/26/02 11:50 AM Page 150
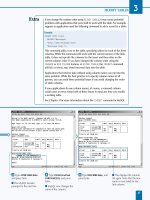
ˇ Type SELECT name,
MONTH(updatetime),
YEAR(updatetime) and
press Enter.
Á Type FROM address; and
press Enter.
■ The month and year for all
rows are displayed.
‡ Type SELECT * FROM
address and press Enter.
° Type WHERE
YEAR(updatetime) = 1998;
and press Enter.
■ Rows that match the
specified year are displayed.
USING MYSQL FUNCTIONS
7
MySQL includes several functions for converting date values to different formats.
The following functions convert MySQL date and time values:
FUNCTION DESCRIPTION
TO_DAYS Converts to number of days since year zero
UNIX_TIMESTAMP Converts to a UNIX timestamp
(number of seconds since 1/1/1970)
TIME_TO_SEC Converts a time value to a number of seconds
Conversely, the following functions convert from various formats back to a
MySQL date or time value:
FUNCTION DESCRIPTION
FROM_DAYS Converts from number of days since year zero
FROM_UNIXTIME Converts from UNIX timestamp
SEC_TO_TIME Converts number of seconds to time (hours, minutes, seconds)
If you need to convert a date to a format not listed here, you can use the
individual functions such as MONTH, DATE, and YEAR, or the DATE_FORMAT
function, described in the next section.
151
516922 Ch07.F 9/26/02 11:50 AM Page 151
MySQL
Note: This example uses the address
table in the testdb database,
available on the CD-ROM.
⁄ From the MySQL monitor,
type
USE testdb; and press
Enter.
■ The database is now
selected.
¤ Type SELECT name,
DATE_FORMAT(updatetime,
"%M %D, %Y") and press
Enter.
‹ Type FROM address; and
press Enter.
■ The rows of the table are
listed with formatted dates.
› Type SELECT
DATE_FORMAT(NOW(), "The
date is %m/%d/%Y"); and
press Enter.
■ The current date is
displayed in the specified
format.
ˇ Type SELECT
TIME_FORMAT(NOW(),
"%h:%i:%s"); and press
Enter.
■ The current time is
displayed in the specified
format.
152
DISPLAY FORMATTED DATES
O
ften, you will need to display a date in a specific
format. You can use the DATE_FORMAT function
to do this in MySQL. This function is particularly
useful to format a date before displaying it or returning it
to an application.
To use DATE_FORMAT, you specify the date value, which can
be a specified date or a column name, and a format string
with one or more codes for date and time components. The
following example displays the rows of the address table
with a date such as "February 20th, 2004":
SELECT name,
DATE_FORMAT(updatetime, "%M %D, %Y")
FROM address;
As with other calculated values, you can use the AS keyword
to assign an alias to the formatted date. This is particularly
useful if you are passing the date to an application.
The format string you use with DATE_FORMAT can contain
punctuation and text to accompany the date. Any text that is
not a code beginning with the % symbol is passed through to
the output. The following example obtains the current date
using the NOW function and formats it with a text message:
SELECT DATE_FORMAT(NOW(), "The date is
%m/%d/%Y.");
If you are only working with the time for a date value, you
can use the TIME_FORMAT function. This function is similar
to DATE_FORMAT, but accepts only the codes that represent
the components of the time. The following example
displays the current time using this function:
SELECT TIME_FORMAT(NOW(), "%h:%i:%s");
The codes you can use with the DATE_FORMAT and
TIME_FORMAT functions are listed in the section
"Understanding Date and Time Functions," earlier in
this chapter.
DISPLAY FORMATTED DATES
516922 Ch07.F 9/26/02 11:50 AM Page 152
ADD AND SUBTRACT DATES AND TIMES
Note: This example uses the address
table in the testdb database,
available on the CD-ROM.
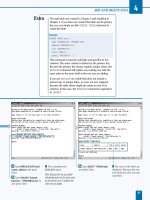
⁄ From the MySQL
monitor, type
SELECT
DATE_ADD(NOW(), INTERVAL
3 MONTH); and press Enter.
■ This displays the current
date plus three months.
¤ Type SELECT NOW() +
INTERVAL 2 YEAR; and press
Enter.
■ This adds two years to the
current date.
‹ Type USE testdb; and
press Enter.
› Type SELECT * FROM
address WHERE and press
Enter.
ˇ Type updatetime > (NOW()
– INTERVAL 30 DAY); and press
Enter.
■ All rows updated within
the last 30 days are
displayed.
153
Y
ou can use the MySQL functions DATE_ADD and
DATE_SUB to add and subtract values from a date.
This is useful when you need to calculate a future
or past date, and is also useful when testing date values.
To add an interval to a date value, use DATE_ADD and
specify the date, the keyword INTERVAL, the number to
add, and the unit for the number, such as MONTH or DAY.For
example, the following SELECT statement displays the date
three months from the current date:
SELECT DATE_ADD(NOW(), INTERVAL 3 MONTH);
In MySQL version 3.23 and later, you can use the + and -
operators as shorthand for DATE_ADD and DATE_SUB.To
use these, simply specify the same INTERVAL keyword and
unit type. The following example adds two years to the
current date and displays the result:
SELECT NOW() + INTERVAL 2 YEAR;
While you can use date addition and subtraction to modify
existing date values, they can also be useful in a WHERE
clause. For example, the following SELECT query displays
the rows from the address table where the updatetime
column has a value within the last 30 days:
SELECT * FROM address WHERE
updatetime > (NOW() - INTERVAL 30 DAY);
This example subtracts an interval of 30 days from the NOW
function to obtain the date 30 days ago and then tests
whether the updatetime column’s value is after that date.
Be sure to use singular values such as DAY, MONTH, and
YEAR in the INTERVAL clause. Plural values, such as
YEARS, will result in an error.
USING MYSQL FUNCTIONS
7
ADD AND SUBTRACT DATES AND TIMES
516922 Ch07.F 9/26/02 11:50 AM Page 153
A
long with the functions described earlier in this
chapter, MySQL includes a variety of other functions.
These include functions to display information about
the MySQL server, current user, and session; functions to
encode and decode strings in various ways; and functions
for working with binary numbers.
MISCELLANEOUS FUNCTIONS
MySQL
154
DATABASE
The DATABASE function does not require any arguments.
It returns the name of the currently selected database.
Usually this is the database you selected with the USE
statement.
Example:
SELECT DATABASE();
USER
The USER function displays the name of the current
MySQL username. If you are using the MySQL monitor,
this is the user you specified on the command line.
The returned value includes the username and the
hostname the user is connecting from, separated by
the @ symbol. The SYSTEM_USER and SESSION_USER
functions are synonyms for USER.
Example:
SELECT USER();
VERSION
The VERSION function returns the MySQL server’s
software version number as a string. This function does
not require any arguments.
Example:
SELECT VERSION();
CONNECTION_ID
The CONNECTION_ID function returns the current
connection ID. This is a number assigned when the
client connects to the MySQL server and will be a
unique number for each current client session.
Example:
SELECT CONNECTION_ID();
LAST_INSERT_ID
The LAST_INSERT_ID function returns the last value
assigned to a column with the AUTO_INCREMENT
attribute when a row was added using the INSERT
statement within the current client session. If you have
added a row to a table that includes an auto-increment
column, you can use this function to obtain a unique
identifier for the new row.
Example:
SELECT LAST_INSERT_ID();
MYSQL INFORMATION FUNCTIONS
The functions described here return information about the
current database, the current user, and the MySQL server
itself. These are particularly useful from within an
application.
516922 Ch07.F 9/26/02 11:50 AM Page 154
USING MYSQL FUNCTIONS
7
PASSWORD
The PASSWORD function accepts a string and
encrypts it. This function is used by MySQL
itself to encrypt passwords for users. For
security reasons, after you have an encrypted
value, there is no way to calculate the
original password; to check user passwords,
MySQL encrypts the value entered by the
user and compares it with the encrypted
password stored in the database.
Example:
SELECT PASSWORD("zephyr");
ENCRYPT
The ENCRYPT function accepts a string as
an argument and encrypts it. This function
is available only on UNIX servers, as it uses
the standard UNIX function crypt().As
with the PASSWORD function, this is a one-
way encryption and cannot be reversed.
Depending on the operating system, the
ENCRYPT function may work with only the
first eight characters of the string. This is
due to the fact that the underlying UNIX
function is intended for encrypting short
passwords.
Example:
SELECT ENCRYPT("zephyr");
ENCRYPTION FUNCTIONS
MySQL includes several operators and functions that
you can use to work with individual bits of binary data.
These include logical AND and OR functions that work
on the individual bits (binary digits) of a number and
other operations. The following table describes the
binary operators available in MySQL.
Along with these operations, MySQL includes a function,
BIT_COUNT, which returns the number of bits used to
store a number. This is useful for checking whether a
number will fit in a particular numeric column type.
OPERATOR DESCRIPTION
| Logical bitwise OR
& Logical bitwise AND
<<
Shift the bits of a number
one space to the left
> Shift the bits of a number
one space to the right
~ Convert all 1 bits to 0 and all 0 bits to 1
BINARY (BIT) OPERATORS
155
MySQL includes a variety of functions that can encode or
decode strings. These are useful when working with
passwords and other sensitive information in a database.
ENCODE
The ENCODE function encodes a string using another string as a
password. It uses the letters in the password to determine how to
alter the original string. Unlike PASSWORD and ENCRYPT, the
encoding is reversible.
The result of the ENCODE function is a binary string with the same
length as the original string. Because it may contain nontext
characters, this value cannot be stored in a text column, such as CHAR
or TEXT. You can store it in a binary column type such as BLOB.
Example:
SELECT ENCODE("Hello there", "zephyr");
DECODE
The DECODE function accepts a string encoded with the ENCODE
function and a password. It decodes the string using the password.
If the password is the same one used when encoding the string, this
should restore the original value of the string.
MD5
The MD5 function calculates an MD5 checksum for a string. A
checksum is a value calculated from a string value using a formula.
MD5 is a standard developed by RSA Data Security. It uses a complex
formula to create an alphanumeric checksum based on the original
string value. The checksum cannot be used to recreate the original
string, but it can be compared with another string’s checksum to
determine whether the strings match.
Example:
SELECT MD5("Hello there");
516922 Ch07.F 9/26/02 11:50 AM Page 155
M
ySQL includes a variety of tools for importing and
exporting data. These are useful for transferring
data to and from other database systems,
spreadsheets, and other applications, and to back up and
restore data in MySQL tables.
IMPORT AND EXPORT TOOLS
MySQL
156
Export with SELECT
The INTO OUTFILE option can be used with any
SELECT query to create a text file with the resulting
row data. Each row of the table is written as a row in
the text file. By default, the fields within each line are
separated by tab characters. The file is saved on the
MySQL server. The default location is the directory
where the MySQL database itself is stored.
Example:
SELECT name, address, city
INTO OUTFILE "mail.txt"
FROM mail;
Text File Formats
The SELECT INTO OUTFILE and LOAD DATA INFILE
commands support several options to control the
structure of the output file. You can specify these options
after the table name and before any list of column names
with LOAD DATA, or after the name of the output file
with SELECT INTO OUTFILE. The table below shows
the available options.
The ENCLOSED BY option can also be used as
OPTIONALLY ENCLOSED BY. If this is specified, text
values are enclosed in the character, but numeric fields
are not enclosed.
KEYWORDS DESCRIPTION DEFAULT
FIELDS
Separates fields \t (tab)
TERMINATED BY
FIELDS
Encloses each field none
ENCLOSED BY
FIELDS
Prefixes special
ESCAPED BY characters \ (backslash)
LINES
TERMINATED BY Ends each line \n (newline)
Import with LOAD DATA
You can use the LOAD DATA INFILE command in
MySQL to read a text file into a database table. This
command can be used to import a text file created by the
SELECT INTO OUTFILE command, or a file you have
exported from another application. To use this command,
use LOAD DATA INFILE and the filename to import.
Specify the table to import to with the INTO TABLE
keywords, and specify a list of column names if needed.
If you do not specify a list of column names, MySQL
will expect all columns to appear in the file in the same
order they are defined in the table's structure.
You can specify the LOW_PRIORITY keyword after LOAD
DATA to wait until no clients are reading from the table
before importing the data. The CONCURRENT option can
be used to allow clients to read data while the import is
in progress. The LOCAL option allows you to specify a
file on the client machine instead of the MySQL server.
If a row in the text file contains the same value for a
unique or key field as an existing row of the table, an
error will occur, and the import operation will be
aborted. You can optionally specify the REPLACE
keyword after the filename to replace the existing rows
with the rows from the text file, avoiding this error.
Alternately, specify the IGNORE keyword to skip any
duplicate rows and continue the import.
Example:
LOAD DATA INFILE 'address.txt'
INTO TABLE address (name, address, city);
516922 Ch08.F 9/26/02 11:37 AM Page 156
IMPORT AND EXPORT DATA
8
157
Back Up Data with mysqldump
The mysqldump utility dumps the contents of a table or
an entire database to the screen, and you can redirect
its output to a file. This command does not create a text
file suitable for use with the LOAD DATA command.
Instead, it creates a file of SQL commands, such as
CREATE TABLE and INSERT, to re-create the table.
Because it can be used to re-create a table or an entire
database easily, mysqldump's output files are ideal
backups for the MySQL server. You can use a utility like
cron under UNIX or the Task Scheduler under Windows
to schedule mysqldump to create regular daily backups.
To use mysqldump, specify a database and a list of
tables on the command line. If you do not specify
tables, the entire database is included in the dump.
This utility also includes a number of options; some of
the most useful are described in the table.
Example:
mysqldump -uuser -ppassword testdb address
>backup.sql
OPTION DESCRIPTION
-A
or all- Includes all databases on
databases the server
-C or compress Attempts to compress data sent
from the server to the client
-B or databases Backs up multiple databases listed
after this option
help Displays a complete list of options
-f or force Ignores MySQL errors during
the dump
-h or host Specifies the hostname for the
MySQL server
-u or user Specifies the MySQL username
-p or password Specifies the password for the
MySQL username
-t or no-create- Writes data only, no table
info structure
-d or no-data Writes table structure only, no
data
-w or where Adds a WHERE clause to select
specific rows
Restore a Backup File
The backup file created by mysqldump contains MySQL
commands. You can restore the data by executing those
commands. You can do this with the mysql command
or with the SOURCE command within the MySQL
monitor.
Example:
mysql -uuser -ppassword –Dtestdb <backup.sql
Copy Data Between Tables
You can use several methods to copy data between
tables. One of the simplest is to create a table with the
same structure as the existing table, and then use the
SELECT option with an INSERT query to copy the data
from the old table to the new table.
Another method of copying a table is to create a
backup of the table using mysqldump, and then edit
the file to use a different table name or rename the
original table on the database server. You can then
restore the backup file to create the new table.
Example:
INSERT INTO address2 SELECT * FROM address;
516922 Ch08.F 9/26/02 11:37 AM Page 157
Note: This example uses the mail
table in the testdb database,
available on the CD-ROM.
⁄ From the MySQL monitor,
type
USE testdb; and press
Enter.
■ The database is now
selected.
¤ Type SELECT name,
address, city and press Enter.
‹ Type FROM mail; and
press Enter.
■ This displays the data that
will be exported to the text
file.
T
he SELECT query in MySQL includes an INTO
OUTFILE option to save the results of the SELECT
query to a file. You can use this to create a text file
containing row and column values from a table. To use this
option, specify INTO OUTFILE and the name of the file
after the column names and before the FROM clause.
The following example saves all of the rows of the mail
table into a text file:
SELECT name, address, city
INTO OUTFILE "mail.txt"
FROM mail;
The INTO OUTFILE option saves a file on the MySQL
server, and the MySQL username you are using must have
the correct permissions to be able to create a file. If you do
not have access to write a file on the server or to read the
file after it has been created, you can use client-side utilities
to create a similar file. These include the mysqldump utility,
described in the section "Back Up Data from a Table," later
in this chapter.
When you use this option, the created file is a simple
text file, with one row per database row. The fields are
separated with tab characters by default. You can use
various options with the FIELDS and ROWS keywords to
modify the format of the output file. These options are
explained in the Extra section.
You can use INTO OUTFILE with any combination of
SELECT query options. You can specify column names to
export, use a WHERE clause to choose rows from the table,
and use a LIMIT clause to limit the number of rows. You
can test the SELECT query without the INTO OUTFILE
clause and make sure the right data is displayed before
creating the output file.
EXPORT TO A TEXT FILE WITH SELECT
158
EXPORT TO A TEXT FILE WITH SELECT
MySQL
516922 Ch08.F 9/26/02 11:37 AM Page 158
› Type SELECT name,
address, city and press Enter.
ˇ Type INTO OUTFILE
"mail.txt" and press Enter.
Á Type FROM mail; and
press Enter.
■ The text file is now
created.
Note: By default, the file will be
created in the directory where the
current database's MySQL data is
stored.
The INTO OUTFILE option allows several optional keywords to modify the format of the
output file. These are divided into FIELDS and LINES options. The FIELDS keyword can be
followed by one or more of the following options:
KEYWORDS DESCRIPTION DEFAULT
TERMINATED BY Character used to separate fields \t (tab)
ENCLOSED BY Character surrounding each field none
ESCAPED BY Character used to escape special characters \ (backslash)
The ESCAPED BY character is used to prefix special characters, such as commas or
quotation marks, within the column data. The ESCAPED BY character itself is represented
by a doubled character, such as \\ for a backslash.
The LINES keyword can include a single option, LINES TERMINATED BY. This specifies
the character that ends each line in the output file. The default is \n, the newline character.
You can specify OPTIONALLY ENCLOSED BY instead of ENCLOSED BY. In this case, MySQL
will only enclose strings with the character. Numeric fields will not be enclosed.
To use the FIELDS or LINES options, specify them after the export filename in the SELECT
INTO OUTFILE query. If you specify multiple options, separate them with commas.
159
IMPORT AND EXPORT DATA
8
516922 Ch08.F 9/26/02 11:37 AM Page 159
Note: This example uses Notepad
under Windows, but any text editor
can be used.
⁄ From the text editor, start
a new text file.
■ You can also open an
existing file containing data
and edit it into the correct
format.
¤ Type a row of data into
the editor. Press the Tab key
to separate fields of data.
Note: This example uses name,
address, and city fields.
‹ After you complete a row,
press Enter to continue to the
next row.
M
ySQL allows you to import data into a table from a
text file. This is useful when you need to transfer
data from another application into MySQL. Before
you attempt to import a file, be sure it is formatted correctly.
To create an import file compatible with MySQL, start
with a simple text file. You can create a text file in an editor
or export one from an application. Be sure to use a text
editor that saves as raw text. Common text editors include
Notepad under Windows, and emacs, vi, and pico under
UNIX. You can also use a word processor to create the file
if you save it as a simple text file.
The file should include one line for each row of data to be
added to the table. Each line should end with a newline
character. The columns of data should be in the same order
on each row. The particular order is not important as long
as it is consistent.
Separate the columns with a tab character if possible. If not,
consistently use another character, such as a comma, and
MySQL can still recognize the file. The file will be easiest to
import if the fields are not enclosed within quotation marks
or other characters. If your application insists on quotation
marks, you will need to specify a FIELDS ENCLOSED BY
option when you import the data into MySQL.
Your text file should include only data for the table. There
should not be any headers, column names, or other
extraneous text at the beginning or end of the file. The
file should not include any blank lines. If a column's value
is blank, you can include a blank field in the file as long as
you still include the correct number of tabs or separator
characters.
FORMAT AN IMPORT FILE
MySQL
160
FORMAT AN IMPORT FILE
516922 Ch08.F 9/26/02 11:37 AM Page 160
› Continue typing rows
until all of the desired data is
included in the file.
Note: You will often start with a file
saved from an application, rather
than typing the data manually.
ˇ Click File ➪ Save As from
the menu.
Á Specify a filename for the
text file and click the Save
button.
■ The text file is now saved.
Note: The save option will vary
depending on the editor you are
using.
If you want to include special characters in the text file, you need to prefix
them with an escape character. The default escape character is a backslash
(\). The following are some typical character sequences that you can use to
specify special characters:
SEQUENCE CHARACTER
\t Tab
\n Newline
\\ Backslash
\" Quotation marks
\' Apostrophe
\N Null value (must be the entire column value)
You can use the ESCAPED BY clause when you import the file to specify a
character other than the backslash. If you will be using quotation marks to
enclose the fields and specifying them in an ENCLOSED BY clause, you
must also escape any quotation marks that appear within a field's value.
161
IMPORT AND EXPORT DATA
8
516922 Ch08.F 9/26/02 11:37 AM Page 161
Note: This example uses the address
table in the testdb database. It also
requires the mail.txt file you created
in the previous section.
⁄ From the MySQL monitor,
type
USE testdb; and press
Enter.
■ The database is now
selected.
¤ Type DELETE FROM
address; and press Enter.
■ This deletes the current
contents of the table.
‹ Type SELECT * FROM
address; and press Enter.
■ Verify that the table is
currently empty.
T
he LOAD DATA command in MySQL allows you to
import a text file into a MySQL table. You can use this
command to import a text file you created with a
SELECT INTO OUTFILE command, or a file you created
yourself or exported from another application.
The following is a simple example of a LOAD DATA
statement. This loads the file mail.txt into the address table
and looks for values for the name, address, and city
columns.
LOAD DATA INFILE "mail.txt"
INTO TABLE address (name, address, city);
The LOAD DATA statement supports several options. First, if
you specify the LOW_PRIORITY keyword before INFILE,
MySQL waits until no clients are reading from the table
before importing the data. If you specify CONCURRENT
instead, other clients are allowed to read data from the
table while the LOAD DATA operation is working.
You specify the column names after INTO TABLE in
parentheses, in the same order they appear in the import
file. If you do not specify column names, MySQL will expect
the file to contain values for every column in the table's
definition, in the same order as they are defined in the table.
By default, MySQL expects column values to be separated
with tab characters and lines to end with a newline
character. You can change this behavior with the FIELDS
TERMINATED BY and LINES TERMINATED BY options.
You can also specify ENCLOSED BY and ESCAPED BY
options, described in the section "Import and Export Tools"
earlier in this chapter, if your file is not in the default format.
Specify any of these options after the table name and
before the list of columns.
If the text file contains an entry that would conflict with an
existing table row, the import stops with an error. You can
specify the IGNORE option to prevent this error and skip
conflicting rows, or specify REPLACE and the data in the
text file will override any conflicting data in the table.
IMPORT FROM A TEXT FILE
MySQL
162
IMPORT FROM A TEXT FILE
516922 Ch08.F 9/26/02 11:37 AM Page 162
› Type LOAD DATA INFILE
"mail.txt" and press Enter.
Note: You may need to specify a
path. If the file is not on the MySQL
server, see the Extra section.
ˇ Type INTO TABLE address
(name, address, city); and
press Enter.
■ The data is now imported
from the file. MySQL displays
the number of rows imported.
Á Type SELECT name,
address, city FROM address;
and press Enter.
■ The file now contains the
imported data.
By default, the LOAD DATA statement looks for a file on the
MySQL server. You can use the LOCAL option to load a file from
the client machine instead. To use this option, specify LOCAL
immediately after LOAD DATA.
Example:
LOAD DATA LOCAL INFILE "mail.txt"
INTO TABLE address (name, address, city);
If you use the LOCAL option, the default location for the file will
be the current directory on the client machine. You can optionally
specify a full path to the file. Because this option transfers the file
across the network from the client to the server, it takes longer
than LOAD DATA without LOCAL. If you have access, you may find
it faster to upload the file to the server and then use LOAD DATA.
If you have a text file on a different machine than the MySQL
server or client, you can upload it to the client or server machine
using FTP or a similar application. When you use FTP between
Windows and UNIX hosts, text files are automatically converted
from Windows-style line breaks to UNIX style. This may prevent
errors when importing the file in MySQL.
163
IMPORT AND EXPORT DATA
8
516922 Ch08.F 9/26/02 11:37 AM Page 163
Note: This example creates a file
containing name, address, and city
fields, suitable for import into the
mail or address tables described
earlier in this book.
⁄ From Microsoft Excel,
type the data you want to
export or load an existing
spreadsheet file.
Note: Be sure only rows of valid data
for export are included in the
spreadsheet.
¤ Click File ➪ Save As from
the menu.
Save As
164
EXPORT DATA FROM A SPREADSHEET
MySQL
B
ecause MySQL allows you to import a simple text file,
you can move data into a MySQL table from any
application that can export to a text file. One
common application is a spreadsheet, such as Microsoft
Excel. Because spreadsheets store data in columns and
rows, their format can easily be adapted to a MySQL table.
When exporting data from any application, the ideal format
is a text file with tabs separating columns and one line per
row. This is the MySQL default format for the LOAD DATA
statement. If this option is not available, columns separated
by commas or other characters will work.
When you save a file in Excel, one of the available file types
is Text (tab delimited). This format matches MySQL's default
settings and makes it easy to export data for use with a
MySQL table. If you are using a different spreadsheet, look
for a similar option. If a character other than a tab is used to
separate fields, note it so you can specify it in the FIELDS
SEPARATED BY clause of the LOAD DATA statement later.
Before exporting data, be sure your data is organized into
a single worksheet with a consistent number of columns
on each row. Remove any rows that contain header
information, captions, or comments. Only rows of data
should be included.
If you do not yet have a MySQL table prepared for the data,
create it based on the fields in the spreadsheet. If you
define the columns of the table in the same order as they
are used in the spreadsheet, you will not need to specify
column names in the LOAD DATA statement when you
import the file into MySQL.
EXPORT DATA FROM A SPREADSHEET
516922 Ch08.F 9/26/02 11:37 AM Page 164
‹ In the Save as Type drop-
down field, select Text (Tab
delimited).
› Specify a filename for the
exported file.
■ In this example, the data is
saved to the excel.txt file.
ˇ Click the Save button.
Á Excel may show a
warning that some data
cannot be saved into a text
file. Click Yes to save the file.
■ You are returned to the
main Excel window. The data
has now been exported and
you can import the text file
into MySQL.
You can also import a text file you created with the SELECT
INTO OUTFILE option in MySQL into a spreadsheet. Microsoft
Excel, in particular, works well with files created in MySQL's
default tab-delimited format.
To import a text file, select Open from the File menu and
choose the file. After you click the Open button, Excel runs the
Text Import Wizard to prompt you for information about the
text file you will be importing. The first dialog box displayed
by the wizard prompts you to choose between Delimited and
Fixed width fields and to choose a starting row for the import.
Data is imported starting with the first row by default.
The next dialog box prompts you for more detailed information.
You can choose the delimiter character and the character that
encloses fields. If you exported the file using MySQL's default
settings, choose Tab as the delimiter and none as the enclosing
character.
The final dialog box displayed by the wizard allows you to
choose a format, such as numeric values or text, for each of
the imported fields. This formats the spreadsheet cells after
the import is completed.
165
IMPORT AND EXPORT DATA
8
516922 Ch08.F 9/26/02 11:37 AM Page 165
⁄ From Access, open the
table that you want to export.
¤ Click File ➪ Export from
the menu.
‹ Choose a filename for the
exported file.
Note: In this example, the filename is
Table1.txt.
› Select Text Files as the file
type to export.
ˇ Click the Save All button.
Export
David Jones
M
icrosoft Access is the most popular desktop
database application, and it is often used to store
business data. Access includes a sophisticated
Export option that can export a file in several different
formats. You can use this feature to create a text file that
you can import into a MySQL table using the LOAD DATA
statement.
To export data from Access, open the table you want
to export and select Export from the File menu. Select a
filename and select Text Files as the file type. After you
click the Save button, the Export Text Wizard prompts you
for several options to control the formatting of the text file.
You can select comma, tab, or another character to separate
fields, and choose whether to enclose data in quotation
marks or another character.
If you select the Tab delimited option from the wizard and
select none for the Text Qualifier option rather than a
quotation mark, the file will be created in the default
format for the LOAD DATA command in MySQL.
Like a MySQL database, an Access database can contain any
number of tables. If you need to transfer multiple tables of
data to MySQL, you must export each table separately to a
text file.
To prepare a table for export, be sure it contains only rows
of data you want to include in the MySQL table. The table
should not include any comments or field names in the first
rows, as this would result in invalid data being exported.
You can use a similar process to export data from most
other database applications. If an application does not let
you choose the characters to enclose and separate fields,
you can use the FIELDS SEPARATED BY and ENCLOSED
BY options in the LOAD DATA statement to make MySQL
work with the format of the file.
EXPORT DATA FROM MICROSOFT ACCESS
MySQL
166
EXPORT DATA FROM MICROSOFT ACCESS
516922 Ch08.F 9/26/02 11:37 AM Page 166