Mysql your visual blueprint for creating open source databases- P12 ppt
Bạn đang xem bản rút gọn của tài liệu. Xem và tải ngay bản đầy đủ của tài liệu tại đây (677.67 KB, 20 trang )
MYSQL SECURITY BASICS
M
ySQL includes a sophisticated security system. You
can use MySQL commands to create users and
grant them privileges for a database or table.
CONFIGURE MYSQL SECURITY
11
207
The Grant Tables
Internally, the MySQL server stores its usernames,
passwords, and privileges in several tables within the
mysql database. This database is created when you
install the MySQL server. The user table within this
database stores a row for each user and a number of
fields that define the basic privileges granted to the user.
The other tables in the mysql database include the host
table, which stores privileges specific to particular
hostnames, and the db table, which stores privileges
granted to users for a specific database. The tables_priv
table stores privileges granted for specific table names,
and the columns_priv table stores privileges granted for
only specific columns of a table.
Default Users
When you install the MySQL server, the root user is
created by default. This user is granted all privileges for all
databases and tables, and can create additional users. The
root user does not have a password by default, and this is
a major security hole. Be sure to change the root password
before allowing users to access the MySQL server.
The installation also creates an anonymous user, which
allows users on the local host to connect without
specifying a username and password. This user is
restricted to a database named test or with a name
beginning with test_, so this does not represent a
serious security risk.
The Authentication Process
When you attempt to connect to a MySQL server, the
client encrypts your password and sends a request
including the username you specified to the server. The
server checks whether the username is listed in the user
table and whether the password matches the encrypted
password stored in that table. If they match, you are
allowed to connect.
After this initial authentication, the MySQL client
authenticates each command the client sends to the
server, and checks the user, db, and other tables to
determine whether the username has the right
privileges for the command being issued.
Security Commands
MySQL includes three basic commands for working
with security. The first, GRANT, grants one or more
privileges to a user for a database or table. If the user
does not already exist, it is created.
The REVOKE command removes one or more privileges
from a username. It can leave a user without privileges,
but does not delete users from the user table.
The SHOW GRANTS command displays the privileges
granted to a particular user. These are displayed as
GRANT statements and can be used to recreate or
duplicate the user's privileges.
MySQL Users and Privileges
You must specify a username when you use MySQL
client programs, such as mysql or mysqladmin. If you
are the administrator of the MySQL server, you can
create usernames and control the privileges, or
permissions, of each user.
You use the GRANT command in MySQL to grant one or
more privileges to a user. If the username you specify
does not exist, it is created. The REVOKE command is
the opposite. This command removes one or more
privileges from a user.
A user in MySQL is actually the combination of a
username and hostname. If a username is set up with a
specific host, the user can only connect from that host.
Users can also be configured to allow multiple hosts or
all hosts.
The privileges you can grant to a user include most of
the different things that can be done with SQL queries,
including SELECT, INSERT, and DELETE. The complete
list of privileges is included later in this chapter.
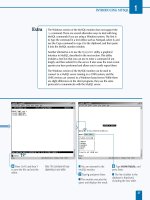
516922 Ch11.F 9/26/02 11:39 AM Page 207
Note: This example uses the testdb
database and the quotes table, which
you can import from the CD-ROM.
⁄ From the MySQL monitor,
type
USE testdb; and press
Enter.
■ The database is now
selected.
¤ Type GRANT ALL ON
testdb.* and press Enter.
■ You are prompted for the
next line.
‹ Type TO nancy IDENTIFIED
BY 'thepass'; and press Enter.
■ The user is now created.
This user has all privileges for
the entire database.
M
ySQL uses its own system of usernames and
passwords, unrelated to the underlying operating
system. You can use the GRANT command from
MySQL to create a username and assign one or more
privileges to the user. You can assign privileges for all
databases, a single database, a table, or even a single column.
The basic syntax of the GRANT command specifies a
privilege type, a table or database name, a username, and
a password. The username can be an existing MySQL user.
If it is a new user, the user is added. The following GRANT
command grants all privileges to the user nancy for the
testdb database:
GRANT ALL ON testdb.*
TO nancy IDENTIFIED BY 'thepass';
Usernames on MySQL can be a simple name like the
above, or a combination of a username, the @ symbol,
and hostname. If you specify a hostname, the user can
only access MySQL from that host. If you do not specify
a hostname, the username will work from any host. You
can use the wildcard character, %, as the hostname to
explicitly indicate that the user can connect from any host.
You can specify a database name with the * symbol, meaning
all tables under that database, a table name under the
current database selected with the USE command, or the
wildcard *.*, meaning all databases on the server. You can
optionally specify a list of columns in parentheses before
the ON keyword, and the user will have the privileges you
specify for only those columns.
The IDENTIFIED BY clause in the GRANT statement allows
you to specify a password for the user. The password will be
encrypted and stored in the MySQL user table. If the user
has already been created with a previous GRANT statement,
you do not need to use the IDENTIFIED BY clause again.
In order to grant privileges to a user, you must be logged in
as a user with those privileges and the ability to grant. If you
specify WITH GRANT OPTION at the end of the GRANT
command, the user will have the ability to grant any
privileges they have to other users.
The REVOKE command allows you to revoke one or more
privileges from a user. To use this command, specify REVOKE,
the privilege type or ALL, the ON keyword, the table or
database name, the FROM keyword, and the username.
GRANT PRIVILEGES TO USERS
MySQL
208
GRANT PRIVILEGES TO USERS
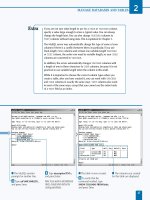
516922 Ch11.F 9/26/02 11:39 AM Page 208
› Type GRANT ALL ON
quotes and press Enter.
ˇ Type TO fred IDENTIFIED
BY 'other'; and press Enter.
■ This creates another user.
This one has access to the
quotes table only.
Á Type REVOKE DELETE,
DROP ON quotes and press
Enter.
‡ Type FROM fred; and
press Enter.
■ This removes the DELETE
and DROP privileges, leaving
the user with the remaining
privileges.
CONFIGURE MYSQL SECURITY
11
Most of the examples here use the ALL keyword as the privilege
type. This keyword assigns all available privileges. You can also
assign the specific privileges listed in the table below.
PRIVILEGE ALLOWS
ALTER Use ALTER TABLE command
CREATE Use CREATE TABLE command
DELETE Use DELETE command
DROP Use DROP TABLE command
FILE Use SELECT INTO OUTFILE and LOAD DATA INFILE
INDEX Use CREATE INDEX or DROP INDEX
INSERT Use INSERT command
LOCK TABLES Use LOCK TABLES command
PROCESS Use SHOW PROCESSLIST and mysqladmin processlist
RELOAD Use the FLUSH command
SELECT Use SELECT queries
SHOW DATABASES Show all databases
SHUTDOWN Shut down the server with mysqladmin shutdown
SUPER Various administrative privileges including mysqladmin kill
UPDATE Use UPDATE queries
209
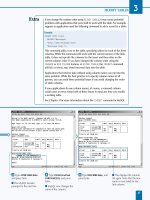
516922 Ch11.F 9/26/02 11:39 AM Page 209
Note: This example uses the users
you created in the previous section.
You must be connected to MySQL as
the root user or another user that can
grant privileges.
⁄ From the MySQL monitor,
type
SET PASSWORD FOR and
press Enter.
¤ Type fred =
PASSWORD('newpass');
and press Enter.
■ This sets the user's
password.
‹ Type SET PASSWORD =
PASSWORD('newpass'); and
press Enter.
■ This sets the password for
the current user.
Note: If you change your password,
be sure not to use the default value
given here, and be sure to remember
the password you have chosen.
A
fter you have created a user and granted privileges
with GRANT, you can change the user's password
using the SET PASSWORD command within the
MySQL monitor. For example, the following command
changes the password for the user fred:
SET PASSWORD FOR fred = PASSWORD('newpass');
MySQL stores passwords in an encrypted form. When you
change a password with the SET PASSWORD command,
you must use the PASSWORD function to encrypt the new
password. MySQL expects the new password to be in
encrypted form.
In order to change a user's password, you must either be
logged in as that user or as a user with the GRANT OPTION
privilege. This allows you to change the password for any
user. You can also assign passwords by using the
IDENTIFIED BY clause when creating users or adding
privileges using the GRANT command, as explained in the
previous section.
You can also change a user's password using the
mysqladmin password command at the command
prompt. In this case, you do not need to use the PASSWORD
function. For example, the following command changes the
password for the current user:
mysqladmin password 'newpass'
If you specify the -u option with mysqladmin, you can set
the password for the specified user. However, this option
requires the user's current password. If you need to set a
password and do not know the user's current password, use
the SET PASSWORD command.
When MySQL is first installed, the root user may be set up
with no password or a default password. To secure the
MySQL server, you should immediately change the
password for this user using SET PASSWORD or
mysqladmin password.
MODIFY USER PASSWORDS
MySQL
210
MODIFY USER PASSWORDS
516922 Ch11.F 9/26/02 11:39 AM Page 210
› Type SET PASSWORD FOR
and press Enter.
ˇ Type nancy =
PASSWORD('pass2');
and press Enter.
■ This sets another user's
password.
Á Type SELECT
PASSWORD('newpass');
and press Enter.
■ This demonstrates the
PASSWORD function and
displays an encrypted result.
CONFIGURE MYSQL SECURITY
11
MySQL uses its own system of usernames and passwords. Usernames
in MySQL are limited to a length of 16 characters. There is no limit to
password length in MySQL, but some systems limit the length to eight
characters. While the username and password can be the same as a
UNIX or Windows user account, they are separate and do not need to
be the same.
When you choose a password, be sure to make it difficult to guess. Names
and words that appear in the dictionary are bad choices for passwords.
The ideal choice is a combination of random letters mixed with numbers,
although truly random passwords are not easy for users to remember.
Because MySQL stores passwords encrypted using the PASSWORD
function, knowing the encrypted password for a user is as good as
knowing the real password. Do not allow users to view the grant tables,
described later in this chapter, as the encrypted passwords would be
displayed.
When users specify a password on the command line to mysql or other
client programs, other users may be able to see the password in the
system's process list. A better strategy is to store the password in a .my.cnf
file in each user's home directory. This file is explained in Chapter 10.
211
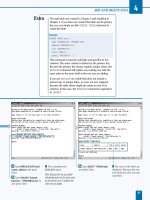
516922 Ch11.F 9/26/02 11:39 AM Page 211
Note: The users referred to in this
example were created in the section
“Grant Privileges to Users.”
⁄ From the MySQL monitor,
type
SHOW GRANTS FOR
nancy; and press Enter.
■ The privileges for the user
are displayed.
Note: You must be connected to
MySQL as the root user or another
user that can grant privileges to use
this command.
¤ Type SHOW GRANTS FOR
fred; and press Enter.
■ This user's privileges are
displayed.
Y
ou can use the VIEW GRANTS command from the
MySQL monitor to find out what privileges have been
granted to a particular user. This is useful if you need
to check what abilities have been given to a user. For
example, the following statement displays the privileges
granted to the user fred:
SHOW GRANTS FOR fred;
The results for SHOW GRANTS are presented in the form
of one or more GRANT statements. You can copy these
statements and use them to restore the user's privileges
in the event of data loss, or use them to create another
user with the same privileges. The password in the GRANT
statement is shown in encrypted form.
In some cases a user is configured in MySQL but does not
have any privileges. This can happen if you create a user
manually in the users table, or if you have revoked all of a
user's privileges. In this case, when you use SHOW GRANTS,
the results show a GRANT USAGE statement. USAGE is a
special privilege meaning "no privileges." In other words,
the user can connect to the MySQL server but cannot
access any databases or tables.
When using SHOW GRANTS, remember that MySQL stores
users as a combination of username and hostname. If a
username is configured with a specific host, you must
specify the hostname to view their privileges. If you have
created the user ted@localhost, for example, no privileges
will be shown if you use this command:
SHOW GRANTS FOR ted;
Because no hostname is specified, this command looks for
a user with access from all hosts, and no user is found. To
show the privileges for the correct user, specify the
hostname with the @ symbol.
VIEW A USER'S PRIVILEGES
MySQL
212
VIEW A USER'S PRIVILEGES
516922 Ch11.F 9/26/02 11:39 AM Page 212
‹ Type REVOKE ALL ON
testdb.quotes FROM fred;
and press Enter.
■ This revokes all of the
user's privileges.
› Type SHOW GRANTS FOR
fred; and press Enter.
■ The user's privileges now
include only the USAGE
privilege, which allows
access but no privileges.
CONFIGURE MYSQL SECURITY
11
In order to use SHOW GRANTS, your username must have the
GRANT OPTION in its list of privileges. When you display
the privileges for a user, the encrypted password is shown in
the GRANT statements, and this could be used to gain access
to the user's resources.
When you change a user's privileges using GRANT or REVOKE,
the changes take effect immediately and are shown in
subsequent SHOW GRANTS commands. The privileges are
checked both when a user attempts to connect to the MySQL
server and when they issue each command after connecting.
You cannot use wildcards with SHOW GRANTS to display the
privileges of multiple users. To display a list of users or quickly
view privileges for multiple users, you can access the grant tables
directly, as described in the next section.
The GRANT statements shown when you use SHOW GRANTS are
a summary of the user's privileges. While they can be used to
recreate the user's privileges, they are not necessarily the same
commands you used to assign the privileges and create the user.
213
516922 Ch11.F 9/26/02 11:39 AM Page 213
⁄ From the MySQL monitor,
type
USE mysql; and press
Enter.
■ The database is now
selected.
Note: Usually you must be logged in
as the root user to access this
database.
¤ Type SELECT * FROM user
and press Enter.
‹ Type WHERE User =
"fred"; and press Enter.
■ The user's entry in the user
table is displayed.
M
ySQL stores the users and privileges you assign in a
set of tables under the mysql database, which was
created when you installed the server. You can view
these tables directly to find out detailed information about
a user or to view the complete lists of users and privileges.
The mysql database is accessible only to the root user
by default. Because this database contains usernames,
passwords, and privileges for all users, access to it
effectively allows you to view or modify any user's
privileges on the server.
The user table within the mysql database stores the list of
usernames and their basic privileges. This table is used by
the MySQL server to determine whether to allow access
when a user attempts to connect. Various columns of this
table store values of "Y" or "N" to indicate whether a
privilege is granted. You can use the following command to
view the complete list of users:
SELECT * FROM user;
Because the output of this command includes encrypted
passwords, be sure not to let anyone other than an
administrator view the list.
The db table stores a row for each user that has privileges
for a specific database on the server. For each row, the
username, hostname, and database name are stored along
with flags indicating various privileges specific to the
database for that user.
The host table stores information for specific hostnames,
and is used when a user is given access from multiple hosts.
The tables_priv and columns_priv tables are used to store
any privileges that have been granted to users specific to a
table or one or more columns of a table.
VIEW SECURITY TABLES
MySQL
214
VIEW SECURITY TABLES
516922 Ch11.F 9/26/02 11:39 AM Page 214
› Type DESCRIBE user; and
press Enter.
■ This displays a summary of
the columns of the user table.
ˇ Type DESCRIBE db; and
press Enter.
■ This displays the columns
of the db table.
CONFIGURE MYSQL SECURITY
11
You can manipulate the tables in the mysql database directly. For
example, you can use the following UPDATE query to change a user's
password rather than using the SET PASSWORD command.
Example:
UPDATE user SET Password=PASSWORD('newpass')
WHERE user='fred';
You can also use INSERT queries to add users or DELETE queries to
delete users from the user table. You can also modify the other tables to
add or remove privileges. While this is rarely necessary, it gives you more
complete access to the various settings stored in the tables and may be
more practical than using GRANT and REVOKE in some cases.
When you have made changes to users or other tables in the mysql
database, they are not automatically reloaded by the server. You can
use the command FLUSH PRIVILEGES from the MySQL monitor, or
mysqladmin flush-privileges from the command prompt, to force
the tables to be reloaded. They will also be reloaded if you restart the
MySQL server.
While modifying these tables directly is powerful, it can also be dangerous:
You could easily delete the root username, for example, and lose root
access to the server. Use these tables with caution, or use the GRANT and
REVOKE commands instead. Also, be sure that you do not give any other
users access to view or modify the tables in the mysql database.
215
516922 Ch11.F 9/26/02 11:39 AM Page 215
MySQL
Note: This example uses the testdb
database. You must be connected to
MySQL as the root user or another
user that can grant privileges.
⁄ From the MySQL monitor,
type
GRANT ALL ON testdb.*
TO henry@localhost and
press Enter.
¤ Type IDENTIFIED BY
'password'; and press Enter.
■ This creates a user that can
access MySQL from the local
host only.
Note: For security, choose your own
password rather than using the one
given here.
‹ Type GRANT ALL ON
testdb.* TO
and press Enter.
› Type IDENTIFIED BY
'password'; and press Enter.
■ This creates a user that can
connect to MySQL from the
example.com host only.
Note: For security, choose a different
password.
216
CONTROL NETWORK ACCESS
W
hen you created users on the MySQL server earlier
in this chapter, you did not specify a hostname in
the GRANT command. This allows the user to
connect to the MySQL server from any host on the
network. While this is often what you need, when a user
will only be connecting from the local host or a specific
host, you can give them access only from certain hosts. This
greatly reduces the possibility of the user account being
used maliciously across the network.
To specify the hostname a user can connect from, use the
@ symbol to combine the user name and hostname. For
example, the following GRANT command creates a username,
henry, that can be used to connect only from the machine
running MySQL server:
GRANT ALL ON testdb.* TO henry@localhost
IDENTIFIED BY 'password';
MySQL allows multiple users with the same name in the
user table, as long as their hostnames are different. For this
reason, limiting the user to the local host will only work if
you have not previously granted privileges to the same
username without specifying a hostname. If you have done
this, use REVOKE to remove the privileges for the original
user before adding a user with a specified hostname.
You can specify a hostname or IP address that the user can
connect from instead of using localhost. For example,
the following GRANT command creates a username, sue,
that can connect only from a host called example.com:
GRANT ALL ON testdb.* TO
IDENTIFIED BY 'password';
If you need to allow access for a user from more than
one host, simply repeat the GRANT command for each
hostname. You can use the wildcard character % in the
hostname to allow a set of host names or IP addresses.
When you do this, you must enclose the username and
hostname in quotation marks:
GRANT ALL ON testdb.* TO
'user1'@'192.168.%';
CONTROL NETWORK ACCESS
516922 Ch11.F 9/26/02 11:39 AM Page 216
ADVANCED MYSQL SECURITY
M
ySQL includes
a number of
more advanced
security options. You
can use various startup
options when you start
the MySQL server to
control specific aspects
of security. You can
also use the secure
SSL protocol when
connecting clients to
a MySQL server.
CONFIGURE MYSQL SECURITY
11
local-infile
This option should be followed by the = symbol and
a value of zero or one. If the value is zero, the LOAD
DATA LOCAL INFILE command is not permitted. This
command may be a security risk because it allows files
on the local system to be read and sent to the MySQL
server. See Chapter 8 for details on using the LOAD
DATA command.
Example:
mysqld –local-infile=0
safe-show-database
Normally, any MySQL user can use the SHOW DATABASES
command to display a complete list of databases on the
server. If you use the safe-show-database option,
users are only shown the databases for which they have
been granted one or more privileges.
safe-user-create
If this option is included, users are not allowed to use
GRANT to create a new user unless they have been
explicitly granted the INSERT privilege for the user
table in the mysql database. Users who have the
GRANT OPTION privilege can still grant any privileges
they have to any existing user.
USING STARTUP OPTIONS
217
The program that handles the MySQL server, mysqld,
includes a variety of startup options. This section describes
several options that you can use to manage the security of
the MySQL server. To use these options, add one or more
of them to the command line when you start the MySQL
server. See Chapter 1 for information on starting the server.
skip-show-database
If this option is used, the SHOW DATABASES command
is not allowed at all, except for users who have been
explicitly given the SHOW DATABASES privilege.
skip-grant-tables
If this option is specified, the grant tables are not used at
all — in other words, MySQL is running with no security
at all. You should never use this option unless you have
a special situation that requires MySQL security to be
turned off.
One use for this command is for recovering access to the
server when you have accidentally changed or deleted
the root user. You can start the server with the skip-
grant-tables option, use GRANT to restore the root
user, and then restart the server to turn security back on.
skip-name-resolve
If this option is used, MySQL will not use DNS (domain
name system) to convert hostnames to IP addresses.
This effectively means that you cannot use a hostname
when granting privileges to users, and you must
explicitly use an IP address instead. This can increase
security if your DNS server is not secure.
skip-networking
If this option is specified, MySQL does not allow
TCP/IP connections to the server across the network.
Connections can only use UNIX sockets, which means
that the local host is usually the only machine that can
connect. This option will increase security if you do not
require access to the server from other machines.
When you connect to a MySQL server using a client, the traffic between the two is not
encrypted. This means that a machine on the network may be able to scan network traffic
and discover passwords or data being transferred to and from the MySQL server.
To prevent this type of network vulnerability, MySQL supports the SSL (Secure Sockets
Library) protocol, the same system used by Web servers to provide encrypted access to
clients. Setting up SSL on MySQL requires re-compiling the server, if it was not initially set
up with this option. For details on using SSL with MySQL, see the MySQL documentation
at www.mysql.com.
SSL AND MYSQL
516922 Ch11.F 9/26/02 11:39 AM Page 217
P
HP is one of the most popular Web scripting languages,
and one of the most popular languages for creating
applications to work with MySQL. PHP is a scripting
language that is interpreted by Web servers. In particular, the
popular open source Apache server can support PHP as a
module, which allows for efficient execution of scripts.
This is only a brief introduction to PHP. PHP is a project of
the Apache Software Foundation, and you can find out
more or download software from the PHP Web site:
www.php.net.
MySQL
INTRODUCING PHP
MySQL
218
PHP and HTML
To use PHP, you embed a script within an HTML
document and save the document with the .php or
.php3 extension. The Web server looks for PHP scripts
in files with these extensions and interprets them
before sending the document to the Web browser.
Thus, the browser does not have access to the PHP
script — only to the output of the script and the
surrounding HTML.
You begin and end a PHP script with the <?php and ?>
tags. Anything between these two tags is interpreted as
PHP rather than HTML. Anything outside these tags
should be valid HTML.
Create Output
PHP supports a number of commands. One basic
example is the echo command, which sends output to
the Web browser as part of the HTML document. Each
statement within the PHP script should end with a
semicolon. The following example displays a message
using PHP:
<?php
echo "This is a test.";
?>
Using Variables
PHP supports variables, containers that can store
numbers, text strings, or other data. PHP variables do not
need to be defined before you use them, and they can
store any type of data. The following example assigns a
string value and a numeric value to two variables:
<?php
$num=39;
$string="This is a test.";
?>
PHP also supports arrays, or variables with indexes. An
array is basically a number of variables with a common
name. The indexes for an array can be either numbers
or string values. The following example assigns a value
to an array element:
<?php
$array[1]="number one";
?>
PHP variables can be included in string values. This is
useful when you need to combine a variable's value
with some text. The following example displays the
value of the $num variable within a string:
<?php
echo "The number is $num.";
?>
PHP and MySQL
PHP includes support for MySQL with a number of
functions, described throughout this chapter. These
allow you to connect to a MySQL server, submit a query
to the server and retrieve the results, and perform other
MySQL tasks. Virtually anything you can do with the
MySQL monitor can also be done from a PHP script.
516922 Ch12.F 9/26/02 11:40 AM Page 218
USING MYSQL WITH PHP
12
219
Using Functions
You can combine several statements into a group with a
function in PHP. To define a function, you use the
function keyword and surround the statements with
braces. The following example defines a function called
print_bold:
<?php
function print_bold($text) {
echo "<b>$text</b>";
}
?>
The values in parentheses are the arguments,or
parameters, of the function. To call a function, you
specify its name and the arguments in parentheses. The
following statement calls the print_bold function:
print_bold("This is a test.");
Functions can also return a value using the return
keyword. When you call such a function, you can store
its result in a variable.
Loops
PHP supports loops to perform a statement or a block
of statements multiple times. The while statement
defines a simple type of loop that repeats as long as a
condition is true. The following is an example of a
while loop:
while ($num < 30) {
$num = $num + 1;
echo "The number is $num.";
}
PHP also supports for loops. This type of loop starts
with a for statement specifying a beginning value, a
condition, and an increment expression for a variable.
The following for loop is equivalent to the previous
while example:
for ($num=0; $num<30; $num = $num + 1)
{
echo "The number is $num.";
}
Operators
PHP supports a number of standard operators for
working with numbers and strings. You can use these in
any expression to work with constants or variables. The
operators available in PHP are similar to those of
MySQL. The following table summarizes some of the
basic PHP operators:
OPERATOR MEANING
+ Addition
- Subtraction
* Multiplication
/ Division
% Modulo (remainder)
. Concatenation (combines strings)
Conditional Statements
You can use the if statement in PHP to perform one or
more statements conditionally. This statement uses a
conditional expression followed by a single PHP
statement, or a block of statements enclosed in braces.
For example, this if statement displays a message if the
$num variable has a value greater than 30:
if ($num > 30) echo "It's bigger than
30.";
The condition in an if statement can use one or more
conditional operators. These are similar to the
conditional operators in MySQL, and are summarized in
the table below.
OPERATOR MEANING
== Is equal to
!= Is not equal to
> Is greater than
< Is less than
>= Is greater than or equal to
<= Is less than or equal to
&& Logical AND
|| Logical OR
516922 Ch12.F 9/26/02 11:40 AM Page 219
⁄ From the UNIX command
prompt, type
pico test.php
and press Enter.
■ This opens a text file for
editing.
Note: Use the appropriate command
to open a file on your system. On
Windows, you can use Notepad to
create the file. With earlier versions
of PHP, you will need to use the
.php3 extension.
¤ Type <?php to begin the
test PHP script and press
Enter.
‹ Type the phpinfo();
command to display PHP
information, and press Enter.
I
f you are running your own Web server and are not
already running PHP, you can install PHP on the server.
Depending on your system, this can be a simple or
complicated process. Most Linux distributions include PHP,
so you may not need to do anything.
If you are using a shared hosting provider, there is a good
chance it supports PHP. In particular, most installations using
the Apache Web server are set up to run PHP. Consult your
host's instructions to find out how to use PHP on the server.
To test whether your server already supports PHP, create a
file with a .php extension and include the following text in
the file:
<?php
phpinfo();
?>
The phpinfo command displays a detailed list of
information about the current PHP installation. If this
information is displayed when you load the .php file you
created into a Web browser, then PHP is installed. Next,
check the Configure Command entry for the with-mysql
option. If this is present, your PHP installation is set up to
work with MySQL.
If PHP does not work or is not configured to work with
MySQL, you may need to install PHP. If you are running
Linux, first check with the vendor of your Linux distribution
to see if they have a prepackaged binary version of PHP
available. This provides an easy way to install PHP. If a
binary version is not available, you will need to install PHP
from source code.
You can download the PHP source code from the PHP
Web site at www.php.net. This site also provides detailed
instructions for installing PHP on a wide variety of systems.
The download will be in the form of a .tar.gz archive. You
can use the tar zxf command to expand the files from
the archive. After the files are extracted, you will need to
use a configure command to choose how PHP will be
configured, and then compile PHP following the instructions.
TEST THE PHP INSTALLATION
MySQL
220
TEST THE PHP INSTALLATION
516922 Ch12.F 9/26/02 11:40 AM Page 220
› Type ?> to end the PHP
script.
ˇ Press Ctrl-X and then Y
to save the file and exit the
editor.
Note: Use the appropriate command
for the editor you are using.
Á Type the URL for the test
file into a Web browser.
■ If the PHP information is
displayed, PHP is working on
your server.
For Windows servers, a binary version of PHP is available from
the PHP Web site at www.php.net. PHP for Windows is available
in two packages: one as a .zip archive, and a second as an .exe
file that automatically begins the installation. Both packages
include built-in support for MySQL, so you do not need to
change the configuration to support MySQL.
If you are using Microsoft's IIS (Internet Information Server)
or PWS (Personal Web Server), included with some versions of
Windows, the .exe version of the PHP binary will automatically
configure your server to work with PHP.
If you are using the Apache Web server under Windows,
download the .zip version of the PHP package. This includes
everything you need to support PHP as an Apache module. At
this writing, this feature only works reliably with PHP 1.x, and
does not yet support the new PHP 2.x versions.
The www.php.net site includes links to external sites where you
can find binary versions of PHP for Mac OS X, Novell NetWare,
and a variety of other systems.
221
USING MYSQL WITH PHP
12
516922 Ch12.F 9/26/02 11:40 AM Page 221
⁄ Type cd followed by the
name of a directory on your
Web server and press Enter.
Note: This assumes you have
downloaded the
phpMyAdmin
installation file to the same directory.
¤ Type tar zxf filename,
replacing filename with the
name of the .tar.gz file, and
press Enter.
■ The files are extracted into
a new directory.
‹ Type cd phpmyadmin-
version, replacing version with
the version you downloaded,
and press Enter.
› Type pico config.inc.php
and press Enter.
Note: Use the appropriate editor
command on your system. The file
may end in .php3, depending on the
version you downloaded.
P
hpMyAdmin is a free, open source application
that gives you a user-friendly interface to a MySQL
database or an entire MySQL server. While this
program is written in PHP and requires PHP, you can use
it to manage your databases and tables even if you do not
know how to program in PHP. This utility allows you to
create databases and tables, browse through data, and
perform most MySQL queries from a Web interface.
To use phpMyAdmin, you must first download and install
it. Because it is written in PHP, it should work on most
Web servers that support PHP. You can download the
phpMyAdmin installation files from the project's Web
page at www.phpmyadmin.net.
The installation files are available in two formats, with the
PHP or PHP3 extension. You can use whichever version will
best work on your server. In most cases, the version with
PHP extensions will work best. Downloads are available in
various archive formats, including .tar.gz, typically used on
UNIX systems, and .zip, usually used under Windows.
To install phpMyAdmin, you can simply install the files from
the archive in a directory on your Web server. After the files
are in place, you will need to edit the config.inc.php file and
specify a username, password, and hostname for the
MySQL server.
After you install phpMyAdmin, you can use it to perform
most of the same functions as the MySQL monitor from
any Web browser. This is very useful for beginners to
MySQL and even for experienced users who want a more
convenient interface to the database.
INSTALL AND TEST PHPMYADMIN
MySQL
222
INSTALL AND TEST PHPMYADMIN
516922 Ch12.F 9/26/02 11:40 AM Page 222
ˇ From the editor, specify
the URL where you have
installed phpMyAdmin.
Á Specify the username to
access the MySQL server.
‡ Specify the password for
the MySQL user.
° Specify the hostname of
the MySQL server.
· Press Ctrl-X and then Y
to save the file and exit the
editor.
‚ Type the URL where you
installed phpMyAdmin into a
Web browser.
■ You can now access
the databases and tables
permitted for the username
you specified.
Note: See the security notes in the
Extra section.
Note: You may want to create
a user specifically for running
phpMyAdmin
. See Chapter 11
for details.
You can use phpMyAdmin to perform virtually any task on the MySQL
server, including dangerous tasks like dropping a database or running a
DELETE query. Because you have specified a MySQL username and
password in phpMyAdmin's configuration, anyone who can access the
Web page can access the database.
Because of this, you should secure the directory where you have
installed phpMyAdmin in some way. Most Web servers allow you to
create an .htaccess file that requires a username and password. You
can secure the page in this way, or place it on a private Web server or
a secure directory you have already configured.
In addition to securing the Web location where phpMyAdmin is installed,
you should also use a username and password in the configuration file
that allow only a minimum of access. You can create a special user in
MySQL that has access to only a certain database, and this way other
databases are inaccessible from the phpMyAdmin utility.
See Chapter 11 for information on creating users in MySQL and assigning
privileges. The phpMyAdmin Web page at www.phpmyadmin.net/ has
more information on security and authentication.
223
USING MYSQL WITH PHP
12
516922 Ch12.F 9/26/02 11:40 AM Page 223
⁄ From the main
phpMyAdmin screen, select
the table with which to work
on the left side of the screen.
Note: This example shows the
quotes table in the testdb database.
■ The structure of the
selected table is displayed.
¤ Click the Browse link to
display the contents of the
table.
A
fter you have installed phpMyAdmin, you can use
it as an alternative to the MySQL monitor and
general-purpose MySQL client. The phpMyAdmin
screen is divided into two frames. The left frame displays
a list of the databases you have access to and can list the
tables within each database. The right frame displays the
data with which you are currently working.
To work with a table in phpMyAdmin, click its entry in the
left frame. The right frame displays a summary of the table's
structure and several additional options. After you have
selected a table, you can select several options.
The Browse option displays the data from the table in
pages, using a series of SELECT queries. An Edit link is
displayed to the left of each row of data. You can click this
to edit the row in a Web form. The Delete link displays a
confirmation prompt and allows you to delete a row from
the table.
The SQL option for a table allows you to enter your own
MySQL queries. A default SELECT query is displayed, and
you can edit the query and click the Go button. The results
of the query, if any, are displayed on the next screen.
The Select option for the table displays a friendly interface
that allows you to create a SELECT query. You can enter a
WHERE clause, select a value for the LIMIT clause, and
enter text values with wildcards.
The Insert option for a table allows you to add a row to
the table using a Web form. Fields are displayed for each of
the columns of the table, and you can enter a value for a
column or select a function such as ENCRYPT to encrypt a
string or NOW for the current date.
MANAGE DATA WITH PHPMYADMIN
MySQL
224
MANAGE DATA WITH PHPMYADMIN
516922 Ch12.F 9/26/02 11:40 AM Page 224
■ The first ten rows of the
table are displayed.
‹ Click the Edit button next
to a row to edit the row.
■ The columns of the
selected row are displayed
in a form.
■ From this screen, you can
modify the row and save it, or
create a new table row based
on the same data.
The phpMyAdmin utility includes several other options for working
with tables. The Export page allows you to export data from the
table. You can choose to export the table data, the table structure,
or both. An option is included to format the data in a CSV format
that can be imported into Microsoft Excel, or you can customize the
formatting. You can also choose to limit the number of rows of data
that will be included in the exported file.
The Operations page includes an interface to several MySQL
options, including options to sort the table data by a particular
column value, rename the table, move it to a different database or
table, or copy it to another table. There are also options to optimize
or repair the table.
The Options page allows you to modify the table options. This
includes the table type, the comment associated with the table, and
a number of other options.
Two final options are included for tables: Empty deletes all of the
rows of a table, and Drop deletes the table completely. Both of
these prompt you for confirmation before deleting anything.
225
USING MYSQL WITH PHP
12
516922 Ch12.F 9/26/02 11:40 AM Page 225
⁄ From a Web browser, type
the URL where you have
installed phpMyAdmin.
■ The main phpMyAdmin
page is displayed.
¤ Click the Show MySQL
runtime information link.
■ The MySQL extended status
values are displayed.
‹ Click the Home link
to return to the main
phpMyAdmin page.
› Click the Show MySQL
system variables link.
I
n addition to working with data in MySQL tables, you
can use phpMyAdmin to manage various aspects of the
MySQL server. This allows you to display information
about the server's current status, manage users, and create
and drop databases.
In order to use these features, you must specify a user with
root access in the config.inc.php file. If the user has access,
phpMyAdmin includes a number of extra features on the
main page. The first of these are interfaces to various SHOW
commands in MySQL.
The Show MySQL runtime information option displays status
information, similar to SHOW STATUS. The Show MySQL
system variables option is equivalent to SHOW VARIABLES.
The Show processes option displays a list of current threads,
the same as the SHOW PROCESSLIST command.
The Reload MySQL option executes a FLUSH command to
reload the security tables and configuration files. The Users
option opens the user table in the mysql database, and
allows you to manage users.
The Database Statistics option displays a summary of the
size of each database, and the total amount of disk storage
used by all tables. This is useful to keep track of which
tables are using the most space.
Finally, the Create new database option allows you to
create a new database, assuming your username has the
correct privileges. You can also delete a database using
phpMyAdmin. To drop a database, first select it from the
list in the left column, and then click the Drop link at the
top of the page. You will be asked to confirm this action.
Because using a user with root access for phpMyAdmin
allows it to perform some powerful and potentially
dangerous functions, be sure you are running it on a
secure Web server or behind a firewall. Otherwise it
represents a serious security risk.
MANAGE THE MYSQL SERVER
WITH PHPMYADMIN
MySQL
226
MANAGE THE MYSQL SERVER WITH PHPMYADMIN
516922 Ch12.F 9/26/02 11:40 AM Page 226