Mysql your visual blueprint for creating open source databases- P13 ppt
Bạn đang xem bản rút gọn của tài liệu. Xem và tải ngay bản đầy đủ của tài liệu tại đây (1.04 MB, 20 trang )
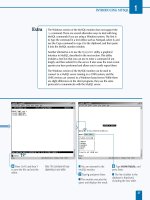
■ The System variables and
their values are displayed.
ˇ Click the Home link
to return to the main
phpMyAdmin page.
Á Click the Show
processes link.
■ The MySQL server's current
process list is displayed.
‡ Click the Home link to
return to the main
phpMyAdmin page.
When you select the Users option, the user table in the mysql
database is opened, and the list of current users is displayed. The Edit
link next to each username allows you to change the user's hostname
and assign privileges. The Delete link deletes a user. The Grants link
displays the current list of privileges granted to a user, and allows you
to delete or modify the privileges.
The Users page also includes a form that allows you to create a new
user. You can specify the hostname the user is allowed to connect
from, a password, and the privileges the user should be assigned for
a particular database.
You can also open the mysql database directly in phpMyAdmin to
work with the various security tables. Keep in mind that this feature
is potentially dangerous; if you mistakenly delete the root user, for
example, you can lose access to the server. See Chapter 11 for more
information about managing MySQL security.
For details on using phpMyAdmin to manage a MySQL server, see the
official documentation. The complete phpMyAdmin documentation is
usually installed when you set up this utility. To access your local copy
of the documentation, follow the phpMyAdmin documentation link
on the main page.
227
USING MYSQL WITH PHP
12
516922 Ch12.F 9/26/02 11:40 AM Page 227
⁄ Type <?php to start the
PHP script.
Note: You will usually want to
include basic HTML tags, as
shown here.
¤ Type mysql_connect( to
begin the command.
B
efore you can use any MySQL functions in PHP, you
must first open a connection to the MySQL server.
You can do this using the mysql_connect function.
To use this function, specify a hostname, username, and
password for the MySQL server:
$link=mysql_connect("localhost", "testuser",
"testpw");
This command opens a connection to the MySQL server
and returns a link identifier that can be used to perform
operations on the server. In this example, the identifier is
stored in the $link variable. If the connection to the server
is not opened successfully, the boolean value false is
returned, and an error message is displayed.
If you do not specify one or more of the parameters for the
mysql_connect command, PHP assumes default values. It
attempts to use localhost as the server hostname, the
username the Web server uses for PHP, and no password. If
these values do not work on your MySQL server, an error
will be returned unless you specify a valid hostname,
username, and password.
After you have opened a connection to the MySQL server,
you can use the connection throughout the PHP script. If
you only have a single connection to a single server open,
you can use it without needing the link identifier.
The connection to the MySQL server stays open until your
PHP script ends, or until you explicitly close the connection.
To close a connection, use the mysql_close command
and specify the link identifier returned when you opened
the connection. This command closes the link opened by
the previous example:
mysql_close($link);
CONNECT TO A MYSQL SERVER
MySQL
228
CONNECT TO A MYSQL SERVER
516922 Ch12.F 9/26/02 11:40 AM Page 228
‹ Add the hostname,
username, and password
for your MySQL server.
Note: See Chapter 11 for information
on creating a username and
password.
› If desired, add a variable
to store the link identifier
returned by mysql_connect.
ˇ End the command with
a closing parenthesis and a
semicolon, and press Enter.
Á Type ?> to end the script.
Note: Add any commands to work
with the server before this tag.
■ This completes the PHP
script to connect to MySQL.
MySQL also supports persistent connections. This is a special type of
connection that stays open even after the PHP script ends. If the same
user attempts to connect to the server a second time, PHP finds the
existing connection and returns its identifier rather than returning a
new connection.
To use persistent connections, use mysql_pconnect() to open the
connection. The arguments for this function are the same as for the
standard mysql_connect()function. You cannot close a persistent
connection manually; instead, the server will keep the connection
open until MySQL's wait_timeout period expires. See Chapter 10
for information on setting this timeout value on a MySQL server.
Example:
$link=mysql_pconnect("localhost", "testuser", "testpw");
// Add statements that use the database server here
Persistent connections can be more efficient in an application where
the same user will make many queries on different PHP scripts. In a
simple application, they are less efficient because connections are left
open and not used further, and MySQL may run out of connections
for future clients.
Persistent connections only work if PHP is running as a module on an
Apache Web server. They are not currently supported when PHP is
run as a CGI program or on other Web servers.
229
USING MYSQL WITH PHP
12
516922 Ch12.F 9/26/02 11:40 AM Page 229
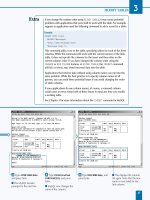
Note: Start with a basic HTML
document.
⁄ Type <?php and ?> to
begin and end the PHP script.
¤ Type mysql_connect
to begin the statement that
connects to the database, and
add the details for the server,
username, and password.
‹ Type mysql_select_db
followed by the database
name to select the database
for future queries.
› Type mysql_query to begin
the function that sends the
query to the MySQL server,
and add the query and a
variable to store the result
identifier.
A
fter you have connected to the MySQL server from a
PHP script, you can run one or more MySQL queries.
Often, you will want to send a SELECT query to the
server and display the resulting data. PHP includes a
number of ways to receive data from the SQL server.
As with the MySQL monitor, before you can make a query,
you must select a database. To do this, use the mysql_
select_db function. To use this function, specify the
database name as a string:
mysql_select_db("testdb");
After you have selected a database, you can send an SQL
query to the server using the mysql_query function. To
use this function, specify the query as a string. The following
example sends a simple SELECT query to the server:
$result=mysql_query("SELECT quote, author
FROM quotes");
If the query is successful, the mysql_query function
returns a result identifier. In this example, the $result
variable stores the result identifier. You can use this
identifier later in the script to display the query results.
While the result identifier indicates that the query was
successful, this only means that MySQL understood the
query — it does not mean there are definitely one or more
rows of data in the result. If the query is unsuccessful, the
mysql_query function returns a FALSE value instead.
Some queries, such as INSERT and DELETE, do not return
data from the server. In this case, mysql_query simply
returns TRUE if the query was successful.
To display query results, you can use the mysql_fetch_row
function. This function accepts a result identifier, and returns
the next row of the result as an array. The array includes all of
the columns of the result in order. You can repeat the
function to retrieve all of the result rows. The following
example uses a while loop to retrieve all of the rows:
while(list($quote, $author) =
mysql_fetch_row($result)) {
echo "<p>$quote $author</p>"; }
This example retrieves each row into the $quote and
$author variables. These are used with an echo statement
to display each row as an HTML paragraph. The list
function allows the array returned by mysql_fetch_row
to be stored in two regular variables instead of an array, and
is a convenient way to handle simple queries.
DISPLAY QUERY RESULTS
MySQL
230
DISPLAY QUERY RESULTS
516922 Ch12.F 9/26/02 11:40 AM Page 230
ˇ Type while to begin
the loop, and add the
mysql_fetch_row
statement. Include braces
to enclose the loop.
Á Type echo to begin the
statement that displays each
row. Add the string to display
and a closing bracket to end
the loop.
‡ Load your PHP document
into a Web browser.
■ The rows of data are
displayed within the HTML
document.
Note: This example uses the quotes
table in the testdb database. You can
import this table from the CD-ROM.
USING MYSQL WITH PHP
You can optionally specify a link identifier from mysql_connect as
a second parameter to the mysql_select_db and mysql_query
functions. However, these and most other MySQL functions in PHP
default to using the last connection you opened, so this is usually not
necessary.
You can use the mysql_db_query function to avoid selecting a
database first. This function is similar to mysql_query, but accepts a
database name as its first parameter.
To use this script or any PHP script you create, you must first save the
edited file, and then upload it to your Web server that supports PHP.
If you are using PHP version 3, save the file with the .php3 extension.
For PHP version 4, save the file with the .php extension.
After the file is saved, you will need to upload it to the correct
directory of the Web server. You can do this using the same program
you use to upload HTML documents. Typically this is done using the
FTP protocol.
After the file is uploaded to the server, you can use a Web browser to
display the result. PHP does not require a particular browser because
it creates HTML output. PHP pages display just like HTML pages.
231
12
516922 Ch12.F 9/26/02 11:40 AM Page 231
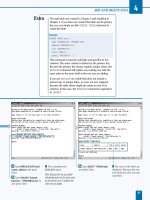
Note: Start with a basic HTML
document.
⁄
Type <?php and ?> to
begin and end the PHP script.
¤
Type mysql_connect
followed by the correct user,
password, and hostname to
connect to the database.
‹
Type mysql_select_db
followed by the database
name to select the database
for future queries.
›
Type $result = mysql_query
to begin the function that
sends the query to the
MySQL server, and add the
query in quotation marks.
Note: This example uses the quotes
table in the testdb database. You can
import this table from the CD-ROM.
W
hen you use the mysql_fetch_row function to
retrieve rows from a query, you must specify the
column names in the query and retrieve them in
the same order. If you are trying to use a query that returns
all columns of a table, and are unsure of the order the
columns will be returned in, you can use mysql_fetch_
object instead.
For example, suppose you have made the following query
to the MySQL server. This query retrieves all columns and
all rows from the quotes table.
$result=mysql_query("SELECT * FROM quotes");
To retrieve the data, you can use mysql_fetch_object.
This returns an object whose properties are the column
values for the row. Thus, you can refer directly to the
MySQL column names rather than assigning your own
variable names to each column. The following while loop
uses the mysql_fetch_object function to retrieve and
display each row:
while($row = mysql_fetch_object($result)) {
echo "<p>$row->quote $row->author</p>";
}
In this example, the $row variable stores each row. You can
use the -> operator to refer to each MySQL column name
as a property of the object. Thus, you can refer to the quote
column as $row->quote and the author column as $row-
>author. Because the MySQL query specified the wildcard
* rather than specific column names, all columns of the
table are available from the object.
You can use whichever function you are most comfortable
with to return data from a MySQL query. The data returned
is the same; only the method you use to access it changes.
PHP includes several other fetch commands that return
the results in different formats, such as mysql_fetch_assoc
to store the data in an associative array. This type of array
uses column names to index the results rather than numeric
indexes.
STORE QUERY RESULTS AS OBJECTS
MySQL
232
STORE QUERY RESULTS AS OBJECTS
516922 Ch12.F 9/26/02 11:40 AM Page 232
ˇ Type while to begin the
loop that iterates through
the rows of data. Add the
statement to retrieve a row
and an opening brace to
begin the loop.
Á Type echo followed by a
string using the $row object
to display the row. Add the
closing brace to end the loop.
‡ Load your PHP document
into a Web browser.
■ The rows of data are
displayed within the HTML
document.
If you are running into MySQL errors while attempting to use a database from
PHP, it is useful to display the results within your PHP script. The following
PHP script adds if statements to check whether each MySQL command
succeeded. It displays an appropriate error message if any command fails.
Example:
<?php
$link = mysql_connect("localhost", "testuser", "testpw");
if (!$link) echo "Failed to connect to MySQL server!";
$status=mysql_select_db("testdb");
if (!$status) echo "Failed to select database!";
$result=mysql_query("SELECT * FROM quotes");
if (!$result) echo "The MySQL query failed!";
while($row = mysql_fetch_object($result)) {
echo "<p>$row->quote $row->author</p>"; }
?>
This example checks the results of the mysql_connect, mysql_select_db,
mysql_query, and mysql_fetch_object commands. All of these return a
FALSE value if they fail. The one condition that these do not account for is if
the query succeeds but returns a zero-row result. If this happens, the while
loop will end immediately without displaying any data.
233
USING MYSQL WITH PHP
12
516922 Ch12.F 9/26/02 11:40 AM Page 233
Note: Start with a basic HTML
document.
⁄ Type <?php and ?> to
begin and end the PHP script.
¤ Type mysql_connect
followed by the username,
host, and password to connect
to the MySQL server.
‹ Type mysql_select_db
followed by the database
name to select the database.
Note: This example uses the testdb
database and the scores table. You
can import this table from the
CD-ROM.
› Type $query= followed
by the MySQL query in
quotation marks.
ˇ Type $success =
mysql_query ($query); to
create the statement that
sends the query to the server.
Y
ou can use the mysql_query command in PHP to
send an INSERT query to the MySQL server. When
you do this, a result identifier is not returned because
an INSERT query does not return any data from the MySQL
server. Instead, the result returned from mysql_query is a
simple true or false value that indicates whether the
query was successful.
For example, the following PHP statements add a record to
the scores table and display a message indicating success or
failure:
$query="INSERT INTO scores (name, score)
VALUES ('Fred', 92)";
$success = mysql_query($query);
if ($success) echo "The INSERT query was
successful.";
else echo "Error: INSERT query failed.";
This example stores the query in the $query variable, and
then uses the mysql_query function to send the query to
the MySQL server. The result of the query is stored in the
$success variable. The if statement checks this variable
and displays a success message, and the else statement
displays an error message if the insert was unsuccessful.
Unlike SELECT queries, an INSERT query does not return a
result identifier. The result stored in the $success variable
will be a simple TRUE or FALSE value.
As with other MySQL queries, you must first connect to the
MySQL server using the mysql_connect function, and
then select a database with mysql_select_db before
attempting to insert a row. You must be connected using a
MySQL username that has the INSERT privilege for the
table you are using in the INSERT command.
Because double quotation marks are used to define the
$query string, you cannot use double quotes inside the
query. You can substitute single quotation marks within the
query. Only values to be stored in text columns need to be
quoted. You can use a PHP variable within the INSERT
query by including its name in the $query string.
INSERT A RECORD FROM PHP
MySQL
234
INSERT A RECORD FROM PHP
516922 Ch12.F 9/26/02 11:40 AM Page 234
Á Type if to begin the
statement that checks whether
the query succeeded, followed
by
echo and the success
message in quotation marks.
‡ Type else to begin the
statement that checks for an
error, and type
echo followed
by the error message.
° Load the PHP document
into a Web browser.
■ The displayed message
indicates whether the
INSERT query was
successful.
If a table includes an auto-increment column, it will automatically be updated with a new
unique value each time you insert a record. After you have inserted a row into a table from
PHP, you can use the mysql_insert_id function to find out what number was assigned to
the auto-increment field in the INSERT query.
This technique is useful because you now have a value that you can use to find the inserted
row in a subsequent query. Without this feature, you would have to use a separate query to
find the newest row, and even that may find a row inserted by a different user.
For example, the following PHP code inserts a row into the quotes table and then displays
the ID assigned to the auto-increment field.
Example:
$link=mysql_connect("localhost", "testuser", "testpw");
mysql_select_db("testdb");
$query = "INSERT INTO quotes (quote, author) VALUES ";
$query .= "('Union gives strength.', 'Aesop')";
$success = mysql_query($query);
if ($success) {
echo "The INSERT query was successful.";
echo "The record number is: " + mysql_insert_id();
} else echo "Error: INSERT query failed.";
You can optionally specify a link identifier from mysql_connect with the mysql_insert_id
function. If you do not use an identifier, the most recent connection used is assumed.
235
USING MYSQL WITH PHP
12
516922 Ch12.F 9/26/02 11:40 AM Page 235
Note: Start with a basic HTML
document.
Note: This example uses the scores
table in the testdb database.
⁄
Type <?php and ?> to
begin and end the PHP script.
¤
Type mysql_connect
followed by the username,
password, and hostname to
connect to the MySQL server.
‹
Type mysql_select_db
followed by the database
name to select the database.
›
Type $query= followed by
the DELETE query.
ˇ
Type $success=mysql_
query($query);
to send the
query to the server.
Y
ou can also use PHP to send a DELETE query to the
MySQL server. As with an INSERT query, when you
use the mysql_query function with a DELETE
query, a simple true or false result is returned that
indicates whether the delete was successful.
To delete one or more rows of a table, you usually will need
to specify a WHERE clause. Without this clause, all records of
the table would be deleted. The following PHP statements
send a DELETE query to the MySQL server:
$query="DELETE FROM scores WHERE name =
'fred'";
$success=mysql_query($query);
if ($success) echo "The DELETE query was
successful.";
else echo "Error: DELETE query failed.";
These statements store the query in the $query variable
and send it to the MySQL server using the mysql_query
function. The if statement displays a message if the
DELETE query succeeded, and the else statement displays
a message if the query failed.
Note that a failed query is not the same as a nonmatching
WHERE clause. If the WHERE clause does not match any
records, the mysql_query function will still succeed. The
query will only fail if the server cannot be reached, or if
there is a syntax error in the query.
You can find out how many rows were affected by the
DELETE query with the mysql_affected_rows function.
This function returns the number of rows affected by the
most recent DELETE, INSERT, or UPDATE query. You can
use this to determine how many rows the WHERE clause
matched.
DELETE RECORDS USING PHP
MySQL
236
DELETE RECORDS USING PHP
516922 Ch12.F 9/26/02 11:40 AM Page 236
Á Type if ($success) to
check whether the query is
successful, and type
echo
followed by a success
message.
‡ Type else echo followed by
the message to display if the
query fails.
° Load the PHP document
into a Web browser.
■ The message indicates
whether the query was
successful.
You can also use the mysql_query function in PHP to send an UPDATE query to the MySQL server
to modify one or more rows of a table. As with an INSERT or DELETE query, the result of an UPDATE
query is a TRUE or FALSE value indicating whether the query was successful. You can use the
mysql_affected_rows function to determine how many rows were affected by the UPDATE query.
The following example updates the quotes table. It uses the MySQL function UPPER to convert the
quote field of each row to uppercase, and then displays the number of affected rows.
Example:
<?php
mysql_connect("localhost", "testuser", "testpw");
mysql_select_db("testdb");
$query="UPDATE quotes SET quote = UPPER(quote)";
$result = mysql_query($query);
$numrows = mysql_affected_rows();
if ($result) echo "Rows updated: $numrows";
else echo "Error: UPDATE query failed.";
?>
As with other MySQL queries, the mysql_query function will return a TRUE value indicating
success even if no rows were modified by the query. This can happen if you have used a WHERE
clause that did not match any rows of the table. Your script can check the mysql_affected_rows
function to make sure the correct number of rows has been updated.
237
USING MYSQL WITH PHP
12
516922 Ch12.F 9/26/02 11:40 AM Page 237
Note: Start with a basic HTML
document.
Note: This example uses the quotes
table in the testdb database.
⁄
Type <form> and </form>
to define the HTML form.
¤
Type <input> to define the
form fields.
‹
Type <?php and ?> to
begin and end the PHP script.
›
Type if ($add) to begin a
statement that checks whether
the form has already been
submitted.
ˇ
Type mysql_connect
followed by the username,
password, and hostname to
connect to the MySQL server.
Á
Type mysql_select_db
followed by the database
name to select the database.
O
ne of the strengths of PHP is its ability to work
directly in an HTML document. You can create
an HTML form and use a PHP script in the same
document to write the data entered into the form to a
MySQL database. As an example, you can create an HTML
form and PHP script that allow you to add a row to the
quotes table.
The <form> tag in HTML starts an HTML form. You can use
the action attribute of the <form> tag to specify the CGI
or PHP program that handles the results of the form. In the
case of PHP, you can specify the same file that contains the
form itself. The following HTML defines a form that calls the
add.php script:
<form method="get" action="add.php">
Quote: <input type="text" name="quote"><br>
Author: <input type="text"
name="author"><br>
<input type="submit" name="add"
value="Submit">
</form>
After you have defined the form, you can create the PHP
script to handle the form results. PHP automatically stores
the form values as variables. In this case, the $quote and
$author variables store the entered data. You can make
these variables part of an INSERT query and send it to the
MySQL server with the mysql_query function. The
following PHP code adds a record from the form:
if ($add) {
mysql_connect("localhost", "testuser",
"testpw");
mysql_select_db("testdb");
$query="INSERT INTO quotes(quote, author)";
$query.=" VALUES( '$quote','$author')";
$result=mysql_query($query);
if ($result) echo "<b>Added one row
successfully.</b>";
}
The if statement checks the $add variable, which is set
when the Submit button has been clicked. The rest of the
script creates a query and sends it to the MySQL server.
CREATE A FORM TO ADD RECORDS
MySQL
238
CREATE A FORM TO ADD RECORDS
516922 Ch12.F 9/26/02 11:40 AM Page 238
‡ Type $query= followed by
the beginning of the MySQL
query.
° Type $query.= followed by
the conclusion of the MySQL
query.
· Type $result=mysql_
query($query); to send the
query to the MySQL server.
‚ Type if ($result) to check
the result, and type
echo
followed by a message to
display if the query was
successful.
— Load the PHP document
into a Web browser.
■ The HTML form is
displayed.
± Enter some data and click
the Submit button.
■ The form is displayed
again, and a message
indicates that the INSERT
query was successful.
The form in this example uses the <form> HTML tag to begin a
form. Within the <form> and </form> tags, you can use various
HTML tags to define form elements for different input types. This
example uses two different input types.
The <input type="text"> tag defines a text input field. The
name attribute assigns a name to the field. This name is used as
the PHP variable name to store the data entered into the field.
The <input type="submit"> tag is also used in this example.
This tag defines a Submit button. When you click this button, the
form data is submitted to the script specified in the action
attribute of the <form> tag. This tag has a name attribute to name
the button, and a value attribute to define the text displayed on
the button.
The Submit button in this example has the name add and the value
"Submit". As with other form fields, this name is used as a PHP
variable name when you submit the form to a PHP script. The if
statement within the PHP script checks for the $add variable to see
whether the form has already been submitted.
239
USING MYSQL WITH PHP
12
516922 Ch12.F 9/26/02 11:40 AM Page 239
Note: Start with a basic HTML
document.
Note: This example uses the quotes
table in the testdb database. You can
import this table from the CD-ROM.
⁄
Type <form> and </form>
to define the HTML form.
¤
Type <input> to define the
form fields.
‹
Type <?php and ?> to
begin and end the PHP script.
›
Type if ($submit) to begin
the statement that checks
whether the Submit button
has been clicked.
ˇ
Type echo followed by text
to display at the beginning of
the search results.
Á
Type mysql_connect
followed by the username,
password, and hostname to
connect to the MySQL server.
‡
Type mysql_select_db
("testdb"); to select the
database.
A
nother common application of PHP is to create a
search engine for a database. You can use an HTML
form and a short PHP script to search a table. The
PHP script runs a SELECT query using the value entered
into the form and displays the results.
As an example, you can create a form to search the quotes
table. The following HTML tags define the form:
<form method="get" action="search.php">
Search for: <input type="text"
name="search">
<input type="submit" name="submit"
value="Search">
</form>
This defines a form that sends data to search.php, the
filename of the current page. There is one text field named
search to specify a search term, and a Submit button named
submit. The PHP script can check for the submit button,
and if it has been clicked, display the results of a search.
The following section of PHP handles the search:
if ($submit) {
echo "Searching for: <b>$search</b><br>";
mysql_connect("localhost", "testuser",
"testpw");
mysql_select_db("testdb");
$query="SELECT * FROM quotes WHERE quote
LIKE '%$search%' ";
$result=mysql_query($query);
while ($row = mysql_fetch_object($result)) {
echo "Found: $row->quote $row->author<br>";
}
}
This code creates a SELECT query, placing the $search
value from the form into a WHERE clause. It then uses
mysql_query to submit the query to MySQL, and a while
loop with the mysql_fetch_object function to display
the results.
CREATE A DATABASE SEARCH FORM
MySQL
240
CREATE A DATABASE SEARCH FORM
516922 Ch12.F 9/26/02 11:40 AM Page 240
° Type $query= followed by
the SELECT query.
· Type $result=mysql_query
($query); to send the query to
the MySQL server.
‚ Type while followed by
the statement to fetch a row
from the result.
— Type echo to begin the
statement that displays the
search results.
± Load the PHP document
into a Web browser.
¡ Enter a search term and
click the Search button.
■ The results of the search
are displayed.
You can use a separate SELECT query using the COUNT(*) keyword to count the number of results
that will be returned from the query. This is useful in a large table, because displaying all of the rows
and counting them would be slow. It is also useful if your script needs to display data in multiple
pages. You can use the count to determine a LIMIT clause to use for each page of data.
The following PHP code could be added to the example to display a count before the search results.
Example:
$q="SELECT COUNT(*) FROM quotes AS c WHERE quote LIKE '%$search%' ";
$cr=mysql_query($q);
$r = mysql_fetch_object($cr);
echo "Number of quotes found: $r->c";
This example uses the $q variable to store the count query, and the $cr variable for the result of the
query. It retrieves a row of the result using mysql_fetch_object into the $r variable. Only a single
row is returned, and the $r->c field is the number of records found.
PHP also includes the mysql_num_rows function. This function accepts a result identifier as a
parameter, and returns the number of rows in the result. You can use this to find out how many rows
a SELECT query returned without using COUNT. However, this technique is very inefficient because
it requires the MySQL server to process the entire SELECT. It is better to use COUNT unless you will
be retrieving all of the rows from the SELECT query.
241
USING MYSQL WITH PHP
12
516922 Ch12.F 9/26/02 11:40 AM Page 241
P
erl, originally an acronym for Practical Extraction and
Report Language, is a sophisticated and powerful
language included on most UNIX systems. Perl is one
of the most popular languages for use with dynamic Web
pages, and includes everything you need to create powerful
applications that connect with MySQL databases.
This is only a brief introduction to Perl. For complete
documentation as well as downloadable versions of Perl and
other packages, visit the Perl web page: www.perl.com/.
INTRODUCING PERL
MySQL
242
The Perl Interpreter
After Perl is installed, the Perl interpreter, perl,is
available. This program reads Perl scripts and outputs their
results. The Perl interpreter is included on many Linux and
UNIX systems and can be installed on Windows.
Perl can also be handled by the mod_perl module of
the Apache Web server. This allows Perl scripts to be
handled efficiently by the Web server itself.
Basic Syntax
Perl files usually begin with a shell header that tells the
system where the Perl interpreter is located. The
following is a typical example:
#!/usr/local/bin/perl
After this line, the script can contain one or more Perl
statements. Each statement ends with a semicolon.
Create Output
The print command is the most common way to
create output in Perl. You can follow this command with
an expression in quotation marks. Perl also includes a
variety of other quoting methods to allow you to
efficiently specify text to be printed.
Example:
print "This is a test.";
Using Variables
Like most languages, Perl supports variables,or
containers that can store a value such as a number or text
string. Perl variables begin with the $ symbol, as in $text
and $score. You do not need to declare variables before
using them, and a variable can store any type of data.
Perl variables can be included in a text string if it uses
double quotes. Strings defined with single quotes are not
evaluated for variables. The following example defines a
variable called $text and then prints it with a message:
Example:
$text = "Hello there.";
print "Here is the text: $text";
Using Arrays
An array is a special type of variable that can store
multiple values, indexed with numbers or text strings.
Perl uses @ followed by the variable name to refer to an
array as a whole, and $ followed by the name and an
index in square brackets to refer to an element of the
array. The following example assigns values to two
elements of the score array:
Example:
$score[0]=59;
$score[1]=95;
Operators
Perl supports a number of standard operators. You can
use these within any Perl statement to work with
numbers or strings. Some of the most common
operators are described in the table.
OPERATOR MEANING
+ Addition
- Subtraction
* Multiplication
/ Division
% Modulo (remainder)
. Concatenation (combines strings)
516922 Ch13.F 9/26/02 11:40 AM Page 242
243
USING MYSQL WITH PERL
13
Regular Expressions
One of Perl's most powerful features is the ability to
work with regular expressions. These are patterns
consisting of text and special characters to search
strings of text. The following are some of the most
useful special characters within regular expressions:
CHARACTER DESCRIPTION
. Matches any character
^ Matches the beginning of a string
$ Matches the end of a string
* Repeats the previous character zero or
more times
+ Repeats the previous character one or
more times
? Repeats the previous expression zero or
one time
You can search using a regular expression with the =~
operator. The following example searches the $text
string for the text search followed by any number of
characters:
$text =~ /search.*/;
Loops
Perl supports loops, or blocks of statements that can be
repeated a number of times. The simplest of these is the
while loop, which checks a condition and repeats the
block of statements as long as the condition is true.
Example:
while ($num < 30) {
$num = $num + 1;
print "The number is $num.";
}
Packages
One of Perl's most powerful features is the ability to
add packages, or modules, that support additional
functions. For example, a package is available to work
with databases such as MySQL. To use a package in a
Perl script, add the use statement and the package
name at the beginning of the script.
Example:
use DBI;
Perl and MySQL
The DBI package adds numerous functions to Perl for
working with databases, tables, queries, and results. The
process of installing this package is explained in "Install
the Perl DBI," later in this chapter. Using the functions
provided by this package, you can do anything from Perl
that you can do from the MySQL monitor or other clients.
Conditional Statements
You can use the if statement in Perl to perform one or
more statements conditionally. This statement uses a
conditional expression followed by a block of Perl
statements enclosed in braces. For example, this if
statement displays a message if the $num variable has a
value greater than 30:
if ($num > 30) {print "It's bigger than
30.";}
The condition in an if statement can use a variety of
conditional operators. The table describes some of the
most common conditional operators.
OPERATOR MEANING
== Is equal to (numeric)
eq Is equal to (string)
!= Is not equal to (numeric)
ne Is not equal to (string)
> Is greater than (numeric)
< Is less than (numeric)
>= Is greater than or equal to
<= Is less than or equal to
&& Logical AND
|| Logical OR
516922 Ch13.F 9/26/02 11:40 AM Page 243
⁄ From the UNIX command
prompt, type
cd followed by
a directory name where the
source code will be stored
and press Enter.
¤ Type wget followed
by the URL for the source
distribution and press Enter.
■ The file is now
downloaded.
‹ Type tar zxf stable.tar.gz
and press Enter to extract the
Perl source files into their
own directory.
› Type cd perl-version and
press Enter, replacing version
with the current Perl version.
ˇ Type rm -f config.sh
Policy.sh and press Enter to
remove unneeded files.
Á Type sh Configure -de and
press Enter.
■ The Configure program
scans your system.
P
erl is included with most Linux distributions. If you
are using an operating system that does not include
Perl, or need to upgrade to the latest version, it is
easy to install from source code. Binary distributions are
also available for most systems. To test whether Perl is
already installed on your system, try the following
command at the command prompt:
perl -v
This command displays version information for the current
Perl installation, if any. If the command fails, either Perl is
not installed or your path is not configured correctly for the
perl command.
To install or upgrade Perl, download the latest source
distribution. This is available from the Perl Web page at
www.perl.com/. The download is in the form of a
compressed .tar.gz archive.
After you have expanded the files from this archive, run the
Configure script. This is an automated script that tests
various aspects of your system configuration and sets up
options to compile the source code. After the Configure
script is finished, you can use the following commands to
compile and install the Perl distribution:
make
make test
make install
You can also install Perl from a binary RPM package under
many Linux distributions, and a wide variety of other
packages are available. See the Downloads section at
www.perl.com for details. To install Perl on a Windows
system, see the section "Install Perl under Windows," later
in this chapter.
Perl can be expanded with modules that add support
for additional features, including the MySQL modules
described later in this chapter. Most of these are available
from CPAN, the Comprehensive Perl Archive Network,
along with a great deal of documentation for Perl. You can
reach CPAN at this URL: www.perl.com/CPAN/index.html.
INSTALL PERL UNDER UNIX
MySQL
244
INSTALL PERL UNDER UNIX
516922 Ch13.F 9/26/02 11:40 AM Page 244
‡ After Configure finishes,
type
make and press Enter.
■ This compiles the source
code. This may take several
minutes.
° Type make test and press
Enter.
■ This tests the Perl binaries
before installing them.
· Type make install and press
Enter.
■ The Perl files are now
installed.
Perl is included with many Linux distributions, and binary packages
are available for others. Most of these are available in a package
format such as RPM, which can be installed using a simple command,
and do not require you to configure or compile Perl yourself.
After you have installed the Perl interpreter, you can use Perl scripts
on the Web using the CGI interface with most Web servers. If you
are using the Apache Web server, you can also install the mod_perl
module. This module allows you to use Apache modules written in
Perl, and also interprets Perl scripts directly within the Web server,
while making more efficient use of system resources. This module is
available from the following URL: />The Apache Web server software itself is included with many Linux
distributions. You will need this or another Web server to use Perl
for Web applications. Apache is open source software and is
available from the Apache Software Foundation at the following
URL: www.apache.org/.
Perl can connect to many database systems, including MySQL,
with installable modules. The process of installing these modules
for MySQL support on most systems is explained in "Install the Perl
DBI" and "Install the MySQL DBD," later in this chapter.
245
USING MYSQL WITH PERL
13
516922 Ch13.F 9/26/02 11:40 AM Page 245
⁄ After you start the installer, a
Welcome message is displayed.
Click the Next button to begin
the installation.
■ The license agreement is
displayed.
¤ Accept the license
agreement and click Next
to continue.
I
f you are using MySQL on a Windows-based server,
Perl is also available in a Windows distribution. The most
popular Windows version of Perl is ActivePerl, developed
by ActiveState. The distribution for ActivePerl is available
from the following URL: www.activestate.com/ActivePerl/.
ActivePerl requires approximately 55MB of free disk space.
It also requires Internet Explorer 5.0 or later and Service
Pack 5 or later for Windows NT 4.0 systems. It should install
on most Windows 2000 and Windows XP systems without
additional software. The other system requirements are
listed on the download page.
ActivePerl is distributed as an .msi file. This is a format
used by Microsoft's Windows Installer utility. The installer is
included with Windows 2000 and Windows XP. For Windows
95, 98, or ME systems, you can download the installer from
Microsoft and install it before installing ActivePerl. A
package that uses an alternate installer is also available.
After you have downloaded ActivePerl, double-click the
.msi file to begin the installation. The Setup Wizard first
displays an introductory screen, and then displays the
ActivePerl license agreement. After you accept the
license agreement and click Next, you can choose which
components to install and the location for the installed files.
The final screen of the Setup Wizard asks whether to add
Perl to your PATH setting and whether to associate .pl files
with the Perl interpreter. Click Next from this screen, and
then click Install to complete the installation.
After the installation is complete, switch to the new PERL
directory from a command prompt window. Within this
directory you will find an example Perl script, example.pl.
Type perl example.pl to test this script. If it displays a
brief Hello message and no error messages, ActivePerl is
working on your system.
INSTALL PERL UNDER WINDOWS
MySQL
246
INSTALL PERL UNDER WINDOWS
516922 Ch13.F 9/26/02 11:40 AM Page 246