JQuery: Novice to Ninja- P18 potx
Bạn đang xem bản rút gọn của tài liệu. Xem và tải ngay bản đầy đủ của tài liệu tại đây (428.52 KB, 15 trang )
Licensed to
232 jQuery: Novice to Ninja
be drag and droppable, like it’s a web site from the future!” Fortunately for us,
jQuery lets us build web sites from the future.
Forms
HTML forms are old. And a bit clunky. And browsers vary wildly in how they deal
with them. Yet, thanks to JavaScript, these forms have become the basis for some
amazingly cool web applications. As always, if JavaScript can do it, jQuery can
make it fun!
We know the drill by now: form elements are DOM elements, so jQuery is great at
manipulating them. But form elements aren’t your typical DOM elements, so there
are a handful of special jQuery tricks for dealing with them more specifically. We’ve
seen quite a few of them throughout the book so far—but now it’s time to focus on
them a little more closely.
Simple Form Validation
Form validation is essential, even if it often seems boring. However, proper, well-
designed and implemented forms can make or break how your users perceive your
site. Who hasn’t had the experience of giving up on a web site because of a particu-
larly frustrating form?
Server-side Form Validation
Client-side form validation with jQuery should only be used to assist your users
in filling out a form, and should never be relied upon to prevent certain types of
data being sent to the server. Users with JavaScript disabled will be unhindered
by your jQuery validation, so they can submit any values they want. Because of
this, if there’s any security risk from users submitting malicious data through your
forms, that data needs to be thoroughly validated on the server side.
Although jQuery avoids dealing with the nitty-gritty of form validation, it does
provide some convenient methods for accessing and setting form values—and that’s
half the battle! You can select form fields like any other element, but there are some
extra filters to make your code more efficient and readable.
Licensed to
Licensed to
Forms, Controls, and Dialogs 233
The :input filter, for example, selects all elements that are inputs, select boxes,
textareas, or buttons. You’d use it as you would any filter. Here’s how we’d give all
of our form elements a lovely lemon chiffon background:
$('#myForm:input').css('background-color', 'lemonchiffon')
If you want to be more choosy about which elements you’re selecting, there are a
number of more specific form element filters: :text, :password, :radio, :checkbox,
:submit, :button, :image (for image buttons), and :file. And remember, you’re
free to apply multiple filters in a single selection.
Furthermore, there are some additional filters that let you select form elements
based on their state and value. The :enabled and :disabled filters will fetch ele-
ments based on their disabled attribute, and :checked and :selected help you
find radio buttons, select box items, and checkboxes that are checked or selected.
:checked and :selected in Conditional Logic
These filters are particularly helpful when you need to perform different actions
depending on the checked or selected state of a checkbox or radio button. For
example, you can check to see if a box is checked with
if($(this).is(':checked')).
After you’ve selected your elements, it’s time to find their values so you can validate
them against your requirements. We’ve already used the val function enough to
know what it does: it returns the value of a form field. We can now perform some
simple validation—let’s test to see if any text boxes in a form are empty:
chapter_07/01_simple_validation/script.js (excerpt)
$(':submit').click(function(e) {
$(':text').each(function() {
if ($(this).val().length == 0) {
$(this).css('border', '2px solid red');
}
});
e.preventDefault();
});
Licensed to
Licensed to
234 jQuery: Novice to Ninja
Fill out one or two of the text inputs, and try submitting the form; any input you
leave blank will be highlighted in red.
The val action works for select boxes and radio buttons too. As an example, let’s
alert the radio button value when the user changes the selection:
chapter_07/02_radio_buttons/script.js (excerpt)
$(':radio[name=sex]').change(function() {
alert($(this).val());
});
This change event is fired whenever a value in a form has changed. For checkboxes,
select boxes, and radio buttons, this occurs whenever the value changes from its
current value. For a text input or textarea, it fires whenever a user changes the
element’s value—but only when the focus is moved away from the element. This
is a great way to implement some simple inline validation.
Let’s revisit our simple validation example, except that this time we’ll test for empty
fields whenever the user moves to the next field. For this, we’ll need to capture the
blur event, which fires whenever a form field loses focus. This is perfect for inline
validation:
chapter_07/03_simple_inline_validation/script.js (excerpt)
$(':input').blur(function() {
if ($(this).val().length == 0) {
$(this)
.addClass('error')
.after('<span class="error">This field must … </span>');
}
});
$(':input').focus(function() {
$(this)
.removeClass('error')
.next('span')
.remove();
});
We’re just checking that the fields are filled in, but any type of validation can be
implemented in this way. You can check for a minimum or maximum number of
Licensed to
Licensed to
Forms, Controls, and Dialogs 235
characters, or a specific format using regular expressions, or check that a password
confirmation field matches the original password field.
Avoid Over-validating!
One important point to consider when designing form validation: keep it simple!
The more rules you add, the more likely you’ll have forgotten an edge case, and
wind up frustrating some of your users. Offer hints, sample inputs, and guidance,
instead of rules that will prevent users from submitting the form if their postal
code is formatted differently to what you expected!
The submit Event
We also can hook into the submit event, which is fired when the form’s submitted.
This is a better technique than listening for a click event on the submit button, as
it will also fire if the user submits the form by pressing the Enter key. If you return
false from the submit event handler, the form will not be submitted. In our example
below, we’ll check all of the text boxes in the form. If any are left empty, we’ll pop
up a message, and focus on the offending element:
chapter_07/04_submit_event/script.js (excerpt)
$("form").submit(function() {
var error = false;
$(this).find(":text").each(function() {
if ($(this).val().length == 0) {
alert("Textboxes must have a value!");
$(this).focus();
error = true;
return false; // Only exits the “each” loop
}
});
if (error) {
return false;
}
return true;
});
With all of these raw, form-based tools at your disposal you can easily add validation
to your forms on a page-by-page basis. If you plan your forms carefully and develop
a consistent naming standard, you can use jQuery to generalize your validation so
that it can apply to many forms.
Licensed to
Licensed to
236 jQuery: Novice to Ninja
But—as we’ve already seen—there are an enormous number of edge cases to consider
when designing form validation. If you need really bulletproof validation and would
rather spend your time designing the user interaction, perhaps you should consider
the Validation Plugin.
Form Validation with the Validation Plugin
Building your own inline validation system can be a daunting endeavor; you need
to know regular expressions to be able to verify that an email address or phone
number is valid, for example. The Validation plugin solves a lot of these problems
for you, and lets you add sophisticated and customizable inline validation to most
forms with minimal effort.
We’ll stop short of going over every option available for use with this plugin here
(that would fill a whole chapter!), but we’ll look at the most common ones.
Let’s start with the form. To illustrate as many of the different validation options,
we’ll go with a sign-up form that includes password and password confirmation
fields:
chapter_07/05_validation_plugin/index.html (excerpt)
<div id="signup">
<h2>Sign up</h2>
<form action="">
<div>
<label for="name">Name:</label>
<input name="name" id="name" type="text"/>
</div>
<div>
<label for="email">Email:</label>
<input name="email" id="email" type="text"/>
</div>
<div>
<label for="website">Web site URL:</label>
<input name="website" id="website" type="text" />
</div>
<div>
<label for="password">Password:</label>
<input name="password" id="password" type="password" />
</div>
<div>
Licensed to
Licensed to
Forms, Controls, and Dialogs 237
<label for="passconf">Confirm Password:</label>
<input name="passconf" id="passconf" type="password" />
</div>
<input type="submit" value="Submit!" />
</form>
</div>
To use the Validation Plugin, we simply need to call validate on a selection of our
form, passing it any options we want to use. The most important option is rules,
which is where you need to define rules used to validate the users’ input:
chapter_07/05_validation_plugin/script.js (excerpt)
$('#signup form').validate({
rules: {
name: {
required: true,
},
email: {
required: true,
email: true
},
website: {
url: true
},
password: {
minlength: 6,
required: true
},
passconf: {
equalTo: "#password"
}
},
success: function(label) {
label.text('OK!').addClass('valid');
}
});
There are a considerable number of predefined validation rules available, and of
course you can define your own. You’ll need to consult the documentation to learn
about all of them. Here we’ve used required, email, url, minlength, and equalTo.
Licensed to
Licensed to
238 jQuery: Novice to Ninja
required marks a field as required, so it will be flagged as an error if it’s empty.
email and url validate the format of the field; emails must contain an @, URLs must
begin with http://, and so on. Inside the rules object, we define an object for each
form field, named after the field’s id. minlength is self-explanatory (and, as you’d
expect, there’s a corresponding maxlength). Finally, equalTo allows us to specify
a jQuery selector pointing at another form field, the contents of which will be
checked against the current field to see if they’re the same.
The Validation plugin will add a new label element after each form field to contain
the error message; by default this will have a class of error, so you’re free to style
it in as stern a fashion as you’d like.
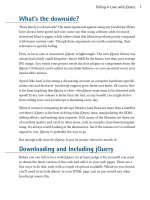
By default, the plugin will only display a message if a field’s value is invalid. User
research has shown, however, that users complete forms more quickly and confid-
ently if they’re also provided with feedback for correct entries. That’s why we’re
using the success callback to set the value of the message label, and giving it a
class to style it with a nice green check mark. success is passed the message element
itself, so you can manipulate it in any way you’d like. Our sample form is illustrated
mid-completion in Figure 7.1.
Figure 7.1. Inline validation with the Validation plugin
Licensed to
Licensed to
Forms, Controls, and Dialogs 239
It’s also possible to customize the error messages themselves, and it’s worth noting
that there are a number of localized variants in the localization folder of the plugin
directory.
This example is just the beginning of what’s possible with the Validation plugin.
Make sure you consult the documentation and the examples in the plugin’s demo
folder to explore all the available features.
Maximum Length Indicator
Our client wants to limit the feedback form content field to 130 characters. “Like
Twitter?” you ask. “Why would you want to do that?” He rambles off a spiel about
targeted feedback and attention span and … but we know he just wants to copy
Twitter. The “remaining characters” count is another feature making a comeback
these days, though the idea of setting a limit on the length of input is as old as
computers themselves.
By displaying the remaining characters next to the form field, users have clear ex-
pectations of how much they can type.
We’ll set a class of maxlength on the textarea we want to target with this effect.
Then, in our script, we append a span after it and add a new kind of event handler:
chapter_07/06_max_length_indicator/script.js (excerpt)
$('.maxlength')
.after("<span></span>")
.next()
.hide()
.end()
.keypress(function(e) {
// handle key presses;
});
After we append the span, the textarea is still the selected element. We want to
modify the new span, so we move to it with the next action. Then we hide the span,
but now we need to go back to our form element to add an event handler, so we use
the end action. The end action moves the jQuery selection back to where it was before
the last time you changed it. In our example, hide doesn’t change the selection, but
next does. So when we call end, the selection moves back to the state it was in before
we called next.
Licensed to
Licensed to
240 jQuery: Novice to Ninja
Now that we’re back on the form element, we attach a keypress event handler. As
you might expect, this event fires whenever a key is pressed. Here we can check
whether another character is still allowed—and prevent the user from adding more
characters if it’s not:
chapter_07/06_max_length_indicator/script.js (excerpt)
var current = $(this).val().length;
if (current >= 130) {
if (e.which != 0 && e.which != 8) {
e.preventDefault();
}
}
Now comes the meat of the effect: we grab the value of the element and use the
JavaScript length property to give us its length. If the current number of characters
is greater than the maximum length, we’ll prevent the key press from registering by
using the preventDefault action of the event.
When handling a keypress event, the event has a which property corresponding to
the ASCII code of the key pressed. Note that we’ve allowed the delete (ASCII code
0) and backspace (ASCII code 8) keys to function regardless of the number of
characters. If we didn’t do this, the user could paste in a response that exceeded
the limit—yet be unable to delete any characters to make it fit:
chapter_07/06_max_length_indicator/script.js (excerpt)
$(this).next().show().text(130 - current);
The last task to do is display the number of remaining characters in the span we
created. We move to the next element, make sure it’s visible, and display the results
of our simple calculation to indicate how many more characters are allowed.
Form Hints
A nice trick to decrease the amount of space a form takes up on the page is to move
the label for a form field inside the input itself. When users move their focus to the
field, the label magically vanishes, allowing them to start typing. If they leave the
field empty and move away, the original label text appears back in its place.
Licensed to
Licensed to
Forms, Controls, and Dialogs 241
This technique is only appropriate for short and simple forms. In larger forms, it’s
too easy for users to lose track of what each particular field is for in the absence of
visible labels. This can be a problem if they need to revisit or change values they’ve
already entered.
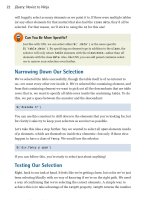
That said, for simple forms like login or search forms, where most users are very
familiar with what each field is for, it can be a great way to save space and streamline
your interface. Looking at Figure 7.2, you could probably come up with a good guess
of how to implement the effect yourself. The only tricky part is how to return the
default value to the input when the user moves on without entering anything into
it.
Figure 7.2. Form hints
If you guessed that we’d do it using the data action, you’d be correct. We’ll store
the default value in the data for each clearable item—and if the value is still empty
when the user leaves, we’ll restore it from there:
Licensed to
Licensed to
242 jQuery: Novice to Ninja
chapter_07/07_form_hints/script.js (excerpt)
$('input.clear').each(function() {
$(this)
.data('default', $(this).val())
.addClass('inactive')
.focus(function() {
$(this).removeClass('inactive');
if ($(this).val() == $(this).data('default') || '') {
$(this).val('');
}
})
.blur(function() {
var default_val = $(this).data('default');
if ($(this).val() == '') {
$(this).addClass('inactive');
$(this).val($(this).data('default'));
}
});
});
We need to go through each element and save the default value when the document
loads. Then we keep track of the focus and blur events that will fire whenever the
user moves into or out of our inputs. On focus, we test if the value of the text box
is the same as our default text; if it is, we clear the box in preparation for the user’s
input.
On the way out, we check to see if the text box is empty, and if it is we put the ori-
ginal value back in. We add and remove a class as we go; this allows us to style the
form fields differently when they’re displaying the hint. In our example, we’ve
simply made the text color a little lighter.
Check All Checkboxes
With text inputs firmly under our control, it’s time to move on to other form controls.
We’ll start off with a bugbear of StarTrackr’s users: there’s too much checkbox
ticking required when filling in the various celebrity information forms. This is
resulting in skewed data, bored users, and inaccurate reports on celebrities. Our
client has asked that each category of statistic have a “check all” box, so that the
user can toggle all of the checkboxes off or on at once.
Licensed to
Licensed to
Forms, Controls, and Dialogs 243
Knowing the jQuery form filters makes this task a walk in the park. We just have
to select all checkboxes in the same group, and check or clear them. The way we
group checkboxes together in HTML forms is by giving all of the related items the
same name:
chapter_07/08_check_all/index.html (excerpt)
<div class="stats">
<span class="title">Reason for Celebrity</span>
<input name="reason"
type="checkbox" value="net" />Famous on the internet<br/>
<input name="reason"
type="checkbox" value="crim" />Committed a crime<br />
<input name="reason"
type="checkbox" value="model" />Dates a super model<br />
<input name="reason"
type="checkbox" value="tv" />Hosts a TV show<br />
<input name="reason"
type="checkbox" value="japan" />Big in Japan<br />
<hr />
<input class="check-all"
name="reason" type="checkbox" /><span>Check all</span>
</div>
We’ve given the last checkbox the special class of check-all. This box will act as
our master checkbox: when it is checked or unchecked, our code springs to life.
First, we construct a selector string that will select all of the checkboxes with the
same name as the master checkbox. This requires gluing a few strings together, to
end up creating a selector that looks like :checkbox[name=reason].
We then set all of the related checkboxes to have the same checked value as our
master checkbox. Because our code is running after the user has changed the value,
the checked property will reflect the new state of the checkbox—causing all of the
related items to be either selected or deselected accordingly:
chapter_07/08_check_all/script.js (excerpt)
$('.check-all:checkbox').change(function() {
var group = ':checkbox[name=' + $(this).attr('name') + ']';
$(group).attr('checked', $(this).attr('checked'));
});
Licensed to
Licensed to
244 jQuery: Novice to Ninja
Performance Issues
If your page is large, trawling through every DOM node looking for checkboxes
can be slow. If you’re noticing pages becoming unresponsive, you might want to
investigate the context parameter of the jQuery selector, which limits where
jQuery will hunt for your selections. We’ll cover the context parameter in
Chapter 8.
Inline Editing
Inline editing (aka edit in place) was one of the first effects that truly showed Ajax’s
power to create naturally helpful controls. The first time you used an inline edit
box you were amazed; every time after that it was unnoticeable—it just worked like
it should work.
There are a number of ways you can recreate the effect. The easiest way is to disguise
your form fields as labels: remove the borders, give them the same background
color as your page, and add borders back in when the users focuses on it! This is a
great cheat, and means your form acts just like a regular one (because it is). However,
this can be tricky to accomplish, and require a lot of extra markup and styles if you
want many different parts of the page to be editable.
As a result, a more common approach is to allow the editing of non-form elements:
paragraph tags and title tags, for example. When the user clicks on the tag, the
contents are replaced with a text box or textarea that the user can interact with.
When the task is complete, the original tags are replaced with the new content.
We’ll use classes to mark content as being editable. For simple one-liners, we’ll use
input elements (by assigning the class editable), and for longer passages we’ll use
textareas (which we’ll give the class name editable-area). We’ll also be sure to
assign each element a unique id. This is so we can send the data to the server for
updating in the database, and reload the new data on the next pageload:
chapter_07/09_inline_editing/index.html (excerpt)
<h3 id="celeb-143-name" class="editable">Glendatronix</h3>
<p id="celeb-143-intro" class="editable-area">
Glendatronix floated onto the scene with her incredible debut …
</p>
Licensed to
Licensed to
Forms, Controls, and Dialogs 245
To make it work, we need to capture a few events. The first is the hover event, to
add an effect so the user can see that the element is editable (we’ll go with a tried
and tested yellow background color).
We also want to capture the click event—which will fire when the user clicks on
the editable content—and the blur event, which signifies the end of editing:
chapter_07/09_inline_editing/script.js (excerpt)
$(".editable, .editable-area")
.hover(function() {
$(this).toggleClass("over-inline");
})
.click(function(e) {
// Start the inline editing
}).blur(function(e) {
// End the inline editing
});
When the user clicks an editable area, our code kicks in. First, we grab a reference
to the element that was clicked and store it in the $editable variable (to prevent
us having to reselect it every time). We’ll also check for the active-inline class
with hasClass. If the element already has the active-inline class, it’s already an
edit box. We’d rather not replace the edit box with another edit box:
chapter_07/09_inline_editing/script.js (excerpt)
// Start the inline editing
var $editable = $(this);
if ($editable.hasClass('active-inline')) {
return;
}
Next up, we want to grab the contents of the element—and then remove it. To obtain
the contents we’ll just save the html data to a variable … but we’ll also use the
$.trim method to remove whitespace from the start and end of the content string.
This is necessary because, depending on how your HTML is laid out, the string
could have extra carriage returns and line spaces that we want to prevent showing
up in the text box.
Licensed to
Licensed to
246 jQuery: Novice to Ninja
Then we add our active class, which serves the dual purpose of indicating that
editing is in process, and providing a hook for our styles. Finally, we clear out the
current element with the empty action. This command is similar to remove, except
that calling empty on an element will result in all of its children being removed,
rather than the element itself:
chapter_07/09_inline_editing/script.js (excerpt)
var contents = $.trim($editable.html());
$editable
.addClass("active-inline")
.empty();
Chaining with empty and remove
It’s important to remember that any jQuery actions you chain after a remove or
empty command will be applied to the removed selection and not the selection
that you had before you removed the elements. The reasoning behind this is that
if you simply threw away the elements, they’d be lost forever. This way you have
the option to keep them around, process them, or store them for future use.
Finally, it’s time to insert our brand-new text box or textarea. We will check for
the editable class to determine which kind of form element we need to append
(remember that we indicated multiline content with editable-area). We set the
new element’s value with the contents of the elements we removed, and append it
to the target element:
chapter_07/09_inline_editing/script.js (excerpt)
// Determine what kind of form element we need
var editElement = $editable.hasClass('editable') ?
'<input type="text" />' : '<textarea></textarea>';
// Replace the target with the form element
$(editElement)
.val(contents)
.appendTo($editable)
.focus()
.blur(function(e) {
$editable.trigger('blur');
});
Licensed to