OBJECT-ORIENTED PHP Concepts, Techniques, and Code- P7 pot
Bạn đang xem bản rút gọn của tài liệu. Xem và tải ngay bản đầy đủ của tài liệu tại đây (366.57 KB, 10 trang )
The ThumbnailImage Class 41
Public Methods
Following the constructor is another public method with the name __destruct.
This method is known as a destructor. The double underscore (
__) in front of
the function name indicates that this method, like the constructor, is another
magic method. Again, it is a method newly introduced in PHP 5. (Recall from
Chapter 5 that magic methods happen in the background, like magic.)
public function __destruct(){
if(isset($this->image)){
imagedestroy($this->image);
}
}
While the use of destructors is new with PHP 5, anyone familiar with
other OO languages has probably already come across them. As its name
suggests, a destructor is the opposite of a constructor. A constructor initializes
an object, while a destructor frees up resources that a class may have allocated.
Generally, PHP does a good job of cleaning up after itself so destructors are
often not strictly necessary. It’s used here to ensure that the image resource
is disposed of.
Garbage Collection
Like Java, PHP employs a garbage collector to automatically clean up
resources. Because the programmer is not responsible for allocating and
freeing memory (as he is in a language like C++, for example), an automated
program must free up resources. The garbage collector determines when
objects are no longer used and then disposes of them, for example, when
they go out of scope. However, using destructors can act as a cue that speeds
up garbage collection. In the case of the
ThumbnailImage class, the destructor
disposes of the reduced image copy by calling the
imagedestroy function.
You can call the destructor directly but, as with other magic methods the
destructor is designed to be invoked in the background without any inter-
vention by the programmer.
Displaying the Image
Next to the constructor, getImage (see Listing 6-4) is the most important
method in the
ThumbnailImage class, because it actually sends a reduced image
to the browser. Its logic is simple: A header is sent to the browser announcing
what to expect, followed by the appropriate content.
public function getImage(){
header("Content-type: $this->mimetype");
switch($this->imageproperties[2]){
OOPHP_02.book Page 41 Friday, May 5, 2006 2:25 PM
42 Chapter 6
case IMAGETYPE_JPEG:
imagejpeg($this->image, "",
$this->quality);
break;
case IMAGETYPE_GIF:
imagegif($this->image);
break;
case IMAGETYPE_PNG:
imagepng($this->image, "",
$this->quality);
break;
default:
die("Couldn't create image.");
}
}
Listing 6-4: The
getImage method
Because .png and .jpeg image types support a reduction in quality, the
quality argument is included when the images are output. The proper MIME
type is sent to the browser first, and subsequently the image is sent in binary
format.
Get and Set Methods
Chapter 5 introduced the concept of private data members and discussed
how they create a need for accessor methods (also referred to as get and set
methods), which retrieve and change the value of data members. The
getMimeType method retrieves the MIME type of your thumbnail image.
(Recall that the value returned is a copy and not the original.)
public function getMimeType(){
return $this->mimetype;
}
You need to retrieve the value of the private variable mimetype when you
display your thumbnail. Merely retrieving the MIME type can do no harm, but
the same cannot be said of setting this value. The MIME type is set in the
constructor by looking at an image’s properties. Since this information can
be determined programmatically and since an image’s MIME type does not
change, there is no need to set this value. Hence, there is no set method to
match the get method. To say the same thing in another way,
$mimetype is a
read-only value and having only a get method contributes to data protection.
Image Quality
On the other hand, it makes sense to have both a set and get method for
image quality. The quality property of a
ThumbnailImage object is quite different
from an image’s MIME type and is not something that must remain fixed.
In fact, getting and setting the quality of an image is one of the requirements
that you set out to achieve when you designed this class. Let’s first look at the
method that sets image quality in Listing 6-5.
OOPHP_02.book Page 42 Friday, May 5, 2006 2:25 PM
The ThumbnailImage Class 43
public function setQuality($quality){
if
($quality > 100 || $quality < 1){
$quality = 75;
if($this->imageproperties[2] == IMAGETYPE_JPEG || $this-
>imageproperties[2] == IMAGETYPE_PNG){
$this->quality = $quality;
}
}
Listing 6-5: The
setQuality method
As you can see in this listing, negative values and values greater
than 100 are prohibited because they are not valid values for image quality.
Furthermore, .gif images don’t support alterations of the image quality, so
the second if statement checks for the appropriate image type before
changing the quality. A set method is superior to direct access to an object’s
properties because values can be tested and rejected, if need be, before they
are assigned. A set method allows you to restrict how the variable
quality is
changed by screening out illegal values.
While the need to control the way in which object properties are
changed is somewhat obvious, retrieving object properties through an
accessor method is also superior to directly accessing a public data member.
Because you can’t alter the quality of a GIF, there is no need to retrieve it,
and the
getQuality method (see Listing 6-6) reflects this.
public function getQuality(){
$quality = null;
if($this->imageproperties[2] ==
IMAGETYPE_JPEG || $this-
>imageproperties[2] == IMAGETYPE_PNG){
$quality = $this->quality;
}
return $quality;
}
Listing 6-6: The
getQuality method
Just as the setQuality method restricted changes to the quality of a .gif
image, the
getQuality method only returns a legitimate value if the image
is a .jpeg or .png. Otherwise,
null is returned.
Accessor methods are superior to direct access to public data members
because they restrict how a variable is changed and how it is retrieved. They
help ensure the integrity of your data and the functionality of the class as a
whole. Get and set methods allow you to ignore the fact that .gif images don’t
support a quality attribute in a way that unfettered public access cannot.
When to Change the Quality
In order to determine if the quality of an image needs reducing, it’s helpful
to know a bit more about the image. The
getInitialFileSize function returns
the image’s original size in bytes. This information helps you decide whether
to reduce the quality of an image and, if so, by how much.
OOPHP_02.book Page 43 Friday, May 5, 2006 2:25 PM
44 Chapter 6
public function getInitialFileSize(){
return $this->initialfilesize;
}
The code in this chapter doesn’t actually call this method, but you can
imagine the circumstances in which it might be useful.
Displaying a Thumbnail
The process of outputting a series of thumbnail images to the browser occurs
in two steps. First, you create a script that outputs an image; then you use
this script file as the source for an
img tag.
The code in Listing 6-7 shows the script file for outputting an image. It
retrieves the path and size from a query string and uses these values to con-
struct a thumbnail and then display it (in this chapter’s downloads, this is
the file
getthumb.php).
<?php
//this file will be the src for an img tag
require 'ThumbnailImage.php';
$path = $_GET["path"];
$maxsize = @$_GET["size"];
if(!isset($maxsize)){
$maxsize = 100;
}
if(isset($path)){
$thumb = new ThumbNailImage($path, $maxsize);
$thumb->getImage();
}
?>
Listing 6-7: Constructing and displaying a thumbnail image
When passed a query string describing the path to an image file and the
desired image size, this code outputs a thumbnail directly to the browser.
The
getImage method ( ) tells the browser the MIME type to expect and
then sends the image file in binary format.
NOTE Typing getthumb.php?path=graphics/filename.jpg into the browser address bar is
equivalent to pointing your browser directly at an image file. However, because you
want to output a series of pictures and control their position, you will use this file as
the
src attribute of an img tag.
Putting It All Together
The short piece of code in Listing 6-8 uses the DirectoryItems class together
with the
ThumbnailImage class to display all images within a directory, at
reduced sizes.
<?php
require 'DirectoryItems.php';
OOPHP_02.book Page 44 Friday, May 5, 2006 2:25 PM
The ThumbnailImage Class 45
$dc = new DirectoryItems('graphics');
$dc->imagesOnly();
$dc->naturalCaseInsensitiveOrder();
$path = "";
$filearray = $dc->getFileArray();
echo "<div style=\"text-align:center;\">";
echo "Click the filename to view full-sized version.<br />";
//specify size of thumbnail
$size = 100;
foreach ($filearray as $key => $value){
$path = "graphics/".$key;
/*errors in getthumb or in class will result in broken links
- error will not display*/
echo "<img
src=\"getthumb.php?path=$path&size=$size\" ".
"style=\"border:1px solid black;margin-top:20px;\" ".
"alt= \"$value\" /><br />\n";
echo "<a href=\"$path\" target=\"_blank\" >";
echo "Title: $value</a> <br />\n";
}
echo "</div><br />";
?>
Listing 6-8: Displaying all the images in a directory at reduced size
As shown in Listing 6-8, you first construct a DirectoryItems object
and pass it the directory named
graphics. You filter non-image files with the
imagesOnly function, and the path is passed as a query string to the getthumb.php
file, which, in turn, is assigned to
the src attribute of an img tag.
This may seem strange at first, but the
getthumb.php file contains all the
information that the browser needs to display an image. However, if there
are any errors in this file or in the thumbnail class file, the image will fail to
display, and there will be no warning or error message, regardless of how
you have configured your
php.ini file. The error message will simply be
interpreted as the binary output expected by the
img tag.
NOTE In order to see error messages and warnings when debugging the ThumbnailImage class
file, you need to call the
getthumb.php file directly and not set it as the src for an img
tag. Do this by hard-coding an image filename directly into the
getthumb.php file and
typing
getthumb.php in the browser address bar.
Where to Go from Here
Using the ThumbnailImage class enhances your ability to display a directory of
images by reducing the size of the images. This is a definite improvement in
both aesthetics and performance, because small images download faster and
use up less screen real estate.
But what if the image directory contains a few hundred or even a few
thousand images? Showing a large number of image files, even if they’re only
thumbnails, places unacceptable demands on server and client resources, and
creates a web page that is far too long. You need to limit the number of images
that display at any one time. Chapter 7 tackles this problem.
OOPHP_02.book Page 45 Friday, May 5, 2006 2:25 PM
OOPHP_02.book Page 46 Friday, May 5, 2006 2:25 PM
7
BUILDING THE
PAGENAVIGATOR CLASS
When there are a large number of images
in a directory, it’s not desirable to display
all of them on one web page because doing
so will probably create a very large and long page.
Web pages should be of reasonable length and should
not take too long to download. Rather than dumping all
your images onto one page, use a page navigator to step through them in an
orderly fashion. This chapter will take on the task of creating a navigator class;
Chapter 8 will use this class in conjunction with the
DirectoryItems class.
Before you can create a page navigator, you need to determine how it
should behave. Keep its design flexible and make sure that its appearance is
easily configurable so that it can blend with the style of any particular page.
How Will the Navigator Behave?
A good starting point is to look at the navigator at the bottom of a Google
query page. When searching Google, the default settings show 10 results per
page and the navigator appears across the bottom of the page. One navigates
by clicking the Previous or Next links, by choosing a page number, or by
OOPHP_02.book Page 47 Friday, May 5, 2006 2:25 PM
48 Chapter 7
clicking one of the many “o”s in Google. If your query returns a large
number of pages, not all pages are shown in the page navigator. Records are
ordered by relevance to the search criteria. Given this ordering scheme,
there is little incentive to move to the last page of results and, in fact, there
is no easy way of doing so.
Different Kinds of Searches
However, in many cases, searches return a relatively small number of items,
and records are often ordered alphabetically. In situations such as this there
should be an easy way to move to the beginning and the end pages, in addition
to being able to move Previous and Next. Too, as with Google, the ability to
configure the number of items shown per page is also desirable.
You should also limit the number of pages or links shown at any one time
by your page navigator and make this option configurable to accommodate
different needs and situations. For example, if you have 2,000 items to display
and you’re showing 10 items per page, it’s probably not advisable to show all
200 links across the bottom of one page. But at the same time, you should show
the total number of pages and identify the current page so that the user is
not left in the dark.
Finally, the display style of navigation buttons should be configurable so
that they match the design of an existing page. The best way to do this is to
assign them a class name and manipulate their style using Cascading Style
Sheets (CSS).
What Will It Look Like?
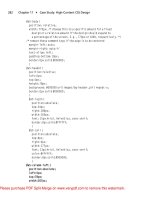
In sum, you will design a page navigator that will look something like
Figure 7-1.
Figure 7-1: Your page navigator design
In this particular example, the maximum number of pages shown by
your navigator is 7. The total number of pages is 12, and the link to the
current page, 4, is disabled (indicated above by an italicized number). Each
button and page number functions as a hyperlink (except for that of the
current page). The button labeled |< displays the first page, and the button
labeled >| displays the last page. In this particular example, the Next button
displays page 5, and the Prev button displays page 3.
Now look at Figure 7-1 again, and note that pages 8 through 12 are not
displayed. You can go directly to page 12 by clicking the >| button, but there
is no way to go directly to pages 8 through 11. At what point should links to
these pages become visible?
Apply this question to the Google navigator, and you’ll see that the
answer is not very straightforward. Among other things, it depends on the
direction you want to move and the number of items your search returns.
OOPHP_02.book Page 48 Friday, May 5, 2006 2:25 PM
Building the PageNavigator Class 49
In some situations, the number of page links shown doubles. You probably
don’t want to emulate this behavior, because your navigator will be used in
a variety of situations, and in some cases space will be at a premium.
If you look more closely at a Google query, you can get a few hints about
how to implement other desired behavior. For instance, try the following:
Perform a Google query and put your mouse over one of the page number
links in the navigator. If you look at the status bar of your browser, you see a
query string that includes the variable
start. If you haven’t changed Google’s
default setting of 10 items per page, the value assigned to this variable is
always a multiple of 10 that increases by 10 as the page numbers increase.
You’ll use a similar technique in your page navigator. Your navigator will
be a series of hyperlinks, each including a query string containing a page num-
ber indicating an offset from the start.
The Code
Go ahead and download the code for your page navigator, and look it over.
Notice that there are considerably more data members than in other classes
discussed so far. Names have been chosen in an attempt to make the purpose
of the variable explicit, and related variables have been grouped. We’ll discuss
these variables in the order in which they appear in the class file.
private $pagename;
The variable $pagename is the name of the page that will contain the
page navigator control. It could be replaced by
$_SERVER['PHP_SELF'], but by
using a variable, you can accommodate situations where the Apache module
mod_rewrite is being used to rewrite URLs. It’s designed to hold a string.
private $totalpages;
$totalpages
is a convenient way to refer to the total number of pages
required to display all the items in your list of images. It is calculated from
the total number of items and the number of items shown per page. Its value
will be an integer.
private $recordsperpage;
private $maxpagesshown;
$recordsperpage
is the number of items shown on a page and $maxpagesshown
is the maximum number of links to additional pages shown on any one page.
The former affects the length of the page, while the latter affects the width of
the navigator. Again, these are intended to be integer variables.
private $currentstartpage;
private $currentendpage;
private $currentpage;
$currentstartpage
, $currentendpage, and $currentpage are best understood
using a visual example. Refer back to Figure 7-1; these would be 1, 7, and 4,
respectively.
OOPHP_02.book Page 49 Friday, May 5, 2006 2:25 PM
50 Chapter 7
The next four variables are string variables that hold the HTML code
necessary to display inactive links.
//next and previous inactive
private $spannextinactive;
private $spanpreviousinactive;
//first and last inactive
private $firstinactivespan;
private $lastinactivespan;
If you are currently on the first page, moving to a previous page or to the
first page itself wouldn’t make sense. These variables will be used in place of
active hyperlinks. Inactive links will be enclosed by
span tags. Assigning a CSS
class name to these spans allows their appearance to be manipulated by a
style sheet.
$firstparamname and $params are data members that will form the query
string in each hyperlink in your navigator.
//must match $_GET['offset'] in calling page
private $firstparamname = "offset";
//use as "&name=value" pair for getting
private $params;
$firstparamname
is assigned a default value of “offset.” While the additional
parameters contained in
$params may or may not be added to the query string,
the use of the “offset” parameter is not optional; this variable’s name must
always be matched by a
$_GET['offset'] in the page that contains your navi-
gator. The
$firstparamname will perform the same function as start in a Google
query string—you will always need to know where the current page is relative
to the start page. The variable
$params will hold any other name/value pairs
that may be needed as part of a query string. (You’ll learn more about this in
Chapter 9.)
The next set of variables are string values that hold the CSS class names
for the page navigator and its elements.
//css class names
private $divwrappername = "navigator";
private $pagedisplaydivname = "totalpagesdisplay";
private $inactivespanname = "inactive";
You’ve assigned default values to each of these variables, but they all have
set and get methods so a client programmer can change them in order to
match existing CSS classes if need be.
$divwrappername is the name of the div
tag that encloses the complete navigator.
$pagedisplaydivname allows you to
separately manipulate the display of the message relating the current page
and total number of pages, such as page 4 of 12. You only need one class
name for all of your inactive spans, because you want them all to have the
same look.
OOPHP_02.book Page 50 Friday, May 5, 2006 2:25 PM