Beginning PHP6, Apache, MySQL Web Development- P6 ppt
Bạn đang xem bản rút gọn của tài liệu. Xem và tải ngay bản đầy đủ của tài liệu tại đây (648.66 KB, 30 trang )
Chapter 4: Using Tables to Display Data
121
How It Works
First, the script used the ALTER TABLE command to add the appropriate fields to the existing movie
table, and then it used the
UPDATE command to insert the new data into those fields. If you aren ’ t
familiar with these commands, you should consider reviewing Chapter 3 again.
Now that you have the data in place, you need to create a new page that you ’ ll use to display the extra
movie information (
movie_details.php ).
T ry It Out Displaying Movie Details
In this exercise, you ’ ll create a new page to display the data you added in the previous exercise.
1. Open your text editor, and type the following program:
< ?php
// take in the id of a director and return his/her full name
function get_director($director_id) {
global $db;
$query = ‘SELECT
people_fullname
FROM
people
WHERE
people_id = ‘ . $director_id;
$result = mysql_query($query, $db) or die(mysql_error($db));
$row = mysql_fetch_assoc($result);
extract($row);
return $people_fullname;
}
// take in the id of a lead actor and return his/her full name
function get_leadactor($leadactor_id) {
global $db;
$query = ‘SELECT
people_fullname
FROM
people
WHERE
people_id = ‘ . $leadactor_id;
$result = mysql_query($query, $db) or die(mysql_error($db));
$row = mysql_fetch_assoc($result);
extract($row);
c04.indd 121c04.indd 121 12/10/08 5:45:20 PM12/10/08 5:45:20 PM
Part I: Movie Review Web Site
122
return $people_fullname;
}
// take in the id of a movie type and return the meaningful textual
// description
function get_movietype($type_id) {
global $db;
$query = ‘SELECT
movietype_label
FROM
movietype
WHERE
movietype_id = ‘ . $type_id;
$result = mysql_query($query, $db) or die(mysql_error($db));
$row = mysql_fetch_assoc($result);
extract($row);
return $movietype_label;
}
// function to calculate if a movie made a profit, loss or just broke even
function calculate_differences($takings, $cost) {
$difference = $takings - $cost;
if ($difference < 0) {
$color = ‘red’;
$difference = ‘$’ . abs($difference) . ‘ million’;
} elseif ($difference > 0) {
$color =’green’;
$difference = ‘$’ . $difference . ‘ million’;
} else {
$color = ‘blue’;
$difference = ‘broke even’;
}
return ‘ < span style=”color:’ . $color . ‘;” > ’ . $difference . ‘ < /span > ’;
}
//connect to MySQL
$db = mysql_connect(‘localhost’, ‘bp6am’, ‘bp6ampass’) or
die (‘Unable to connect. Check your connection parameters.’);
mysql_select_db(‘moviesite’, $db) or die(mysql_error($db));
// retrieve information
$query = ‘SELECT
movie_name, movie_year, movie_director, movie_leadactor,
movie_type, movie_running_time, movie_cost, movie_takings
FROM
movie
WHERE
c04.indd 122c04.indd 122 12/10/08 5:45:21 PM12/10/08 5:45:21 PM
Chapter 4: Using Tables to Display Data
123
movie_id = ‘ . $_GET[‘movie_id’];
$result = mysql_query($query, $db) or die(mysql_error($db));
$row = mysql_fetch_assoc($result);
$movie_name = $row[‘movie_name’];
$movie_director = get_director($row[‘movie_director’]);
$movie_leadactor = get_leadactor($row[‘movie_leadactor’]);
$movie_year = $row[‘movie_year’];
$movie_running_time = $row[‘movie_running_time’] .’ mins’;
$movie_takings = $row[‘movie_takings’] . ‘ million’;
$movie_cost = $row[‘movie_cost’] . ‘ million’;
$movie_health = calculate_differences($row[‘movie_takings’],
$row[‘movie_cost’]);
// display the information
echo < < < ENDHTML
< html >
< head >
< title > Details and Reviews for: $movie_name < /title >
< /head >
< body >
< div style=”text-align: center;” >
< h2 > $movie_name < /h2 >
< h3 > < em > Details < /em > < /h3 >
< table cellpadding=”2” cellspacing=”2”
style=”width: 70%; margin-left: auto; margin-right: auto;” >
< tr >
< td > < strong > Title < /strong > < /strong > < /td >
< td > $movie_name < /td >
< td > < strong >
Release Year < /strong > < /strong > < /td >
< td > $movie_year < /td >
< /tr > < tr >
< td > < strong > Movie Director < /strong > < /td >
< td > $movie_director < /td >
< td > < strong > Cost < /strong > < /td >
< td > $$movie_cost < td/ >
< /tr > < tr >
< td > < strong > Lead Actor < /strong > < /td >
< td > $movie_leadactor < /td >
< td > < strong > Takings < /strong > < /td >
< td > $$movie_takings < td/ >
< /tr > < tr >
< td > < strong > Running Time < /strong > < /td >
< td > $movie_running_time < /td >
< td > < strong > Health < /strong > < /td >
< td > $movie_health < td/ >
< /tr >
< /table > < /div >
< /body >
< /html >
ENDHTML;
? >
c04.indd 123c04.indd 123 12/10/08 5:45:21 PM12/10/08 5:45:21 PM
Part I: Movie Review Web Site
124
2. Save it as movie_details.php , and upload it to the web server.
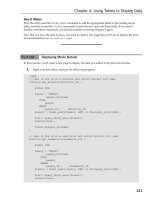
3. Open table3.php in your browser, and click on one of the movie links. It will open
movie_details.php , and you will see something like Figure 4 - 6 .
Figure 4-6
How It Works
Three of the four custom functions at the start of the script should be familiar to you:
get_director() , get_leadactor() , and get_movietype() . Each accepts an id key and
translates it into the corresponding human - friendly value by performing a database lookup in the
appropriate table. In effect, you can think of functions as tiny custom programs that exist within a
larger script — they take in some information, process it, and return some result.
The fourth custom function,
calculate_differences() , generates an HTML string to show
whether a movie made a profit, lost money, or broke even. It accepts the movie ’ s takings and the
production cost, then subtracts the cost from the takings to find the difference. An
if statement is used
to further refine the output. If the movie lost money, then the difference will be negative, so the first
block of code sets the color to red and trims the leading negative sign by converting the difference to
its absolute value with
abs() . If the difference is positive, then the movie made money, and the
amount will be set in green. The final clause sets the color blue in case the movie broke even
financially.
The script connects to the database and retrieves the movie information from the movie table. The
WHERE clause of the query will make sure that this information is for the requested movie, because it
compares the
movie_id field with the value passed in to this script through the URL. You ’ ll notice,
c04.indd 124c04.indd 124 12/10/08 5:45:21 PM12/10/08 5:45:21 PM
Chapter 4: Using Tables to Display Data
125
though, that this time you didn ’ t use extract() to retrieve the field information after the query.
Instead, you ’ re assigning them directly from the
$row array into variables of their own. This is because
you ’ re not using the values as they are, but rather appending ‘ mins ’ to the running time and ‘ million ’
to the amounts.
Then the
calculate_differences() function is called, and the returned HTML code is saved as
$movie_health . After that, the information is displayed back to the user in an HTML - formatted
table, using
echo and heredoc syntax.
A Lasting Relationship
What if you wanted to find all the reviews for a particular movie? As it stands, you ’ d need to create a
new SQL query in the
movies_details.php page and execute it when the page loaded, which would
make a total of two SQL queries in one page. It would work, but it would not be very efficient. (We ’ re all
efficient coders, aren ’ t we?) This also results in unnecessary code.
It ’ s time to answer the question: What ’ s a relationship?
A relationship is a way of joining tables so that you can access the data in all those tables. The benefit of
MySQL is that it is a relational database and, as such, supports the creation of relationships between
tables. When used correctly (this can take a bit of time to get your head around), relationships can be
very, very powerful and can be used to retrieve data from many, many tables in one SQL query.
The best way to demonstrate this is to build upon what you have done so far, so let ’ s do it.
Try It Out Creating and Filling a Movie Review Table
Before you can access movie reviews in your movie review table, you need to create the table and then
fill it with data.
1. Open your text editor, and type the following code:
< ?php
$db = mysql_connect(‘localhost’, ‘bp6am’, ‘bp6ampass’) or
die (‘Unable to connect. Check your connection parameters.’);
mysql_select_db(‘moviesite’, $db) or die(mysql_error($db));
//create the reviews table
$query = ‘CREATE TABLE reviews (
review_movie_id INTEGER UNSIGNED NOT NULL,
review_date DATE NOT NULL,
reviewer_name VARCHAR(255) NOT NULL,
review_comment VARCHAR(255) NOT NULL,
review_rating TINYINT UNSIGNED NOT NULL DEFAULT 0,
KEY (review_movie_id)
)
ENGINE=MyISAM’;
c04.indd 125c04.indd 125 12/10/08 5:45:21 PM12/10/08 5:45:21 PM
Part I: Movie Review Web Site
126
mysql_query($query, $db) or die (mysql_error($db));
//insert new data into the reviews table
$query = < < < ENDSQL
INSERT INTO reviews
(review_movie_id, review_date, reviewer_name, review_comment,
review_rating)
VALUES
(1, “2008-09-23”, “John Doe”, “I thought this was a great movie
Even though my girlfriend made me see it against my will.”, 4),
(1, “2008-09-23”, “Billy Bob”, “I liked Eraserhead better.”, 2),
(1, “2008-09-28”, “Peppermint Patty”, “I wish I’d have seen it
sooner!”, 5),
(2, “2008-09-23”, “Marvin Martian”, “This is my favorite movie. I
didn’t wear my flair to the movie but I loved it anyway.”, 5),
(3, “2008-09-23”, “George B.”, “I liked this movie, even though I
Thought it was an informational video from my travel agent.”, 3)
ENDSQL;
mysql_query($query, $db) or die(mysql_error($db));
echo ‘Movie database successfully updated!’;
? >
2. Save this file as db_ch04 - 2.php , and open it in your browser. Your reviews table has now
been created as well as populated.
How It Works
By now you should be familiar with creating tables using MySQL and PHP, so this should be pretty
self - explanatory. If you ’ re having trouble, you might want to go back and review the relevant sections
in Chapter 3 .
Try It Out Displaying the Reviews
In this example, you ’ re going to link two tables (movies and reviews) and show the reviews for a
particular movie. This requires a lot of changes to the
movie_details.php page, so you would be
best served by making a backup copy of the file, as you can ’ t ever be too careful. If you make any
mistakes, then you can always revert back to your original version. To display the reviews, follow
these steps:
1. Add this code to the top of movie_details.php :
// function to generate ratings
function generate_ratings($rating) {
$movie_rating = ‘’;
for ($i = 0; $i < $rating; $i++) {
$movie_rating .= ‘ < img src=”star.png” alt=”star”/ > ’;
}
return $movie_rating;
}
c04.indd 126c04.indd 126 12/10/08 5:45:22 PM12/10/08 5:45:22 PM
Chapter 4: Using Tables to Display Data
127
2. Now split the tail end of the heredoc block that outputs the movie ’ s information so that there
are two:
< td > < strong > Health < /strong > < /td >
< td > $movie_health < td/ >
< /tr >
< /table >
ENDHTML;
echo < < < ENDHTML
< /div >
< /body >
< /html >
ENDHTML;
3. Add this code between the two heredoc blocks to fill the break you just made:
// retrieve reviews for this movie
$query = ‘SELECT
review_movie_id, review_date, reviewer_name, review_comment,
review_rating
FROM
reviews
WHERE
review_movie_id = ‘ . $_GET[‘movie_id’] . ‘
ORDER BY
review_date DESC’;
$result = mysql_query($query, $db) or die(mysql_error($db));
// display the reviews
echo < < < ENDHTML
< h3 > < em > Reviews < /em > < /h3 >
< table cellpadding=”2” cellspacing=”2”
style=”width: 90%; margin-left: auto; margin-right: auto;” >
< tr >
< th style=”width: 7em;” > Date < /th >
< th style=”width: 10em;” > Reviewer < /th >
< th > Comments < /th >
< th style=”width: 5em;” > Rating < /th >
< /tr >
ENDHTML;
while ($row = mysql_fetch_assoc($result)) {
$date = $row[‘review_date’];
$name = $row[‘reviewer_name’];
$comment = $row[‘review_comment’];
$rating = generate_ratings($row[‘review_rating’]);
c04.indd 127c04.indd 127 12/10/08 5:45:22 PM12/10/08 5:45:22 PM
Part I: Movie Review Web Site
128
echo < < < ENDHTML
< tr >
< td style=”vertical-align:top; text-align: center;” > $date < /td >
< td style=”vertical-align:top;” > $name < /td >
< td style=”vertical-align:top;” > $comment < /td >
< td style=”vertical-align:top;” > $rating < /td >
< /tr >
ENDHTML;
}
4. Save the file as movie_details.php (overwriting the existing one — we hope you have
made a backup copy, as suggested).
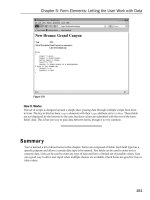
5. Upload the file to your web server, load table3.php , and click a movie.
You ’ ll see something similar to Figure 4 - 7 .
Figure 4-7
How It Works
The generate_ratings() function is fairly straightforward. You send it the value that is in the
ratings field for a movie, and it creates an HTML string of rating images for that movie and returns it.
Notice that you are using
.= to ensure that movies with a rating of more than 1 will get additional
images added to the single rating image.
c04.indd 128c04.indd 128 12/10/08 5:45:22 PM12/10/08 5:45:22 PM
Chapter 4: Using Tables to Display Data
129
By splitting the heredoc block into two sections, you made room to insert the HTML code that
displays the reviews without breaking your page layout. The first portion displays the opening HTML
tags and the details table, while the second portion displays the closing tags for the page.
The MySQL query retrieves all the reviews for the movie with the appropriate
review_movie_id . The ORDER BY phrase of the query instructs MySQL to sort the results first
in chronologically descending order. After that, the fields are extracted from the result set and
displayed as a row in the table.
You ’ ve made quite a few changes in this section. But, as you can see, the changes have been well
worth it. Now you know how to use MySQL to create relationships between tables. You successfully
retrieved all the reviews from the review table, depending on the
movie_id variable. You also looked
at using the
$_GET superglobal array to pass values from one page to another.
Summary
You ’ ve learned how to work with HTML tables to display your data, how to pull data from more than
one database table and have it displayed seamlessly with data from another table, and how to create
dynamic pages that display detailed information about the rows in your database. You can also include
images to graphically display data to your web site visitors, as with this chapter ’ s example of using
rating stars.
So far, you ’ ve hard - coded all the additions to the database yourself, which isn ’ t very dynamic. In
Chapter 6 , we ’ ll teach you how to let the user add items to the database and edit them. But first, you
need to know how to use forms with PHP, which is the subject of our next chapter.
Exercises
1. Add an entry in the top table of your movie_details.php file that shows the average rating
given by reviewers.
2. Change each column heading of the reviews table in your movie_details.php to a link that
allows the user to sort by that column (i.e., the user would click on “ Date ” to sort all the reviews
by date).
3. Alternate the background colors of each row in the review table of your movie_details.php
file to make them easier to read. Hint: odd - numbered rows would have a background of one
color, even - numbered rows would have a background of another color.
c04.indd 129c04.indd 129 12/10/08 5:45:23 PM12/10/08 5:45:23 PM
c04.indd 130c04.indd 130 12/10/08 5:45:23 PM12/10/08 5:45:23 PM
5
Form Elements: Letting the
User Work with Data
An interactive web site requires user input, which is generally gathered through forms. As in the
paper - based world, the user fills in a form and submits its content for processing. In a web
application, the processing isn ’ t performed by a sentient being; rather, it is performed by a PHP
script. Thus, the script requires some sort of coded intelligence.
When you fill in a paper form, you generally use a means to deliver its content (the postal service
is one example) to a known address (such as a mail - order bookstore). The same logic applies to
online forms. The data from an HTML form is sent to a specific location and processed.
The form element is rather simple in HTML. It states where and how it will send the contents of the
elements it contains once submitted. It is after that point that PHP comes into play. PHP uses a set of
simple yet powerful expressions that, when combined, provide you with the means to do virtually
anything you want. The PHP script receives the data from the form and uses it to perform an action
such as updating the contents of a database, sending an e - mail, testing the data format, and so on.
In this chapter, you begin to build a simple application that allows you to add, edit, or delete
members of a data set (in this instance, the data will be movies, actors, and directors). This chapter
welcomes you into a world of PHP/MySQL interaction by covering the following:
Creating forms using buttons, text boxes, and other form elements .
Creating PHP scripts to process HTML forms .
Passing hidden information to the form - processing script via hidden form controls and a
URL query string .
Your First Form
As a wise man once said, “ Every journey starts with a single step. ” To start this particular journey,
you will focus on a very simple form. It will include only a text field and a submit button. The
processing script will display only the value entered in the text field.
❑
❑
❑
c05.indd 131c05.indd 131 12/10/08 5:45:36 PM12/10/08 5:45:36 PM
Part I: Movie Review Web Site
132
Try It Out Say My Name
In this exercise, you are going to get PHP to respond to a name entered in a form. This is a simple
variation of the commonly used “ hello world ” program, allowing you to take your first step into
interactivity.
1. Create form1.html with your favorite text editor.
2. Enter the following code:
< html >
< head >
< title > Say My Name < /title >
< /head >
< body >
< form action=”formprocess1.php” method=”post” >
< table >
< tr >
< td > Name < /td >
< td > < input type=”text” name=”name” / > < /td >
< /tr > < tr >
< td colspan=”2” style=”text-align: center;” >
< input type=”submit” name=”submit” value=”Submit” / > < /td >
< /tr >
< /table >
< /form >
< /body >
< /html >
3. Create another empty file named formprocess1.php , and enter the following code:
< html >
< head >
< title > Say My Name < /title >
< /head >
< body >
< ?php
echo ‘ < h1 > Hello ‘ . $_POST[‘name’] . ‘! < /h1 > ’;
? >
< pre >
< strong > DEBUG: < /strong >
< ?php
print_r($_POST);
? >
< /pre >
< /body >
< /html >
4. Open form1.html in your browser.
5. Type your name in the name text box (as shown in Figure 5 - 1 ), and click the Submit button.
c05.indd 132c05.indd 132 12/10/08 5:45:37 PM12/10/08 5:45:37 PM
Chapter 5: Form Elements: Letting the User Work with Data
133
You can see two distinct parts on the resulting page: the “ Hello Test ” portion and the DEBUG
part shown in Figure 5 - 2 .
Figure 5-1
Figure 5-2
c05.indd 133c05.indd 133 12/10/08 5:45:37 PM12/10/08 5:45:37 PM
Part I: Movie Review Web Site
134
Congratulations, you just coded your first form - processing script.
How It Works
As with any good recipe, it ’ s an excellent idea to start working on forms by understanding the
ingredients you will be using. You ’ ll need some background information about HTML form elements
and a few PHP functions to familiarize yourself with forms.
Let ’ s start with the HTML form itself.
You can find HTML references at the World Wide Web Consortium web site at
www.w3.org/MarkUp .
FORM Element
First, we ’ ll introduce the first HTML element you ’ ll need: form . It delimits the form ’ s area in the page
and holds the fields you want your web site users to fill in.
< form action=”formprocess1.php” method=”post” >
< ! form controls go here >
< /form >
Notice that the form element has an ending tag and two attributes. The first attribute ( action ) is the
recipient page address (the form - processing script). The second attribute (
method ) is the way in which
you will send the data to the recipient. You may recall that there are two separate ways of sending a form
to its processing script: the
POST and the GET methods.
The
POST method takes the data from the form fields and sends it through an HTTP header. In this
case, the data cannot be seen in the URL. The
GET method gets the data from the form fields, encodes it,
and appends it to the destination URL.
INPUT Element
The second new HTML element included here is input . This is the basis of most forms and can be
used in many different ways to gather many different types of information. In this case, you use two
different types of
input : the text and submit types.
Here ’ s the
input text type:
< input type=”text” name=”name” / >
The input text type is a standard single - line text box. As with all form controls, it needs a name so
that the processing script can access its content using the following syntax:
< ?php
echo $_POST[‘name’]; // will display the value typed in
? >
c05.indd 134c05.indd 134 12/10/08 5:45:38 PM12/10/08 5:45:38 PM
Chapter 5: Form Elements: Letting the User Work with Data
135
And here ’ s the input submit type:
< input type=”submit” name=”submit” value=”Submit” / >
As its name cleverly hints, the submit element displays a button that causes the browser to submit the
form when it is pressed. The button ’ s text is set through the
value attribute. As mentioned for the text
input , this form control needs a name for a processing reference.
Processing the Form
In this little script, you may have noticed a few new functions and some new syntax, and you are
probably curious about them.
The first form - processing script is an interactive variation of the famous “ hello world, ” but in this case it
displays “ hello ” and the name you type in the text box. To make this happen, you need to print the value
of the text field you filled in on the form. You know the
echo command, so let ’ s move on to the other
piece,
$_POST[‘name’] .
The
$_POST global array contains all form data submitted with the POST method. The array index of the
field is its name. In a moment, you ’ ll see how to check the content of your
$_POST array using the
print_r() function.
< ?php
echo ‘ < h1 > Hello ‘ . $_POST[‘name’] . ‘! < /h1 > ’;? >
In this example, $_POST[‘name’] displays what you entered in the name field.
You might wonder what
print_r($_POST) does. It simply dumps the whole contents of the super
global
$_POST array to the output. This is a great way to debug your forms. The $_POST array, as with
all arrays, has case - sensitive indexes. Use this tip to check for case and display the state of your objects
when building a script.
When receiving the submitted form information, PHP sets the
$_POST array with the data that the form
sends. As with any array, you can directly access any of the indexes by name. In this instance, you can
clearly see that the
name index contains the value Joe . This trick works for all forms, even the most
complicated ones.
Let ’ s move on to see how you can use more HTML elements during form input to interact with the user.
Driving the User Input
The form in this example allows you to lead the user to choose values from a set of values you provide.
Defining a value set is done through the use of specific HTML elements, such as list boxes, radio buttons,
and check boxes.
Two kinds of predefined user input are in HTML forms. The first kind allows you to choose one
item from the available options; the second allows the user to choose multiple items. Drop - down list
boxes and radio buttons allow for one selection only. Check boxes and multiline list boxes provide for
multiple choices.
c05.indd 135c05.indd 135 12/10/08 5:45:38 PM12/10/08 5:45:38 PM
Part I: Movie Review Web Site
136
Try It Out Limiting the Input Choice
Let ’ s start with the simple type of input. Follow these steps to create a single - selection list:
1. Create a text file named form2.html , and open it in your favorite text editor.
2. Enter the following code:
< html >
< head >
< title > Greetings Earthling < /title >
< /head >
< body >
< form action=”formprocess2.php” method=”post” >
< table >
< tr >
< td > Name < /td >
< td > < input type=”text” name=”name” / > < /td >
< /tr > < tr >
< td > Greetings < /td >
< td >
< select name=”greeting” >
< option value=”Hello” > Hello < /option >
< option value=”Hola” > Hola < /option >
< option value=”Bonjour” > Bonjour < /option >
< /select >
< /td >
< /tr > < tr >
< td > < /td >
< td >
< input type=”checkbox” name=”debug” checked=”checked”/ >
Display Debug info
< /td >
< /tr > < tr >
< td colspan=”2” style=”text-align: center” >
< input type=”submit” name=”submit” value=”Submit” / >
< /td >
< /tr >
< /table >
< /form >
< /body >
< /html >
3. Create another empty file named formprocess2.php , and enter the following code:
< html >
< head >
< title > Greetings Earthling < /title >
< /head >
< body >
< ?php
c05.indd 136c05.indd 136 12/10/08 5:45:39 PM12/10/08 5:45:39 PM
Chapter 5: Form Elements: Letting the User Work with Data
137
echo ‘ < h1 > ’ . $_POST[‘greeting’] . ‘ ‘ . $_POST[‘name’] . ‘! < /h1 > ’;
if (isset($_POST[‘debug’])) {
echo ‘ < pre > < strong > DEBUG: < /strong > ’ . “\n”;
print_r($_POST);
echo ‘ < /pre > ’;
}
? >
< /body >
< /html >
4. Save formprocess2.php .
5. Call the page from your browser. As you can see from the resulting page, as displayed in
Figure 5 - 3 , the form got a bit more complicated.
Figure 5-3
6. Enter your name, and click the Submit button. The display page that appears, shown in Figure
5 - 4 , is rather simple; it holds only debug information and a greeting.
c05.indd 137c05.indd 137 12/10/08 5:45:39 PM12/10/08 5:45:39 PM
Part I: Movie Review Web Site
138
How It Works
As you see, this code uses logic similar to that in formprocess1.php . Two fields have been added
(a drop - down list box and a check box).
formprocess2.php does the same thing as formprocess1.php , but with an added twist. It displays
the debugging information only if the debug check box is selected, and greets you using any of the drop -
down list choices in the subsections that follow.
The check box can represent only two possibilities: When checked, it passes the value
on to the
$_POST array, but otherwise it isn ’ t sent by the browser at all. This is a great way to represent Boolean
typed data.
The
SELECT element (also known as a list) allows you to display a fixed list of choices from which the
user has to choose an element. The item selected won ’ t be sent as displayed but will be sent as its value.
In this example, the value and its display are identical, but in a database - driven system, you would
probably see record IDs as the values and their text labels as list choices. A good example is a product
number and its name.
Figure 5-4
c05.indd 138c05.indd 138 12/10/08 5:45:39 PM12/10/08 5:45:39 PM
Chapter 5: Form Elements: Letting the User Work with Data
139
Be sure to set the value part of the OPTION items when using lists. If these are not set, the list looks the
same but is totally useless because all choices will send the same null value.
One Form, Multiple Processing
Forms always react in a predefined way based on how you code your processing script to handle the
data that the user sends to the system. You can create a single form with more than one defined action by
using different submit buttons.
Try It Out Radio Button, Multiline List Boxes
In the following example, you create a form that prepares a search and creates a movie/actor/director
interface.
1. Create a text file named form3.php , and open it in your text editor. Then type the
following code:
< html >
< head >
< title > Add/Search Entry < /title >
< style type=”text/css” >
< !
td {vertical-align: top;}
>
< /style >
< /head >
< body >
< form action=”formprocess3.php” method=”post” >
< table >
< tr >
< td > Name < /td >
< td > < input type=”text” name=”name”/ > < /td >
< /tr > < tr >
< td > Movie Type < /td >
< td >
< select name=”movie_type” >
< option value=”” > Select a movie type < /option >
< option value=”Action”
> Action < /option >
< option value=”Drama” > Drama < /option >
< option value=”Comedy” > Comedy < /option >
< option value=”Sci-Fi” > Sci-Fi < /option >
< option value=”War” > War < /option >
< option value=”Other” > Other < /option >
< /select >
< /td >
< /tr > < tr >
< td > Item Type < /td >
< td >
< input type=”radio” name=”type” value=”movie” checked=”checked” / >
Movie < br/ >
< input type=”radio” name=”type” value=”actor” / > Actor < br/ >
c05.indd 139c05.indd 139 12/10/08 5:45:40 PM12/10/08 5:45:40 PM
Part I: Movie Review Web Site
140
< input type=”radio” name=”type” value=”director”/ > Director < br/ >
< /td >
< /tr > < tr >
< td > < /td >
< td > < input type=”checkbox” name=”debug” checked=”checked” / >
Display Debug info
< /td >
< /tr > < tr >
< td colspan=”2” style=”text-align: center;” >
< input type=”submit” name=”submit” value=”Search” / >
< input type=”submit” name=”submit” value=”Add” / >
< /td >
< /tr >
< /table >
< /form >
< /body >
< /html >
2. Create another file named formprocess3.php , and enter the following code:
< ?php
if ($_POST[‘type’] == ‘movie’ & & $_POST[‘movie_type’] == ‘’) {
header(‘Location: form3.php’);
}
? >
< html >
< head >
< title > < ?php echo $_POST[‘submit’] . ‘ ‘ . $_POST[‘type’] . ‘: ‘ .
$_POST[‘name’]; ? > < /title >
< /head >
< body >
< ?php
if (isset($_POST[‘debug’])) {
echo ‘ < pre > ’;
print_r($_POST);
echo ‘ < /pre > ’;
}
$name = ucfirst($_POST[‘name’]);
if ($_POST[‘type’] == ‘movie’)
{
$foo = $_POST[‘movie_type’] . ‘ ‘ . $_POST[‘type’];
} else {
$foo = $_POST[‘type’];
}
echo ‘ < p > You are ‘ . $_POST[‘submit’] . ‘ing ‘;
echo ($_POST[‘submit’] == ‘Search’) ? ‘for ‘ : ‘’;
echo ‘a ‘ . $foo . ‘ named ‘ . $name . ‘ < /p > ’;
? >
< /body >
< /html >
c05.indd 140c05.indd 140 12/10/08 5:45:40 PM12/10/08 5:45:40 PM
Chapter 5: Form Elements: Letting the User Work with Data
141
3. Start your browser and open form3.php . The form shown in Figure 5 - 5 appears. Notice that
the form has two submit buttons. One is labeled Search, the other Add.
4. Type Kevin Kline in the Name field.
5. Leave Movie Type as is; then, move on to the Item Type field, which you ’ ll set to Actor.
6. Clear the Display Debug info check box if you like; then, click the Search button. The results
appear, as shown in Figure 5 - 6 .
Figure 5-5
c05.indd 141c05.indd 141 12/10/08 5:45:41 PM12/10/08 5:45:41 PM
Part I: Movie Review Web Site
142
7. Now play around a bit with the form. Look at the output and how it changes when you
modify the data.
How It Works
You just coded a simple form with two possible actions. Depending on the button you click and the
data you choose to enter, this code outputs different information.
What ’ s new in the form page itself? A group of radio buttons and a new submit button have been
added. Let ’ s have a closer look at these.
Radio INPUT Element
The radio button is a very simple element. By default, if no radio button is specified as CHECKED , no
default choice is made. Always remember that choosing the default value is a very important part of
building a form. Users often leave defaults in forms, and in that case, if you do not set a default value,
you will not receive any information for that field when the form is submitted.
< input type=”radio” name=”type” value=”movie” checked=”checked” / > Movie < br/ >
< input type=”radio” name=”type” value=”actor” / > Actor < br/ >
< input type=”radio” name=”type” value=”director”/ > Director < br/ >
Figure 5-6
c05.indd 142c05.indd 142 12/10/08 5:45:41 PM12/10/08 5:45:41 PM
Chapter 5: Form Elements: Letting the User Work with Data
143
For multiple radio buttons to be linked together to form a group and be processed as a single form
element, they need to share the same name and supply different values (quite obviously). In the
preceding code, the name is always
type . This tells the browser that the radio buttons are linked
together and that selecting one of them will clear the others.
Multiple Submit Buttons
As with radio buttons, the submit buttons share the same name but supply different values. Clicking one
of these buttons will cause the browser to submit the form. As you can see in the
DEBUG block, the submit
button sends its own information to the script. By reading this value, the script allows you to have
multiple submit buttons for the same form, and performs different processing actions depending on
which one was clicked.
< input type=”submit” name=”submit” value=”Search” / >
< input type=”submit” name=”submit” value=”Add” / >
Basic Input Testing
Now let ’ s move our attention to the processing script, to see what ’ s new in there.
The following code checks that the item type is
movie , and if it is, it checks that the user has selected a
valid movie type from the list. If he or she has not, then the visitor is redirected to the form page.
The test is an
if comparison that makes use of the & & operator (the Boolean And operator). You can
think of this in simple Monopoly game parlance: if the item type is movie and the movie type is not
specified, then you go back to square one without passing go, and you do not collect $200. Otherwise,
the script can continue processing.
if ($_POST[‘type’] == ‘movie’ & & $_POST[‘movie_type’] == ‘’) {
header(‘Location: form3.php’);
}
The header function allows you to send a raw HTTP header. This can be quite handy when dealing with
implementing access restrictions and when redirecting users to other scripts. In this instance, it redirects
the user to the
form3.php page.
PHP will automatically send some HTTP headers before it sends any output to the browser. This is
important to keep in mind, because once sent, HTTP headers cannot be sent again. If you use the
header() function after output has already been sent (either by an echo or print statement, HTML,
whitespace, etc.), then you will receive a warning resembling the following:
Warning: Cannot modify header information - headers already sent by (output
started at C:\Program Files\Apache Software Foundation\Apache2.2\htdocs\
formprocess3.php:2) in C:\Program Files\Apache Software Foundation\Apache2.2\
htdocs\formprocess3.php on line 4
c05.indd 143c05.indd 143 12/10/08 5:45:41 PM12/10/08 5:45:41 PM
Part I: Movie Review Web Site
144
Here are two examples of problem code:
< ?php
header(‘Location: form3.php’);
? >
This code will fail because there is an empty line before the opening < ?php tag. The whitespace will be
sent as output before the
header() function is called.
< ?php
echo ‘foobar’;
header(‘Location: form3.php’);
? >
This code will fail because the echo statement will output “ foobar ” before the header() function
is called.
To avoid this problem, you might want to consider using output buffering functions or setting a few
special directives in your
php.ini file. But output buffering is an advanced concept, and there ’ s no
guarantee other servers will have the same
ini values as yours when you try to run your code on them.
Ultimately, the best solution is to be aware of this issue and make sure you keep your code clean and
organized.
Ternary Operator
If PHP makes it past the if statement with header redirect, then the rest of the page can be
generated. The script goes on to output HTML and construct the rest of the page. Everything is pretty
straightforward and isn ’ t anything we haven ’ t looked at earlier, except the
ucase() function and the
ternary operator.
ucase() is a function that returns a string with the first character capitalized. But
the ternary comparison operation
?: is much more interesting because it acts as a handy shortcut for an
if - else construct. The ternary operator is not PHP - specific; many other languages have it as well.
To be honest, I remember when I first saw the
?: operator, and thought to myself, “ Wow . . . that ’ s too
strange. I ’ m never going to use that! I ’ ll just stick with using
if - else . ” But as I saw it more and started
using it, I realized how useful it is for writing short, clear code, especially when validating input data.
The form of the operator is this:
[expression] ? [execute if TRUE] : [execute if FALSE];
The expression to the left of the ? is evaluated. If it is found to be true, then the first action (between the
? and : ) is performed. Otherwise, if it is found to be false, then the second action (after the : ) is
performed. This is handy with
echo statements and assigning variables. The line that uses the ternary
operator in
formprocess3.php is:
echo ($_POST[‘submit’] == ‘Search’) ? ‘for ‘ : ‘’;
If the user clicks the Search submit button, then the condition will evaluate true, and “ for ” will be
applied back to
echo . If the user clicks the Add submit button, then the condition will be false, and an
c05.indd 144c05.indd 144 12/10/08 5:45:42 PM12/10/08 5:45:42 PM
Chapter 5: Form Elements: Letting the User Work with Data
145
empty string will be passed back to echo . The following if - else statement effectively accomplishes the
same thing:
if ($_POST[‘submit’] == ‘Search’) {
echo ‘for ‘;
} else {
echo ‘’;
}
The ternary operator is a great way to apply a quick true/false filter of sorts. But don ’ t be tempted to use
it as a full - fledged
if - else statement, especially with nesting, because then your code becomes
exponentially more difficult to read and maintain. Consider this example:
< ?php
$num = 42;
if ($num < 0) {
$value = ‘The value is negative.’;
} else {
if ($num > 0) {
$value = ‘The value is positive.’;
} else {
$value = ‘The value is zero.’;
}
}
? >
This is much easier to read and understand, and consequently to maintain, than if it were compressed
into two ternary operators:
< ?php
$num = 42;
echo ‘The value is ‘;
echo ($num < 0) ? ‘negative.’ : ($num > 0) ? ‘positive.’ : ‘zero.’;
? >
So what ’ s the bottom line? Use syntactical shortcuts and conveniences that are available to you, if they
make your life easier and your code more concise, but don ’ t go overboard — and keep readability and
maintainability in mind as well.
Linking Forms Together
Now that you know most of the form elements, let ’ s create a skeleton for the movie application. The
system will add new items or search for existing ones. Database interaction has been touched upon
earlier and will be explored more in Chapter 6 , but for now you ’ ll just build the forms and output the
results to the browser.
c05.indd 145c05.indd 145 12/10/08 5:45:42 PM12/10/08 5:45:42 PM