Beginning PHP6, Apache, MySQL Web Development- P13 pdf
Bạn đang xem bản rút gọn của tài liệu. Xem và tải ngay bản đầy đủ của tài liệu tại đây (645.6 KB, 30 trang )
Chapter 11: Sending E - mail
331
message TEXT,
PRIMARY KEY (email_id)
)
ENGINE=MyISAM’;
mysql_query($query, $db) or die (mysql_error($db));
echo ‘Success!’;
? >
2. Run db_ch10 - 2.php , and you should see the success message displayed.
3. Open up postcard.php in your editor and replace its content with the following code:
< ?php
require ‘db.inc.php’;
$db = mysql_connect(MYSQL_HOST, MYSQL_USER, MYSQL_PASSWORD) or
die (‘Unable to connect. Check your connection parameters.’);
mysql_select_db(MYSQL_DB, $db) or die(mysql_error($db));
? >
< html >
< head >
< title > Send Postcard < /title >
< script type=”text/javascript” >
window.onload = function() {
// assign change_postcard_image to select field
var s = document.getElementById(‘postcard_select’);
s.onchange = change_postcard_image;
}
function change_postcard_image() {
var s = document.getElementById(‘postcard_select’);
var i = document.getElementById(‘postcard’);
var x = s.options.selectedIndex;
// update image’s src and alt attributes
i.src = s.options[x].value;
i.alt = s.options[x].text;
}
< /script >
< /head >
< body >
< h1 > Send Postcard < /h1 >
< form method=”post” action=”sendconfirm.php” >
< table >
< tr >
< td > Sender’s Name: < /td >
< td > < input type=”text” name=”from_name” size=”40” / > < /td >
< /tr > < /tr >
< td > Sender’s E-mail: < /td >
< td
> < input type=”text” name=”from_email” size=”40” / > < /td >
c11.indd 331c11.indd 331 12/10/08 6:05:30 PM12/10/08 6:05:30 PM
332
Part II: Comic Book Fan Site
< /tr > < tr >
< td > Recipient’s Name: < /td >
< td > < input type=”text” name=”to_name” size=”40” / > < /td >
< /tr > < /tr >
< td > Recipient’s E-mail: < /td >
< td > < input type=”text” name=”to_email” size=”40” / > < /td >
< /tr > < tr >
< td > Choose a Postcard: < /td >
< td > < select id=”postcard_select” name=”postcard” >
< ?php
$query = ‘SELECT image_url, description FROM pc_image ORDER BY description’;
$result = mysql_query($query, $db) or die(mysql_error());
$row = mysql_fetch_assoc($result);
extract($row);
mysql_data_seek($result, 0);
while ($row = mysql_fetch_assoc($result)) {
echo ‘ < option value=”’ . $row[‘image_url’] . ‘” > ’ . $row[‘description’] .
‘ < /option > ’;
}
mysql_free_result($result);
? >
< /select >
< /td >
< /tr > < tr >
< td colspan=”2” >
< img id=”postcard” src=” < ?php echo $image_url; ? > ”
alt=” < ?php echo $description; ? > ” / >
< /td >
< /tr > < tr >
< td > Subject: < /td >
< td > < input type=”text” name=”subject” size=”80” / > < /td >
< /tr > < tr >
< td colspan=”2” >
< textarea cols=”76” rows=”12”
name=”message” > Enter your message here < /textarea >
< /td >
< /tr > < tr >
< td colspan=”2” >
< input type=”submit” value=”Send” / >
< input type=”reset” value=”Reset the form” / >
< /td >
< /tr >
< /table >
< /form >
< /body >
< /html >
c11.indd 332c11.indd 332 12/10/08 6:05:31 PM12/10/08 6:05:31 PM
Chapter 11: Sending E - mail
333
4. Next, write sendconfirm.php , the page that sends out the confirmation e - mail to the user.
< ?php
require ‘db.inc.php’;
$db = mysql_connect(MYSQL_HOST, MYSQL_USER, MYSQL_PASSWORD) or
die (‘Unable to connect. Check your connection parameters.’);
mysql_select_db(MYSQL_DB, $db) or die(mysql_error($db));
$to_name = $_POST[‘to_name’];
$to_email = $_POST[‘to_email’];
$from_name = $_POST[‘from_name’];
$from_email = $_POST[‘from_email’];
$postcard = $_POST[‘postcard’];
$subject = $_POST[‘subject’];
$message = $_POST[‘message’];
$query = ‘SELECT description FROM pc_image WHERE image_url = “’ . $postcard . ‘”’;
$result = mysql_query($query, $db) or die(mysql_error());
$description = ‘’;
if (mysql_num_rows($result))
{
$row = mysql_fetch_assoc($result);
$description = $row[‘description’];
}
mysql_free_result($result);
$token = md5(time());
$query = ‘INSERT INTO pc_confirmation
(email_id, token, to_name, to_email, from_name, from_email, subject,
postcard, message)
VALUES
(NULL, “’ . $token . ‘”, “’ . $to_name . ‘”, “’ . $to_email . ‘”,
“’ . $from_name . ‘”, “’ . $from_email . ‘”, “’ . $subject . ‘”,
“’ . $postcard . ‘”, “’ . $message . ‘”)’;
mysql_query($query, $db) or die(mysql_error());
$email_id = mysql_insert_id($db);
$headers = array();
$headers[] = ‘MIME-Version: 1.0’;
$headers[] = ‘Content-type: text/html; charset=”iso-8859-1”’;
$headers[] = ‘Content-Transfer-Encoding: 7bit’;
$headers[] = ‘From: no-reply@localhost’;
$confirm_subject = ‘Please confirm your postcard [‘ . $subject .’]’;
$confirm_message = ‘ < html > ’;
$confirm_message .= ‘ < p > Hello, ‘ . $from_name . ‘. Please click on the link ‘ .
‘below to confirm that you would like to send this postcard. < /p > ’;
$confirm_message .= ‘ < p > < a href=”http://localhost/confirm.php?id=’ .
$email_id . ‘ & token=’ . $token .’” > Click here to confirm < /a > < /p > ’;
c11.indd 333c11.indd 333 12/10/08 6:05:31 PM12/10/08 6:05:31 PM
334
Part II: Comic Book Fan Site
$confirm_message .= ‘ < hr / > ’;
$confirm_message .= ‘ < img src=”’ . $postcard . ‘” alt=”’ . $description .
‘ “/ > < br/ > ’;
$confirm_message .= $message . ‘ < /html > ’;
? >
< html >
< head >
< title > Mail Sent! < /title >
< /head >
< body >
< ?php
$success = mail($from_email, $confirm_subject, $confirm_message,
join(“\r\n”, $headers));
if ($success) {
echo ‘ < h1 > Pending Confirmation! < /h1 > ’;
echo ‘ < p > A confirmation e-mail has been sent to ‘ . $from_email . ‘. ‘ .
‘Open your e-mail and click on the link to confirm that you ‘ .
‘would like to send this postcard to ‘ . $to_name . ‘. < /p > ’;
} else {
echo ‘ < p > < strong > There was an error sending the confirmation. < /strong > < /p > ’;
}
? >
< /body >
< /html >
5. Next is confirm.php . This file is loaded in the browser with an ID in the URL to designate
which saved postcard is awaiting confirmation, and the script then sends the postcard to the
intended recipient.
< ?php
require ‘db.inc.php’;
$db = mysql_connect(MYSQL_HOST, MYSQL_USER, MYSQL_PASSWORD) or
die (‘Unable to connect. Check your connection parameters.’);
mysql_select_db(MYSQL_DB, $db) or die(mysql_error($db));
$id = (isset($_GET[‘id’])) ? $_GET[‘id’] : 0;
$token = (isset($_GET[‘token’])) ? $_GET[‘token’] : ‘’;
$query = ‘SELECT email_id, token, to_name, to_email, from_name, from_email,
subject, postcard, message FROM pc_confirmation WHERE
token = “’ . $token . ‘”’;
$result = mysql_query($query, $db) or die(mysql_error());
if (mysql_num_rows($result) == 0) {
echo ‘ < p > Oops! Nothing to confirm. < /p > ’;
mysql_free_result($result);
exit;
} else {
$row = mysql_fetch_assoc($result);
extract($row);
mysql_free_result($result);
c11.indd 334c11.indd 334 12/10/08 6:05:31 PM12/10/08 6:05:31 PM
Chapter 11: Sending E - mail
335
}
$boundary = ‘==MP_Bound_xyccr948x==’;
$headers = array();
$headers[] = ‘MIME-Version: 1.0’;
$headers[] = ‘Content-type: multipart/alternative; boundary=”’ . $boundary . ‘”’;
$headers[] = ‘From: ‘ . $from_email;
$postcard_message = ‘ < html > ’;
$postcard_message .= ‘ < p > Greetings, ‘ . $to_name . ‘! ‘;
$postcard_message .= $from_name . ‘ has sent you a postcard today. < /p > ’;
$postcard_message .= ‘ < p > Enjoy! < /p > ’;
$postcard_message .= ‘ < hr / > ’;
$postcard_message .= ‘ < img src=”’ . $postcard . ‘” alt=”’ . $description .
‘ “/ > < br/ > ’;
$postcard_message .= $message;
$postcard_message .= ‘ < hr/ > < p > You can also visit ‘ .
‘ < a href=”http://localhost/viewpostcard.php?id=’ . $email_id . ‘ & token=’ .
$token .’” > http://localhost/viewpostcard.php?id=’ . $email_id .
‘ & token=’ . $token .’ < /a > to view this postcard online. < /p > < /html > ’;
$mail_message = ‘This is a Multipart Message in MIME format’ . “\n”;
$mail_message .= ‘ ’ . $boundary . “\n”;
$mail_message .= ‘Content-type: text/html; charset=”iso-8859-1”’ . “\n”;
$mail_message .= ‘Content-Transfer-Encoding: 7bit’ . “\n\n”;
$mail_message .= $postcard_message . “\n”;
$mail_message .= ‘ ’ . $boundary . “\n”;
$mail_message .= ‘Content-Type: text/plain; charset=”iso-8859-1”’ . “\n”;
$mail_message .= ‘Content-Transfer-Encoding: 7bit’ . “\n\n”;
$mail_message .= strip_tags($postcard_message) . “\n”;
$mail_message .= ‘ ’ . $boundary . ‘ ’ . “\n”;
? >
< html >
< head >
< title > Postcard Sent! < /title >
< /head >
< body >
< ?php
$success = mail($to_email, $subject, $mail_message, join(“\r\n”, $headers));
if ($success) {
echo ‘ < h1 > Congratulations! < /h1 > ’;
echo ‘ < p > The following postcard has been sent to ‘ . $to_name .
‘: < br/ > < /p > ’;
echo $postcard_message;
} else {
echo ‘ < p > < strong > There was an error sending your message. < /strong > < /p > ’;
}
? >
< /body >
< /html >
c11.indd 335c11.indd 335 12/10/08 6:05:32 PM12/10/08 6:05:32 PM
336
Part II: Comic Book Fan Site
6. Next, you ’ ll create a form that allows a user to view the postcard. Call this one
viewpostcard.php .
< ?php
require ‘db.inc.php’;
$db = mysql_connect(MYSQL_HOST, MYSQL_USER, MYSQL_PASSWORD) or
die (‘Unable to connect. Check your connection parameters.’);
mysql_select_db(MYSQL_DB, $db) or die(mysql_error($db));
$id = (isset($_GET[‘id’])) ? $_GET[‘id’] : 0;
$token = (isset($_GET[‘token’])) ? $_GET[‘token’] : ‘’;
$query = ‘SELECT email_id, token, to_name, to_email, from_name, from_email,
subject, postcard, message FROM pc_confirmation WHERE
token = “’ . $token . ‘”’;
$result = mysql_query($query, $db) or die(mysql_error());
if (mysql_num_rows($result) == 0) {
echo ‘ < p > Oops! Nothing to view. < /p > ’;
mysql_free_result($result);
exit;
} else {
$row = mysql_fetch_assoc($result);
extract($row);
mysql_free_result($result);
}
? >
< html >
< head >
< title > < ?php echo $subject; ? > < /title >
< /head >
< body >
< ?php
echo ‘ < img src=”’ . $postcard . ‘” alt=”’ . $description . ‘ “/ > < br/ > ’;
echo $message;
? >
< /body >
< /html >
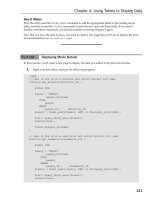
7. Load postcard.php in your browser to verify that it works. The results should look similar
to what ’ s shown in Figure 11 - 6 .
c11.indd 336c11.indd 336 12/10/08 6:05:32 PM12/10/08 6:05:32 PM
Chapter 11: Sending E - mail
337
Figure 11-6
c11.indd 337c11.indd 337 12/10/08 6:05:32 PM12/10/08 6:05:32 PM
338
Part II: Comic Book Fan Site
8. Enter the appropriate information; remember to put in valid e - mail addresses in the Sender ’ s
E - mail and Recipient ’ s E - mail fields.
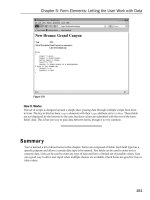
9. In the Choose a Postcard field, select a postcard from the drop - down list, enter a message, and
click the Send button. A screen similar to the one shown in Figure 11 - 7 loads.
Figure 11-7
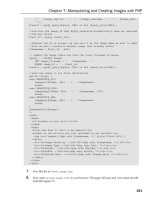
10. Check your e - mail. You should receive an e - mail that looks something like Figure 11 - 8 .
c11.indd 338c11.indd 338 12/10/08 6:05:33 PM12/10/08 6:05:33 PM
Chapter 11: Sending E - mail
339
11. Click the link in the e - mail to confirm that you want to send the postcard.
12. Open the e - mail account this postcard was sent to (see Figure 11 - 9 ).
You did send it to an e - mail address you have access to, right? If you sent this to your little
sister, we sure hope you didn ’ t scare her!
Figure 11-8
c11.indd 339c11.indd 339 12/10/08 6:05:33 PM12/10/08 6:05:33 PM
340
Part II: Comic Book Fan Site
Figure 11-9
How It Works
Your application is getting more complex. However, it is still fairly basic in the functionality it offers.
Here ’ s what it does:
The user loads
postcard.php and fills out all the fields. He or she also selects a postcard to
be sent. In the Sender ’ s E - mail field, the user enters his or her e - mail address.
❑
c11.indd 340c11.indd 340 12/10/08 6:05:33 PM12/10/08 6:05:33 PM
Chapter 11: Sending E - mail
341
After clicking Send, the user receives an e - mail showing what the postcard and message look
like. A link is provided at the bottom of the e - mail for the user to click on, to confirm the
postcard.
Once the user clicks the confirmation link, the postcard is sent to the intended recipient.
Taking a closer look at the start of it, you see in
postcard.php that you used a query to retrieve the
list of images from the database. This is pretty straightforward and is something you ’ ve done several
times already. But this time you used
extract() on the first returned row and then reset the result
list ’ s internal pointer back to its beginning with
mysql_data_seek() , before generating the options
for the
select element.
< select id=”postcard_select” name=”postcard” >
< ?php
$query = ‘SELECT image_url, description FROM pc_image ORDER BY description’;
$result = mysql_query($query, $db) or die(mysql_error());
$row = mysql_fetch_assoc($result);
extract($row);
mysql_data_seek($result, 0);
while ($row = mysql_fetch_assoc($result)) {
echo ‘ < option value=”’ . $row[‘image_url’] . ‘” > ’ . $row[‘description’] .
‘ < /option > ’;
}
mysql_free_result($result);
? >
< /select >
When the page first loads the select list, it shows its first option as the active postcard selection. The
$image_url and $description variables populated by extract() are used as the initial values for
the postcard ’ s
image element, so the two are initially in sync.
< img id=”postcard” src=” < ?php echo $image_url; ? > ”
alt=” < ?php echo $description; ? > ” / >
Only the surface of using PHP, Apache, and MySQL has been scratched, but we ’ re sure you will agree
this book is large enough, and that if we were to start discussing the intricacies of JavaScript, then you
might give yourself a hernia just trying to take it off the bookshelf! You ’ re right, JavaScript is beyond
the scope of this book. But because PHP code only runs on the server, not in the client ’ s browser, it
cannot be used to keep the displayed images in sync with each other once the page has been generated
and sent off. Using JavaScript in this situation helps you reduce loading time and round trips to the
server. The following lines of extra code written in JavaScript are included in the page:
< script type=”text/javascript” >
window.onload = function() {
// assign change_postcard_image to select field
var s = document.getElementById(‘postcard_select’);
s.onchange = change_postcard_image;
}
function change_postcard_image() {
var s = document.getElementById(‘postcard_select’);
❑
❑
c11.indd 341c11.indd 341 12/10/08 6:05:34 PM12/10/08 6:05:34 PM
342
Part II: Comic Book Fan Site
var i = document.getElementById(‘postcard’);
var x = s.options.selectedIndex;
// update image’s src and alt attributes
i.src = s.options[x].value;
i.alt = s.options[x].text;
}
< /script >
If you want to know more about JavaScript, we recommend starting with ppk on JavaScript , by
Peter - Paul Koch (New Riders, 2006).
Now you move on to
sendconfirm.php . Much of it is similar to sendmail.php , so we ’ ll just touch
on the script ’ s most important point. Before sending the confirmation e - mail, a token is generated and,
together with the message, is stored in the
pc_confirmation database table.
$token = md5(time());
$query = ‘INSERT INTO pc_confirmation
(email_id, token, to_name, to_email, from_name, from_email, subject,
postcard, message)
VALUES
(NULL, “’ . $token . ‘”, “’ . $to_name . ‘”, “’ . $to_email . ‘”,
“’ . $from_name . ‘”, “’ . $from_email . ‘”, “’ . $subject . ‘”,
“’ . $postcard . ‘”, “’ . $message . ‘”)’;
mysql_query($query, $db) or die(mysql_error());
You used the md5() function to create the token. This returns a 128 - bit “ fingerprint, ” or “ hash value, ”
of the message passed to it. For example, the MD5 hash of “ Hello World ” is b10a8db164e0754105b7a99
be72e3fe5. The MD5 algorithm is designed as a one - way encryption of the data passed in to it, so it
cannot be reversed to discover the original value. Using a one - way hash in this manner allows you to
safely have the user click on a link in his or her e - mail to view the postcard. If you used a simple
number or keyword, a malicious user could more easily guess the URL and ruin all your fun —
guessing an MD5 hash would take too long to make it worthwhile for the hacker.
By passing in a time value, you can be fairly certain that the MD5 hash returned will be a unique
value, which you use as a unique ID for the data. It is not 100 percent guaranteed to be unique, but
because it is generated based on the current time in seconds and contains 32 alphanumeric characters,
you can be reasonably sure it will be unique.
You should read RFC 1321 if you are interested in finding out more information about the
MD5 hash. RFC 1321: “ The MD5 Message - Digest Algorithm ” is available online at
www.faqs.org/rfcs/rfc1321 .
c11.indd 342c11.indd 342 12/10/08 6:05:34 PM12/10/08 6:05:34 PM
Chapter 11: Sending E - mail
343
sendconfirm.php sends an e - mail that includes a link to confirm.php and passes the message ’ s ID
and token in the URL string. The postcard data sits patiently until the sender receives the confirmation
message and follows the link that will finally send the postcard to the intended recipient.
$confirm_message .= ‘ < p > < a href=”http://localhost/confirm.php?id=’ .
$email_id . ‘ & token=’ . $token .’” > Click here to confirm < /a > < /p > ’;
When the sender receives the confirmation message, he or she clicks the link, and confirm.php is
loaded in a web browser. The script takes in the message ID and unique validation token and uses them
to retrieve the message from the database.
$id = (isset($_GET[‘id’])) ? $_GET[‘id’] : 0;
$token = (isset($_GET[‘token’])) ? $_GET[‘token’] : ‘’;
$query = ‘SELECT email_id, token, to_name, to_email, from_name, from_email,
subject, postcard, message FROM pc_confirmation WHERE
token = “’ . $token . ‘”’;
$result = mysql_query($query, $db) or die(mysql_error());
The query will return all postcards that match your ID and token. Of course, there should always be just
one match because
$id is unique, even if, by some astronomical chance, $token is not.
Checking that
mysql_num_rows() is not 0 (showing that the query matched no records) serves as a
little extra insurance to make sure you don ’ t try to send out a postcard if no postcard data exists. Of
course, you ’ ll probably think of a much more elegant error message than we ’ ve provided. In fact, this
might even be a good place for the PHP
header() function to redirect the user to a “ more information ”
error page.
if (mysql_num_rows($result) == 0) {
echo ‘ < p > Oops! Nothing to confirm. Please contact your administrator. < /p > ’;
mysql_free_result($result);
exit;
} else {
$row = mysql_fetch_assoc($result);
extract($row);
mysql_free_result($result);
}
Creating a Reusable Mail Class
Now that you ’ ve seen how to perform basic e - mail functions using PHP, it ’ s time to take what you ’ ve
learned and make a nice reusable code component. PHP objects and classes were discussed briefly,
earlier in this book, but you haven ’ t done much with them. So, this code will be written as a class. The
benefit to writing this as a class is that it will be self - contained to make reusability easier.
c11.indd 343c11.indd 343 12/10/08 6:05:34 PM12/10/08 6:05:34 PM
344
Part II: Comic Book Fan Site
Try It Out Creating a Reusable Mail Class
You are going to be creating a very handy file, class.SimpleMail.php . This file is going to contain a
PHP class that will supplement PHP ’ s simple
mail() function. The class will encapsulate sending a
multipart e - mail, which helps keep your source code cleaner when you use it.
1. Open your editor, and create a new PHP file called class.SimpleMail.php :
< ?php
class SimpleMail
{
// class properties- parts of a message
private $toAddress;
private $CCAddress;
private $BCCAddress;
private $fromAddress;
private $subject;
private $sendText;
private $textBody;
private $sendHTML;
private $HTMLBody;
// initialize the message parts with blank or default values
public function __construct() {
$this- > toAddress = ‘’;
$this- > CCAddress = ‘’;
$this- > BCCAddress = ‘’;
$this- > fromAddress = ‘’;
$this- > subject = ‘’;
$this- > sendText = true;
$this- > textBody = ‘’;
$this- > sendHTML = false;
$this- > HTMLBody = ‘’;
}
// set TO address
public function setToAddress($value) {
$this- > toAddress = $value;
}
// set CC address
public function setCCAddress($value) {
$this- > CCAddress = $value;
}
// set BCC address
public function setBCCAddress($value) {
$this- > BCCAddress = $value;
}
// set FROM address
public function setFromAddress($value) {
c11.indd 344c11.indd 344 12/10/08 6:05:34 PM12/10/08 6:05:34 PM
Chapter 11: Sending E - mail
345
$this- > fromAddress = $value;
}
// set message subject
public function setSubject($value) {
$this- > subject = $value;
}
// set whether to send email as text
public function setSendText($value) {
$this- > sendText = $value;
}
// set text email message body
public function setTextBody($value) {
$this- > sendText = true;
$this- > textBody = $value;
}
// set whether to send email as HTML
public function setSendHTML($value) {
$this- > sendHTML = $value;
}
// set text HTML message body
public function setHTMLBody($value) {
$this- > sendHTML = true;
$this- > HTMLBody = $value;
}
// send email
public function send($to = null, $subject = null, $message = null,
$headers = null) {
$success = false;
if (!is_null($to) & & !is_null($subject) & & !is_null($message)) {
$success = mail($to, $subject, $message, $headers);
return $success;
} else {
$headers = array();
if (!empty($this- > fromAddress)) {
$headers[] = ‘From: ‘ . $this- > fromAddress;
}
if (!empty($this- > CCAddress)) {
$headers[] = ‘CC: ‘ . $this- > CCAddress;
}
if (!empty($this- > BCCAddress)) {
$headers[] = ‘BCC: ‘ . $this- > BCCAddress;
}
if ($this- > sendText & & !$this- > sendHTML) {
$message = $this- > textBody;
c11.indd 345c11.indd 345 12/10/08 6:05:35 PM12/10/08 6:05:35 PM
346
Part II: Comic Book Fan Site
} elseif (!$this- > sendText & & $this- > sendHTML) {
$headers[] = ‘MIME-Version: 1.0’;
$headers[] = ‘Content-type: text/html; charset=”iso-8859-1”’;
$headers[] = ‘Content-Transfer-Encoding: 7bit’;
$message = $this- > HTMLBody;
} elseif ($this- > sendText & & $this- > sendHTML) {
$boundary = ‘==MP_Bound_xyccr948x==’;
$headers[] = ‘MIME-Version: 1.0’;
$headers[] = ‘Content-type: multipart/alternative; boundary=”’
. $boundary . ‘”’;
$message = ‘This is a Multipart Message in MIME format.’ . “\n”;
$message .= ‘ ’ . $boundary . “\n”;
$message .= ‘Content-type: text/plain; charset=”iso-8859-1”’ .
“\n”;
$message .= ‘Content-Transfer-Encoding: 7bit’ . “\n\n”;
$message .= $this- > textBody . “\n”;
$message .= ‘ ’ . $boundary . “\n”;
$message .= ‘Content-type: text/html; charset=”iso-8859-1”’
. “\n”;
$message .= ‘Content-Transfer-Encoding: 7bit’ . “\n\n”;
$message .= $this- > HTMLBody . “\n”;
$message .= ‘ ’ . $boundary . ‘ ’;
}
$success = mail($this- > toAddress, $this- > subject, $message,
join(“\r\n”, $headers));
return $success;
}
}
}
? >
2. Next, create the file that will be used to demonstrate plaintext functionality, mail_text.php .
Make sure you change the e - mail address to reflect the account to which you want to send
the e - mail.
< ?php
require ‘class.SimpleMail.php’;
$message = new SimpleMail();
$message- > setToAddress(‘’);
$message- > setSubject(‘Testing text email’);
$message- > setTextBody(‘This is a test using plain text email!’);
if ($message- > send()) {
echo ‘Text email sent successfully!’;
} else {
echo ‘Sending of text email failed!’;
}
? >
c11.indd 346c11.indd 346 12/10/08 6:05:35 PM12/10/08 6:05:35 PM
Chapter 11: Sending E - mail
347
3. Now, create a file to send HTML - format e - mails. Remember to change the e - mail address, as
you did in the previous step. Save this file as
mail_html.php .
< ?php
require ‘class.SimpleMail.php’;
$message = new SimpleMail();
$message- > setSendText(false);
$message- > setToAddress(‘’);
$message- > setSubject(‘Testing HTML Email’);
$message- > setHTMLBody(‘ < html > < p > This is a test using < b > HTML
email < /b > ! < /p > < /html > ’);
if ($message- > send()) {
echo ‘HTML email sent successfully!’;
} else {
echo ‘Sending of HTML email failed!’;
}
? >
4. Next, create a file that will demonstrate multipart e - mails and the rest of the bells and whistles
that make up the headers. Again, be sure to change the e - mail addresses appropriately. Save
this file as
mail_multipart.php .
< ?php
require ‘class.SimpleMail.php’;
$message = new SimpleMail();
$message- > setToAddress(‘’);
$message- > setFromAddress(‘’);
$message- > setCCAddress(‘’);
$message- > setBCCAddress(‘’);
$message- > setSubject(‘Testing Multipart Email’);
$message- > setTextBody(‘This is the plain text portion of the email!’);
$message- > setHTMLBody(‘ < html > < p > This is the < b > HTML portion < /b > of the
email! < /p > < /html > ’);
if ($message- > send()) {
echo ‘Multi-part mail sent successfully!’;
} else {
echo ‘Sending the multi-part mail failed!’;
}
? >
c11.indd 347c11.indd 347 12/10/08 6:05:35 PM12/10/08 6:05:35 PM
348
Part II: Comic Book Fan Site
5. Last, create a file to demonstrate the quick - message functionality in the SimpleMail class.
Save this file as
mail_quick.php .
< ?php
require ‘class.SimpleMail.php’;
$message = new SimpleMail();
if ($message- > send(‘’, ‘Testing Quick Email’,
‘This is a quick test of SimpleMail- > send().’)) {
echo ‘Quick mail sent successfully!’;
} else {
echo ‘Sending the quick mail failed!’;
}
? >
Load up mail_text.php , mail_html.php , mail_multipart.php , and mail_quick.php in your
browser. Assuming everything was typed carefully, all four “ success ” messages should appear, and
you will have the matching e - mail messages in your inbox as proof.
How It Works
As you might have already discovered, using a PHP class for encapsulating functionality can be a
great way to save coding time later on. Looking at
class.SimpleMail.php , you start out by defining
the class and its properties:
< ?php
class SimpleMail
{
// class properties- parts of a message
private $toAddress;
private $CCAddress;
private $BCCAddress;
private $fromAddress;
private $subject;
private $sendText;
private $textBody;
private $sendHTML;
private $HTMLBody;
Pretty straightforward so far. You ’ ll notice the basic e - mail elements to , from , subject , and so on are
listed as private members, which means that they are safe from accidentally being modified by code
outside the class.
Next is the
__construct() method. PHP calls this automatically when you create an instance of
the class, and its purpose is to initialize any variables and resources the object will be using. Here the
__construct() method sets initial values to the class ’ s properties previously defined. Notice that
when you are inside the class ’ s definition and you want to reference one of the properties, you have to
use the special syntax
$this - > .
public function __construct() {
$this- > toAddress = ‘’;
$this- > CCAddress = ‘’;
$this- > BCCAddress = ‘’;
$this- > fromAddress = ‘’;
c11.indd 348c11.indd 348 12/10/08 6:05:36 PM12/10/08 6:05:36 PM
Chapter 11: Sending E - mail
349
$this- > subject = ‘’;
$this- > sendText = true;
$this- > textBody = ‘’;
$this- > sendHTML = false;
$this- > HTMLBody = ‘’;
}
Because the properties were defined as private, you cannot assign values to them directly from outside
the class. You need another way to assign them values. Here you use a set of settor methods. Each
method takes in a value which is assigned to its corresponding property.
public function setToAddress($value) {
$this- > toAddress = $value;
}
Making an interface to set or get the values of an object ’ s properties is considered good programming
practice because it keeps things neatly encapsulated and helps preserve the state of the object ’ s
sensitive variables.
While the class does not have gettor methods used to retrieve the value of the property, you could very
easily write them in yourself. A sample method to retrieve the
$toAddress property would be:
public function getToAddress() {
return $this- > toAddress;
}
Finally the send() method is defined. You ’ ve given it four optional parameters that can be used when
calling the method:
public function send($to = null, $subject = null, $message = null,
$headers = null) {
If at least the first three arguments are passed to send() , then the function will behave almost
identically to the PHP built - in
mail() function:
$success = false;
if (!is_null($to) & & !is_null($subject) & & !is_null($message)) {
$success = mail($to, $subject, $message, $headers);
return $success;
} else {
You might be thinking, “ Why bother with this when I can use the normal mail() function instead? ”
Truthfully, you very well could, in this example. However, the advantage here is that the PHP class
can enhance the normal mail - sending process with custom error messages or fallback processes, and it
will still be only one line in the calling script ’ s code.
If fewer than three parameters are passed to the method, the normal send functionality begins,
starting by setting the headers:
$headers = array();
if (!empty($this- > fromAddress)) {
$headers[] = ‘From: ‘ . $this- > fromAddress;
}
if (!empty($this- > CCAddress)) {
c11.indd 349c11.indd 349 12/10/08 6:05:36 PM12/10/08 6:05:36 PM
350
Part II: Comic Book Fan Site
$headers[] = ‘CC: ‘ . $this- > CCAddress;
}
if (!empty($this- > BCCAddress)) {
$headers[] = ‘BCC: ‘ . $this- > BCCAddress;
}
The $sendText and $sendHTML properties are checked to determine what format the e - mail should
be sent in, starting with plaintext:
if ($this- > sendText & & !$this- > sendHTML) {
$message = $this- > textBody;
If the e - mail is specified as HTML - only, the headers and message body are set accordingly:
} elseif (!$this- > sendText & & $this- > sendHTML) {
$headers[] = ‘MIME-Version: 1.0’;
$headers[] = ‘Content-type: text/html; charset=”iso-8859-1”’;
$headers[] = ‘Content-Transfer-Encoding: 7bit’;
$message = $this- > HTMLBody;
In the case of multipart e - mails, the boundary tokens are set, and the e - mail message body is
constructed with both the
$textBody and $HTMLBody properties.
} elseif ($this- > sendText & & $this- > sendHTML) {
$boundary = ‘==MP_Bound_xyccr948x==’;
$headers[] = ‘MIME-Version: 1.0’;
$headers[] = ‘Content-type: multipart/alternative; boundary=”’ .
$boundary . ‘”’;
$message = ‘This is a Multipart Message in MIME format.’ . “\n”;
$message .= ‘ ’ . $boundary . “\n”;
$message .= ‘Content-type: text/plain; charset=”iso-8859-1”’ . “\n”;
$message .= ‘Content-Transfer-Encoding: 7bit’ . “\n\n”;
$message .= $this- > textBody . “\n”;
$message .= ‘ ’ . $boundary . “\n”;
$message .= ‘Content-type: text/html; charset=”iso-8859-1”’ . “\n”;
$message .= ‘Content-Transfer-Encoding: 7bit’ . “\n\n”;
$message .= $this- > HTMLBody . “\n”;
$message .= ‘ ’ . $boundary . ‘ ’;
}
Finally, the send() method proceeds to send the e - mail after all the message and header construction
is complete.
$success = mail($this- > toAddress, $this- > subject, $message,
join(“\r\n”, $headers));
return $success;
c11.indd 350c11.indd 350 12/10/08 6:05:36 PM12/10/08 6:05:36 PM
Chapter 11: Sending E - mail
351
Perhaps you have noticed that the methods are defined using the keyword function . That ’ s
because a method and function are practically the same thing. The difference is more in terminology;
a method is a function that is defined as part of a class. You should also have noticed that the class ’ s
methods are declared as
public . Unlike the properties, the methods are allowed to be accessed from
outside the class.
The other scripts should be pretty straightforward. Starting in
mail_text.php , you include your
SimpleMail class, and create a new object instance of it:
require ‘class.SimpleMail.php’;
$message = new SimpleMail();
Next, the required properties are set:
$message- > setToAddress(‘’);
$message- > setSubject(‘Testing text email’);
$message- > setTextBody(‘This is a test using plain text email!’);
And finally, the e - mail is sent, giving a success message:
if ($message- > send()) {
echo ‘Text email sent successfully!’;
} else {
echo ‘Sending of text email failed!’;
}
When sending HTML - formatted e - mail, as in mail_html.php , you begin roughly the same way,
including the
class.SimpleMail.php file and creating a new instance of a SimpleMail object. It
differs when you start setting the properties of the mail:
$message- > setSendText(false);
$message- > setToAddress(‘’);
$message- > setSubject(‘Testing HTML Email’);
$message- > setHTMLBody(‘ < html > < p > This is a test using < b > HTML
email < /b > ! < /p > < /html > ’);
There are two things to take note of here. First, you ’ re using the setHTMLBody() method instead of
the
setTextBody() message to provide your message. If you used the setTextBody() method
instead of
setHTMLBody() , then your e - mail would be empty! Second, you ’ re explicitly turning off
plaintext sending. If you didn ’ t turn off plaintext sending, then the value for
$sendText would be
true (the default value), and the e - mail would be sent as multipart.
In the multipart example script,
mail_multipart.php , you add extra header fields, such as From , Cc ,
and
Bcc :
$message- > setToAddress(‘’);
$message- > setFromAddress(‘’);
$message- > setCCAddress(‘’);
$message- > setBCCAddress(‘’);
$message- > setSubject(‘Testing Multipart Email’);
$message- > setTextBody(‘This is the plain text portion of the email!’);
$message- > setHTMLBody(‘ < html > < p > This is the < b > HTML portion < /b > of the
email! < /p > < /html > ’);
c11.indd 351c11.indd 351 12/10/08 6:05:37 PM12/10/08 6:05:37 PM
352
Part II: Comic Book Fan Site
No extra effort is needed to send a multipart message, other than specifying both a plaintext message
and an HTML message. How simple is that?
In the final example, you use the basic emulation of PHP ’ s
mail() function that the class provides.
Behold the short and sweet
mail_quick.php :
< ?php
require ‘class.SimpleMail.php’;
$message = new SimpleMail();
if ($message- > send(‘’, ‘Testing Quick Email’,
‘This is a quick test of SimpleMail- > send().’)) {
echo ‘Quick mail sent successfully!’;
} else {
echo ‘Sending the quick mail failed!’;
}
? >
All you had to do was include the class file and call the send method, using the three required
parameters!
Summary
In this chapter, you ’ ve looked at PHP ’ s mail() function and learned how to use it, by creating a
postcard application. You may have seen similar applications at Hallmark ’ s or Yahoo! ’ s web sites
(
www.hallmark.com and www.yahoo.americangreetings.com ). Your application is not as complex
as theirs, but with a little bit more work, it shouldn ’ t be too difficult to offer your users some really
terrific features.
You ’ ve also created a simple e - mail – sending PHP class that can be reused in applications that need basic
e - mail functionality. Now you won ’ t have to recode those messy multipart e - mail messages each time!
Keep your eyes peeled in future chapters because it will be popping up from time to time to lend a hand.
The
mail() function gives PHP the capability to communicate with the outside world, whether it be
with users of the web site, web site or server administrators, or even another server. There are many
opportunities to use
mail() . A simple form on the web page that a user fills out to describe a technical
problem can be immediately e - mailed to a tech support person, for example. Or the PHP server can send
the web site administrator an e - mail any time a web page displays a fatal error. Complicated workflow
applications can be created, such as content management applications.
c11.indd 352c11.indd 352 12/10/08 6:05:37 PM12/10/08 6:05:37 PM
Chapter 11: Sending E - mail
353
You ’ ve experienced user interaction in this chapter by requiring that the user click a link in a
confirmation e - mail before sending the postcard. In the next chapter, you ’ ll take the interaction a step
further, as you learn how to let the user create an account on your site. With this feature, you can keep
track of your users and present custom information based on each user ’ s preferences.
Exercises
See how you might accomplish the following tasks:
1. Create code to send a message to an e - mail account and blind carbon copy (BCC) yourself or
another account.
2. Create a simple web form that e - mails comments or suggestions to an account of your choosing.
c11.indd 353c11.indd 353 12/10/08 6:05:37 PM12/10/08 6:05:37 PM
c11.indd 354c11.indd 354 12/10/08 6:05:38 PM12/10/08 6:05:38 PM
12
User Logins, Profiles, and
Personalization
In this chapter, you ’ ll learn how to implement user logins and profiles and how to personalize
your web pages using PHP ’ s session and cookie functions. You will create a useful login and
personalization application that can easily be integrated into other applications you ’ ve created in
this book thus far.
With Apache ’ s support for additional per - directory configuration files and PHP ’ s support for
sessions, you can prevent hackers and the general public from stumbling onto your sensitive files.
Session and cookie functions are probably two of the most important and useful functions you will
encounter in the entire PHP programming language, because of the ability they give you to
identify an individual viewing a page and restrict or grant access to certain content. You wouldn ’ t
want just anyone nosing about in your important files, and you certainly wouldn ’ t want a
malicious visitor changing information displayed on your web site in any way he or she desired.
Specifically, you learn how to do the following in this chapter:
Restrict access to files and directories via
htpasswd .
Use PHP to accomplish the same functionality as with
htpasswd , but with more control
and flexibility .
Store user and admin information in a database and utilize database - driven logins .
Create a registration system with required and optional fields for users to sign up .
Use cookies to preserve login information between sessions .
Modify a navigation system depending on whether a user has logged in or not .
❑
❑
❑
❑
❑
❑
c12.indd 355c12.indd 355 12/10/08 6:07:20 PM12/10/08 6:07:20 PM