Multimedia cho Joomla part 3 pps
Bạn đang xem bản rút gọn của tài liệu. Xem và tải ngay bản đầy đủ của tài liệu tại đây (2.15 MB, 10 trang )
Managing Your
Joomla! Media
One of the most important tasks when using multimedia in our Joomla! websites is
the ability to upload and manage the les on your web server. Once uploaded, this
content may not require further attention, or you might need the ability for constant
management and le revisions.
In this chapter, we will look at using the built-in Joomla! Media Manager, as well as
alternative methods for managing our website media and les. This chapter includes:
Overview of the Joomla! Media Manager
Uploading media using the Media Manager
The view
Organizing your content
Uploading your content
Managing media using the Media Manager
Alternative methods of managing les and media
Third-party le management extensions
•
•
•
•
•
•
•
•
This material is copyright and is licensed for the sole use by jackie tracey on 23rd February 2010
953 Quincy Drive, , Brick, , 08724
Managing Your Joomla! Media
[ 28 ]
Overview of the Joomla! Media Manager
The Media Manager is a useful le management tool, which is included in the
Joomla! CMS.
The Media Manager tool is located within your administration area and can be
accessed by using the "Quick Link" icon on your Control Panel, or by going to
the Menu: Site|Media Manager:
One of the main purposes of the Media Manager is to easily allow site
administrators, and frontend users with permissions, the ability to upload and
manage les for their Joomla! site. In circumstances where you do not have FTP
(File Transfer Protocol) access to your web server, the media manager might be the
only available tool with which you can add new images, videos, documents, and
other les to your website.
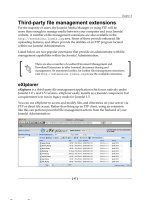
Uploading media using the Media Manager
During initial site development, there are usually regular requirements to upload
new les to your Joomla! site. Depending on the content for your website, this
process can decrease as you move into the maintenance stages, or stay as a
requirement for sites which are updated often.
Media Manager settings
As with all software applications, the Media Manager tool contains a set of
predened settings. Before using the Media Manager for the rst time, it is
recommended that you take a look at these as they offer the ability to customize
media handling for your website. Depending on your le requirements, adjusting
the media conguration settings now may save you time and effort down the line.
This material is copyright and is licensed for the sole use by jackie tracey on 23rd February 2010
953 Quincy Drive, , Brick, , 08724
Chapter 2
[ 29 ]
Your Joomla! site Media Settings can be found by going to Site|Global
Conguration. Once the page has loaded, you will then need to click on
the link named System.
The Media Settings area not only allows you to adjust settings related to the Media
Manager, but also contains general settings for the media used throughout your
Joomla! website. Information regarding each setting is as follows:
The elds are:
Legal Extensions (File Types)
This eld is a comma-separated list of le types that you want to allow to
be uploaded to your Joomla! website. This setting applies to the frontend of
your site, as well as the backend which includes the Media Manager tool.
Maximum Size (in bytes)
This eld holds the maximum size of the le (in bytes) to be uploaded. This
can be set to "0" if you do not wish to restrict your le upload sizes. Most web
servers will have their own le size limit that is usually congurable for the
server by adjusting the server information le.
Path to Media Folder
By default, Joomla! has a media folder called
<joomlaroot>/images. This is
the area where all les will be uploaded to when using the Media Manager.
You can change this value to a different directory if you wish, creating a
default path for managing your media. The majority of Joomla! projects
would probably leave this value as default.
•
•
•
This material is copyright and is licensed for the sole use by jackie tracey on 23rd February 2010
953 Quincy Drive, , Brick, , 08724
Managing Your Joomla! Media
[ 30 ]
If you do decide to use another folder name for your media
directory, it is important to leave the current /images
directory on the server as this can often be used by other
components.
Path to Image Folder
This is generally a path where you put your images for your Joomla!
Content Articles.
By default, it is set to
<joomlaroot>/images/stories. You can change this to
be what you wish. If you want to access this folder from the Media Manager,
then make this a subfolder of the "Media Folder" previously mentioned. For
example, <joomlaroot><mediafoldername>/<imagefoldername>.
If you do decide to use another folder name for your image
directory, it is important to leave the current /images/
stories directory on the server as this can often be used
by other components.
Restrict Uploads
This feature restricts uploads by user type. The default is set to Yes, which
means that users below the status of a "Manager" will only get one folder
option to upload les into. That folder is your main "Media Folder". If you set
this option to No, then users will also be allowed to upload to subdirectories
within your main media folder.
Check MIME Types
This is a security feature, and uses MIME Magic or Fileinfo to verify
your uploaded le types. By checking the MIME le information, you help
ensure users don't upload malicious les to your site. Further information
about Fileinfo can be found at
/>fileinfo.php
.
Legal Image Extensions (File Types)
This is a list of legal image extensions that you and other users are allowed to
upload to your Joomla! site. The default list includes bmp, gif, jpg, and png
les. Adjust, if you require further image extension types.
•
•
•
•
This material is copyright and is licensed for the sole use by jackie tracey on 23rd February 2010
953 Quincy Drive, , Brick, , 08724
Chapter 2
[ 31 ]
Ignored Extensions
This setting checks the le types which should be ignored for MIME
checking. By default, this is left blank so all les would be included if
MIME checking is turned on.
Legal MIME Types
This sets the list of legal MIME types for uploading. By default, this setting
includes some le types, and it is recommended that you do not adjust this
setting unless you know what you are doing.
Illegal MIME Types
This sets the list of illegal MIME types for uploading. As with the legal MIME
types, it is recommended that you do not adjust this setting unless you know
what you are doing.
Enable Flash Uploader
The Media Manager contains an integrated Flash uploader tool. If enabled,
this allows you to upload multiple les at once. The default setting is No.
If you do decide to enable the Flash uploader and receive uploading
issues, then disable this feature again. Issues can arise from incompatible
Adobe Flash settings.
If you have made adjustments to the default Joomla! Media Settings, then you will
need to save these by clicking on the Save button at the top right-hand side of the
page in the Global Conguration section. A conrmation message to inform you
that these settings have been saved should show on the following page.
Now that we have congured our site's Media Settings, let's head over to take a
detailed look at the Media Manager upload feature.
The Media Manager tool is located within your administration area and can be
accessed by using the "Quick Link" icon on your Control Panel, or by going to
the Menu: Site|Media Manager.
•
•
•
•
This material is copyright and is licensed for the sole use by jackie tracey on 23rd February 2010
953 Quincy Drive, , Brick, , 08724
Managing Your Joomla! Media
[ 32 ]
The view
When you open the Media Manager, one of the initial options available to you is the
choice of viewing your les and the associated information about them.
The two options are "Thumbnail View" and "Detailed View".
1. Thumbnail View: The rst (and default setting) is called Thumbnail View.
This offers a thumbnail preview of your les and a delete button below
each le. Thumbnail View is great for a quick scan of your les (especially
images), as you can actually see the list and a thumbnail icon in front of you.
This view, however, can be cumbersome when dealing with larger quantities
of les.
2. Detailed View: The Detailed View option shows a ve column layout. This
contains additional information about each le. The following information
is offered in the Detailed View:
File Preview
File Name in alphabetical order
Image Dimensions
File Size
Delete option
°
°
°
°
°
This material is copyright and is licensed for the sole use by jackie tracey on 23rd February 2010
953 Quincy Drive, , Brick, , 08724
Chapter 2
[ 33 ]
It is a simple click to switch between both of these view types. Depending on the
directory you are in and how many les are contained within this, you may
nd that you often use both of these views.
Organizing your content
By default, the Joomla! Media Manager contains a number of subdirectories which
will show up in a column to the left of the Media Manager. By clicking on the folders
in this tree structure, you can show their content in the right-hand section of the
Media Manager. Navigation through subdirectories in the Media Manager can be
done using this method, or by clicking on the folders in the right-hand section which
will also show the contents.
The organization of your website media content is of utmost importance. Just like
with your Joomla! Articles, the correct structure of your les can save you time
and frustration down the line when you want to easily nd an image or media le.
One of the limitations in the current version of the Media Manager is that les
cannot be moved into other directories. This means that it's important to get your
le structure correct at the start of the project, and then les can easily be uploaded
to their destination.
This material is copyright and is licensed for the sole use by jackie tracey on 23rd February 2010
953 Quincy Drive, , Brick, , 08724
Managing Your Joomla! Media
[ 34 ]
Creating a new directory
At the top of the Media Manager, you will see a horizontal bar showing the current
directory location you are in. New directories can be easily created in the Media
Manager by using the Create Folder, situated to the right of this bar.
To make a new directory, rst make sure that you are in the directory where you
wish to create a new folder. Populate the text eld to the left of the
Create Folder button and then click on this button to create your new directory
with that name.
The page should reload, showing your new directory in place.
A forward slash is already pre-populated, so you only need to enter the
name of the directory and nothing else.
Just like with your Joomla! Articles, the better you organize your site les, the easier
it is to manage these on an ongoing basis.
Deleting files
As with most things, a spring clean regularly can help in keeping things organized
and efcient.
If you are not using your les any more or have created newer versions of them, then
you can easily delete them by clicking on the red "X" icon next to the le type:
If you wish to delete multiple les at once, then you tick the checkbox next to each
le, and click on the Delete button in the top-right of the Media Manager.
This material is copyright and is licensed for the sole use by jackie tracey on 23rd February 2010
953 Quincy Drive, , Brick, , 08724
Chapter 2
[ 35 ]
Uploading your content
Depending on your "Media Settings" in the Global Conguration, you have the
option of using two types of upload features in the Media Manager.
Single file upload
The default uploader in the Media Manager is the single le upload tool, which
is located at the bottom of the Media Manager. This tool will allow you to browse
your local computer for a single le type, and upload this to your web server in
the directory you have chosen.
To upload les using this method, rst make sure that your destination for the le
upload is correct. The easiest way to do this is by using the Folder Directory Menu
on the left-hand side, and making sure the directory you want to upload your le
to is highlighted.
To upload a le, click on the Choose File button. This will allow you to browse your
local computer for the le to upload. Once selected, click on the Start Upload button
to upload this le to your chosen directory on your web server. The Media Manager
will refresh once the le is uploaded and you should see your new le inside your
selected directory.
This material is copyright and is licensed for the sole use by jackie tracey on 23rd February 2010
953 Quincy Drive, , Brick, , 08724
Managing Your Joomla! Media
[ 36 ]
Multiple file uploads
If you have enabled the "Enable Flash Uploader" option in your Global Conguration
Media Settings, then you should be able to benet from the Flash based upload feature.
Like the single le feature, the multiple le Flash uploader is also located at the
bottom of the Media Manager.
To upload multiple les, rst make sure that the directory you wish to upload to is
highlighted. Click on the Browse Files button and browse your local computer for a
le. Repeat this process until you have a list of the les you wish to upload. Click on
the Start Upload button to upload the les.
The process will show the status of each le upload.
At the time of writing this book, Flash 11s security settings have broken
the built-in Joomla! Media Manager Flash Multi-le upload tool. This may
be addressed in future releases of Joomla! However, the single le upload
feature is the stable upload tool to use at present.
Managing media using the Media Manager
As mentioned earlier in this chapter, the necessity for good organization of your site
content is very important.
Analyzing your project requirements at the start may save you hours of work in
the future. A dened directory structure and clear descriptions of these folders can
be very helpful for not only your own management, but for other administrators
and users who may be uploading les to the site server. Even the default
<joomlaroot>/images/stories structure can become challenging at times;
now, did I put it in the /images folder or was it the /images/stories folder?
This material is copyright and is licensed for the sole use by jackie tracey on 23rd February 2010
953 Quincy Drive, , Brick, , 08724