CCNA Wireless Official Exam Certification Guide part 30 pps
Bạn đang xem bản rút gọn của tài liệu. Xem và tải ngay bản đầy đủ của tài liệu tại đây (556.45 KB, 10 trang )
262 CCNA Wireless Official Exam Certification Guide
2. Which methods can be used to assign an IP address to a standalone AP? (Choose all
that apply.)
a. DHCP
b. Static through the CLI
c. TFTP
d. DNS
3. What are three methods that require an IP address? (Choose all that apply.)
a. Console to it using a console cable and the console port.
b. Telnet into it if it has an IP address.
c. Web browse to it if it has an IP address.
d. SSH into it if it has an IP address.
4. Which of the following methods can be used to obtain the IP address of the AP?
(Choose all that apply.)
a. DHCP server logs
b. CDP
c. NTP server statistics
d. IP Setup Utility
5. You can apply a separate SSID to different radios. True or False?
a. True
b. False
6. More than one authentication server can be configured. True or False?
a. True
b. False
7. What is required if you are converting from standalone to lightweight mode? (Choose
all that apply.)
a. An upgrade image
b. A DHCP server
c. An upgrade tool
d. A WLC
16_1587202115_ch14.qxd 9/29/08 2:40 PM Page 262
Chapter 14: Migrating Standalone APs to LWAPP 263
8. If you are using the Autonomous to Lightweight Mode Upgrade tool, what else must
you obtain from Cisco?
a. A TFTP server
b. A WCS
c. The correct LWAPP software (version 12.3(JA) or better)
d. Autonomous to Lightweight Mode Upgrade image
9. What protocol is used for the upgrade from autonomous to lightweight?
a. FTP
b. TFTP
c. SCP
d. SSH
10. A controller must be reachable after the AP is upgraded for the AP to function. True
or False?
a. True
b. False
16_1587202115_ch14.qxd 9/29/08 2:40 PM Page 263
264 CCNA Wireless Official Exam Certification Guide
Foundation Topics
Connecting to a Standalone AP
Almost any AP that is capable of operating in both autonomous and lightweight mode
ships in autonomous mode. You need to convert the device to lightweight mode if you
plan to use it in that mode. Luckily, you can accomplish this conversion in two ways. You
can get a Windows application called the Upgrade tool to do it, and you can get it done
using the Cisco Wireless Control System (WCS). Either method accomplishes the same
task; it is simply a matter of what you prefer and what you have access to. After the device
is in lightweight mode, you can manage it through the Cisco wireless LAN controllers
(WLC). Understand, however, that Cisco provides customers with the flexibility of run-
ning either IOS or LWAPP, and an AP can be purchased in whatever form as needed.
Accessing the AP in Autonomous Mode
You can access an autonomous AP in four ways:
■ Console to it using a console cable and the console port.
■ Telnet into it if it has an IP address.
■ Browse to it with a web browser if it has an IP address.
■ SSH into it if configured (preferred over Telnet).
You might be wondering how to get an IP address for an autonomous AP. The answer is
simple: use DHCP. You just plug in the autonomous AP, and it grabs an address on its own.
Note, however, that the device does not have a service set identifier (SSID) configured by
default, and the radio is disabled by default; this is true for any IOS release later than
12.3(4)JA. In fact, the autonomous AP has a yellow sticker right on the outside of the box
that indicates this. When you consider why, you begin to realize that it is a good security
mechanism. You do not have to worry about people associating with the AP while you are
scrambling to set it up.
If you are wondering how you are going the find the AP when it has a dynamic address,
you can try to get the IP from the DHCP server, which you might or might not have access
to. You can also use Cisco Discovery Protocol (CDP) on the switch that the AP is con-
nected to, and you can sometimes use the command show arp | include mac-address (as-
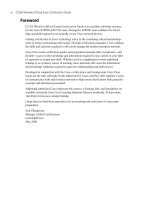
suming that the IP address is in the CAM table), or you can use a tool created by Cisco
called the IP Setup Utility, seen in Figure 14-1. The IP Setup Utility takes the MAC ad-
dress of the AP and resolves the IP address associated with it. You can get the MAC ad-
dress from a sticker on the AP.
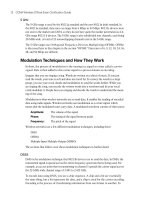
After you obtain the IP address, you can access the AP via a web browser. Figure 14-2
shows the initial page when you log in to the AP.
To quickly configure the settings of the AP, you can use the Express Setup and Express
Security Pages.
Key
Topi
c
16_1587202115_ch14.qxd 9/29/08 2:40 PM Page 264
Figure 14-1 IP Setup Utility
Figure 14-2 Initial Login to the AP
Chapter 14: Migrating Standalone APs to LWAPP 265
Using the Express Setup and Express Security for
Basic Configuration
From the initial login screen, you quickly can gain valuable information about clients, re-
peaters, interfaces, and events.
To quickly set up the AP, use the EXPRESS SET-UP and EXPRESS SECURITY links in
the left menu. You are prompted for the following:
■ Hostname of the device
Key
Topi
c
16_1587202115_ch14.qxd 9/29/08 2:40 PM Page 265
266 CCNA Wireless Official Exam Certification Guide
■ Method of IP address assignment
■ IP address
■ Subnet mask
■ Default gateway
■ SNMP community
■ Radio properties, as seen in Figure 14-3
■ 802.11G properties, including its role
■ 802.11A properties, including its role
It is that easy. Simply click Apply for the settings in the Express Setup page to take effect.
As for the Express Security configuration, this is where you assign an SSID, determine
whether it will be broadcast, apply VLANs, and define the security settings such as Wired
Equivalent Privacy (WEP), Wi-Fi Protected Access (WPA), and WPA2. If you enable
VLAN IDs, you can have more than one SSID and apply the security settings differently
to each VLAN. Again, you need to apply the changes with the Apply button. Figure 14-4
shows a sample of the Express Security page.
Figure 14-3 Express Setup Radio Properties
16_1587202115_ch14.qxd 9/29/08 2:40 PM Page 266
Figure 14-4 Express Security Setup
Chapter 14: Migrating Standalone APs to LWAPP 267
Following are some other important facts related to the configuration of SSIDS and secu-
rity:
■ You cannot tie an SSID to a particular radio; the SSID configured applies to both ra-
dios.
■ You cannot set up more than one authentication server.
■ You cannot combine authentication types.
After applying the Express Setup and Express Security configuration, you can use the
web interface for additional configuration.
Working with the Web Interface
At this point, assuming you have followed along through the section, “Using the Express
Setup and Express Security for Basic Configuration,” you do not necessarily have a func-
tional AP. As mentioned previously, the radios are now disabled by default. You can see
this from the home page:
Step 1. Click HOME from the left menu.
Step 2. View the status of the radios under the Network Interfaces section.
16_1587202115_ch14.qxd 9/29/08 2:40 PM Page 267
268 CCNA Wireless Official Exam Certification Guide
You can use two different methods to enable the radios:
■ Select the NETWORK INTERFACES link on the left menu, select the ra-
dio, and then select the Settings button and enable the radio with the
Enable radio button.
■ Click on the radio link on the home page, as seen in Figure 14-5 (in this
case, Radio0-802.11G or Radio1-802-802.11A).
After you have accessed the Settings page, you can enable the radio following the same
process as the first method described. When the radio is enabled, you have a working AP.
Note: You might want to spend some time getting familiar with the options in the web in-
terface; however, for the CCNA wireless exam, it is not as significant of a topic as the light-
weight configurations.
Figure 14-5 Radio Configuration
16_1587202115_ch14.qxd 9/29/08 2:40 PM Page 268
Chapter 14: Migrating Standalone APs to LWAPP 269
That being said, with a functional AP, you can allow users access to the network. Recall,
however, that the goal is to use this AP with a controller. This means you need to convert
this autonomous AP to a lightweight AP.
Converting to LWAPP
Three methods you can use to convert the AP to lightweight mode are as follows:
■ Use the IOS to LWAPP conversion utility. This is an installable application that you
can download from Cisco.com.
■ Use the WCS. If you have a WCS, this method is probably preferred; however, it is
not covered as part of the CCNA wireless certification.
■ As of July 2005, simply archive the image to the AP to convert it to LWAPP.
The section that follows examines the IOS-to-LWAPP conversion.
Converting to LWAPP Using the IOS-to-LWAPP Conversion Utility
Before you can use the IOS-to-LWAPP conversion utility, you need to obtain the software.
To do so, you need to access the AP download page at Cisco.com. To do so, follow these
steps:
Step 1. Go to www.cisco.com/go/wireless.
Step 2. Click the AP you are working with. The list of APs is at the bottom of the
page.
Step 3. On the AP page, from the right side of the page in a box labeled Support,
click the Download Software link.
Step 4. Using the menu tree, find the AP you are looking for, and expand the folder.
Step 5. Select the link to the AP inside that folder.
Step 6. Enter your Cisco username and password.
When you have authenticated to Cisco, you will see a page similar to the one in Figure
14-6. Notice that this page offers four links:
■ Autonomous to Lightweight Mode Upgrade Image
■ Autonomous to Lightweight Mode Upgrade Tool
■ IOS Software
■ IP Setup Utility (IPSU)
The first link is to the Autonomous to Lightweight Mode Upgrade Image. You need this
image to perform the upgrade. It is not the same image that runs on the controller. Recall
that the controller and AP need to be on the same version; however, any mismatch is cor-
rected when an AP finds a controller. If the code versions are different, the controller ei-
ther upgrades or downgrades the AP. This Autonomous to Lightweight Mode Upgrade
image simply gets LWAPP functionality on the AP. From there, the controller can handle
the rest.
16_1587202115_ch14.qxd 9/29/08 2:40 PM Page 269
270 CCNA Wireless Official Exam Certification Guide
Figure 14-6 Download Area of Cisco.com
The second link on the Downloads page is to the Autonomous to Lightweight Mode Up-
grade Tool. This is the software application you need to perform the upgrade. This soft-
ware installs on a Windows computer.
The third link on the Downloads page is to IOS Software, and the fourth link is for the IP
Setup Utility. Select the link to download the software you need. Because you want the IP
Setup Utility for this task, click that link.
After you have the Autonomous to Lightweight Mode Upgrade Tool software and the Au-
tonomous to Lightweight Mode Upgrade image, you are ready to install it on a Windows
PC. After it is installed, you can perform the upgrade.
Before performing the upgrade, however, you must meet the following requirements:
■ IOS on the AP must be version 12.3(7)JA or above. If it is not, upgrade it first by se-
lecting the IOS Software link on the Downloads page.
■ The WLC must be running version 3.1 or later. Keep in mind that after you do the up-
grade from autonomous to lightweight, the AP cannot function without the con-
troller, and the console port is no longer useful. Also, the upgrade supports only
Layer 3 LWAPP mode.
To begin the upgrade, first check to see if you are running a code version on the AP that is
capable of being upgraded. In Figure 14-7, the code version is 12.3(7)JA4. This indicates
that the version is compatible.
Key
Topi
c
16_1587202115_ch14.qxd 9/29/08 2:40 PM Page 270
Chapter 14: Migrating Standalone APs to LWAPP 271
Figure 14-7 Verify the IOS Version
Note: You can order new LWAPP-capable APs with the lightweight code already installed
if desired.
After you have verified the IOS version, you need to make sure that the controller and the
AP are on the same subnet or that the controller is reachable after the upgrade. You can do
this via DHCP option 43 or DNS.
The next step is to prepare a text file of APs that you want to upgrade. I recommend using
Notepad so that you can save it as a .txt file. In the text file, the format should resemble
the following:
ap-ip-address, telnet-username, telnet-Password, enable-password
Create a new line for each AP that you want to convert. When you are finished with the
text file, save it somewhere that you can find it, and name it something like APList.txt.
You are going to browse to this file in the Upgrade tool interface.
As a final preparation step, you need to make sure that the upgrade code is on the local
machine. The steps described in the preceding paragraphs detailed where you can obtain
this, so make sure you have it.
You will be using the TFTP protocol to upgrade the AP, so you can use Tftpd32, which
you can download for free from , or you can use the TFTP serv-
ice that is integrated in the Upgrade tool.
16_1587202115_ch14.qxd 9/29/08 2:40 PM Page 271