CCNA Wireless Official Exam Certification Guide part 43 ppt
Bạn đang xem bản rút gọn của tài liệu. Xem và tải ngay bản đầy đủ của tài liệu tại đây (1.31 MB, 10 trang )
392 CCNA Wireless Official Exam Certification Guide
Figure 19-7 Verify the AP Upgrade
Upgrading WCS
Beginning in WCS version 4.2, the WCS code upgrade script made it possible to upgrade
the WCS while retaining the directories, root password, and license information. The op-
eration is automated and simply involves downloading the install file from the Cisco web-
site and running it on the machine on which the WCS is installed. During the install
process, you are informed that a previous install has been detected, and you’re asked to
choose between upgrading and installing. Upgrading retains all the information from the
previous install. If you choose the install option, it will be as if WCS was not previously
there; in other words, it’s a fresh install.
Managing Configurations
When working in the Cisco Unified Wireless Environment, you deal with a number of
configuration files. You potentially have numerous controller configurations as well as AP
configurations. When you’re working with the controller, it’s a good idea to save your con-
figuration often. Clicking the Save Configuration link can save a controller’s configura-
tion. It is found in the top-right corner of the web interface, as shown in Figure 19-8.
22_1587202115_ch19.qxp 9/29/08 2:46 PM Page 392
Chapter 19: Maintaining Wireless Networks 393
Figure 19-8 Save the Configuration
In addition to saving the configuration to NVRAM, you can back up the configuration on
a remote TFTP server. Saving to a TFTP server is similar to how you upgraded the con-
troller, only this time you are moving a file in the opposite direction. The setup requires
the use of TFTP server software installed on the destination computer where you want to
back up the file. TFTP uses UDP port 69, so make sure that nothing in the transit path,
such as a firewall, might block that type of traffic. If you have already upgraded from the
TFTP server, you probably won’t have any issues.
The next step is to choose COMMANDS > Upload File. In the drop-down box, choose
Configuration. Select the option to encrypt the file is you want, enter the server’s address
and configuration file name, and click upload. If you don’t choose to encrypt it, you get a
pop-up warning when you click Upload.
After you upload the configuration file, you can download this file to other controllers.
However, you cannot read it as you would a configuration file from a router or switch, be-
cause it is an XML file.
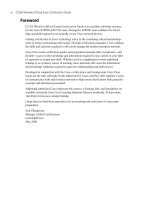
Suppose you wanted to back up the controller configuration to 192.168.2.99. Simply enter
the IP address 192.168.2.99 in the IP Address field and give it a name, as shown in Figure
19-9. In this example, the file name is 1WLC1.cfg.
22_1587202115_ch19.qxp 9/29/08 2:46 PM Page 393
394 CCNA Wireless Official Exam Certification Guide
Click the Upload button to begin the process. This takes a short time. After completion,
you can verify by viewing the directory on the TFTP server where the files are stored, as
shown in Figure 19-10. After viewing the directory on the TFTP server, you can see that
the upload was successful. The file has been backed up and can now be used on other
controllers.
Further exploration shows that the file can be opened and viewed but is not very readable,
as shown in Figure 19-11.
If you do want to view the configuration in a readable format, you could issue the show
running-config command from the CLI on the controller. In Example 19-1, the show
running-config command has been entered on the controller. Using this command you
can see line by line how the controller is configured. It’s important to note the difference
between this command and the show run-config command, because they produce very
different output. show running-config displays the contents of the configuration line by
line. show run-config provides information about the state of the system.
Figure 19-9 Backing Up the Controller Configuration to TFTP
Key
Topi
c
22_1587202115_ch19.qxp 9/29/08 2:46 PM Page 394
Chapter 19: Maintaining Wireless Networks 395
Figure 19-10 TFTP Directory
Figure 19-11 Viewing the File on the TFTP Server
22_1587202115_ch19.qxp 9/29/08 2:46 PM Page 395
396 CCNA Wireless Official Exam Certification Guide
Example 19-1 show running-config Command Output
(Cisco Controller) > show running-config
802.11a 11nSupport a-mpdu tx priority 0 disable
802.11a cac voice tspec-inactivity-timeout ignore
802.11a cac video tspec-inactivity-timeout ignore
802.11a cac voice stream-size 84000 max-streams 2
802.11b 11nSupport a-mpdu tx priority 0 disable
802.11b cac voice tspec-inactivity-timeout ignore
802.11b cac video tspec-inactivity-timeout ignore
802.11b cac voice stream-size 84000 max-streams 2
aaa auth mgmt local radius
advanced 802.11a receiver pico-cell-V2 rx_sense_thrld 0 0 0
advanced 802.11a receiver pico-cell-V2 cca_sense_thrld 0 0 0
advanced 802.11a receiver pico-cell-V2 sta_tx_pwr 0 0 0
Location Summary
Algorithm used: Average
Client
RSSI expiry timeout: 150 sec
Half life: 60 sec
Notify Threshold: 0 db
Calibrating Client
RSSI expiry timeout: 30 sec
Half life: 0 sec
Rogue AP
RSSI expiry timeout: 120 sec
Half life: 0 sec
Notify Threshold: 0 db
RFID Tag
RSSI expiry timeout: 5 sec
Half life: 0 sec
Notify Threshold: 0 db
location rssi-half-life tags 0
location rssi-half-life rogue-aps 0
location expiry tags 5
location expiry client 150
location expiry calibrating-client 30
location expiry rogue-aps 120
advanced eap identity-request-timeout 1
advanced eap identity-request-retries 20
advanced eap request-timeout 1
ap syslog host global 255.255.255.255
interface create guest_lan 80
interface address ap-manager 192.168.1.51 255.255.255.0 192.168.1.1
interface address dynamic-interface guest_lan 172.30.1.50 255.255.255.0 172.30.1.1
interface address management 192.168.1.50 255.255.255.0 192.168.1.1
22_1587202115_ch19.qxp 9/29/08 2:46 PM Page 396
Chapter 19: Maintaining Wireless Networks 397
interface address service-port 192.168.100.1 255.255.255.0
interface address virtual 1.1.1.1
interface dhcp ap-manager primary 192.168.1.1
interface dhcp dynamic-interface guest_lan primary 172.30.1.1
interface dhcp management primary 192.168.1.1
interface dhcp service-port disable
interface vlan ap-manager 1
interface vlan guest_lan 80
interface vlan management 1
interface port ap-manager 1
interface port guest_lan 1
interface port management 1
load-balancing window 5
logging buffered 1
mesh security eap
mgmtuser add admin **** read-write
mobility group domain CP_Mobile
mobility group anchor wlan add 2 192.168.1.50
mobility dscp value for inter-controller mobility packets 0
network webmode enable
network rf-network-name CP_Mobile
radius fallback-test mode off
radius fallback-test username cisco-probe
radius fallback-test interval 300
snmp version v2c enable
snmp version v3 enable
sysname 1WLC1
wlan create 1 Open Open
wlan create 2 Public_Guest_Access GUESTNET
wlan interface 2 guest_lan
wlan session-timeout 1 1800
wlan session-timeout 2 disable
wlan wmm allow 1
wlan wmm allow 2
wlan security wpa disable 2
wlan security web-auth server-precedence 1
wlan security web-auth server-precedence 2
wlan security wpa akm ft reassociation-time 0 1
wlan security wpa akm ft over-the-air disable 1
wlan security wpa akm ft over-the-ds disable 1
wlan security wpa akm ft reassociation-time 0 2
wlan security wpa akm ft over-the-air disable 2
wlan security wpa akm ft over-the-ds disable 2
wlan enable 1
wlan enable 2
22_1587202115_ch19.qxp 9/29/08 2:46 PM Page 397
398 CCNA Wireless Official Exam Certification Guide
Figure 19-12 Options for Resetting the AP
Working with AP Configuration Files
Keeping in mind that the AP gets its configuration from the controller should make it clear
that you don’t really have to do much to manage AP configurations. However, you might
encounter scenarios where you want to reset an AP to its factory default. You can do this
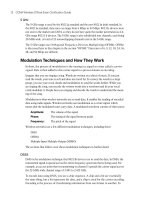
at the AP itself, but you require physical access to the AP. To reset the AP from the con-
troller, simply choose WIRELESS, choose the AP you want to reset, and scroll to the bot-
tom. You have two options, as shown in Figure 19-12. You can click Clear All Config or
Clear Config Except Static IP. The choice depends on what you want to happen. If you
use static IPs and want to reset the AP and remove it from the network, choose the second
option.
Resetting the Controller to the Defaults
Finally, if you decide to reset the controller to its factory defaults, you can choose
COMMANDS > Reset to Factory Default. This page presents a message similar to the
one shown in Figure 19-13; it explains what happens when you reset the controller to the
defaults. The controller needs to reboot for this to occur, because the configuration is not
only stored in NVRAM, but it is also active in RAM and is cleared only with a reboot.
You will lose connectivity when you do this.
22_1587202115_ch19.qxp 9/29/08 2:46 PM Page 398
Chapter 19: Maintaining Wireless Networks 399
Figure 19-13 Reset the Controller to the Factory Defaults
22_1587202115_ch19.qxp 9/29/08 2:46 PM Page 399
400 CCNA Wireless Official Exam Certification Guide
Exam Preparation Tasks
Review All the Key Topics
Review the most important topics from this chapter, denoted with the Key Topic icon.
Table 19-2 lists these key topics and the page number where each one can be found.
Definition of Key Terms
Define the following key terms from this chapter, and check your answers in the Glossary:
RTOS, RAM, NVRAM, TFTP
References
Cisco Wireless Control System Configuration Guide, Release 5.0: />en/US/docs/wireless/wcs/5.0/configuration/guide/wcstasks.html#wp1076844
Cisco Wireless LAN Controller Configuration Guide, Release 5.0: />en/US/docs/wireless/controller/5.0/configuration/guide/c5mfw.html
Table 19-2 Key Topics for Chapter 19
Key Topic Item Description Page Number
Figure 19-1 Verifying the software version 386
Figure 19-3 General details for the Lobby-AP 387
Paragraph from the section
“Controller Upgrade
Approaches”
A list of files contained in the
compressed upgrade file
388
Figure 19-5 Upgrading the controller via the web
interface
389
Paragraph from the section
“Upgrading an AP”
Bullet points about AP upgrades
and downgrades
391
Figure 19-9 Backing up the controller
configuration to TFTP
394
22_1587202115_ch19.qxp 9/29/08 2:46 PM Page 400
22_1587202115_ch19.qxp 9/29/08 2:46 PM Page 401