Xây dựng ứng dụng cho Android với HTML, CSS và javascript - part 7 pptx
Bạn đang xem bản rút gọn của tài liệu. Xem và tải ngay bản đầy đủ của tài liệu tại đây (4 MB, 10 trang )
Handling Long Titles
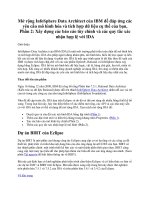
Suppose we had a page on our site with a title too long to fit in the header bar (Fig-
ure 3-4). We could just let the text break onto more than one line, but that would not
be very attractive. Instead, we can update the #header h1 styles such that long text will
be truncated with a trailing ellipsis (see Figure 3-5 and Example 3-7). This might be my
favorite little-known CSS trick.
Example 3-7. Adding an ellipsis to text that is too long for its container
#header h1 {
color: #222;
font-size: 20px;
font-weight: bold;
margin: 0 auto;
padding: 10px 0;
text-align: center;
text-shadow: 0px 1px 1px #fff;
max-width: 160px;
overflow: hidden;
white-space: nowrap;
text-overflow: ellipsis;
}
Figure 3-4. Text wrapping in the toolbar is not very attractive
Simple Bells and Whistles | 43
Download from www.eBookTM.com
Figure 3-5. but we can beautify it with a CSS ellipsis
Here’s the rundown: max-width: 160px
instructs the browser not to allow the h1 element
to grow wider than 160px. Then, overflow: hidden instructs the browser to chop off
any content that extends outside the element borders. Next, white-space: nowrap pre-
vents the browser from breaking the line into two. Without this line, the h1 would just
get taller to accommodate the text at the defined width. Finally, text-overflow: ellip
sis appends three dots to the end of any chopped-off text to indicate to the user that
she is not seeing the entire string.
Automatic Scroll-to-Top
Let’s say you have a page that is longer than the viewable area on the phone. The user
visits the page, scrolls down to the bottom, and clicks on a link to an even longer page.
In this case, the new page will show up “prescrolled” instead of at the top as you’d
expect.
Technically, this makes sense because we are not actually leaving the current (scrolled)
page, but it’s certainly a confusing situation for the user. To rectify the situation, we
can add a scrollTo() command to the loadPage() function (Example 3-8).
44 | Chapter 3: Advanced Styling
Download from www.eBookTM.com
Whenever a user clicks a link, the page will first jump to the top. This has the added
benefit of ensuring the loading graphic is visible if the user clicks a link at the bottom
of a long page.
Example 3-8. It’s a good idea to scroll back to the top when a user navigates to a new page
function loadPage(url) {
$('body').append('<div id="progress">Loading </div>');
scrollTo(0,0);
if (url == undefined) {
$('#container').load('index.html #header ul', hijackLinks);
} else {
$('#container').load(url + ' #content', hijackLinks);
}
}
Hijacking Local Links Only
Like most sites, ours has links to external pages (i.e., pages hosted on other domains).
We shouldn’t hijack these external links, because it wouldn’t make sense to inject their
HTML into our Android-specific layout. As shown in Example 3-9, we can add a con-
ditional that checks the URL for the existence of our domain name. If it’s found, the
link is hijacked and the content is loaded into the current page (i.e., Ajax is in effect).
If not, the browser will navigate to the URL normally.
You must change jonathanstark.com to
the
appropriate domain or
hostname for your website, or the links to pages on your website
will no longer be hijacked.
Example 3-9. You can allow external pages to load normally by checking the domain name of the URL
function hijackLinks() {
$('#container a').click(function(e){
var url = e.target.href;
if (url.match(/jonathanstark.com/)) {
e.preventDefault();
loadPage(url);
}
});
var title = $('h2').html() || 'Hello!';
$('h1').html(title);
$('h2').remove();
$('#progress').remove();
}
Simple Bells and Whistles | 45
Download from www.eBookTM.com
The url.match function uses a language, regular expressions, that is of-
ten embedded within other programming languages such as JavaScript,
PHP, and Perl. Although this regular expression is simple, more com-
plex expressions can be a bit intimidating, but are well worth becoming
familiar with. My favorite regex page is located at ular
-expressions.info/javascriptexample.html.
Roll Your Own Back Button
The elephant in the room at this point is that the user has no way to navigate back to
previous pages (remember that we’ve hijacked all the links, so the browser page history
won’t work). Let’s address that by adding a Back button to the top left corner of the
screen. First, we’ll update the JavaScript, and then we’ll do the CSS.
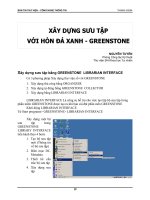
Adding a standard toolbar Back button to the app means keeping track of the user’s
click history. To do this, we’ll have to:
• store the URL of the previous page so we know where to go back to, and
• store the title of the previous page so we know what label to put on the Back button
Adding this feature touches on most of the JavaScript we’ve written so far in this chap-
ter, so I’ll go over the entire new version of android.js line by line (see Example 3-10).
The result will look like Figure 3-6.
Example 3-10. Expanding the existing JavaScript example to include support for a Back button
var hist = [];
var startUrl = 'index.html';
$(document).ready(function(){
loadPage(startUrl);
});
function loadPage(url) {
$('body').append('<div id="progress">Loading </div>');
scrollTo(0,0);
if (url == startUrl) {
var element = ' #header ul';
} else {
var element = ' #content';
}
$('#container').load(url + element, function(){
var title = $('h2').html() || 'Hello!';
$('h1').html(title);
$('h2').remove();
$('.leftButton').remove();
hist.unshift({'url':url, 'title':title});
if (hist.length > 1) {
$('#header').append('<div class="leftButton">'+hist[1].title+'</div>');
$('#header .leftButton').click(function(){
var thisPage = hist.shift();
var previousPage = hist.shift();
loadPage(previousPage.url);
46 | Chapter 3: Advanced Styling
Download from www.eBookTM.com
});
}
$('#container a').click(function(e){
var url = e.target.href;
if (url.match(/jonathanstark.com/)) {
e.preventDefault();
loadPage(url);
}
});
$('#progress').remove();
});
}
Figure 3-6. It wouldn’t be a mobile app without a glossy, left-arrow Back button
This line initializes a variable named hist as an empty array. Since it is defined
outside of any functions, it exists in the global scope and will be available everywhere
in the page. Notice that it doesn’t use the full word history as the variable name,
because that is a predefined object property in JavaScript and you should avoid it in
your own code.
This line defines the relative URL of the remote page to load when the user first visits
android.html. You might recall that earlier examples checked for url == undefined
to handle the first page load, but in this example we are using the start page in a few
places. Therefore, it makes sense to define it globally.
Simple Bells and Whistles | 47
Download from www.eBookTM.com
This line and the next make up the document ready function definition. Unlike
previous examples, we’re passing the start page to the loadPage() function.
On to the loadPage() function. This line and the next are verbatim from previous
examples.
This if else statement determines which elements to load from the remote page.
For example, if we want the start page, we grab the uls from the header; otherwise,
we grab the content div.
On this line, the url parameter and the appropriate source element are concatenated
as the first parameter passed to the load function. As for the second parameter, we’re
passing an anonymous function (an unnamed function that is defined inline) directly.
As we go through the anonymous function, you’ll notice a strong resemblance to
the hijackLinks() function, which has been replaced by this anonymous function.
For example, the following three lines are identical to previous examples.
On this line, we remove the .leftButton object from the page. This might seem weird
because we haven’t yet added it to the page; we’ll be adding it a couple steps down.
Here we use the built-in unshift method
of the JavaScript array to add an object to
the beginning of the hist array. The object has two properties: url and title—the
two pieces of information we need to support the Back button display and behavior.
This line includes the built-in length method
of the JavaScript array to find out how
many objects are in the history array. If there is only one object in the history array,
it means the user is on the first page. Therefore, we don’t need to display a Back
button. However, if there is more than one object in the hist array, we need to add
a button to the header.
This line adds the .leftButton I mentioned above. The text of the button will be the
same as the title of the page before the current page, which is what we’re accessing
with the hist[1].title code. JavaScript arrays are zero-based, so the first item in
the array (the current page) has an index of 0. In other words, index 0 is the current
page, index 1 is the previous page, index 2 is the page before that, and so on.
This block of code binds an anonymous function to the click handler of the Back
button. Remember, click handler code executes when the user clicks, not when the
page loads. So, after the page loads and the user clicks to go back, the code inside
this function will run.
This line and the next use the built-in shift method
of the array to remove the first
two items from the hist array, then the last line in the function sends the URL of
the previous page to the loadPage() function.
The remaining lines were copied exactly from previous examples, so I won’t rehash
them here.
48 | Chapter 3: Advanced Styling
Download from www.eBookTM.com
This is the URL-matching code introduced earlier in this chapter. Remember to
replace jonathanstark.com with part of your website’s domain or hostname, or none
of the local links will be hijacked and loaded into the page.
Please visit />rays for a full listing of JavaScript array functions with descriptions and
examples.
Now that we have our Back button, all that remains is to purty it up with some CSS
(see Example 3-11). We’ll start off by styling the text with font-weight, text-align,
line-height, color, and text-shadow. We’ll continue by placing the div precisely where
we want it on the page with position, top, and left. Then, we’ll make sure that long
text on the button label will truncate with an ellipsis using max-width, white-space,
overflow, and text-overflow. Finally, we’ll apply a graphic with border-width and
-webkit-border-image. Unlike the earlier border image example, this image has a dif-
ferent width for the left and right borders because the image is made asymmetrical by
the arrowhead on the left side.
Don’t forget that you’ll need an image for this button. You’ll need to
save it
as back_button.png in the images folder underneath the folder
that holds your HTML file. See “Adding Basic Behavior with
jQuery” on page 26 for tips on finding or creating your own button
images.
Example 3-11. Add the following to android.css to beautify the Back button with a border image
#header div.leftButton {
font-weight: bold;
text-align: center;
line-height: 28px;
color: white;
text-shadow: 0px -1px 1px rgba(0,0,0,0.6);
position: absolute;
top: 7px;
left: 6px;
max-width: 50px;
white-space: nowrap;
overflow: hidden;
text-overflow: ellipsis;
border-width: 0 8px 0 14px;
-webkit-border-image: url(images/back_button.png) 0 8 0 14;
}
Simple Bells and Whistles | 49
Download from www.eBookTM.com
By default, Android displays an orange highlight to clickable objects that have been
tapped (Figure 3-7). This may appear only briefly, but removing it is easy and makes
the app look much better. Fortunately, Android supports a CSS property called
-webkit-tap-highlight-color, which allows you to suppress this behavior. We can do
this here by setting the tap highlight to a fully transparent color (see Example 3-12).
Figure 3-7. By default, Android displays an orange highlight to clickable objects that have been tapped
Example 3-12. Add the following to android.css to remove the default tap highlight effect
#header div.leftButton {
font-weight: bold;
text-align: center;
line-height: 28px;
color: white;
text-shadow: 0px -1px 1px rgba(0,0,0,0.6);
position: absolute;
top: 7px;
left: 6px;
max-width: 50px;
white-space: nowrap;
overflow: hidden;
text-overflow: ellipsis;
border-width: 0 8px 0 14px;
-webkit-border-image: url(images/back_button.png) 0 8 0 14;
50 | Chapter 3: Advanced Styling
Download from www.eBookTM.com
-webkit-tap-highlight-color: rgba(0,0,0,0);
}
In the
case of the Back button, there could be at least a second or two of delay before
the content from the previous page appears. To avoid frustration, we can configure the
button to look clicked the instant it’s tapped. In a desktop browser, this is a simple
process: you just add a declaration to your CSS using the :active pseudoclass to specify
an alternate style for the object that the user clicked. I don’t know if it’s a bug or a
feature, but this approach does not work on Android; the :active style is ignored.
I toyed around with combinations of :active and :hover, which brought me some
success with non-Ajax apps. However, with an Ajax app like the one we are using here,
the :hover style is sticky (i.e., the button appears to remain “clicked” even after the
finger is removed).
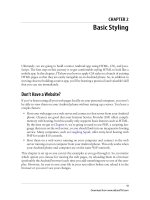
Fortunately, the fix is pretty simple—use jQuery to add the class clicked to the button
when the user taps it. I’ve opted to apply a darker version of the button image to the
button in the example (see Figure 3-8 and Example 3-13). You’ll need to make sure
you have a button image called back_button_clicked.png in the images subfolder. See
“Adding Basic Behavior with jQuery” on page 26 for tips on finding or creating your
own button images.
Figure 3-8. It might be tough to tell in print, but the clicked Back button is a bit darker than the default
state
Example 3-13.
Add the following to android.css to make the Back button looked clicked when the
user taps it
#header div.leftButton.clicked {
-webkit-border-image: url(images/back_button_clicked.png) 0 8 0 14;
}
Simple Bells and Whistles | 51
Download from www.eBookTM.com
Since we’re using an image for the clicked style, it would be smart to
preload the image. Otherwise, the unclicked button graphic will disap-
pear the first time it’s tapped while the clicked graphic downloads. I’ll
cover image preloading in the next chapter.
With the CSS in place, we can now update the portion of the android.js that assigns the
click handler to the Back button. First, we add a variable, e, to the anonymous function
to capture the incoming click event. Then, we wrap the event target in a jQuery selector
and call jQuery’s addClass() function to assign the clicked CSS class to the button:
$('#header .leftButton').click(function(e){
$(e.target).addClass('clicked');
var thisPage = hist.shift();
var previousPage = hist.shift();
loadPage(lastUrl.url);
});
A special note to any CSS gurus in the crowd: the CSS Sprite technique—
popularized by A List Apart—is not an option in this case because it
requires setting offsets for the image. The -webkit-border-image prop-
erty does not support image offsets.
Adding an Icon to the Home Screen
Hopefully, users will want to add an icon for your webapp to their home screens (this
is called a “launcher icon”). They do this by bookmarking your app and adding a
bookmark shortcut to their home screens. This is the same process they use to add any
bookmark to their home screens. The difference is that we’re going to specify a custom
image to display in place of the default bookmark icon.
First, upload a .png image file to your website. To maintain a consistent visual weight
with other launcher icons, it’s recommended that the file be 56px × 56px if its visible
area is basically square, and 60px × 60px otherwise. You’ll have to experiment with
your specific graphic to settle on the perfect dimensions.
Because Android is built to run on many different devices with a variety
of screen
sizes and pixel densities, creating icons that look good every-
where is fairly involved. For detailed instructions and free downloadable
templates, please visit the Icon Design page on the Android developer
site ( />sign.html#launcherstructure).
52 | Chapter 3: Advanced Styling
Download from www.eBookTM.com