Xây dựng ứng dụng cho Android với HTML, CSS và javascript - part 14 pdf
Bạn đang xem bản rút gọn của tài liệu. Xem và tải ngay bản đầy đủ của tài liệu tại đây (3.78 MB, 10 trang )
Figure 7-2. Use the Android SDK and AVD Manager to download SDK packages for particular
versions of the Android OS
Figure 7-3. Check the box next to and
click the Install Selected button
Download the Android SDK | 113
Download from www.eBookTM.com
10. When your download completes, click Close to close the download window.
11. On Mac OS
X, select Quit Android from the Android menu to leave the Android
app. On Windows or Linux, simply close the window.
Download PhoneGap
Now that we have the Android SDK installed, we can use PhoneGap to create an An-
droid project based on our web app.
To ensure the instructions in this book will continue to work long into
the future, I
have forked the main phonegap-android project and intend
to keep a relatively static version. Once you become comfortable using
my version of PhoneGap for your Android development, you might
want to visit the main page for the PhoneGap project to see if there is
anything new and exciting that you might want to incorporate into your
apps.
1. Navigate to the Android PhoneGap download page on GitHub and click the
Download Source button in the top right under the Search box (Figure 7-5).
2. When prompted to select an archive format, click on the big .zip icon. The down-
load graphic will stay open even after the file has been downloaded.
Figure 7-4. Read and accept the platform description and license, then click the Install button
114 | Chapter 7: Going Native
Download from www.eBookTM.com
3. Unzip the downloaded archive to whichever directory you like. I’m going to put
mine on
the desktop and rename the unzipped SDK directory to “PhoneGap” for
the sake of simplicity.
Setting Up the Environment
In order to work together, the Android SDK and PhoneGap need to be able to find each
other. To facilitate this, you need to configure your PATH environment variable.
Your computer uses environment variables to store little bits of data that are used by
programs that you run. One of these, PATH, is a list of directories that tells programs
where to look for other programs. So, when you type the name of a command (such as
grep or findstr) at the command prompt, your computer looks in each of the directories
in your PATH for the command.
On Windows, items in the PATH are separated by a semicolon, as in: C:\Windows
\System32;C:\Windows. On Mac and Linux, they are separated by a colon, as in /usr/
bin:/usr/local/bin.
Figure 7-5. My PhoneGap Android page will ensure forward compatibility for the examples in this
book
Setting Up the Environment | 115
Download from www.eBookTM.com
To add a directory to your PATH under Windows, open up your computer’s System
Properties. You can get to this by left-clicking the Start Menu, right-clicking Computer
(or My Computer), and selecting Properties. On Vista or Windows 7, click the Ad-
vanced System Settings link on the left. On Windows XP, click the Advanced tab.
In the dialog box that appears, click Environment Variables. Under System Variables,
scroll down until you see PATH and double-click it. Be careful not to modify anything
in there yet (if you make a mistake, you can always click Cancel and start over). Move
the cursor all the way to the right, and add the following (with no space before the
semicolon):
;C:\Android\tools;C:\PhoneGap\bin
Replace C:\Android with the location of the Android SDK (such as C:\Users\youruser
name\Desktop\Android) and replace C:\PhoneGap with the location where you put Pho-
neGap. Click OK and dismiss the remaining dialog boxes.
On Mac OS X or Linux, you should find a .bash_profile file in your home directory. It
will be invisible, so try running this command at the command line:
ls -l ~/.bash_profile
If that file exists, edit it by running the nano editor as shown below. If it does not exist
but you have a .profile file (use ls -l ~/.profile to find out), edit that file instead (just
replace .bash_profile with .profile):
nano ~/.bash_profile
Next, scroll all the way to the bottom of the file using the arrow keys and add the
following line:
PATH=$PATH:~/Android/tools:~/PhoneGap/bin
Replace ~/Android with the location of the Android SDK (such as ~/Desktop/Android/
tools) and replace ~/PhoneGap with the location of PhoneGap. Save the file by pressing
Control-O then Enter. Press Control-X to exit.
Close any open Command Prompts or Terminals, then restart them. You should be
able to run commands such as adb or android at the command line. If not, see http://
developer.android.com/sdk/installing.html#Installing and review the instructions there.
The utility in the PhoneGap/bin folder requires
that Ruby be installed
on your computer. It should be installed by default on any Mac or Linux
system. If you install it on Windows (see />downloads/), you may need to edit your PATH variable again and add the
path to Ruby’s bin directory (such as C:\Ruby191\bin). Don’t forget to
add a semicolon before the path entry as you did earlier.
116 | Chapter 7: Going Native
Download from www.eBookTM.com
Create an Android Virtual Device
Now that we have the Android SDK and PhoneGap installed, (and our PATH variable
updated), we need to create a device emulator that will allow us to test our code in a
simulated environment.
1. To see a list of available targets, enter the following:
android list targets
I downloaded all of the SDK platforms, so running this command on my machine
lists four options:
jsc-mbp:~ jstark$ android list targets
Available Android targets:
id: 1 or "android-3"
Name: Android 1.5
Type: Platform
API level: 3
Revision: 4
Skins: HVGA (default), HVGA-L, HVGA-P, QVGA-L, QVGA-P
id: 2 or "android-4"
Name: Android 1.6
Type: Platform
API level: 4
Revision: 3
Skins: HVGA (default), QVGA, WVGA800, WVGA854
id: 3 or "android-7"
Name: Android 2.1-update1
Type: Platform
API level: 7
Revision: 2
Skins: HVGA (default), QVGA, WQVGA400, WQVGA432, WVGA800, WVGA854
id: 4 or "android-8"
Name: Android 2.2
Type: Platform
API level: 8
Revision: 1
Skins: HVGA (default), QVGA, WQVGA400, WQVGA432, WVGA800, WVGA854
Take note of the ID string listed in the output for Android 2.1 (i.e., android-7).
This SDK is the most widely deployed platform at the time of this writing.
2. Enter the following command to create your AVD:
android create avd -n mySim -t android-7
Here we’re telling Android to create a virtual device (avd) with the name (-n)
“mySim” that targets (-t) the android-7 platform.
When asked if you want to configure custom options, just type no and press Enter.
The process should only take a few seconds and when it’s complete, the emulator
is installed.
Create an Android Virtual Device | 117
Download from www.eBookTM.com
3. To launch the emulator, enter the following command:
emulator -avd mySim
Here we’re using the emulator command to launch the Android Virtual Device that
we just created. The -avd flag is followed by the name you chose when creating
your AVD in the previous step.
Wait while the emulator initializes and eventually displays the phone’s home
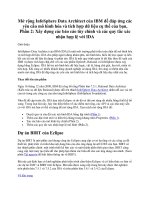
screen (Figure 7-6). The first launch can take a minute or two, so be patient.
Figure 7-6. The Android Virtual Device (AVD) allows you to test and debug your app without using
an actual phone
Build KiloGap
Next,
we’re
going to convert our web app into a native Android app. The gang at Nitobi
has created a little helper application named droidgap to help us with this. When you
run droidgap, it’ll ask you a few questions and insert your answers into a bunch of
locations throughout a template to create your project. It’s very cool; in fact, if you ever
run into someone from Nitobi, you should buy him a martini.
118 | Chapter 7: Going Native
Download from www.eBookTM.com
The Android SDK requires Apache Ant, which is included with Mac OS
X and many versions of Linux. If you’re using Windows, see http://ant
.apache.org/manual/install.html. You will need to install Ant before you
can run droidgap.
1. To begin the wizard, launch the Terminal application and enter the following
command:
droidgap wiz
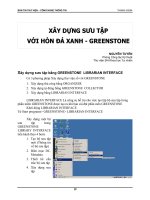
The wizard will ask you for a few pieces of information that will be used to generate
your PhoneGap project (Figure 7-7).
Figure 7-7. The droidgap wizard asks you a few questions and builds a customized Android project
based on your answers
2. When prompted,
enter a name for your app. This is the name that will be displayed
to the user in various places on the phone (e.g., beneath the home screen icon for
your app, in the list of applications). I’m going to enter “Kilo.”
3. When prompted, enter a package name for your app. The package name serves as
a unique identifier for your app. Typically, people use reverse domain name syntax
for app package names. I’m going to enter com.jonathanstark.kilo, but you should
use your own domain name.
Build KiloGap | 119
Download from www.eBookTM.com
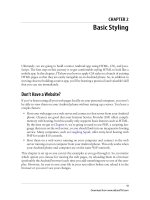
4. When prompted, enter the path to the folder on your computer that contains the
HTML, CSS, and JavaScript files for your web app. My files are in a folder named
www on my desktop (Figure 7-8), so I’ll enter:
~/Desktop/www
Figure 7-8. My HTML, CSS, and JavaScript files are in a folder named www on my desktop
5. When
prompted,
enter
a directory path for your project. The directory must not
already exist—droidgap is going to create it for you. If a directory exists at the path
you specify, droidgap will give you an error and ask for a different path. I want
droidgap to put my PhoneGap project on my desktop in a directory named Kilo-
Gap, so I’m going to enter the following:
~/Desktop/KiloGap
6. When prompted, enter the Android SDK platform you are targeting. If you fol-
lowed the instructions above to install all Android SDK platforms, your target
platform ID is android-7.
120 | Chapter 7: Going Native
Download from www.eBookTM.com
If you want to target a different platform, you can get a list of available platform
IDs by leaving the platform ID blank and pressing Enter. In the list that appears,
the first line of each entry will have an ID displayed as both an integer and string
(e.g., id: 2 or "android-4"). Enter the string version of the ID without quotes (i.e.,
android-4) when the droidgap prompt returns.
After entering the target SDK ID, droidgap will build your project and put the files in
the output directory you specified. The process should only take a couple of seconds
(Figure 7-9).
Figure 7-9. droidgap will build your project and put the files in the output directory you specified
Build KiloGap | 121
Download from www.eBookTM.com
If you navigate to the ~/Desktop/KiloGap/assets/www/ directory, you’ll notice that
droidgap has deposited a file named phonegap.js alongside your other application files.
This is the file that PhoneGap uses to expose certain native device functionality via
JavaScript. To make use of phonegap.js, you have to include it in the head section of
your index.html file like so:
<head>
<title>Kilo</title>
<link type="text/css" rel="stylesheet"
media="screen" href="jqtouch/jqtouch.css"/>
<link type="text/css" rel="stylesheet"
media="screen" href="themes/jqt/theme.css"/>
<link type="text/css" rel="stylesheet"
media="screen" href="kilo.css"/>
<script type="text/javascript" src="phonegap.js" charset="utf-8"></script>
<script type="text/javascript" src="jqtouch/jquery.js" charset="utf-8"></script>
<script type="text/javascript" src="jqtouch/jqtouch.js" charset="utf-8"></script>
<script type="text/javascript" src="kilo.js" charset="utf-8"></script>
</head>
Installing KiloGap in the Emulator
Now it’s time to test our shiny new native Android app in the emulator.
1. If your emulator is not running, launch it by entering the following command in
the Terminal application (this way, you can let it “warm up” while you’re building
the Kilo package):
emulator -avd mySim
You should see the Android emulator window appear after a few seconds. Notice
that the command prompt doesn’t return in the terminal window—it will sort of
just sit there and hang until you close the emulator. We won’t be interacting with
this window, so you can minimize it to get it out of the way.
2. Open a new terminal window and navigate into the KiloGap directory. In my case,
the command to do so is:
cd ~/Desktop/KiloGap
3. Enter the following command to compile your app with debugging enabled:
ant debug
If all goes well, you’ll see a stream of output with BUILD SUCCESSFUL at the end
(Figure 7-10). A binary executable named Kilo-debug.apk will now be sitting in the
~/Desktop/KiloGap/bin directory (Figure 7-11). If the build is not successful, repeat
the steps in “Build KiloGap” on page 118.
122 | Chapter 7: Going Native
Download from www.eBookTM.com