Wordpress 3.0 jQuery - part 21 pptx
Bạn đang xem bản rút gọn của tài liệu. Xem và tải ngay bản đầy đủ của tài liệu tại đây (2.01 MB, 10 trang )
jQuery Animation within WordPress
[ 186 ]
Next up, we'll move the h2 header up a bit and most importantly, as our actual posts
are under the positioned absolute
.sticky posts, we'll move those down so they
show up under our soon-to-be-animated sticky posts. We'll also adjust the image's
right-hand side margin a bit for placement.
//move the header back over if it's affected by the css
//you could also do this in the CSS directly
jQuery('.sticky h2').css({margin: '0', padding: '0'});
//move the margin over a bit
//you could also do this in the CSS directly
jQuery('.sticky img').css('marginRight','30px');
//this pushes the other posts down out of the way
jQuery('.post:not(.sticky):first').css('margin-top','360px');
Pay special attention to the bold jQuery selector in the previous code snippet. You
can refer to Chapter 3, Digging Deeper: Understanding jQuery and WordPress Together
for more on using selectors if you need to refresh your knowledge. Essentially, we're
targeting the rst
.post div that does not have the .sticky class assigned to it. Nice!
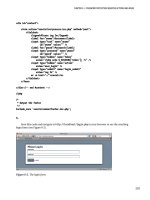
The result looks like this:
Chapter 5
[ 187 ]
OK! jQuery has that really nice function we've looked at previously called .each,
which will run additional functions on every object in a wrapper set. If all we wanted
to do was run through each item one time, we could use this bit of code:
jQuery('.sticky')
.hide()/*hide each post*/
.each( function (i){
/*i = numeric value that will increase with each loop*/
jQuery(this)
/*make sure each div is on it's own z-index*/
.css('z-index','i+10')
//using the animate function to fade in each div
//3 seconds apart*/
.animate({'backgroundColor': '#000000'}, i*3000, function(){
/*actual div fade in*/
jQuery(this).fadeIn('slow');
}
);//end animate
});//end each
This looks good! However, once the last div has faded in, it stops and doesn't continue.
Nope, there's no super slick jQuery way to keep the .each() function going. Yet,
an .each function is so easy to set up, it's a shame not to leverage them, even for
"innite loops".
jQuery Animation within WordPress
[ 188 ]
Now, a quick explanation here: you can do a Google search for "infinite
animation loops jquery
", if you dare, and see that for all ten-thousand-some
results, there appears to be about that many ways JavaScript developers like to set
up repeating, or innite loops, and each developer seems to feel (of course!) that their
method is the best method available. My preference is to resort to regular JavaScript,
and use a
setInterval function and some custom variables set up in a way that
makes it very easy to leverage my existing jQuery
.each() statement and functions.
To get started creating our loop, we'll take our existing jQuery statement and place it
inside its own function. You'll need to make sure this function is outside your main
jQuery(function(){ document ready function. Otherwise, the setInterval
function will not launch it properly.
Let's call our new function
loopStickies. You'll nd it familiar, aside from the
rst statement:
function loopStickies(duration){
/*note the variable "duration" being passed*/
///we'll need to make sure everything fades out
//except the first sticky post*/
jQuery('.sticky:not(:first)').fadeOut();
/*this should look almost the same*/
jQuery('.sticky')
.each( function (i){
/*i = numeric value that will increase with each loop*/
jQuery(this)
/*make sure each div is on it's own z-index*/
.css('z-index','i+10')
/*using the animate function & "duration" var for timing*/
.animate({'backgroundColor': '#000000'}, i*duration,
function(){
jQuery(this).fadeIn('slow');
}
);//end animate
}); //end each
}//end loopStickies
Chapter 5
[ 189 ]
OK, that's just the start, now that we have our loopStickies function, located
outside the jQuery document ready function, let's place the rest of our code, back
inside the jQuery(function(){ document ready function. Follow along with
the comments in bold:
/*set the stickies in a wrapper set to overflow hidden*/
jQuery('.sticky').wrapAll('<div id="stickyRotate"
style="position: absolute; padding: 0; margin-top: 5px;
width: 650px; height: 320px; border: 2px solid #000;
overflow:hidden;"></div>');
//make sure the first .sticky post fades in:
jQuery('.sticky:first').fadeIn();
//set the "duration" length to 6 seconds for each slide:
//(this is the var our function uses)
var duration = 6000;
/*create the interval duration length, based on the duration:*/
var intervalDuration = duration * jQuery('.sticky').length;
/*the function needs to run once before the setInterval kicks in*/
loopStickies(duration);
//the setInterval will kick off loopStickies in
//18 seconds: (6secs x number of sticky posts) */
setInterval( 'loopStickies("'+duration+'")', intervalDuration
);
The way this works is, our original jQuery statement and .each() function runs
through each sticky post in the jQuery selection by evoking the loopStickies
function. At the same time, the setInterval function is kicked off, but because we
have the
intervalDuration variable set to calculate our duration variable times
the number of sticky posts, it's not going to kick off for 18 seconds. Just in time for
our original function to complete! The
setInterval function will take it from there
and loop our sticky posts into innity.
jQuery Animation within WordPress
[ 190 ]
OK, let's take a look; we now have a very nice set of sticky posts, holding for six
seconds and then crossfading to the next post!
Putting in a little extra effort: Adding a loop indicator
The rotating stickies are great! Yet, while the client will only have three or four
stickies rotating at any given time, it's a good practice to at least let a user know
about how long a view they're in for should they decide to look at all the rotations.
Most rotating slide shows have an indicator somewhere to let a user know how
many panels are going to be displayed and allowing the user to navigate around
the panels.
Let's see about adding this functionality to our rotating posts. First up, we'll need
to create a little interface. Inside our
#stickyRotate wrapper that we created in
the previous code, after the last sticky post object, I'll add in a div with inline styles.
Again, this is not necessarily ideal for a working project, but I want to make each
step clear. In reality, you'll probably create custom stylesheets or amend the theme
you're working on. At any rate, here's our interaction holder. I've placed this code
at the bottom of my previous code inside the jQuery document ready function:
jQuery('.sticky:last')
.after('<div id="stickyNav"
style="position: absolute; padding: 10px 0 0 0; margin-top: 280px;
height: 25px; width: 650px; color: #eee; background: #000;
text-align: center"></div>');
Chapter 5
[ 191 ]
And below that code, we'll add some more jQuery which will insert numbers for
each sticky post into the #stickyNav div we just created:
jQuery('.sticky')
.each( function (i){
jQuery('#stickyNav').fadeTo(0, 0.8)
.append("<div class='sN'
style='display:inline; margin: 0 5px;
border: 1px solid #999;
padding: 2px 5px;'>"+(i+1)+"</div> ");
});
This code uses another each function, but we only need, and want, it to run once,
and append the numbers 1 through 3 (or however many sticky posts we have)
to the #stickyNav div.
Last, to really nalize this effect, we'll need to dip back inside our
loopStickies
function. Inside the .animate function's call back function, we'll add the following
code that's in bold:
jQuery('.sticky')
.each( function (i){
/*i = numeric value that will increase with each loop*/
jQuery(this)
/*make sure each div is on it's own z-index*/
.css('z-index','i+10')
/*using the animate function for timing*/
.animate({'backgroundColor': '#000000'}, i*duration,
function(){
jQuery(this).fadeIn('slow');
//interactivity
jQuery("#stickyNav .sN").css('color','#666666');
jQuery('#stickyNav .sN:eq('+i+')').css('color','#ffffff');
}
);//end animate
}); //end each
jQuery Animation within WordPress
[ 192 ]
Using the :eq() selector in the previous code, we're able to target the corresponding
number in the interface display and make it stand out compared to the other numbers.
This allows users to see how many slides there are, and which slide they're on.
Summary
You're now a pro at handling animations with jQuery! From these examples you
can probably recognize several ways to incorporate further enhancements into
your WordPress sites. You should now know how to:
Use animation to direct a user's attention to key information
Generate animated bar graphs
Create some really slick, animated page navigation
Develop rotating sticky posts
Up next, let's take a look at the jQuery UI plugin and the many ways it can benet
a WordPress site.
•
•
•
•
WordPress and jQuery's UI
We're now ready to take a look at jQuery's most popular plugin: UI. UI of course,
stands for User Interface. The jQuery UI plugin takes many of the most popular
tasks that the developers have already made simple through jQuery, and makes
them even simpler. I know, it's hard to imagine it getting any easier, but that's
exactly what this plugin does. Most importantly, while the enhanced effects are nice,
the UI plugin provides interface widgets and an easy way to style or "theme" them
without the need for coding up specic interface elements such as tabs, dialog
boxes, and more.
In this chapter, we'll:
Take a look at the UI plugin and how to get started with it quickly
Learn how to apply jQuery UI widgets to our WordPress site, make it more
intuitive, easier to understand content, and encourage users to take action
Learn how to implement popular UI features and widgets with common
WordPress features
Let's get started.
•
•
•
WordPress and jQuery’s UI
[ 194 ]
Getting to know jQuery's UI plugin
You can take a tour of the jQuery UI plugin by heading on over to
.
The UI plugin offers a set of standardized widgets, interactions, and effects. Let's
take a look at each type of offering in detail.
Widgets
The term "widget" within jQuery is a bit different from a WordPress widget, which
is a small plugin designed to sit nicely in a sidebar of a theme. Within jQuery's
UI plugin, widgets describe a set of fully-featured, user interface controls that are
commonly needed in projects and created by jQuery developers. The UI widgets
save jQuery developers a lot of time writing jQuery statements and chaining
functions together to create the same interface and effect. Here are the interface
widget's jQuery UI offers:
Accordion: This widget expands and collapses content that is broken into
logical sections by clicking on the headers of each section. Only one section
can be opened at any given time.
•
Chapter 6
[ 195 ]
Autocomplete (1.8+): This is a new feature available in version 1.8. The
Autocomplete widgets provide suggestions while you type into the eld.
The suggestion source is provided as a basic JavaScript array.
Button (1.8+): Also new to 1.8 is the Button widget. This lets you
take different types of markup and apply the UI's button styling and
functionality to it.
Datepicker: The Datepicker widget can be applied a standard form input eld.
Focus on the input eld opens an interactive calendar in a small overlay.
Dialog: This widget is an overlay positioned within the page. It has a title bar
and a content area, and can be moved, resized, and closed with the 'x' icon by
default or by additional button parameters passed to it.
Progressbar: The Progressbar widget is designed to simply display the
current percentage complete for a process passed to it through a value
parameter. It scales to t inside its parent container by default.
Slider: The jQuery UI Slider widget turns objects, such as empty
div tags
into sliders. There are various options such as multiple handles, and ranges
that can then be passed to other objects and functions. You can mouse or use
the arrow keys to change the slider's position.
Tabs: The Tabs widget is used to break content into multiple sections that can
be swapped by clicking the tab header to save space, much like an accordion.
Interactions
jQuery UI interactions takes a collection of the more common complex jQuery
behaviors that developers need to create, most often for projects, and packages
them into convenient and easy-to-use functions as follows:
Draggable: This interaction makes the selected elements draggable
by mouse.
Droppable: This interaction works with the draggable elements and makes
the selected ones droppable (meaning that they accept being dropped on by
the draggable elements).
Resizable: This interaction makes the selected elements resizable by adding
visual "handles" to the object. You can specify one or more handles as well
as min and max width and height.
Selectable: This interaction allows elements to be selected by dragging a
"lasso" or box with the mouse over the elements.
Sortable: This makes the selected elements sortable by dragging with
the mouse.
•
•
•
•
•
•
•
•
•
•
•
•