Brad’s Sure Guide to SQL Server Maintenance Plans- P9 pdf
Bạn đang xem bản rút gọn của tài liệu. Xem và tải ngay bản đầy đủ của tài liệu tại đây (549.46 KB, 5 trang )
Chapter 2: Before you Create any Maintenance Plans…
41
Figure 2.11: If all went well, you will see lots of "Success" entries.
If the Configuring… screen reports success, then Database Mail has been successfully set up
for your SQL Server instance – or has it? While the success statuses are great, we still don't
know if Database Mail has really been set up correctly. For example, perhaps there was a typo
in the e-mail address or password, made when entering the SMTP information. If there was,
Database Mail won't have any way of knowing this. In short, this means that you need to test
your set up.
In order to test that Database Mail really is working as expected, close the Configuring…
screen, then right-click on the Database Mail folder, just as you did when you began the
Database Mail Wizard, and select Send Test E-Mail, as shown in Figure 2.12.
Chapter 2: Before you Create any Maintenance Plans…
42
Figure 2.12: To ensure that Database Mail really works, you need to send a test e-mail.
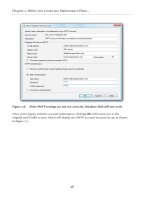
The Send Test E-Mail screen, shown in Figure 2.13, will appear.
Figure 2.13: You need to enter your e-mail address to see if a test e-mail can be sent
successfully from Database Mail.
Notice that the first option is Database Mail Profile, and it has a drop-down box next to it.
This is used to select the profile you want use to send the test e-mail. In this case, you need to
use the profile you just created, which was Maintenance Plan. If the profile you want to test
is not selected, then you can choose it by selecting it from the drop-down box.
Chapter 2: Before you Create any Maintenance Plans…
43
Fill in the To box with your e-mail address and click on Send Test E-Mail (this box will be
grayed out until you enter an e-mail address). The screen shown in Figure 2.14 should appear.
Figure 2.14: This screen can be used to help diagnose e-mail problems if you don't receive
your test e-mail.
Having pressed Send Test E-Mail, the test e-mail will be sent to the designated account. The
screen in Figure 2.14 tells you that it was sent (the number of the Sent e-mail is unimportant),
so check your e-mail client and verify that the message was received. If the SMTP server is
busy, or the e-mail client only polls for e-mails every few minutes, you may have to wait a
short time before it appears. If you don't see the e-mail after a little while, be sure to check
your spam folder to see if it ended up there.
Once you receive the test e-mail, you know Database Mail has been configured correctly
and you are ready to continue with the next step, which is to set up an operator. If your mail
never arrives, try clicking on the Troubleshoot… button, as shown in Figure 2.14, which sends
you to articles in Books Online that guide you through the troubleshooting process.
How to Configure a SQL Server
Agent Operator
When we configure a Maintenance Plan to send an e-mail, created with either the
Maintenance Plan Wizard or the Maintenance Plan Designer, we aren't able to enter an
e-mail address directly into the Maintenance Plan. Instead, we configure e-mails to be sent to
an operator.
Chapter 2: Before you Create any Maintenance Plans…
44
An operator is an alias for a specific person (such as yoursel), or a group (such as a DBA mail
group). This alias is more than just a name; it is actually a set of attributes that include the
operator's name, the operator's contact information, and the operator's availability schedule.
Here's an example: let's say that a company has three DBAs, each working a different eight
hour shift, so that all of the organization's SQL Servers have 24-hour DBA coverage. The
DBAs are:
Name Contact Information Working Hours
Brad
9 a.m. – 5 p.m.
Tony
5 p.m. – 1 a.m.
Andrew
1 a.m. – 9 a.m.
Each DBA can become an operator. For example, an operator could be created called "Brad"
that includes his name, contact information, and his working hours. The same is true for the
other DBAs. One advantage of using operators, instead of using specific e-mail addresses, is
that if any piece of information changes about an operator, it can be changed in a single place.
If specific contact information was stored within Maintenance Plans, then every time some
information changed, then all of the Maintenance Plans would have to be manually changed,
which could be a lot of work.
In addition, since working hours can also be associated with an operator, it is possible to
create a Maintenance Plan that is able to send e-mails to the right DBA, during their working
hours. Of course, you don't need to take advantage of all this flexibility, but it is there if you
need it.
Now that we know what an operator is, we need to learn how to create them, because a
Maintenance Plan cannot be configured to use an operator until the operator has first been
created and configured.
To create a new operator, open SSMS, navigate to the SQL Server instance you wish to
configure, open up the SQL Server Agent folder, navigate to the Operators folder,
right-click on it and select New Operator, as shown in Figure 2.15.
Chapter 2: Before you Create any Maintenance Plans…
45
Figure 2.15: Operators are created using the SQL Server Agent.
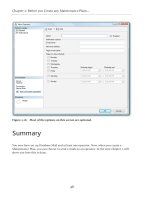
The New Operator screen, shown in Figure 2.16 will appear.
While the New Operator screen has lots of options, we will focus only on the three that are
most important.
• Name – this is your name, or the name of the person or group who you want to receive
the Maintenance Plan e-mails.
• Enabled – this option is selected by default, and you don't want to change it, otherwise
you won't be able to receive any notices from SQL Server.
• E-mail name – this option is poorly named. It really means that you are supposed to
enter your e-mail address, or the group's e-mail address here.
That's it; all the other options are optional, and you can use them if you like, or leave them
blank. When you are done, click on OK, and the name you specified in Figure 2.16 will now
appear under the Operators folder in SSMS. If you have more than one person who should
be notified of Maintenance Plan jobs, you can create additional operators. Alternatively, you
could enter an e-mail group instead of an individual e-mail address, in the E-mail name
field. This way, when a Maintenance Plan report is sent to a single operator, everybody in the
e-mail group will receive the same e-mail.


