Brad’s Sure Guide to SQL Server Maintenance Plans- P14 pps
Bạn đang xem bản rút gọn của tài liệu. Xem và tải ngay bản đầy đủ của tài liệu tại đây (576.53 KB, 5 trang )
Chapter 3: Getting Started with the Maintenance Plan Wizard
66
Figure 3.11: Once at least one database is selected, additional options are the screen can
be configured.
The middle section of the screen in Figure 3.11 contains the configuration options for a given
task. In this example, there is only one option, Include indexes. Each task will have different
options. For example, Figure 3.12 shows the same portion of the screen for the Rebuild
Index task.
Chapter 3: Getting Started with the Maintenance Plan Wizard
67
Figure 3.12: Task-specific configuration options for the Rebuild Index task.
If I were to go through all the options on this screen in full detail, and the equivalent
screens for the remaining tasks, it would quickly become overwhelming. Instead, starting
with Chapter 5, I have devoted individual chapters to each of the eleven possible database
maintenance tasks. Please refer to a task's specific chapter for full details on all of these
configuration options.
Task Scheduling
The final section of the screen shown in Figure 3.11 is devoted to task scheduling, as shown in
Figure 3.13.
Figure 3.13: Scheduling maintenance tasks.
By default, each task is set to Not Scheduled (On Demand). To implement a schedule on
which the task should run, click on Change and you'll arrive at the Job Schedule Properties
screen, shown in Figure 3.14.
Chapter 3: Getting Started with the Maintenance Plan Wizard
68
Figure 3.14: The Job Schedule Properties screen.
As you can see, this is a complex screen with many options, and some of these options
do not mean quite what you might initially think. As a result, we will defer a full discussion
of all of these options to a dedicated chapter (Chapter 4), where we'll also look at
general considerations when scheduling multiple tasks, so as to avoid overlap and
server resource contention.
For now, you can either click Cancel to exit the Job Schedule Properties screen, and then
exit the Wizard; or you can work through the screens, leaving all tasks unscheduled, selecting
databases where necessary, and accepting all the default task configuration options, until you
arrive at the Select Report Options screen.
Chapter 3: Getting Started with the Maintenance Plan Wizard
69
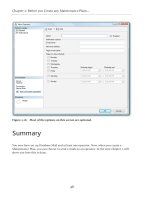
Report Options
Once you've configured and scheduled each of the individual tasks that make up a
Maintenance Plan, you will arrive at the Select Report Options screen. After a Maintenance
Plan runs, it can produce a report of the tasks that were performed. For example, you can see
the results of a Database Check Integrity task, or see what databases were backed up.
These reports are very useful because they tell you whether or not everything ran correctly,
and they are helpful when troubleshooting Maintenance Plans that don't seem to be doing
what you expect them to do.
Chapter 2 described how to configure Database Mail so that these Maintenance Plan reports
can be sent to you via e-mail, and it is when we reach the Select Report Options screen,
shown in Figure 3.15, that our groundwork pays off.
Figure 3.15: After a Maintenance Plan runs, it can write a report to the local SQL Server,
and/or send you an e-mail message containing the report.
Chapter 3: Getting Started with the Maintenance Plan Wizard
70
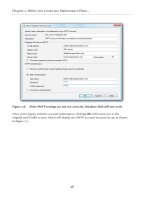
By default, the Write a report to a text file option is selected, and I recommend you keep
it selected. This way, every time a Maintenance Plan runs, a new report will be produced
that you can view to see what is going on. By default, in SQL Server 2008, Maintenance
Plan reports are written to the \Program Files\Microsoft SQL Server\MSSQL10.
MSSQLSERVER\MSSQL\Log folder. Unless you have a good reason to place the reports in
another location, I suggest you keep them here, as this is the standard practice. If you place
them elsewhere, it will make them harder for other DBAs to find.
Removing/Archiving Maintenance Plan reports…
Unless you create a Maintenance Task to remove them, all plans will remain in the
designated folder indefinitely. If you forget to delete them, you can end up with a folder
with thousands of old reports. You can use the Maintenance Cleanup task (see Chapter 15
for details) to periodically remove older files.
The E-mail report option on the screen is not selected by default. As we discussed in Chapter
2, in addition to the text report saved on disk, I think it is a good idea to have these reports
sent to you via e-mail, so that you can more easily review them. Not only does this save you
the effort of locating the correct report among all of your servers, the e-mails also serve as a
constant reminder that you need to read them to see if everything is running as it should be.
Note
Even if you have reports e-mailed to you, I suggest you have the reports written to disk as
well. That way, should you need to troubleshoot a problem, all of the reports will be in a
single location.
Notice that my name is listed in the drop-down box next to the To option, reflecting the
fact that I set myself up as an operator. If you have not set up Database Mail or created any
operators, then no names will be available from the drop-down box.
To receive e-mail reports every time this Maintenance Plan runs, select the E-mail report
options and select your name from the drop-down box, as shown in Figure 3.16.