Brad’s Sure Guide to SQL Server Maintenance Plans- P53 pdf
Bạn đang xem bản rút gọn của tài liệu. Xem và tải ngay bản đầy đủ của tài liệu tại đây (548.71 KB, 5 trang )
Chapter 19: Create and Modify Maintenance Plans Using the Designer
261
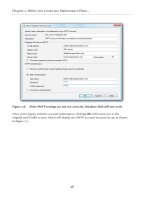
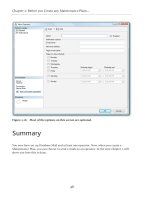
Figure 19.12: Configuring the Reporting and Logging screen can be done any time
throughout the Maintenance Plan design process, although I have saved
it for last.
For example, in the Maintenance Plan we just created, a report text file will be written to disk
every time a subplan executes. The Daily Full Backup subplan will be executed once a day (7
reports per week), the Hourly Log Backup subplan will be executed 24 times a day (168 reports
per week), and the Weekly Maintenance subplan will be executed once a week (1 report per
week). If you need to do any troubleshooting, there will be a lot of text file reports to wade
through. Fortunately, each report has a time stamp, and you should be able to narrow down
a problem to a specific time period, which will make it easier for you to find any reports for
troubleshooting purposes. And as you can see, this is why you need to delete older text file
reports as part of your maintenance tasks, as their numbers can add up fast.
Chapter 19: Create and Modify Maintenance Plans Using the Designer
262
Save the Maintenance Plan
Once we are done creating the Maintenance Plan, we can save it by clicking on the Save
Selected Items icon on the SSMS toolbar. Or, if we try to exit the Maintenance Plan without
saving it first, we will be prompted to save the plan. Either method will ensure that the plan
is saved.
Test the Maintenance Plan
Having created our Maintenance Plan, it's important to test it before scheduling it and
putting it into production. If a Maintenance Plan has only one subplan, it can be started by
right-clicking on it and selecting Execute. Unfortunately, this does not work if a Maintenance
Plan has two or more subplans, which is the case in our example.
Behind the scenes, the Maintenance Plan is implemented as a single SSIS package containing
a number of distinct executables, one for each subplan, and each executable is executed using
a separate SQL Server Agent job. So, if there is more than one subplan, there is more than
one executable and more than one job, and we need to execute each SQL Server Agent job
individually in order to test the full Maintenance Plan.
The three SQL Server Agent jobs created for our example AdventureWorks Maintenance
Plan are shown in Figure 19.13.
Figure 19.13: Each subplan within a Maintenance Plan has its own associated
SQL Server Agent job.
To test each subplan, simply right-click on the appropriate job and select Start Job at Step.
Remember that we must perform at least one full backup of a database before we can create
a transaction log so, for my tests, I ran the Daily Fully Backup job first then, once it had
completed successfully, the Hourly Log Backup job.
Although the Weekly Maintenance job could be run first, second or last, I would save it
for last because this is normally how the subplans would be scheduled to run once the
Maintenance Plan goes into production. As we test each job, a status screen tells us if the job
succeeded or failed, as shown in Figure 19.14. This screen only appears when testing the jobs
manually and will not be displayed when the jobs run automatically, after they are scheduled.
Chapter 19: Create and Modify Maintenance Plans Using the Designer
263
Figure 19.14: Use this status screen to see if the Maintenance Plan subplans succeeded.
If a particular job fails, we'd want to check out the report text file that was created for that
subplan. In addition, assuming a given subplan has Notify Operator tasks associated with
it, the operator should receive an e-mail telling him or her at what specific Maintenance Plan
task the subplan failed.
Hopefully, using this information, we'd be able to figure out what the problem was, open the
Maintenance Plan using the Maintenance Plan Designer, and make the necessary changes
to make the subplan work. Sometimes, multiple test-fix iterations will be required before
everything is working correctly.
Once we've verified that all the subplans for our Maintenance Plan run as we expect, we are
ready to set their schedules.
Set the Schedules
The final step before putting our Maintenance Plan into production, is to set the schedules
for each subplan.
To do this, we'll need to reopen the Maintenance Plan, so right-click on the plan in SSMS
Object Explorer and select Modify. The Maintenance Plan will open up in the Maintenance
Plan Designer.
Next, click on the Schedule icon next to each subplan, and set the schedule that is
appropriate to meet the goals of the subplan. As previously discussed, the Daily Full Backup
subplan should be execute once a day, the Hourly Log Backup subplan should run once an
Chapter 19: Create and Modify Maintenance Plans Using the Designer
264
hour, and the Weekly Maintenance subplan should run once a week, during the weekend
maintenance window. See Chapter 4 on scheduling, if you have forgotten how to do this.
Once all the subplans are scheduled, resave your plan, and each subplan begins running
immediately, based on those schedules.
Run in Production and Follow Up
Even though I always thoroughly test a Maintenance Plan before putting it into production, I
still like to check up on a new Maintenance Plan after it is put into production, to ensure that
it is working as expected.
This includes checking to see that the jobs have run, looking at the report text files that have
been saved to file, and checking any e-mails that I might have received. I also monitor server
resources usage whenever new plans are being run.
When you first schedule your subplans, it is often hard to determine how long a particular
subplan will take. If a subplan takes longer than you expected, it may start to conflict with
other jobs on your server and so place unnecessary stress on server resources. If this is the
case, you may need to reschedule your subplans so that there are no job overlaps.
After a couple of days of checking and monitoring, I leave it up to my plan to let me know if
there are any problems.
Modifying an Existing Maintenance
Plan
Throughout this book, I have made occasional reference to the fact that you should use the
Maintenance Plan Designer to modify Maintenance Plans created using the Maintenance
Plan Wizard. This is because the Maintenance Plan Wizard offers no way to modify a
Maintenance Plan after it has been created, so the only way to change it safely is to use the
Maintenance Plan Designer.
I have left the discussion of this topic until now, as you really need to understand how to use
the Maintenance Plan Designer before you attempt to modify Maintenance Plans created
with the Wizard. With this knowledge acquired, you'll find modifying existing plans very easy.
A Maintenance Plan, created using either the Maintenance Plan Wizard or the Maintenance
Plan Designer, is implemented "behind the scenes" as a single SQL Server Integration Services
Chapter 19: Create and Modify Maintenance Plans Using the Designer
265
(SSIS) package, executed using one or more SQL Server Agent jobs. While it is possible
to manually modify a Maintenance Plan by modifying its SQL Server Agent job, it is not
recommended, as there is a strong likelihood of breaking the plan. Instead, always make your
changes to a Maintenance Plan using the Maintenance Plan Designer.
Hacking Maintenance Plans
If you have the skills and desire to hack a Maintenance Plan in order to get it to perform
differently, then I suggest that you would be happier and better off using T-SQL or
PowerShell to perform your database maintenance, rather than the Maintenance Plan
Designer or Wizard.
By way of an example, let's say that we want to modify a Maintenance Plan called User
Databases Maintenance Plan that we originally created using the Maintenance Plan Wizard.
The first step is to open up the plan in the Designer, so right-click on the plan's name and
select Modify. The Maintenance Plan Designer screen appears.
When you originally created the plan in the Wizard, one of the very first screens offered the
option to either create a Separate schedule for each task (this is the option I recommended),
or to create a Single schedule for the entire plan or no schedule.
The Maintenance Plan Designer screen will look slightly different, depending on which
option you selected. If you chose the Separate schedule for each task option, then a
separate subplan will be created for each individual maintenance task in the plan, as shown
in Figure 19.15.