The Best Damn Windows Server 2003 Book Period- P7 pptx
Bạn đang xem bản rút gọn của tài liệu. Xem và tải ngay bản đầy đủ của tài liệu tại đây (470.8 KB, 10 trang )
include information about Enforce and Block Inheritance flags in Group Policy imple-
mentation.These affect how GPOs are inherited throughout the AD infrastructure.
■
Trust relationships, both transitive and explicitly defined
■
Network connectivity hardware (switches, routers, firewalls, and other LAN and WAN
connectivity devices)
■
Client computer configuration, both hardware and software
■
Line-of-business application inventory and configuration
■
Backup, restore, and disaster recovery procedures
Windows Server 2003, built upon the same technology as Windows 2000, has been upgraded
and improved to address a variety of needs in today’s networked environment. We’ve reviewed the
new features in Windows Server 2003 and taken a quick look at some of the tools available to make
installing, maintaining and repairing Windows Server 2003 a bit easier. We’ve also reviewed the
basics of network design, planning and testing and we’re now ready to jump into the specifics of
Windows Server 2003.
26 Chapter 1 • Overview of Windows Server 2003
301_BD_Win2k3_01.qxd 5/12/04 10:53 AM Page 26
Using Server Management Tools
In this chapter:
■
Recognizing Types of Management Tools
■
Managing Your Server Remotely
■
Using Emergency Management Services
■
Managing Printers and Print Queues
■
Managing and Troubleshooting Services
■
Using Wizards to Configure and Manage Your Server
Introduction
The network administrator’s daily tasks can be made easier (or more difficult) by the
number and quality of administrative tools available to perform those tasks. In the pre-
vious chapter, we quickly reviewed some of the tools. In this chapter, we’ll take a more
in-depth look at specific server management tools.
In Windows Server 2003, Microsoft has provided administrators with a wealth of
graphical and command-line utilities for carrying out their job duties.The Administrative
Tools menu is the place to start, and there you’ll find predefined management consoles for
configuring and managing most of Server 2003’s services and components, including
Active Directory tools, distributed file system (Dfs), DNS, Security policies, Licensing,
Routing and Remote Access,Terminal Services, Media Services, and more.
But that’s only the beginning. Administrators can create customized Microsoft
Management Consoles as well, just as with Windows 2000.This makes it easier to per-
form tasks yourself, and easier to delegate administrative tasks to others, because you can
create consoles for specific purposes and enable only limited user access to them for
specified users or groups.
Chapter 2
27
301_BD_W2k3_02.qxd 5/12/04 10:54 AM Page 27
For those who prefer the power and flexibility of the command line, many of these same
administrative tasks can be performed there, as well as other tasks that have no GUI interface.
Windows Server 2003 includes a huge number of command-line utilities, including dozens of new
ones that were not included in Windows 2000 Server.
Many of the more complex configuration tasks performed by administrators can be done via
Wizards that walk you through the steps.This makes it easier to set up services and server compo-
nents for those who are unfamiliar with the process.
In this chapter, we introduce you to many of the graphical management consoles and com-
mand-line administrative utilities that are included in Windows Server 2003, and show you how to
use them to manage your server and your network.
Recognizing Types of Management Tools
So many administrative tools are available, located in so many different places, that it can be
daunting for a new administrator of a Windows computer to know where to look. Of course, in the
fullness of time, experience brings familiarity - but even experienced administrators occasionally dis-
cover a tool that they haven’t seen before. In this section we will review where most of the
common administrative tools are located.
Administrative Tools Menu
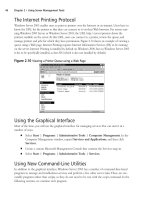
The Administrative Tools menu is where many important tools are located. Click Start | Programs
| Administrative Tools to see what is available.You can change what appears in this folder by editing
the All Users profile in the Documents and Settings folder as shown in Figure 2.1.
Another way to access the same folder is by clicking Start | Settings | Control Panel, and
then double-clicking the Administrative Tools icon.
28 Chapter 2 • Using Server Management Tools
Figure 2.1 Location of the Administrative Tools Folder
301_BD_W2k3_02.qxd 5/12/04 10:54 AM Page 28
Note that the items in the Administrative Tools menu folder are shortcuts, rather than the pro-
grams or console files themselves. Many of the actual management console files (.msc files) are
located in the <systemroot>\system32 folder.You can find the location of the .msc file by right-
clicking the shortcut in the right pane as shown in the figure, selecting Properties, and then
checking the Target field on the Shortcut menu.
Custom MMC Snap-Ins
The Microsoft Management Console (normally referred to as an MMC) is the framework for nearly
all Windows graphical administrative tools. It provides a blank sheet to which you can add your
favorite administration tools.The idea is that all administrative tools have a common look and feel
and that the management tool for an administrative task, such as adding users and groups, is written
as a snap-in for an MMC.The administrator can then choose which snap-ins to have in a console or
use one of the many pre-configured ones found in the Administrative Tools folder. Some of the
MMC snap-ins can be used to manage remote computers as well as the local computer (assuming
you have the appropriate rights). Many vendors of third-party management tools provide snap-ins
for their products, which you can add to your MMC consoles.
Note that some of the tools in the Administrative Tools folder, such as Licensing, are stand-
alone programs that don’t work with an MMC. When you look at the properties of those shortcuts,
you’ll find that the target files are executables (.exe) instead of MMCs (.msc).
After you’ve created an MMC, it can be saved as a stand-alone file and even e-mailed to
another administrator to use. Possession of an MMC file does not in itself give a user any additional
rights. So if you e-mail an MMC file with, for example, the Disk Management snap-in to a non-
administrative user, that user won’t be able to complete any disk management tasks even though he
or she can see the snap-in.
MMC Console Modes
MMC consoles can be configured to prevent anyone from changing them. A console can be saved
in one of four modes, each of which has varying restrictions.Table 2.1 shows the four modes and
the functionality of each.
Table 2.1 MMC Console Modes
Console Mode Functionality
Author mode Full access to the MMC and change all aspects.
User mode –full access Full access to the windowing commands but can’t add or
remove snap-ins.
User mode – limited access, Access only to the areas of the console as it was when
multiple window saved. Can create new windows but not close existing
windows.
User mode – limited access, Access to the console as it was when saved. Can’t open
single windows new windows.
Using Server Management Tools • Chapter 2 29
301_BD_W2k3_02.qxd 5/12/04 10:54 AM Page 29
To give you an idea of how you can use the MMC, use the following steps to create a custom
MMC.You may choose to use this MMC or you may simply follow the steps to get a better idea of
how to create a custom MMC.
1. To create a new console, click Start | Run and type mmc in the dialog box.
2. Select Add/Remove Snap-in from the File pull-down menu.
3. In the Add/Remove Snap-in dialog-box, click the Add button.
4. In the Add Standalone Snap-in dialog box, scroll through the list and click Event
Viewer, and then click the Add button.
5. In the Select Computer dialog box, click Finish.
6. Click Close in the Add Standalone Snap-in dialog box, and then click OK in the
Add/Remove Snap-in dialog box.
7. Repeat steps 2 to 6, but for step 5 select Another Computer and enter the name of or
browse to another computer on your network.
8. Repeat steps 2 to 6, but for step 4 select Services and in step 5 select Local Computer.
9. In the left-hand pane, click the plus signs next to the two Event Viewer folders to expand
them.
10. Click Application under the Event Viewer (Local) folder.
11. You should now have a console similar to the one shown in Figure 2.2.
12. To save this console for future use, select Save from the File pull-down menu.Type
MyConsole in the File name box and click Save.
13. The console is saved and can be started again via Start | Programs | Administrative
Tools | MyConsole.msc.
30 Chapter 2 • Using Server Management Tools
Figure 2.2 Viewing the Application Log for the Local Computer
301_BD_W2k3_02.qxd 5/12/04 10:54 AM Page 30
14. We will now look at opening multiple windows. Highlight Event Viewer (Local), and
then right-click and select New Window from Here.You now have two windows open,
which can be managed using the Window pull-down option.
15. Click Window and explore the various options for how the two windows are laid out.
16. Switch to the Event Viewer (Local) window and close this window by typing Ctrl-F4.
You should now have only one window called Console Root.
17. Click File and select Options.
18. In the Options dialog box that appears, click the pull-down menu for the Console
mode box and select User mode – limited access, single window, and then click
OK.
19. Click File and select Save.
20. Click File and select Exit.
21. Re-open the console by selecting Start | Programs | Administrative Tools |
MyConsole.msc.
22. Note that the Window pull-down option is no longer present, that you cannot add new
snap-ins via the File pull-down menu, and that you cannot close any of the snap-ins that
are in the MMC.
Command-Line Utilities
As the name suggests, command-line utilities are designed to be run in a command window (start by
selecting Start | Run, and then type cmd in the Open box and press Enter) or as part of batch files
or scripts. Administrators are forever looking for ways to simplify administration and using command
lines in batch files is a very good way of handling routine, repetitive tasks.You can perform some
administrative tasks using only a graphical interface, some using only a command-line utility, and
others can be done using either. Later in the chapter, we will examine printer administration, which is
a good example of something that can be managed using graphical or command-line tools.
Command-line utilities are written using a language that has to be run using a scripting host
such as Windows cscript and others run as compiled programs or executables.
Command-line utilities are harder to find because they are not in any of the Start menus (although
you can add them).A good place to look for information is in Windows Help and Support. Search
on Command-line Reference and you get an A-Z of Windows command-line tools.
Wizards
Wizards guide you through potentially complex tasks by taking you through a series of dialog boxes
where you answer questions or make choices; they are essentially wrappers around the underlying
graphical or command-line based tool. Each version of Windows increases the number of wizards in
an attempt to make administration easier for the inexperienced administrator. However, in some
cases it can be quicker for the experienced administrator to perform a task directly using the appro-
priate administrative tools rather than using a wizard.
Using Server Management Tools • Chapter 2 31
301_BD_W2k3_02.qxd 5/12/04 10:54 AM Page 31
Many wizards can be accessed through the Manage Your Server tool and the Configure Your
Server Wizard in Administrative Tools.
Windows Resource Kit
The Windows Resource Kit, available for download from Microsoft’s Web site, provides even more
tools for administrators to use to manage Windows servers in a large network. If you are responsible
for many servers, you should download this kit and spend some time reviewing its contents.
The Run As command
It is good practice for administrators not to log on using an account that has administrative rights.
This prevents accidental changes to the file server, viruses having more access than otherwise, and so
on. As an administrator, you should log on using an ordinary user account and when you need to
perform an administrative task you can use the Run as option to choose an administrator account.
Run as is available by right-clicking an item in the start menu.
The Run as option won’t appear in the right context menu for every Start menu item, just for
executables, management consoles, and other programs that can be run.
You can also use the runas command in a command prompt for command-line utilities. Start a
command prompt and then type runas /user:administrator cmd.This will start a new command
prompt with administrator privileges.
Managing Your Server Remotely
How often have you had to walk to the other end of a building to perform a server task or – even
worse – had to drive or fly to another office? One of the main aims for any administrator is to be
able to manage all the servers without leaving his or her desk! Windows Server 2003 provides you
with a variety of methods to remotely manage your servers depending on your scenario.
Remote Assistance
Remote Assistance is designed for users to request help on their PCs (which must be running
Windows XP or later) from another user.The user requesting help sends an invitation to assist, using
Windows Messenger or e-mail via the Help and Support Center.The request includes an attach-
ment (which contains details of how to connect to the user’s PC) that the recipient double-clicks to
start a Remote Assistance session with the requesting user’s PC. Once connected, the helper can
view the desktop of the requesting user and chat online with him.The helper can also, with the
user’s permission, take control of his desktop.
The request can optionally include an “expiry” (expiration) date, after which the Remote
Assistance request is no longer valid.This is used to reduce the risk of unauthorized access to the
user’s computer.The user requesting help can also require the helper to use a password to connect
to his computer.The user must communicate this password to the helper.
The user can review his invitations in the Help and Support Center. Figure 2.3 shows a
summary of invitations that have been sent out.
Although the usual method is for the user requesting help to initiate the Remote Assistance ses-
sion, it is also possible within a domain for a helper to offer assistance.An administrator can set
32 Chapter 2 • Using Server Management Tools
301_BD_W2k3_02.qxd 5/12/04 10:54 AM Page 32
group policy to prevent users from requesting remote assistance, or to restrict whether users will be
able to enable a helper to remotely control their computers or only view them.
Both users need to be connected to the Internet in order to use Remote Assistance and if fire-
walls are in use, port 3398 must be open.You can disable Remote Assistance completely to prevent
any Remote Assistance invitations being sent.
To configure Remote Assistance, right-click My Computer and select Properties, and then
click the Remote tab.
Using Web Interface for Remote Administration
If you need to manage your servers from home or perhaps from another office, one option is to use
a standard Web browser to administer your servers using the remote administration component of
Windows Server 2003.You must configure your server first, but after you have done this, you can
simply point the browser to your server’s IP address and you can administer it from anywhere in the
world.To access the server over the Internet, the following conditions must be met:
■
The Remote Administration (HTML) component must be installed on the server. It is not
installed by default (with the exception of Windows Server 2003 Web Edition).
■
Port 8098 on the server must be accessible through your Internet connection.
■
Your server must have a valid external IP address.
If you want to access your servers only over your company network, an external IP address is not
necessary, but you must still be able to communicate with port 8098 on the server. Microsoft recom-
mends that the browser you use for remote administration be Internet Explorer version 6.0 or later.
To access your server over the Web, browse to https://servername:8098.You must use a
secure connection.The :8098 in the URL directs the browser to connect to port 8098 on the
server instead of the default port 80.You can change your server to work on a different port in
Internet Information Services (IIS) Manager.After you’ve connected to the server, you’ll see the
Welcome page, as shown in Figure 2.4.
Using Server Management Tools • Chapter 2 33
Figure 2.3 Summary of Remote Assistance Invitations
301_BD_W2k3_02.qxd 5/12/04 10:54 AM Page 33
Through this Web site, you can carry out the more common administration tasks, such as con-
figuring Web sites, managing network settings, and administering local user accounts.
Remote Desktop for Administration
The Remote Desktop (RD) for Administration facility enables users to connect to a Windows
Server 2003 or a Windows 2000 Server computer desktop from any computer that has the Remote
Desktop client software. In Windows 2000, this facility was called Terminal Services Administration
mode. Remote Desktop for Administration is effectively Terminal Server installed in a special mode
that enables up to two remote users and one local user (at the console) to connect to a server for
administration purposes and does not require any additional licensing.Terminal Server can also be
used in application mode to enable many users to connect to your server using Remote Desktop
from their computers and run applications in a “thin client” computing model. Application mode
requires Terminal Server licensing to be set up.
You can connect to the server from any client computer running the RDC client or the
Windows terminal services client. Microsoft provides an RDC client for Windows 95, 98/98SE,
ME, NT 4.0 and 2000.You can also download an RDC client for Macintosh OS X.
The Remote Desktop snap-in is a very useful tool for adding Remote Desktop functionality to
an MMC. With this tool, you can connect to the server’s console session.
Administration Tools Pack (adminpak.msi)
The Windows Server 2003 Administration Tools Pack is used on client computers running
Windows XP Professional to provide management tools for Windows Server 2003 computers.The
client computers must have Windows XP Service Pack 1 applied.
You can install the Administration Tools from the adminpak.msi file, which you can find on
the Windows Server 2003 CD or in the system32 folder of a computer running Windows Server
2003. Double-click the adminpak.msi file to install the tools.
34 Chapter 2 • Using Server Management Tools
Figure 2.4 Welcome Page for Server Web Administration
301_BD_W2k3_02.qxd 5/12/04 10:54 AM Page 34
After the tools are installed, you’ll have all the administrative tools that we looked at earlier in
this section available on your Windows XP computer and you’ll be able to perform server and net-
work administrative tasks from the XP client. In particular, this includes tools for server-based ser-
vices such as DNS, DHCP, and Active Directory.
Windows Management Instrumentation (WMI)
Windows Management Instrumentation (WMI) provides an object-based method for accessing
management information in a network. It is based on the Web-Based Enterprise Management
(WBEM) standard specified by the Distributed Management Task Force (DTMF) organization and
is designed to enable the management of a wide range of network devices. WMI is Microsoft’s
implementation of WBEM for Windows operating systems.
WMI is used with programs or scripts to retrieve management information or change configu-
rations of Windows computers, but using WMI is not trivial and requires programming skills. WMI
can be used at the command line using WMIC, but you need knowledge of the WMI database of
objects. For more information on this topic, refer to Microsoft’s WMI Software Development Kit.
Some enterprise Microsoft tools, such as Systems Management Server (SMS) and Health
Monitor in the Back Office products use WMI to manage computers. For more information on
WMI, have a look at Microsoft’s Web site at www.microsoft.com/windows2000/techinfo/howit-
works/management/wmiscripts.asp.
Using Computer Management
to Manage a Remote Computer
Computer management is available on client and server computers to perform management tasks
and is actually a pre-configured MMC console.To start computer management, select Start |
Settings | Control Panel, double-click Administrative Tools, and then double-click
Computer Management.Alternatively, right-click the My Computer icon and select Manage.
You can also use computer management to connect to another computer (providing you have
the appropriate rights). Select Connect to another computer… from the Action pull-down
menu, and then enter the name of the remote computer in the Another computer: box or
browse for it by clicking the Browse button.
Figure 2.5 shows Computer Management on a server with the Disk Management snap-in
expanded. On a server computer, Computer Management has additional snap-ins for server-based
services, so you won’t see exactly the same snap-ins in Computer Management on a computer run-
ning Windows 2000 Professional or Windows XP Professional.
Computer Management has three nodes that group the management tasks, as shown in Table
2.2. Expanding each node reveals the snap-ins. System Tools contains snap-ins for local management
tasks, the Storage node contains snap-ins for tasks related to local disks and storage devices (such as
tape drives), and the Services and Applications node contains snap-ins for other server-based applica-
tions.The contents of this node vary depending on whether the computer is running a client or
server operating system and the server components that have been installed.Table 2.2 shows only
some of the possible snap-ins under Services and Applications.
Using Server Management Tools • Chapter 2 35
301_BD_W2k3_02.qxd 5/12/04 10:54 AM Page 35