The Best Damn Windows Server 2003 Book Period- P9 pdf
Bạn đang xem bản rút gọn của tài liệu. Xem và tải ngay bản đầy đủ của tài liệu tại đây (491.47 KB, 10 trang )
The Internet Printing Protocol
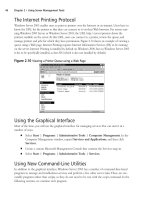
Windows Server 2003 enables users to print to printers over the Internet or an intranet. Users have to
know the URL for the printer so that they can connect to it via their Web browsers. For servers run-
ning Windows 2000 Server or Windows Server 2003, the URL http://server/printers shows the
printers available on the server.At this URL, users can connect to a printer, review the queue, and
manage printers and jobs for which they have permissions. Figure 2.10 shows an example of viewing a
queue using a Web page. Internet Printing requires Internet Information Services (IIS) to be running
on the server. Internet Printing is installed by default on Windows 2000, but on Windows Server 2003
it has to be specifically installed, as does IIS (which is also not installed by default).
Using the Graphical Interface
Most of the time, you will use the graphical interface for managing services.You can start it in a
number of ways:
■
Select Start | Programs | Administrative Tools | Computer Management. In the
Computer Management window, expand Services and Applications, and then click
Services.
■
Create a custom Microsoft Management Console that contains the Services snap-in.
■
Select Start | Programs | Administrative Tools | Services.
Using New Command-Line Utilities
In addition to the graphical interface, Windows Server 2003 has a number of command-line-based
programs to manage and troubleshoot services and perform a few other server tasks.These are exe-
cutable programs rather than scripts, so they do not need to be run with the cscript command. In the
following sections, we examine each program.
46 Chapter 2 • Using Server Management Tools
Figure 2.10 Viewing a Printer Queue using a Web Page
301_BD_W2k3_02.qxd 5/12/04 10:54 AM Page 46
Sc.exe
The sc.exe program communicates with the Service controller and has twenty-four different options.
We won’t examine them all here, but you can refer to the online help for more information. In gen-
eral, sc is used to configure services and manage their status, name, and permissions. For example, sc
stop <servicename> is used to stop a service but <servicename> must be the name as stored in the
registry and not the display name. Use sc getkeyname to determine the registry name of the service.
Figure 2.11 shows how to find the registry name for the Telnet service, how to check the service’s
current status, and how to stop the Telnet service.
Schtasks.exe
You use schtasks to set programs to run at scheduled intervals, delete or change existing scheduled
tasks, and stop or run a scheduled task immediately.Table 2.6 lists the six options for schtasks. Schtasks
doesn’t provide as much control over scheduled tasks as using the graphical interface.
Table 2.6 Options for the schtasks Command
Schtasks option Use
schtasks create Create a new scheduled task.
schtasks change Change the properties of a scheduled task but not the actual schedule.
schtasks run Run a scheduled task immediately.
schtasks end Stop a scheduled task that is currently running.
schtasks delete Delete a scheduled task.
schtasks query List all the scheduled tasks on the local or a remote computer.
Using Server Management Tools • Chapter 2 47
Figure 2.11 Stopping the Telnet Service Using sc
301_BD_W2k3_02.qxd 5/12/04 10:54 AM Page 47
Setx.exe
You use setx to configure environment variables for either the user (the variables apply only to a
specific user) or the system environment (variables apply to all users).You can set variables explicitly
by specifying their value or using the value of a registry key or the contents of a file. Setx is the only
way to permanently (i.e., remembered between reboots) set a variable name via the command line.
Shutdown.exe
Use the shutdown command to shut down or restart local or remote computers.You can also use it
for shutting down several computers at once using the /i option. With this option, a new window
appears where you add the names of the computers that you want to shut down or restart. Figure
2.12 shows the dialog box for the /i option.
Tasklist.exe
Tasklist shows all the tasks that are running on the local or remote computer. Tasklist is a really useful
command given its many options as shown in Table 2.7.
■
The /S option connects to a remote computer.You might also have to specify the /U
option to connect as a particular user and the /P option to specify the password for that
user.
■
The /M option lists all the dll modules that a process has loaded. However, you can also
use this option to list all the processes that have loaded a particular module by specifying
/M module name. For example, to list all processes that have loaded the user32.dll module,
use tasklist /M user32.dll.
■
The /FI option is particularly useful for restricting the output to list only the tasks that
are of interest.This option is used with a variety of filters, which can, for example, be used
48 Chapter 2 • Using Server Management Tools
Figure 2.12 The Remote Shutdown Dialog Box
301_BD_W2k3_02.qxd 5/12/04 10:54 AM Page 48
to display tasks with a particular name, process number, or processes that have used more
than a certain amount of CPU time. As an example, to list all processes that start with H,
use the command tasklist /FI “IMAGENAME eq H*”.
■
The /FO option controls how the output is displayed.There are three formats:Table, List,
or CSV.
■
The /V option adds information to the output.
Table 2.7 Some of the Options for the tasklist Command
Tasklist Option Use
Tasklist /S Connect to a remote computer (system).
Tasklist /M List modules loaded by processes.
Tasklist /FI filter Display only processes that match the filter.
Tasklist /FO format Specify how the output is displayed.
Tasklist /V Display verbose information.
Taskkill.exe
Use taskkill to terminate processes on the local or a remote computer.You need to use tasklist first
to identify the process that needs to be terminated. Taskkill has many options and if used without
care you could end up ending more processes than you expected.
■
The /S option connects to a remote computer.You might also have to specify the /U
option to connect as a particular user and the /P option to specify the password for that
user.
■
The /F option forcefully terminates a process. Without the /F option a process might not
actually terminate, particularly if it raises a dialog box asking whether changes should be
saved.The /F option overrides this but there is a risk of losing the user’s work.
■
Use the /FI option with extreme care, because it can terminate all processes that match a
given filter. For example taskkill /FI “IMAGENAME eq H*” terminates all processes
that start with H.
■
The /PID option terminates a process with a specific process number.
■
The /T option terminates a process and all child processes that it started.
■
The /IM option is functionally the same as /FI with IMAGENAME in that it terminates
processes with a specific name or names.You can use wildcards to specify the process names.
Using Server Management Tools • Chapter 2 49
301_BD_W2k3_02.qxd 5/12/04 10:54 AM Page 49
Table 2.8 Some of the Options for the taskkill Command
Taskkill Option Use
Tasklist /S Connect to a remote computer (system).
Tasklist /F Forcefully terminate a process.
Tasklist /FI filter Terminate processes that match the filter. Use
with care!
Tasklist /PID process id Terminate the process with this ID.
Tasklist /T Terminate a process and all its child processes.
Tasklist /IM process name Terminate all processes that match the given
image name.
Using Wizards to
Configure and Manage Your Server
A lot of effort has been made in Windows Server 2003 to make administrative tasks easy for the
administrator through the use of wizards. A key wizard is the Configure Your Server Wizard,
which, in conjunction with the Manage Your Server tool, guides an administrator through the
most common administrative tasks.
Using the Configure Your
Server Wizard and Manage Your Server
Windows Server 2003 introduces the concept of server roles, which brings related administrative
tasks together for management purposes. We’ll examine each of these roles in the next chapter.
Figure 2.20 shows the server role page of the Configure Your Server Wizard.This page shows
whether a role has been configured.
You must install server roles using the Configure Your Server Wizard before you can manage
them using Manage Your Server. In the rest of this section we’ll look at each of the roles in more
detail.The Configure Your Server Wizard and Manage Your Server can be found in Start |
Programs | Administrative Tools.
Note that the use of server roles is completely optional and there is no reason you can’t perform
server administrative tasks without setting up server roles.
50 Chapter 2 • Using Server Management Tools
301_BD_W2k3_02.qxd 5/12/04 10:54 AM Page 50
Planning Server
Roles and Server Security
In this chapter:
■
Understanding server roles
■
Planning a server security strategy
■
Planning baseline security
■
Customizing server security
Introduction
Planning an effective security strategy for Windows Server 2003 requires an under-
standing of the roles that different servers play on the network and the security needs of
different types of servers based on the security requirements of your organization.
Securing the servers is an important part of any network administrator’s job.
In this chapter, we will first review server roles and ensure that you have an under-
standing of the many roles Windows Server 2003 can play on the network. We will dis-
cuss domain controllers; file and print servers; DHCP, DNS, and WINS servers; Web
servers; database servers; mail servers; certification authorities; and terminal servers.Then
we will delve into how to plan a server security strategy. We will examine how to
choose the right operating system according to security needs, how to identify min-
imum security requirements for your organization, and how to identify the correct con-
figurations to satisfy those security requirements.
Next, we’ll review how to plan baseline security on both client and server machines.
We will cover planning the secure baseline installation parameters and enforcing default
security settings on new computers. We will look at how to customize server security,
securing your servers according to their roles.Then we will walk through the process of
creating custom security templates and how to deploy security configurations.
Chapter 3
51
301_BD_w2k3_03.qxd 5/12/04 10:56 AM Page 51
Understanding Server Roles
When Windows Server 2003 is installed on a computer, it provides a wide variety of tools and func-
tionality. However, additional features may still need to be installed on the server to bring clients the
services they need.The server may need to supply file and print services, authenticate users, or sup-
port a local intranet Web site. Until Windows Server 2003 is configured to supply these services,
clients will be unable to use the server in a manner that is required by the organization.
Server roles are profiles that are used to configure Windows Server 2003 to provide specific
functionality to the network. When you set up a server to use a specific role, various services and
tools are enabled or installed, and the server is configured to provide additional services and
resources to network clients. Roles are applied to machines using the Configure Your Server Wizard
and managed using the Manage Your Server tool.
As shown in Figure 3.1, Manage Your Server provides information about the roles that are cur-
rently configured for a server, and it provides the ability to add and remove roles from a server.
Depending on your server’s settings, this tool will start automatically upon logon. If you’ve checked
the Don’t display this page at logon check box at the bottom of this window, Manage Your
Server will not start automatically.You can start it manually by selecting Start | Administrative
Tools | Manage Your Server.
As shown in Figure 3.1, there are a variety of items in Manage Your Server’s main window.The
left side of the window lists the roles currently configured for the server. Beside each entry, there are
buttons that relate to the corresponding role.These buttons differ from role to role, and they are
used to invoke other tools for managing the role or to view information on additional steps that can
be taken to configure, administer, and maintain the role.
Near the top of the Manage Your Server window are three buttons.Two of these are used to
obtain additional information about roles and remote administration.The other button, labeled Add
or remove a role, is used to invoke the Configure Your Server Wizard.You can also start the
Wizard by selecting Start | Administrative Tools | Configure Your Server.
52 Chapter 3 • Planning Server Roles and Server Security
Figure 3.1 The Main Manage Your Server Window
301_BD_w2k3_03.qxd 5/12/04 10:56 AM Page 52
When the Configure Your Server Wizard starts, it informs you of possible preliminary steps that
need to be taken before a new role is added. As shown in Figure 3.2, these steps include ensuring
that network and Internet connections are set up and active for the server, peripherals are turned
on, and your Windows Server 2003 installation CD is available. When you finish reading this infor-
mation, click the Next button to have the Wizard test network connections and continue to the
next step.
In the next window, shown in Figure 3.3, roles that are available to add and remove through the
Wizard are listed in the Server Role column; the Configured column indicates whether the role
has been previously installed. If you want to install a role that isn’t listed here, click the Add or
Remove Programs link to open the Add or Remove Programs applet (in the Windows Control
Panel), where you can configure additional services.
In Figure 3.3, you can see that there are 11 different roles that can be applied to Windows
Server 2003 through the Configure Your Server Wizard.These roles are as follows:
Planning Server Roles and Server Security • Chapter 3 53
Figure 3.2 Preliminary Steps of the Configure Your Server Wizard
Figure 3.3 Configuring Server Roles
301_BD_w2k3_03.qxd 5/12/04 10:56 AM Page 53
■
Domain controller This role is used for authentication and installs Active Directory on
the server.
■
File server This role is used to provide access to files stored on the server.
■
Print server This role is used to provide network printing functionality.
■
DHCP server This role allocates IP addresses and provides configuration information to
clients.
■
DNS server This role resolves IP addresses to domain names (and vice versa).
■
WINS server This role resolves IP addresses to NetBIOS names (and vice versa).
■
Mail server This role provides e-mail services.
■
Application server This role makes distributed applications and Web applications avail-
able to clients.
■
Terminal server This role provides Terminal Services for clients to access applications
running on the server.
■
Remote access/VPN server This role provides remote access to machines through
dial-up connections and virtual private networks (VPNs).
■
Streaming media server This role provides Windows Media Services so that clients can
access streaming audio and video.
After you select the role to add to the server, click Next to step through the process of setting up
that role. Each set of configuration windows is different for each server role. Also, although multiple
roles can be installed on Windows Server 2003, only one role at a time can be configured using the
Configure Your Server Wizard.To install additional roles, you need to run the Wizard again.
Before setting up a server role, it is important to understand each of the roles that can be
applied to Windows Server 2003 so you select the roles most appropriate for the server’s use and for
your organization. In the sections that follow, we will discuss these roles in greater detail and
examine how they are installed with the Configure Your Server Wizard and other tools.
Domain Controllers (Authentication Servers)
Domain controllers are a fundamental part of a Microsoft network because they are used to manage
domains. An important function of a domain controller is user authentication and access control. By
combining authentication and access control, a domain controller can permit or deny access to net-
work services and resources on a user by user basis.
Active Directory
To perform these functions, the domain controller must have information about users and other
objects in a domain. In Windows 2000 and Windows Server 2003, this data is stored in Active
Directory (AD), which is a directory service that runs on domain controllers.
When AD is installed, the server becomes a domain controller. Until this time, it is a member
server that cannot be used for domain authentication and management of domain users or other
domain-based objects.This does not mean, however, that AD can be installed on every version of
54 Chapter 3 • Planning Server Roles and Server Security
301_BD_w2k3_03.qxd 5/12/04 10:56 AM Page 54
Windows Server 2003. It can be installed on Standard Edition, Enterprise Edition, and Datacenter
Edition, but servers running the Web Edition of Windows Server 2003 cannot be domain con-
trollers. Web Edition servers can be only stand-alone or member servers that provide resources and
services to the network.
A Windows Server 2003 computer can be changed into a domain controller by using the
Configure Your Server Wizard or by using the Active Directory Installation Wizard (DCPROMO).
DCPROMO is a tool that promotes a member server to domain controller status. During the instal-
lation, a writable copy of the AD database is placed on the server’s hard disk.The file used to store
directory information is called NTDS.dit and, by default, is located in %systemroot%\NTDS. When
changes are made to the directory, they are saved to this file.
Each domain controller retains its own copy of the directory, containing information about the
domain in which it is located. If one domain controller becomes unavailable, users and computers
can still access the AD data store on another domain controller in that domain.This allows users to
continue logging on to the network, even though the domain controller that is normally used is
unavailable. It also allows computers and applications that require directory information to continue
functioning while one of these servers is down. When a change is made on one domain controller,
the changes are replicated, so every domain controller continues to have an accurate copy of AD.
This type of replication is called multi-master, because each domain controller contains a full
read/write copy of the AD database.
Operations Master Roles
In Windows Server 2003, all domain controllers are relatively equal by default. However, there are
still some operations that need to be performed by a single domain controller in the domain or
forest.To address these, Microsoft created the concept of operations masters. Operations masters serve
many purposes. Some control where components of AD can be modified; others store specific infor-
mation that is key to the healthy function of AD at the domain level. Because only one domain
controller in a domain or forest fulfills a given role, these roles are also referred to as Flexible Single
Master of Operations (FSMO) roles. Some FSMO roles are unique to each domain; others are unique
to the forest.
There are five different types of master roles, each serving a specific purpose.Two of these
master roles are applied at the forest level (forest-wide roles), and the others are applied at the
domain level (domain-wide roles).The following are the forest-wide operations master roles:
■
Schema master A domain controller that is in charge of all changes to the AD schema.
The schema determines which object classes and attributes are used within the forest. If
additional object classes or attributes need to be added, the schema is modified to accom-
modate these changes.The schema master is used to write to the directory’s schema, which
is then replicated to other domain controllers in the forest. Updates to the schema can be
performed only on the domain controller acting in this role.
■
Domain naming master A domain controller that is in charge of adding new domains
and removing unneeded ones from the forest. It is responsible for any changes to the
domain namespace.This role prevents naming conflicts, because such changes can be per-
formed only if the domain naming master is online.
Planning Server Roles and Server Security • Chapter 3 55
301_BD_w2k3_03.qxd 5/12/04 10:56 AM Page 55