The Best Damn Windows Server 2003 Book Period- P14 ppt
Bạn đang xem bản rút gọn của tài liệu. Xem và tải ngay bản đầy đủ của tài liệu tại đây (510.56 KB, 10 trang )
connect internally to your server.This system reduces WAN bandwidth requirements while also
increasing security by minimizing the number of clients connecting outside of your network.Also, this
centralized control allows you to test updates before deploying them.
There are basically two components to this system. SUS is the server component responsible for
downloading the updates from Microsoft’s servers. Also, the SUS component provides centralized
control of updates.The second component to the system is the Automatic Updates client software.
This software offers a mechanism for clients to connect to either Microsoft’s update servers or to
your centralized update server. Let’s see how this system is configured.
Install and Configure Software Update Infrastructure
The software update infrastructure (SUS) provides centralized administration and distribution of
software updates within your organization’s network. In this section, we will focus on the server
components of the SUS infrastructure.The system is not a single piece of software but actually a
combination of components that make up the infrastructure.To provide a centralized in-house SUS
infrastructure, SUS uses the following three components:
■
A new synchronization service called Windows Update Synchronization Service.This ser-
vice downloads content to your SUS server.
■
A server running an Internet Information Services (IIS) Web site.This server services the
update requests from Automatic Updates clients.
■
An SUS administration Web page.
SUS has the following software and minimum hardware requirements:
■
Windows 2000 Server or Windows Server 2003
■
Pentium III 700 MHz or higher processor
■
A network card
■
512 megabytes of RAM
■
6 gigabytes (GB) of free hard disk space on an NTFS partition for storage of update
packages
■
A minimum of 100MB of free space on an NTFS partition for installation of SUS itself
■
Microsoft Internet Explorer v5.5 or above
According to Microsoft, this configuration should support up to 15,000 clients using one SUS
server.To build the SUS server:
1. Download the Sus10sp1.EXE file from the www.microsoft.com SUS page.The file is
approximately 33 megabytes in size.
2. Copy the file to the server where you will install SUS.
3. Double-click the Sus10sp1.exe file.
4. In the Welcome screen, click Next.
96 Chapter 4 • Security Templates and Software Updates
301_BD_w2k3_04.qxd 5/12/04 10:57 AM Page 96
5. Accept the End User License Agreement, and click Next.
6. Select the Typical check box. At this point, a typical install has been completed for the
SUS server.The next screen will display the URL used by client machines to connect to
the SUS server being installed. Document the URL and click Install.
7. The IIS lockdown tool may run at this point, depending on current server configuration.
The Finish page will be displayed next. Document the administration URL displayed on
the Finish page.
8. Click Finish to launch the SUS administration Web site in your default Web browser.
At this point, your SUS server has been installed with default configurations. In the next sec-
tion, we will customize the server configuration. An SUS server provides two basic functions: syn-
chronizing content and approving content. Before the SUS server can download content, it has to
be configured.
1. Configuration settings are adjusted from the Set Options link, as shown in Figure 4.15.
2. From the Set Options page, configure your network proxy settings if your network uses a
proxy.The default setting is Automatically detect proxy server settings.This configu-
ration will detect and automatically configure the proxy connection if your network sup-
ports this option. Otherwise, configure the proxy settings for your particular proxy.
3. Depending on whether your network uses DNS or NetBIOS for name resolution, you
should configure the SUS server to support the proper name service for your network.
This will determine the name used by clients to connect to the SUS server.
4. Configure the SUS server used to provide synchronized content.The options are to use
Microsoft servers or to use a server on your internal network.
5. Specify how your server will handle new versions of previously approved updates.
6. Select a storage location for updates.The options are to maintain the updates on a
Microsoft Windows Update server or to save the updates to a local folder.Also, locales may
Security Templates and Software Updates • Chapter 4 97
Figure 4.15 Set Options Configuration Screen
301_BD_w2k3_04.qxd 5/12/04 10:57 AM Page 97
be selected from this portion of the configuration. Note that each locale that is selected
will increase the amount of storage space necessary to maintain updates on your server.
There are two types of data associated with the SUS synchronization:
■
The metadata stored in a file named Aucatalog.cab.This file stores details about the pack-
ages and package availability.
■
The actual package file that updates your systems.
No matter how the SUS server is configured, the Aucatalog.cab file will always be downloaded.
As previously mentioned, you have the option to store packages in a local folder or to use Maintain
the updates on the Microsoft Windows Update servers.The benefit to the second option takes
advantage of the global availability of the Microsoft Windows Update servers while still providing
control over which updates your clients will receive.This does not provide bandwidth-saving advan-
tages the way that keeping an internal SUS server does. It does, however, reduce the amount of free
disk that you need on the SUS server.
Now that we have installed the Windows Update Synchronization Service to our SUS server
and configured the update and storage settings, it is time to synchronize the server with the
Microsoft Windows Update servers.
1. Click Synchronize server in the navigation panel on the left side of the Software
Update Services administration page as shown in Figure 4.16.
2. From this page, you should configure a synchronization schedule for your SUS server.The
synchronization schedule setting allows for synchronization at a particular time of day on a
weekly or daily basis. Determine a time when network traffic is low and your server is not
in the process of being backed up or processing other service requests, if possible.
Scheduling settings are shown in Figure 4.17.
98 Chapter 4 • Security Templates and Software Updates
Figure 4.16 Synchronize Server Page
301_BD_w2k3_04.qxd 5/12/04 10:57 AM Page 98
3. After specifying a schedule and completing the SUS server configuration, it is a good idea
to manually synchronize the server the first time. Select Synchronize Now from the
Synchronize Server page.
4. After synchronization is complete, depending on your server configuration, your server
will either automatically approve the updates or you will have a list of updates to review
for your approval.To review the updates, select Approve updates from the navigation
menu as shown in Figure 4.18.
5. Review the updates available and select the updates that you want applied to your client
systems, then click the Approve button to complete the SUS synchronization and update
process. A pop-up message will appear to warn you that your update list will be modified
as shown in Figure 4.19. Select Ye s to continue.
Security Templates and Software Updates • Chapter 4 99
Figure 4.17 Setting SUS Scheduling
Figure 4.18 Update Review for Approval
301_BD_w2k3_04.qxd 5/12/04 10:57 AM Page 99
6. Depending on the update or updates selected, you may be prompted to accept an End
User License Agreement (EULA) to continue as shown in Figure 4.20. Select Accept to
continue.
7. After the SUS server finishes downloading the selected updates, you are prompted with
another pop-up window informing you that the updates have been successfully approved
and are available for clients as shown in Figure 4.21.
8. The SUS server is now configured, and synchronization and approval have been com-
pleted.
9. Your server may display one of the following messages next to each update in the
approval list:
■
New This indicates that the update was recently downloaded.The update has not
been approved and will not be offered to any client computers that query the server.
100 Chapter 4 • Security Templates and Software Updates
Figure 4.19 Synchronization List Warning
Figure 4.20 EULA Prompt
Figure 4.21 Completed Approval pop-up
301_BD_w2k3_04.qxd 5/12/04 10:57 AM Page 100
■
Approved This means that the update has been approved by an administrator and
will be made available to client computers that query the server.
■
Not Approved This indicates that the update has not been approved and will not be
made available to client computers that query the server.
■
Updated This indicates that the update has been changed during a recent synchro-
nization.
■
Temporarily Unavailable This message is displayed only when updates are stored
locally on the server.An update is in the Temporarily Unavailable state if one of the
following is true:The associated update package file required to install the update is
not available or a dependency required by the update is not available.
10. Depending on your server configuration, the server may need periodic administration to
approve new updates for your clients. It is best practice to test updates on non-production
machines before approving them for your production environment.This ensures that the
updates do not conflict with other software used by your client systems.
A Monitor server page is available for a high-level overview of updates available. Also, as syn-
chronizations are performed, log entries are added to the Event Log to document the synchroniza-
tion process and to provide information in the event of a synchronization failure.
In the next section, we will discuss the process used to install and configure SUS clients with
the Automatic Client Update software on Windows 2003, Windows XP, and Windows 2000
client systems.
Install and Configure Automatic Client Update Settings
You now have a working SUS server on your corporate LAN so it is time to configure the clients.
The updated Automatic Update client is available for Windows 2000 Professional, Windows 2000
Server, and Windows 2000 Advanced Server (all with Service Pack 2 or higher), Windows XP
Professional, Windows XP Home Edition, and Windows Server 2003 family. Windows 2000 Data
Center Server uses a special service for system update capabilities separate from the standard SUS
service.Three options are available for client installation:
■
Install Automatic Updates client using the MSI install package.
■
Self-update from the STPP version Critical Update Notification (CUN).
■
Install Windows 2000 Service Pack 3 (SP3).
■
Install Windows XP SP1.
■
Install Windows Server 2003.
Microsoft recommends using the MSI install package (filename WUAU22.msi) to update
Windows 2000 and Windows XP client systems.The client software may be installed using the MSI
package through Microsoft IntelliMirror, Microsoft Systems Management Server (SMS), or through
a simple logon script.
Security Templates and Software Updates • Chapter 4 101
301_BD_w2k3_04.qxd 5/12/04 10:57 AM Page 101
Once the client software is installed, there are two basic configuration categories to complete:
■
Automatic Updates functionality
■
Automatic Updates server to use—from Microsoft Windows Updates servers or from a
server running SUS on your local network
SUS clients use the Microsoft Windows Updates servers by default. Clients must be redirected
to use the local SUS server or servers.The recommended approach for SUS client redirection to a
local SUS server is through Group Policy settings.
To configure Group Policy SUS server redirection in an Active Directory environment:
1. The WUAU.adm file that describes the new policy settings for the Automatic Updates client
is automatically installed into the %windir%\inf folder when you install Automatic Updates.
This file describes the new policy settings used for the Automatic Update configuration.
2. Load WUAU.adm as an administrative template in the Group Policy Object Editor.
3. From an Active Directory domain controller, click Start | Programs | Administrative
Tools | Active Directory Users and Computers.
4. Right-click the Organizational Unit (OU) or domain where you want to create the
policy, and then click Properties.
5. Click the Group Policy tab, and click New.
6. Type a name for the policy, and then click Edit to open the Group Policy Object
Editor.
7. Under either Computer Settings or User Settings, right-click Administrative Templates.
8. Click Add/Remove Templates and Add.
9. Enter the name of the Automatic Updates ADM file: %windir%\inf\WUAU.adm.
10. Click Open.
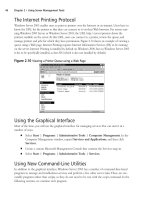
11. From within the Group Policy Editor, Computer Configuration | Administrative
Templates | Windows Components | Windows Update in the right pane of the
management console, the two configuration options are listed as seen in Figure 4.22.
102 Chapter 4 • Security Templates and Software Updates
Figure 4.22 Configuring Windows Automatic Update Using Group Policy
301_BD_w2k3_04.qxd 5/12/04 10:57 AM Page 102
12. Configure the SUS server location information by double-clicking on Specify intranet
Microsoft update service location and clicking Enable as shown in Figure 4.23.
13. In the Set the intranet update service for detecting updates: box, enter the URL
for the SUS server.
14. In the Set the intranet statistics server: box, enter the URL for the statistics server.
Click OK to continue.This server can be the same server as the SUS server.The server
has to have IIS installed and configured to be the statistics server.
15. Configure the Automatic Update Properties by double-clicking Configure
Automatic Updates in the right pane of the management console.
16. Click Enable and select one of the three Configure Automatic Updating: options as
shown in Figure 4.24.The Notify for download and notify for install option notifies
a logged-on administrative user prior to the download and prior to the installation of the
updates.The Auto download and notify for install option automatically begins down-
loading updates and then notifies a logged-on administrative user prior to installing the
updates.The Auto download and schedule the install option is configured to perform
a scheduled installation.The recurring scheduled installation day and time must also be set
using the Scheduled install day: and Scheduled install time: drop-down boxes. Click
OK to continue.
Security Templates and Software Updates • Chapter 4 103
Figure 4.23 Enabling SUS Client Redirection
301_BD_w2k3_04.qxd 5/12/04 10:57 AM Page 103
17. If the computer is not running when the scheduled install time arrives, the Reschedule
Automatic Updates scheduled installations policy setting will provide a means to
install the updates after the computer has been started. Double-click Reschedule
Automatic Updates scheduled installations, click Enable, and specify a time in the
Wait after system startup(minutes): box (a value between 1 and 60). Click OK to
complete this configuration setting.
Twenty-four hours after the client first establishes a connection with the update service, a local
administrator will be presented with a wizard-based configuration for the client update settings if no
configuration settings have been specified through other methods.A local administrator can use the
Automatic Updates applet in the Control Panel to configure Automatic Update or to modify the set-
tings. If Group Policy has been configured for Automatic Updates, it will override the local settings.
The order for policy application is the same as discussed earlier: Local, Site, Domain, Organizational
Unit. Each policy overwrites the previous policy if conflicting parameters are encountered.
Supporting Legacy Clients
Legacy clients (running operating systems that predate Windows 2000) do not work with Group
Policy.To take advantage of software update capabilities for Windows 98 and Windows 98SE sys-
tems, you will have to modify the registry. In a non-Active Directory environment (workgroup or
NT 4.0 Domain), there are several ways to configure registry keys for the SUS client settings.The
most common ways to set the registry keys in a non-Active Directory environment are:
■
Manually editing the registry using Regedit.exe
■
Centrally deploying these registry key changes using Windows NT 4 System Policy
First, update the Critical Update Notification system to accommodate the new Automatic
Update system.The option to update using self-update from the STPP version Critical Update
Notification (CUN) involves editing the registry in the following manner:
1. Open Registry Editor. Click Start | Run and type regedit.exe. Press OK.
104 Chapter 4 • Security Templates and Software Updates
Figure 4.24 Configuring Automatic Update Properties
301_BD_w2k3_04.qxd 5/12/04 10:57 AM Page 104
2. Navigate to HKEY_LOCAL_MACHINE\SOFTWARE\Microsoft\Windows\
CurrentVersion\WindowsUpdate\Critical Update.
3. Create SelfUpdServer value under this key as REG_SZ “SelfUpdServer”=”http://
<YourServer>/SelfUpdate/CUN5_4”.
4. Navigate to HKEY_LOCAL_MACHINE\SOFTWARE\Microsoft\Windows\
CurrentVersion\WindowsUpdate\Critical Update\Critical Update SelfUpdate.
Create the SelfUpdServer value under this key as REG_SZ. ”SelfUpdServer”= where
<YourServer> is the name of the SUS server on your network.
After the Critical Update software has been upgraded, it is time to configure the software. Let’s
take a look at one of the methods used to update the registry on older client systems.To modify the
registry with regedit.exe, add the following settings to the registry at this location:
HKEY_LOCAL_MACHINE\Software\Policies\Microsoft\Windows\
WindowsUpdate\AU
■
RescheduleWaitTime
■
Range: n; where n = time in minutes (1 through 60)
■
Registry value type: REG_DWORD
■
NoAutoRebootWithLoggedOnUsers
■
Set this to 1 if you want the logged on users to choose whether or not to reboot their
systems
■
Registry value type: REG_DWORD
■
NoAutoUpdate
■
Range = 0|1. 0 = Automatic Updates is enabled (default), 1 = Automatic Updates is
disabled
■
Registry Value Type: Reg_DWORD
■
AUOptions
■
Range = 2|3|4. 2 = notify of download and installation, 3 = automatically download
and notify of installation, and 4 = automatic download and scheduled installation.All
options notify the local administrator.
■
Registry Value Type: Reg_DWORD
■
ScheduledInstallDay
■
Range = 0|1|2|3|4|5|6|7. 0 = Every day; 1 through 7 = the days of the week from
Sunday (1) to Saturday (7)
■
Registry Value Type: Reg_DWORD
■
ScheduledInstallTime
■
Range = n; where n = the time of day in 24-hour format (0 through 23)
■
Registry Value Type: Reg_DWORD
Security Templates and Software Updates • Chapter 4 105
301_BD_w2k3_04.qxd 5/12/04 10:57 AM Page 105