The Best Damn Windows Server 2003 Book Period- P16 pptx
Bạn đang xem bản rút gọn của tài liệu. Xem và tải ngay bản đầy đủ của tài liệu tại đây (558.31 KB, 10 trang )
By default, the top section displays the volume list view and the bottom section displays the
graphical view.You can change the view by clicking the View menu bar, choosing To p or
Bottom, and selecting the view that you want.
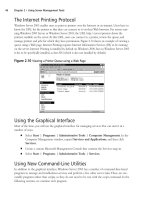
In Figure 5.5, the top section is using the default volume list view.This view uses text in a table
to show how your volumes and partitions are configured.The bottom section is using the graphical
view. As the name implies, it provides a graphical representation of how your disks are configured.
The third view (not shown by default) is the disk list view. It uses text to show you how your disks
are configured. It looks similar to the volume list view, except it displays information on a per-disk
basis instead of volume and partition information.
Most administrators find the default combination volume list and graphical view to be most effi-
cient. Notice that there is a legend on the bottom of the MMC, as shown in Figure 5.6.The color
codes enable you to look at each disk and easily determine what type of volume(s) or partition(s) it
contains.You can use the View menu bar to change the colors assigned to each disk region.
116 Chapter 5 • Managing Physical and Logical Disks
Figure 5.5 Using Disk Management from within Computer Management
Figure 5.6 Using the Legend in the Disk Management MMC
301_BD_W2k3_05.qxd 5/12/04 12:31 PM Page 116
Using the Command-Line Utilities
Microsoft has increased the number of functions that administrators can perform from the command
prompt in Windows Server 2003.This gives you more flexibility in accomplishing administrative tasks.
Windows Server 2003 includes the following command-line tools for performing disk-related tasks:
■
Diskpart.exe: for managing disks
■
Fsutil.exe: for managing the file system
■
Rss.exe: for managing remote storage
In the following sections, we will discuss each of these utilities in detail.
Using Diskpart.exe
Diskpart.exe enables you to manage disks, partitions, or volumes from the command prompt.You can
type the commands directly at the command prompt via interactive mode or you can configure
diskpart.exe to use a script for its input.
Diskpart.exe scripting is beneficial if you are automating the deployment of Windows Server
2003 by using unattended setup files. Microsoft recommends that you put all your diskpart.exe
commands into a single script to avoid conflicts between multiple scripts. If you must use separate
scripts, you must allow at least 15 seconds after each script finishes before the next one starts to exe-
cute. Put the command timeout /t 15 at the beginning of each script to force a 15-second delay.
The syntax for using diskpart.exe with scripts is:
diskpart [/s <script>]
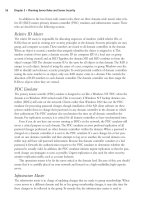
If you want to use diskpart.exe in interactive mode, type diskpart.exe at the command prompt.
This will take you to the DISKPART> prompt, shown in Figure 5.7. Whenever you see
DISKPART>, you are in interactive mode and diskpart.exe is awaiting your input.Typing help in
interactive mode will display all the utility’s available commands, as shown in Table 5.1.
Table 5.1 Using Diskpart.exe Commands
Command Description
ADD Adds a mirror to a simple volume.
ACTIVE Marks the current basic partition as active.
ASSIGN Assigns a drive letter or mount point to the selected volume.
AUTOMOUNT Enables and disables automatic mounting of basic volumes.
BREAK Breaks a mirror set.
CLEAN Clears the configuration information, or all information, off
the disk.
CONVERT Converts between different disk formats.
CREATE Creates a volume or partition.
DELETE Deletes an object.
Managing Physical and Logical Disks • Chapter 5 117
Continued
301_BD_W2k3_05.qxd 5/12/04 12:31 PM Page 117
Table 5.1 Using Diskpart.exe Commands
Command Description
DETAIL Provides details about an object.
EXIT Exits Diskpart.exe.
EXTEND Extends a volume.
GPT Assigns attributes to the selected GPT partition.
HELP Prints a list of commands.
IMPORT Imports a disk group.
INACTIVE Marks the current basic partition as inactive.
LIST Prints out a list of objects.
ONLINE Onlines a disk that is currently marked as offline.
REM Does nothing. Used to comment scripts.
REMOVE Removes a drive letter or mount point assignment.
REPAIR Repairs a RAID
RESCAN Rescans the computer looking for disks and volumes.
RETAIN Places a retained partition under a simple volume.
SELECT Moves the focus to an object.
Before you can use any of these commands, you must list all disk objects and then choose one
on which diskpart.exe will carry out the command(s). After you place the focus on a particular
object, all commands entered will target that object until you change the focus to a different object.
Use the following steps to walk through the process of focusing diskpart.exe on a disk. Figure 5.8
shows these commands as entered in the command console.
1. Use the appropriate list command from the table to list the disk, volumes, or partitions on
your system. For this example, we are going to list the disks.Type list disk and press
Enter.The output is shown in Figure 5.8.
118 Chapter 5 • Managing Physical and Logical Disks
Figure 5.7 Using Diskpart.exe in Interactive Mode
301_BD_W2k3_05.qxd 5/12/04 12:31 PM Page 118
2. Now that you know which disks are available, select one for the focus of your commands.
For this example, we select the first disk (disk 0).Type select disk 0 and press Enter.
3. You can now type list disk again and press Enter to verify that the correct disk was
selected.The disk on which diskpart.exe is focused has an asterisk (*) to the left of it.
Now you can use the desired command to perform an operation on the selected disk. For
example, to change a basic disk to dynamic, you use the convert command with the following syntax:
DISKPART> convert dynamic
Using Fsutil.exe
You can use fsutil.exe to manage FAT and NTFS file systems from the command prompt. Some of
the actions you can perform with this utility include the following:
■
Managing sparse files
■
Managing reparse points
■
Mounting and dismounting volumes
■
Viewing the amount of free space on a volume
Fsutil.exe supports the commands shown in Table 5.2.
Table 5.2 Using Fsutil.exe Commands
Command Description
behavior File system behavior control
dirty Volume dirty bit management
file File-specific commands
fsinfo File system information
Managing Physical and Logical Disks • Chapter 5 119
Figure 5.8 Focusing Diskpart.exe on Disk 0
Continued
301_BD_W2k3_05.qxd 5/12/04 12:31 PM Page 119
Table 5.2 Using Fsutil.exe Commands
Command Description
hardlink Hardlink management
objectid Object ID management
quota Quota management
reparsepoint Reparse point management
sparse Sparse file control
usn USN management
volume Volume management
You can perform many different management tasks with this utility that do not have a GUI
counterpart. For example, you enable or disable settings for generating 8.3 file names, set the
amount of disk space to be reserved for the Master File Table Zone, set a file’s valid data length, and
create hard links (directory entries for files).
Experimenting with fsutil.exe can create serious file system problems or even make your system
unbootable, so Microsoft recommends that only advanced users run this utility.
Using Rss.exe
Rss.exe manages Remote Storage from the command prompt.You can use Remote Storage to
extend your server’s disk space by moving data off your hard disks and onto magnetic tapes or mag-
neto-optical (MO) disks, with file data cached locally for quick access. We discuss Remote Storage
in much more detail in the section “Understanding and Using Remote Storage.”
The rss.exe utility enables you to run scripts that enable applications to directly access Remote
Storage.You can use rss.exe only after you have set up Remote Storage using the Remote Storage
MMC (covered later in this chapter).The basic syntax for rss.exe is as follows:
RSS [ADMIN | VOLUME | MEDIA | FILE] [SET | SHOW | JOB | MANAGE | UNMANAGE
| DELETE | SYNCHRONIZE | RECREATEMASTER | RECALL] <args> <switches>
Managing Physical and Logical Disks
We’ve discussed physical and logical disks and how they’re implemented in Windows Server 2003.
In this section, we’ll look at how you can effectively manage basic and dynamic disks.
Managing Basic Disks
It is important to understand the circumstances that make it desirable to use basic disks.You should
not upgrade your disks to dynamic status without knowing all the consequences of that action. If
you choose to stick with basic disks, you need to know how to create and delete partitions and log-
ical drives. Basic disks can be managed via the Disk Management MMC or the diskpart.exe utility,
and you can use scripts to automate many management tasks as discussed previously.
120 Chapter 5 • Managing Physical and Logical Disks
301_BD_W2k3_05.qxd 5/12/04 12:31 PM Page 120
In the following sections, we discuss the most important aspects of managing basic disks,
including:
■
When to use basic disks instead of dynamic disks
■
How to create partitions and logical drives
■
How to assign a new drive letter
■
How to format a basic volume
■
How to extend a basic volume
When to Use Basic Disks
Basic disks are the default for Windows Server 2003.You should always use basic disk if you are
going to dual-boot your machine with another operating system. MS-DOS, Windows 9x, Windows
NT 4.0, and Windows XP Home Edition do not support dynamic disks. Windows 2000, Windows
XP Professional, and Windows Server 2003 do support dynamic disks, but not when dual booting.
Use basic disk if you will be moving your disks between machines. If you use dynamic disks,
you have to go into Disk Management and import dynamic disk every time you move them from
one PC to another. With basic disks, you just install them and Windows automatically sees them.
Laptop hard disks must be configured as basic disks as most removable storage media.
Creating Partitions and Logical Drives
When you install Windows Server 2003, setup will prompt you to create a primary partition to use
as the boot partition for Windows. If you want to create more partitions afterwards, you will need to
use the disk management MMC.This section will walk you through creating a primary partition,
creating an extended partition, creating a logical drive, and assigning a new drive letter.
Creating a primary partition
1. Right-click the unallocated space on the disk on which you want to create a primary
partition.
2. Click New partition on the pop-up menu.This will start the New Partition Wizard,as
shown in Figure 5.9.
3. Click Next to continue.
Managing Physical and Logical Disks • Chapter 5 121
301_BD_W2k3_05.qxd 5/12/04 12:32 PM Page 121
4. On the Select Partition Type window (Figure 5.10), select Primary partition.
5. Click Next to continue.You will now be prompted to specify the partition size as shown
in Figure 5.11.
6. Specify the Partition size in MB and click Next to continue.
122 Chapter 5 • Managing Physical and Logical Disks
Figure 5.9 Creating a Primary Partition Using the New Partition Wizard
Figure 5.10 Selecting to Create a Primary Partition
Figure 5.11 Specifying the Partition Size
301_BD_W2k3_05.qxd 5/12/04 12:32 PM Page 122
7. Now you need to identify your new partition. Select a drive letter or choose to mount
the new volume to an NTFS folder. For this example we are assigning our partition the
drive letter F, as shown in Figure 5.12.
8. Click Next to continue.
9. You must now format your new partition.You can format partitions as FAT, FAT32, or
NTFS. For this example, choose NTFS, as shown in Figure 5.13, and then click Next to
continue.
10. You will now see the Completing the New Partition Wizard window, as shown in
Figure 5.14. Read over the summary to verify that you made the correct selections and
click Finish to complete the process.
Managing Physical and Logical Disks • Chapter 5 123
Figure 5.12 Assigning a Drive Letter or Path
Figure 5.13 Formatting the Partition
301_BD_W2k3_05.qxd 5/12/04 12:32 PM Page 123
Creating an extended partition
1. Right-click the unallocated space on the disk on which you want to create an extended
partition.
2. Click New partition on the pop-up menu.This will start the New Partition Wizard as
shown in Figure 5.15.
3. Click Next to continue.
4. On the Select Partition Type window (Figure 5.16), select Extended partition.
5. Click Next to continue.You will now be prompted to specify the partition size as shown
in Figure 5.17.
6. Specify the Partition size in MB and click Finish to create the extended partition.
124 Chapter 5 • Managing Physical and Logical Disks
Figure 5.14 Completing the New Partition Wizard
Figure 5.15 Creating an Extended Partition with the New Partition Wizard
301_BD_W2k3_05.qxd 5/12/04 12:32 PM Page 124
Creating a logical drive
1. Right-click the Extended partition on the disk on which you want to create a logical
drive.
2. Click New Logical Drive on the pop-up menu.This will start the New Partition
Wizard, as shown in Figure 5.18.
3. Click Next to continue.
Managing Physical and Logical Disks • Chapter 5 125
Figure 5.16 Selecting to Create an Extended Partition
Figure 5.17 Specifying the Partition Size
301_BD_W2k3_05.qxd 5/12/04 12:32 PM Page 125