The Best Damn Windows Server 2003 Book Period- P26 potx
Bạn đang xem bản rút gọn của tài liệu. Xem và tải ngay bản đầy đủ của tài liệu tại đây (612.05 KB, 10 trang )
and make that group a member of the appropriate local groups on the nodes.Also, assign NTFS
permissions in a similar manner.
Cluster Data Security
As with any server, data should be accessed in a controlled manner.You do not want users accessing,
deleting, or corrupting data. Assign appropriate NTFS file system permissions on a server cluster, just
as you would assign them on a stand-alone server.
Disk Resource Security
Use NTFS permissions to ensure that only members of the Administrators group and the cluster
service account can access the quorum disk. If you use scripts and the generic script resource type,
you should assign appropriate NTFS Execute permissions to the scripts. A buggy script, or one run
in an unplanned or uncontrolled manner, may cause data loss or a service outage.
Cluster Configuration Log File Security
When a cluster is created or a node is added to a cluster using the Wizard, a file containing critical
information about the cluster is placed the %systemroot%\System32\LogFiles\Cluster\ directory,
unless you do not have administrative permissions on the node; in that case, the file is placed in the
%temp% directory.The log file, ClCfgSrv.log, should have NTFS permissions that allow access to
only the Administrators group and the cluster service account.
Creating a New Cluster
Use the following steps to create a server cluster. Only the creation of the first node is covered. Each
server cluster and network configuration is unique.You will need to substitute your TCP/IP
addresses and account names, and adjust this process to fit your hardware.
1. Properly assemble your hardware. Ensure that only this first node is connected to and can
access the shared storage unit(s).
2. Assign friendly names to your network interfaces and configure them with static IP
addresses.
3. Log on to your domain with an account capable of creating user accounts. Open Active
Directory Users and Computers. In the Users container, create an account called
ClusterAdmin matching the settings shown in Figures 6.26 and 6.27. Close Active
Directory Users and Computers.
216 Chapter 6 • Implementing Windows Cluster Services and Network Load Balancing
301_BD_W2k3_06.qxd 5/13/04 3:06 PM Page 216
4. Log on to your first cluster node and start Cluster Administrator by selecting Start |
Administrative Tools | Cluster Administrator.
5. When the Open Connection to Cluster dialog box is presented (Figure 6.28), select
Create new cluster from the Action drop-down box and click OK.
Implementing Windows Cluster Services and Network Load Balancing • Chapter 6 217
Figure 6.26 Create a New Cluster Service User Account
Figure 6.27 Assign a Password and Properties to New Cluster Service User
Account
301_BD_W2k3_06.qxd 5/13/04 3:06 PM Page 217
6. The New Server Cluster Wizard will start, as shown in Figure 6.29. Click Next.
7. Select your domain in the Domain drop-down list and enter cluster1 in the Cluster
name text box, as shown in Figure 6.30. Click Next.
218 Chapter 6 • Implementing Windows Cluster Services and Network Load Balancing
Figure 6.28 Open Connection to Cluster
Figure 6.29 The New Server Cluster Wizard’s Welcome Window
301_BD_W2k3_06.qxd 5/13/04 3:06 PM Page 218
8. Enter the name of the computer that will become your first node in the Computer
name text box, as shown in Figure 6.31, and click Next.
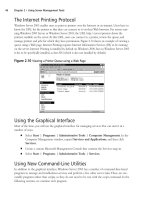
9. The Analyzing Configuration window will appear, as shown in Figure 6.32, while the
configuration of the node is verified.You can click the View Log… button to see the his-
tory of actions the Wizard has performed, or click the Details… button to see the most
recent task.
Implementing Windows Cluster Services and Network Load Balancing • Chapter 6 219
Figure 6.30 Specify the Cluster Name and Domain
Figure 6.31 Select the Computer Name
Figure 6.32 Analyzing the Configuration of the Cluster Node
301_BD_W2k3_06.qxd 5/13/04 3:06 PM Page 219
10. When the analysis is completed, the Analyzing Configuration window will show the
tasks completed, as shown in Figure 6.33. Click the plus signs (+) to see the details behind
each step. When you’re finished examining the details, click Next.
11. You are asked what IP address you want assigned to the server cluster, as shown in Figure
6.34. Enter the appropriate IP Address and click Next.
12. In the Cluster Service Account window, shown in Figure 6.35, enter the User name,
Password, and Domain for the cluster service account you created in step 3.Then click
Next.
220 Chapter 6 • Implementing Windows Cluster Services and Network Load Balancing
Figure 6.33 Finished Analyzing the Configuration of the Cluster Node
Figure 6.34 Enter the Cluster IP Address
301_BD_W2k3_06.qxd 5/13/04 3:06 PM Page 220
13. The Wizard will display the proposed server cluster configuration, as shown in Figure
6.36. Review the information.
14. Click the Quorum… button. Select the correct quorum disk for your configuration from
the drop-down list, as shown in Figure 6.37, and select OK.
Implementing Windows Cluster Services and Network Load Balancing • Chapter 6 221
Figure 6.35 Enter the Cluster Service Account Information
Figure 6.36 Review the Proposed Cluster Configuration
301_BD_W2k3_06.qxd 5/13/04 3:06 PM Page 221
15. The Wizard will now create the server cluster, as shown in Figure 6.38. As the configura-
tion progresses, you can click View Log… or Details… to see what the Wizard is doing.
16. When the Wizard finishes creating the server cluster, the Creating the Cluster window
will show the tasks completed, as shown in Figure 6.39. Click the plus signs (+) to see
details about each step performed. Click Next.
222 Chapter 6 • Implementing Windows Cluster Services and Network Load Balancing
Figure 6.37 Select the Quorum Disk
Figure 6.38 Creating the Cluster
301_BD_W2k3_06.qxd 5/13/04 3:06 PM Page 222
17. The Wizard informs you that the server cluster is created, as shown in Figure 6.40.You can
click View Log… to examine all of the activity involved in the creation. Click Finish to
exit the Wizard.
18. The Cluster Administrator utility appears. As shown in Figure 6.41, it displays the server
cluster you just created.
Implementing Windows Cluster Services and Network Load Balancing • Chapter 6 223
Figure 6.39 Completed Cluster Creation
Figure 6.40 The Wizard’s Final Window
301_BD_W2k3_06.qxd 5/13/04 3:06 PM Page 223
19. Right-click the server cluster name (CLUSTER1) and select Properties. Click the
Network Priority tab and move Interconnect to the top of the list, as shown in Figure
6.42. Click Apply.
20. Examine the Quorum and Security tabs to become familiar with the default settings on
these tabs. When you have finished reviewing the configuration of these tabs, click OK.
Then close Cluster Administrator.
Making Network Load Balancing
Part of Your High-Availability Plan
The other high-availability tool included in Windows Server 2003 is Network Load Balancing
(NLB). A primary use for NLB is increasing the scalability and availability of Internet applications
(Web, FTP, VPN, firewall, proxy servers, and so on) by having multiple machines simultaneously
224 Chapter 6 • Implementing Windows Cluster Services and Network Load Balancing
Figure 6.41 The Newly Created Cluster
Figure 6.42 Change Network Priorities
301_BD_W2k3_06.qxd 5/13/04 3:06 PM Page 224
answering and serving client requests. NLB is included in all versions of Windows Server 2003 and
is installed automatically, although it must be configured and activated before it is usable.
Microsoft also considers NLB a clustering technology.The two clustering technologies are very
different and serve different purposes. A server cluster requires specialized hardware, and there is typ-
ically one installed copy of each application, which moves between server cluster nodes. Only the
node actively hosting the application responds to client requests.An NLB cluster does not require
any specialized or additional hardware. Every host runs a separate and independent copy of the applica-
tion and actively responds to client requests. Server clusters are used mainly for database-type appli-
cations. NLB clusters are used for traffic or communication type applications.
NLB has been available since Windows NT 4, when it was an add-in component called
Windows Load Balancing Service (WLBS).You will still see NLB called this in some utilities and
documentation. Unless specifically referred to in a historical context, the terms WLBS and NLB
should be considered interchangeable.
Terminology and Concepts
NLB introduces some new terms for dealing with this form of clustering. Some terms are similar to
those used with server clusters, but they have different meanings.
Hosts/Default Host
When referring to NLB, a host is a server running any edition of Windows Server 2003 that has
been configured to respond to client requests via the NLB driver. Since NLB is automatically
installed, any Windows Server 2003 server has the potential to be an NLB host.
The default host in an NLB cluster is the host with the highest currently active priority.The pri-
ority is a unique identifying number assigned to each host in an NLB cluster. An NLB cluster can
have up to 32 hosts, so the priorities range from 1 to 32. Hosts cannot be configured to have the
same priority.
Load Weight
As previously mentioned, an NLB cluster can consist of up to 32 hosts.The hosts do not need to be
identical in hardware or configuration.The load weight is a mechanism for distributing the traffic
load within an NLB cluster to the hosts that are most suited to handle the load. Lighter loads can be
configured for hosts with less capacity and heavier loads for more robust hosts.
The load weight is applicable only if specifically configured; otherwise, all hosts are configured
with equal load weights. When used, each host is assigned a load weight from 0 (lowest weight) to
100 (highest weight).The weights from all active hosts in the cluster are averaged, and traffic is dis-
tributed accordingly. In this way, the load weight is a relative value within the NLB cluster.
Traffic Distribution
The way requests from clients are spread out among the hosts in an NLB cluster is referred to as
traffic distribution. Each host in an NLB cluster is configured with at least two IP addresses. One
address is reserved for the nonclustered traffic directed to the host, and the second IP address is
shared among all nodes in the cluster and is called the cluster IP address. It is to this second IP address
that clients direct their requests.
Implementing Windows Cluster Services and Network Load Balancing • Chapter 6 225
301_BD_W2k3_06.qxd 5/13/04 3:06 PM Page 225