The Best Damn Windows Server 2003 Book Period- P65 ppsx
Bạn đang xem bản rút gọn của tài liệu. Xem và tải ngay bản đầy đủ của tài liệu tại đây (409.05 KB, 10 trang )
Windows Installer Packages (.msi)
In the early days of Windows computing, you could use a third-party installation and packaging tool
to simplify software deployment (including Microsoft’s SMS). Beginning with Windows 2000, the
new Windows Installer technology became available, this provides a native packaging and distribu-
tion tool for Windows operating systems, and Group Policy provides a way to distribute software
without buying a distribution product.
The Installer technology is made up of the following components:
■
The Installer service, which is an operating system service that uses Windows Installer
packages to perform software installation, modification, and uninstallation.
■
The .msi file, which is a group of files compressed together along with the appropriate
scripting to install and configure the software. It is essentially a relational database con-
taining a number of tables that holds information about the application.The package can
be configured to handle upgrades as well as new installations.
■
The application programming interface (API) by which applications interface with the
Installer service.
A big advantage of Windows Installer is its ability to “roll back” to the former state if problems
occur during an installation.The Installer service can also monitor the state of installed “self-
repairing” applications, and detect missing or corrupt program files.The service can then automati-
cally restore the damaged or missing components so that the application will work properly again.
The database design of the Installer package makes it fast to query and provides for smaller file
sizes.The information in the tables includes data that will allow for different installation scenarios, so
that there is a set of information about how to install the application clean for the first time, how to
install it over a previous version, and so forth. Because the Installer service tracks the installation of
the application’s features and components, it makes it easier to remove the application completely,
without leaving remnants that can cause problems later.
Transforms (.mst)
Packages provided by vendors with their applications are configured and ready to install.This means
there isn’t much room for flexibility if, for example, you want different installation options for com-
puters in different departments.This is where transforms come into play.Transforms are also called
modifications. That’s because a transform is a record of changes to the original package file that allows
you to customize the installation by including or excluding particular features. A transform is appli-
cable to a specific Windows Installer package.
Transforms are especially important when you are doing silent or unattended installations.The
ability to add or remove certain features or make Registry changes in applying your package makes
configuration easier for the administrator. Installing and configuring applications via Group Policy
cuts down on the time spent by the administrator in setting up, configuring, and troubleshooting
applications for users.
606 Chapter 18 • Deploying Software via Group Policy
301_BD_W2k3_18.qxd 5/12/04 2:19 PM Page 606
Transforms customize the installation features at the time you assign or publish the application.
You can create transforms using the authoring and repackaging utilities we discussed earlier, or the
utilities included with applications themselves. Office 2000 included a Custom Installation Wizard
to create transforms for making modifications to the application’s package when deploying it in
your organization. It is often easier to apply a transform rather than repackage an application to
make changes.
You associate your transforms with the application when you configure software installation for
the application. In the new package that you add via the GPO Editor, you need to select Advanced
published or assigned in the Deploy software dialog box that begins the software deployment
process.
Patches and Updates (.msp)
There are times when an application has to be updated because of fixes or new features that are
available through a service pack, patch, or other update software.An .msp file is a special type of
modification that is used to update an existing Windows Installer package with new information.
This allows for easy updates of users’ workstations and application of important security patches and
other fixes.
With an .msp file, only the updated information needs to be distributed to users.This cuts back
on the time and effort required to deploy updates and patches, and cuts down on the amount of
network traffic generated by application updates.
To deploy an .msp update, you generally should advertise the package again to those to whom
the original application was assigned or published. Sometimes, the software vendor will provide an
entire new .msi package if changes are extensive. In this case, you should just replace the old .msi
file with the new one. Otherwise, use the .msp file to make the changes to the original .msi file, and
then redeploy the application.This will automatically install the new version for those users and
computers where the original was installed, and make it available instead of the old version for those
users to whom the original was published, who haven’t yet installed the application.
Note that .msp files are not able to make certain changes. For example, they cannot be used to
remove Registry keys, or remove or change the names of shortcuts and files.They cannot be used to
change product codes, and you can’t use them to remove features.These tasks require the use of an
.mst transform or a new .msi package.
Application Assignment Scripts (.aas)
When you set up Group Policy Software Installation and publish or assign applications, an
Application Assignment Script (with the file extension .aas) is generated automatically.The
Application Assignment Script is stored in the GPO in Active Directory.The script contains infor-
mation regarding the configuration of the Software Installation.Advertisement information is also
stored within the assignment script.
Deploying Software to Users
GPOs can be linked to a site, domain, or OU (or to a local computer). With that in mind, we will
now discuss deployment of software to user objects in Active Directory. Because software installation
Deploying Software via Group Policy • Chapter 18 607
301_BD_W2k3_18.qxd 5/12/04 2:19 PM Page 607
cannot be done through local group policies, we will be concerned with deploying software at the
site, domain, or OU level.The easiest way to deploy software to a specific group of users is to use
the OU that contains the user objects. A link can be made to an existing GPO, or you can create a
new GPO for this purpose.
Remember that when you deploy software to users, it might be installed soon after they log on.
This is determined by whether you assign the software or publish it. If the software is assigned, the
software will be installed when the user attempts to run the application from the shortcut or clicks on
an associated file. Large installations might make users think that the workstation is locked or froze up,
so you have to be careful about whether you assign, publish, or deploy to the workstation instead.
If the application is published, the user can install the application from Add/Remove
Programs in Control Panel.This makes it more likely that the user will know what’s going on,
since he or she will have chosen to install the application. However, the published application will
be installed via document invocation if file associations were set up within the package, which can
result in the same problem of a user not realizing an installation is taking place and thinking there is
a problem with the computer.
Deploying Software to Computers
Most of the same rules discussed in regard to deploying software to users also apply to deploying
software to computer objects in Active Directory. However, you need to remember that you can
only assign software to computers; there is no publishing to computer objects. Software installation
policies can be applied like any group policy to sites, domains, or OUs. In Active Directory, by
default each computer object is added to the Computers container in the root domain.You will
most likely want to set up software deployment to computers by creating an OU, but this depends
on your Active Directory design.
When software is deployed to computer objects, the installation generally takes place when the
computer boots, prior to the appearance of the Ctrl + Alt + Del screen.This means the user
cannot log on until all of the software has been installed.This must be considered prior to designing
or assigning software installation packages. Assigning too many applications at the same time can
cause the workstation to take a long time to start up.
Using Group Policy Software
Installation to Deploy Applications
Now that you know the basics of software installation, let’s look at the details and step-by-step pro-
cedures involved in completing the process. We will look at the interface used to add software
installation packages: the GPO Editor MMC snap-in.
In this section, we will review the Microsoft Windows Installer technology and packages, in the
context of how they are used in the process of software deployment. We will also look at how to
create your own Windows Installer packages using Veritas WinINSTALL LE. Because the configura-
tion of legacy applications is often an issue in real-world deployment scenarios, we will show you
how to deploy software when you don’t have a Windows Installer package and do not want to
create one. Finally, we will discuss how to set up distribution points.
608 Chapter 18 • Deploying Software via Group Policy
301_BD_W2k3_18.qxd 5/12/04 2:19 PM Page 608
Preparing for Group Policy Software Installation
Determining which applications you plan to distribute with Group Policy Software Installation is an
important first step in the deployment process. Because the GPOs used to deploy software can be
linked to a site, domain, or OU, some planning is required.You must take into consideration your
Active Directory design and the application needs of your organization.
Some departments will require a particular application, whereas there is no need for that appli-
cation in other departments. For example, the Financial department may need accounting software
that is not used elsewhere. In other cases, an application is required for all those in a particular job
function. For example, all project managers may need a particular project management application,
regardless of department.There are also times when an application must be distributed throughout
the entire enterprise. For example, the software that is used to open and read personnel policies or
security policies that apply to all employees will be needed by everyone, regardless of department or
job function.Your Active Directory design and organizational needs will ultimately determine your
plans for where you will configure Software Installation within Group Policy.
Creating Windows Installer Packages
Although Microsoft provides Installer packages with most of their software programs, the situation is
not quite as simple when you have third-party software to install.Then, you may not have the con-
venience of having a Windows Installer package available, but when this happens, you can use a
utility to create an Installer package. One such tool that has been available since Windows 2000 is
WinINSTALL.The original version of WinINSTALL LE (Limited Edition) was included on the
Windows 2000 Server installation CD-ROM.The software is no longer included on the Windows
Server 2003 CD-ROM, but a free MSI repackager, WinINSTALL LE 2003, can be downloaded at
no cost at the OnDemand Software Web site at www.ondemandsoftware.com/FREELE2003/.
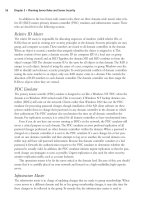
Alternatively, you can download a trial version of the full WinINSTALL product.The full product
can be used in environments where deployment needs are more complex, and provides features such
as hardware and software inventory, conflict assessment, MSI validation, and multicast replication—
many of the same features offered by Microsoft’s SMS.
Figure 18.2 shows the WinINSTALL LE interface.
Deploying Software via Group Policy • Chapter 18 609
Figure 18.2 WinINSTALL LE 2003 Console
301_BD_W2k3_18.qxd 5/12/04 2:19 PM Page 609
Before you begin to create your own packages, you should configure a freshly installed worksta-
tion to use for this purpose.This will ensure that you have a clean Registry and standard configura-
tion of the operating system. Using a workstation that has had software installed and removed and
other changes made to it can cause problems with package deployment.
If you cannot dedicate a workstation for creating .msi packages, you must use a computer that is
as close as possible to the configuration of the workstations that will receive the package.The work-
station on which you create the packages should be running the same version of the operating
system as the computers on which the packages will be deployed.As simple as package creation
seems, if configuration steps are not followed closely, you might spend more time troubleshooting
problems than successfully deploying software.
Using .zap Setup Files
It is possible to publish applications that don’t have .msi packages by using the application’s Setup
program. If you want to deploy software via Group Policy, do not have an .msi file, and do not want
to create one, you can instead create a .zap file for the program.The key point to remember in
using .zap files is that they can only be published to users; you cannot assign software to users or to
computers by this method.This type of software deployment also has some additional limitations
when compared to Windows Installer packages, including the following:
■
These installations cannot take advantage of elevated user privileges.This means that if the
application requires an account with administrative privileges to be used to install it, users
who don’t have administrative privileges won’t be able to install it even though it is pub-
lished to them.
■
The programs cannot be installed on first use by double-clicking a shortcut, as with
Windows Installer packages.
■
The system does not automatically repair or remove an application, and you cannot roll
back a failed deployment.
■
You cannot install features upon first use of the feature, as you can with .msi packages.
If these limitations don’t present a problem with the application you want to deploy, the first
step is to create a .zap file for the application being deployed.To create a .zap file, you must follow
the format prescribed by Microsoft.The .zap file is a text file and can be created in any text editor
(for example, Notepad).A sample is available to use as a guide in the Microsoft Knowledge Base
article Q231747.
Only two items are required to be completed for a working .zap file.As long as FriendlyName
and SetupCommand are filled in with a Program Name and a string for executing the Setup pro-
gram, the .zap file will work.The [Application] section is required, and you can also include an
[Ext] section; the latter is the file extension section where the application is associated with a file
extension in Active Directory.The [Ext] section is optional.
The .zap file is created in a text editor such as Notepad.
610 Chapter 18 • Deploying Software via Group Policy
301_BD_W2k3_18.qxd 5/12/04 2:19 PM Page 610
After you create the .zap file, you have to add it to your Software Installation configuration
within Group Policy.The following example walks you through the steps of publishing an applica-
tion with a .zap file.
Publish Software Using a .ZAP File
When publishing software with a .zap file, you first need to determine which GPO you want to
edit. After you determine whether to use a GPO that is applicable to a site, a domain, or an OU,
open the appropriate GPO (see the section titled Working with the GPO Editor later in this chapter)
and make the appropriate addition by following these steps:
1. In the GPO Editor’s left console pane, expand User Configuration, and then expand
Software Settings.
2. Right-click Software Installation, select New, and then select Package.
3. Change the Files of type field to ZAW Down-level applications package (*.zap).
4. In the Open dialog box, navigate to the location of your .zap file or type the path in the
File Name field.
5. Click the .zap file you created and click the Open button.
6. Click Published as the deployment method in the Deploy Software dialog box, and
click OK.
Creating Distribution Points
To distribute software, you must ensure that the users are able to access the needed files from the
network.As a network administrator, you must create shared folders on the network known as distri-
bution points, to hold the necessary files for installing the deployed applications.A distribution point
can be part of a Distributed File System (Dfs) hierarchy or any share point that is available to all
users who will need to install the software.
Each share point needs to be configured with the appropriate NTFS permissions to allow access
to those who will install the software.This will allow you to control the software that can be
installed. If a user doesn’t have permissions to access the folder where a package is stored, the soft-
ware cannot be deployed to that user.
In most cases, it is preferable to control who is able to receive the software through their associ-
ation and permissions to the GPO itself, but the NTFS permissions must be at least Read and
Execute for the distribution point and its subfolders.
Working with the GPO Editor
For those who have worked with the Window NT 4.0 System Policy Editor, learning to use the
Active Directory GPO Editor should be relatively easy. However, deploying applications via Group
Policy can be a bit complex.There are many different options to configure when you are setting up
a package for deployment.You can deploy software for fresh installations, manage the upgrade of
previously installed packages, and remove software from workstations by forcibly uninstalling the
software. Every tool is available for managing software within your organization.
Deploying Software via Group Policy • Chapter 18 611
301_BD_W2k3_18.qxd 5/12/04 2:19 PM Page 611
In the following sections, we will show you how to use the GPO Editor to set installation
options, assign and publish applications, upgrade applications, and remove managed applications.
Opening or Creating a GPO for Software Deployment
The first step in deploying software via Group Policy is to create a new GPO or open an existing
GPO that applies to the site, domain, or OU to which you want to deploy the software.You can
open an existing domain policy by following these steps:
1. Click Start | All Programs | Administrative Tools | Active Directory Users and
Computers.
2. In the left console pane of the ADUC tool, right-click the name of the domain and select
Properties.
3. Click the Group Policy tab.
4. Select the policy you want to edit under Group Policy Object Links. Click the Edit
button.This will open the policy in the GPO Editor.
To deploy software at the OU level, follow the same steps except, in step 2, expand the node for
the domain, right-click the name of the OU to which you want to deploy the software, and then
click Properties.
If you want to deploy software at the site level, follow these steps:
1. Click Start | All Programs | Administrative Tools | Active Directory Sites and
Services.
2. In the left console pane, expand the Sites node.
3. In the right details pane, right-click the site to which you want to deploy the software, and
click Properties.
4. Click the Group Policy tab.
5. Select the policy you want to edit under Group Policy Object Links. Click the Edit
button.This will open the policy in the GPO Editor.
Assigning and Publishing Applications
Earlier we discussed the concepts of assigning versus publishing applications. Now we will look at
the GPO Editor console’s interface to become more familiar with the step-by-step process.After
you open the GPO Editor, right-click on Software Installation under either Computer
Configuration or User Configuration (depending on whether you want to assign the software to
computers or assign or publish it to users) and choose New Package from the right context menu
as shown in Figure 18.3.
612 Chapter 18 • Deploying Software via Group Policy
301_BD_W2k3_18.qxd 5/12/04 2:19 PM Page 612
A dialog box will open asking you for the package you want to use. Navigate to a network
location where the .msi file for the software you want to deploy is located. Package files should be
stored in a central location.This central location is your distribution point for your software pack-
ages. Software packages can generally be downloaded from the manufacturer. Some organizations
choose to create their own with other third-party software products.
When you choose a new package, it should be located on a network share. Otherwise, you will
receive a message informing you that clients will not be able to install the package, as shown in
Figure 18.4.
Next, a prompt will ask you if you want to assign or publish the application, or use the
Advanced method. If you choose Advanced, you will be presented with the Properties window for
your new package. We discuss the options that you can configure in this Properties box in the sec-
tion titled Configuring Software Installation Properties later in this chapter.
Assign Software to a Group
This procedure will walk you through the steps of assigning software to an Active Directory group
at the OU level.This gives more granularity to the configuration, and this example will give you
some good hands-on practice in using the interface.
Deploying Software via Group Policy • Chapter 18 613
Figure 18.3 Configuring a New Package
Figure 18.4 Error Message When Selecting Drive Letter
301_BD_W2k3_18.qxd 5/12/04 2:19 PM Page 613
1. Ensure that you have a distribution point (a shared folder containing the .msi package) set
up with the appropriate NTFS permissions assigned.
2. Log on as a Domain Administrator.
3. Open Active Directory Users and Computers from the Administrative Tools menu
and right-click the OU to which you want to deploy the software. Select Properties.
4. Click the Group Policy tab and choose New to create a new GPO.
5. Select the new GPO in the list and type a distinguishing name for it.
6. Click Edit to make changes to the GPO.
7. In the GPO Editor, highlight Software Settings under User Configuration.
8. Right-click, select New, and then select Package.
9. Navigate to the location of your .msi package.This is the distribution point that you
shared earlier. Enter the UNC path so the workstations can find the software.
10. Next, you are prompted to select whether to publish or assign the application or choose
the Advanced option. Select Assigned.
11. Click OK.The software package name should show up in the right details pane of the
GPO Editor.
12. Close the GPO Editor window. In the OU’s Properties dialog box, select the GPO
under Group Policy Object Links and click the Properties button.
13. In the GPO’s Properties dialog box, click the Security tab.
14. Remove Authenticated Users on the Security tab and add the appropriate group that
contains the users to whom you want to assign this application.
15. Click OK and the application should be ready for deployment.
Configuring Software Installation Properties
When you first open the GPO Editor, expand Computer Configuration or User Configuration
(depending on whether you want to deploy the software to computers or users), and then expand
Software Settings. Under Software Settings, right-click Software Installation and choose
Properties.
There are four tabs within the Properties of Software Installation. In the following sections, we
will discuss the configuration options that can be made with each of these tabs.
The General Tab
On the General tab, you can specify the default location of all packages. Under the New Packages
section on that same tab, you can specify the default value for publishing or assigning.The default is
to prompt the user to decide at the time of object creation.The last item to be configured on this
tab is the User Interface options.This setting determines how much of the installation the user sees.
The Basic option only shows minimal screen display during software deployment.The Maximum
option shows all the installation screens as the installation happens.
614 Chapter 18 • Deploying Software via Group Policy
301_BD_W2k3_18.qxd 5/12/04 2:19 PM Page 614
The Advanced Tab
The Advanced tab has options to be configured such as how to handle 64-bit machines as well as
OLE information being published in Active Directory. Figure 18.5 shows the Advanced tab.
The first option in this window is Uninstall applications when they fall out of the scope
of management.This means that if a software program was installed with Group Policy and later
the account was moved to a different OU, the software could be uninstalled automatically.
You can also choose to have Object Linking and Embedding (OLE) information stored in Active
Directory. OLE can be a key part of user interaction and collaboration.
The File Extensions Tab
The File Extensions tab is where you can associate documents and other file types to a specific
application that is configured for deployment as shown in Figure 18.6.
Deploying Software via Group Policy • Chapter 18 615
Figure 18.5 Advanced Tab of Software Installation
Figure 18.6 File Extensions Tab
301_BD_W2k3_18.qxd 5/12/04 2:20 PM Page 615