The Best Damn Windows Server 2003 Book Period- P95 pps
Bạn đang xem bản rút gọn của tài liệu. Xem và tải ngay bản đầy đủ của tài liệu tại đây (510.92 KB, 10 trang )
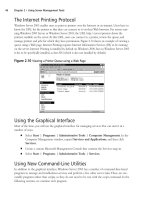
4. The Virtual Directory Creation Wizard will appear. Click Next.
5. Type the virtual directory name in the Virtual Directory Alias window and click Next. We
will enter “TestVirtualDir” for our demonstration.
6. In the Web Site Content Directory choose the physical directory the virtual directory is
point to. We will choose C:\test to point our TestVirtualDir.Therefore form the IIS point
of view, every time we say TestVirtualDir it is pointing to C:\test. Click Next
7. Select the access permissions from the Virtual Directory Access Permissions window.The
default is Read and Run Scripts.The options are very similar to Web site creation options.
(Please refer to the Web Site Creation section.) Click Next to finish the creation process.
You will be greeted with a confirmation screen.A virtual directory accessed in the same
way as a subdirectory under the root directory.The external user will not know that he or
she is communicating to a virtual directory (as apposed to a subdirectory under the root
Web directory).
Hosting Multiple Web Sites
Hosting multiple Web sites can be done in three ways.The most common is to assign an IP address to
every new Web site.This used to be the most common practice.The obvious limitation is the number
of IP addresses available for the organization.This will not be a major issue for internal access within
the enterprise. (Behind a corporate firewall.The enterprise will have its own private addressing range.
We can use the private IP address for these Web sites.) This practice is also an expensive one to
manage.The following is the IIS 6.0 process to assign an IP address for a particular site:
1. Open IIS Manager.
2. Select the server and right-click on the Web site.This will be the Default Web Site for our
demonstration purposes.
3. Click Properties and select the Web Site tab.Your screen should be similar to Figure
26.16.
916 Chapter 26 • Managing Web Servers with IIS 6.0
Figure 26.15 Creating a Virtual Directory for a Web Site
301_BD_W2k3_26.qxd 5/14/04 9:52 AM Page 916
4. Click the IP address combo box and select or type the IP address your Web site should
refer to. Click the OK button at the bottom. We will select (All Unassigned) for this
example.
The second option is to use the same IP address and use a different port number. A
different port number will be assigned to each Web site. (For example, Web site A will run
on port 1001 and Web site B will run on port 1002).This will require you to change the
URL of the Web site. (For example, Web site A could be accessed as www.siteA.com:1001
and site B can be accessed as www.siteB.com:1002).This would be a great mechanism to
handle internal or intranet access behind a corporate firewall.
The last option is to assign unique host headers on a single IP address.The host
headers are unique DNS names that identify different Web sites. IIS will channel all the
requests for a single IP address and filter them using the header information.The filter pro-
cess will forward them to the correct Web site according to the header name.This is a
good mechanism to implement small to medium Web sites on a single machine. We need
dedicated IP addresses for large Web sites. (For example, 150 Web sites running on a single
IP address using host headers will affect performance and it is not scalable.) Here is the
process to create a header for a site. Follow the steps from 1 to 4 from the last example.
Then click the Advance button.You will get the following window (Figure 26.17).
Managing Web Servers with IIS 6.0 • Chapter 26 917
Figure 26.16 Assigning an IP Address for a Web Site
301_BD_W2k3_26.qxd 5/14/04 9:52 AM Page 917
5. Click the Add button and you will see Figure 26.18. Choose the IP Address of the Web
site and enter the port number.Then enter the header information (DNS entry) in the
Host Header value text box and click OK. (We have entered a new header called
www.myDefaultSite.com for our Default Web Site).
If you refer to the Site Setup – Setting up a Web Site section, you’ll see that we already have a
sample Web site called TestWebSite. It has the header www.mytestwebsite.com. Now, if we investi-
gate closely, we have two Web sites (the Default web site and TestWebSite) running on port 80 of
the same IP address.
Please note that the mixed case in the host header file will not matter from IIS 6.0 point of
view. It is not case sensitive.The host header implementation will be an issue for SSL implementa-
tions. SSL certificates are issued for a Web site and they are tied to an IP address or machine name.
The issue is all the Web sites use one IP address.Therefore, SSL-supported sites should have their
dedicated IP address for the Web site.
918 Chapter 26 • Managing Web Servers with IIS 6.0
Figure 26.17 Entering Header Information for a Web Site
Figure 26.18 Entering a New Header for Default Web Site
301_BD_W2k3_26.qxd 5/14/04 9:52 AM Page 918
Assigning Resources to Applications
Resources can be assigned to applications in different ways.The most common way is to use a
Properties tab to control caching, performance, and process options.You can also use the band-
width throttling option to restrict resources for a given Web site. (This option can be found under
the Performance section in the Properties tab.) Bandwidth throttling will limit the network
bandwidth resources for a Web site.The maximum bandwidth value is 1024 KB per second.This is
also the default value.You can enable bandwidth throttling by ticking the Limit the network
bandwidth to this Web site check box and specifying maximum kilobytes per second value.You
can also limit the number of connections to the Web site by using this Performance tab.Tick the
Unlimited or Connection limit to option buttons and specify a connection value.
Working with ASP.NET
ASP.NET is the advanced version of Active Server Pages. IIS 6.0 will enable you to run both ASP
and ASP.NET applications.The ASP.NET scripts are built on .NET model and the ASP scripts
follow the old windows Component Object Model (COM).The ASP.NET model is scalable and
performs better than the ASP model. We can use ASP scripting inside ASP.NET scripts. ASP.NET
applications can be built on any .NET compatible language (C#, VB.NET, Jscript.NET, etc.). We
can enable ASP.NET support from the Web service extension interface. Here are the steps:
1. Navigate to Start | Administrative Tools | IIS Manager.
2. Click Web Server Extensions node on a selected server name. Figure 26.14 is similar to
a default view of the Web service extensions window.
3. Select the ASP.NET option from the Web Service Extension window.You can click the
Allow or Prohibit button to enable or disable ASP.NET access.
Backing up and Restoring the Metabase
Metabase has the IIS configuration setting as XML entries.The metabase has two components.
Those are the metabase.xml and the metabase schema file. It is a good practice to back up the
metabase regularly.The metabase back will back up both the metabase.xml and metabase schema
files (a .mdVersionNumber file for the metabase and .scVersionNumber file for the schema file).The
metabase can be safely restored (from a backup) if we lose all the IIS settings.This utility will back
up only IIS entries. It does not back up the Web site content.Therefore, you need to configure the
Web site manually after a restore. Here are the steps to create and restore backups:
1. Open IIS Manager.
2. Select the server and right-click and select All Task | Backup / Restore
Configuration.
3. You will get the Configuration Backup/ Restore window (see Figure 26.19).
4. Select the Create Backup button to create a backup (It will take the next version number
by default) or select a backup and click the Restore button to restore the IIS settings.
Managing Web Servers with IIS 6.0 • Chapter 26 919
301_BD_W2k3_26.qxd 5/14/04 9:52 AM Page 919
Enabling Health Detection
Health detection enables IIS to monitor its worker process functionality. We can enable pinging and
configure rapid application fail over (discussed in 503 errors under Troubleshooting later in the
chapter).You can also set the start up and shut down time for a worker process using the option.
Enable Health Detection
You can enable health detection by following this process.This process only works if you’re running
in worker process isolation mode.
1. Start IIS Manager.
2. Select Application Pools.
3. Navigate to the correct Web site
4. Right-click on the site and click Properties.
5. Select the Health tab and enter your settings.You can configure the ping interval using the
Enable Pinging group box.This interval describes the timeframe to contact a worker process
to make sure it is functioning accordingly.The default setting is 240 seconds. Enable Rapid
fail-over group box functionality is explained in the 503 error section.You can also con-
figure the worker process startup time (if the worker process restarts) and shutdown time
(if the worker process gets into a deadlock position) using this screen.
Managing IIS Security
We are going to investigate the security concepts in ISS 6.0 in this section.The core concepts
haven’t changed much since IIS 5.0. Windows 2003 default installation does extend more security
features than the previous Windows server versions. Internet access, ASP scripts, WebDAV, and
FrontPage Extensions are all disabled by default.This adds another level of security to the server.
The default Internet Explorer access is restricted to High Security Zone and no Web sites are
920 Chapter 26 • Managing Web Servers with IIS 6.0
Figure 26.19 Backup and Restore Metabase
301_BD_W2k3_26.qxd 5/14/04 9:52 AM Page 920
permitted till they are added to the Trusted Zone links. Let’s learn how to configure the security
settings for a Web site in IIS 6.0.
Configuring Authentication Settings
The authentications setting are configured at the Web site level.There are several ways to protect
your Web site from intruders.The security settings for a Web site can be viewed by right-clicking
on a Web site in IIS Manager and selecting Properties.The settings can be found in the
Directory Security tab. Figure 26.20 displays the configurable options of security settings.
The first option is to restrict users by forcing them to authenticate to the IIS server.This can be
achieved by clicking the Edit button of the Authenticate and Access Control group box. Figure
26.21 describes the options available for authenticating in IIS 6.0.
Managing Web Servers with IIS 6.0 • Chapter 26 921
Figure 26.20 Directory Security Tab for a Web Site
Figure 26.21 Authentication Options Available in IIS 6.0
301_BD_W2k3_26.qxd 5/14/04 9:52 AM Page 921
■
Enable anonymous access This will enable the users to use the site without explicitly
logging on.The IIS will impersonate the IUSR_MachineName account to execute scripts
in this instance. A safer option is to disable the anonymous access and force the user to
authenticate using one of the following methods.
■
Integrated Windows authentication This was formally known as Windows NT
Challenge / Response or NTLM. It is a secure form of authentication that hashes the user
name and the password before any network transmission. It uses Kerberos version 5 for
authentication if the client browser supports Kerberos. Otherwise, it will use NTLM
authentication to protect user name and password data.
■
Digest authentication for Windows domain servers This option will use Digest
Authentication. Please refer to New IIS Features section to learn about Digest security.
■
Basic authentication This option uses clear text username and password for authentica-
tion.This is not secure and not recommended.This could be useful in a less secure envi-
ronment (e.g., a development environment behind a firewall).You can alternatively use SSL
encryption to encrypt the clear text username and password details.
■
.NET Passport Authentication This option uses .NET passports to authenticate Web
users.This is a new feature in IIS 6.0. .NET Passport is a single sign-on mechanism.The
incoming HTTP requests must have the passport credentials (user name and password)
inside the query string or as a cookie value. (We can comprise the cookie and be exposed
to malicious attacks.Therefore, Microsoft recommends to run .NET Passport
Authentication over SSL.) You can enable this option by clicking the .NET Passport
Authentication check box.You will be asked to select the Domain the IIS server
belongs to and the Realm to configure the .NET passport credentials.These details need
to be available to the client for future requests to the Web server.
The second option is to restrict users on an IP address level. We can list all the permitted IP
addresses using this method.The users are denied access if they are not accessing from this permitted
list.This could be achieved by clicking the Edit button under IP Address and Domain name
restrictions group box on the Web site’s Properties window (Figure 26.20).You will be presented
with Figure 26.22.
922 Chapter 26 • Managing Web Servers with IIS 6.0
Figure 26.22 Assigning IP Address Restrictions on a Web Site
301_BD_W2k3_26.qxd 5/14/04 9:52 AM Page 922
In this demonstration, we enable all computers to have access to our Web site by default. We
can also restrict access to users by including their IP address in a list.You do this by clicking the
Add button and entering the IP address.The above example will let any user access the Web site
unless their IP address is 202.56.178.122.
The third option is to enable SSL and attach security certificates to the Web site.You do this by
using the buttons on the Secure Communications group box (Figure 26.20).The Server
Certificate button will initiate a wizard to configure a certificate for the Web site.The Edit button
will enable you to view any existing certificate entries.The Certificate will have information on the
version, serial number, signature algorithm (e.g., sha1RSA), Issuer, Valid From, Valid To, Subject, and
Public key information.The certificate has keys that are used to authenticate the server and the
client for SSL encryption.The Web server will create a Session or Encryption key according to
the security certificate.This key is used to encrypt all the communication with the server and the
client.The strength of the encryption is measured by the length of the encryption key (this is in
bits).The encryption strength can be either 40 bits or 128 bits.The choice of the strength of the
encryption depends on the sensitivity of the data. (High importance will require 128 bits – as
apposed to 40).
Troubleshooting IIS 6.0
Let’s concentrate our attention on some of the troubleshooting associated with IIS 6.0. We can
divide this troubleshooting section into three subsections: content errors, connection errors, and
miscellaneous errors. First we look at content errors.
Troubleshooting Content Errors
Content errors are caused by ASP or ASP.NET application code. We need the application code or
scripts to perform business intelligence task to derive data.These errors are associated with these
scripts. We will try to get familiar with these errors. Her are some of the common ones.
Static Files Return 404 Errors
This is the most common IIS error.This could be due to two main reasons.The user may type in an
incorrect URL. Or the file extension is invalid. IIS is configured to only accept requests from files
that have a valid extension. (For example, IIS will understand the “aspx” extension, but it will not
understand “.abc” file extension.)
IIS checks for the file extension as soon as it gets a request.All the valid file extensions are avail-
able as Multipurpose Internet Mail Extensions (MIME) formats in IIS. MIME types will instruct the
Web server how to process the incoming requests. (For example, if you get “.aspx” file, the Web
server knows to instruct ASP.NET to process the request.) The MIME type does not have any effect
on the returned data to the client. (The returned data will be in HTML for most HTTP requests.)
IIS will start to process the file if the incoming file extension is present in the MIME list for IIS 6.0.
Managing Web Servers with IIS 6.0 • Chapter 26 923
301_BD_W2k3_26.qxd 5/14/04 9:52 AM Page 923
Dynamic Content Returns a 404 Error
IIS 6.0 default installation does not activate ASP.NET and CGI applications.These have to be man-
ually enabled using Web Service Extensions module (discussed above). If the ASP.NET or CGI
applications are not enabled, you will get a 404 error on dynamic content.
Sessions Lost Due to Worker Process Recycling
Sessions were very popular in ASP scripts. (A “Session” could be described as a data storage mecha-
nism for a single user on a Web site. We use to manipulate HTTP cookies to store information
about the user activities.This information is referred as Session data.) These ASP sessions were alive
till we restarted the IIS server. IIS 6.0 works on a worker process model.Therefore, when the
worker process stops, we lose all the session information.The default installation will configure IIS
to recycle worker process every 120 minutes. (Session data can grow to a large number in a high-
scale Web farm.This could have an adverse affect on the performance and the memory management
of the Web servers.Therefore, IIS 6.0 will empty the session information by recycling the worker
process every 120 minutes by default.) We can either disable worker process recycling or extend the
time span to get over this problem. Here are the steps.
Configure Worker Process Recycling
1. Open IIS Manager.
2. Select Application Pools and right-click the correct application pool for your Web site.
3. Select Properties.
4. Select Recycling tab.
5. To disable worker process recycling, untick the Recycle worker process (in minutes)
check box. Alternatively you can tick the box and enter a figure to extend the time.
6. Click OK.
ASP.NET Pages are Returned as Static Files
ASP.NET files should be processed at the server and the HTML is returned to the browser. (In
some cases this could be DHTML, depending on the complexity of the browser.) If the IIS server
does not recognize an ASP.NET file (.aspx file extension), the server will return the static text as the
reply.This can happen if you reinstall IIS without reregistering ASP.NET.
Troubleshooting Connection Errors
Let’s concentrate on the Connection errors now. Mainly connection issues with IIS and ASP.NET
cause these errors.
924 Chapter 26 • Managing Web Servers with IIS 6.0
301_BD_W2k3_26.qxd 5/14/04 9:52 AM Page 924
503 Errors
This error is generally caused by HTTP.sys overload. It could be due to two reasons. Either the
request queue length has exceeded the number of available application pool resources, or the
problem is rapid-fail protection initiated by IIS.
Every application pool has a configurable queue length. If the request pool queue exceeds this
amount, the HTTP.sys will not be able to process the requests.This will result in a 503 error been
thrown at the client.
Extend The Queue Length of An Application Pool
We can investigate the process to increase the queue length of the application process.The default
value for the queue length is 2000 requests. We can extend the value by following these steps:
1. Open IIS Manager.
2. Select Application Pools and right-click the correct application pool for your Web site.
3. Select Properties.
4. Select Performance tab.
5. In the Request Queue Limit group box, select the Limit the kernel request queue
tick box and put a value in the text box.
6. Click OK.
IIS initiates rapid-fail protection when too many application pool errors are generated for a
specified time frame.The default is five errors occurring in five minutes.This scenario will trigger
the IIS to restart and issue a 503 error to the client.
Extend The Error Count and Timeframe
Use the following steps to increase the error count and expand the timeframe. Usually this is
resulting from a memory leak in the application code. Here is the process to configure rapid-fail
protection:
1. Open IIS Manager.
2. Select Application Pools and right-click the correct application pool for your Web site.
3. Select Properties.
4. Select the Health tab.
5. In the Enable rapid-fail protection group box, enter the value for Failures and Time
Period (in minutes) spaces.
6. Click OK.
Clients Cannot Connect to Server
Windows 2003 server comes with an inbuilt software firewall. Internet Connection Firewall is
disabled by default. If you enable the firewall, you need to provide the correct settings to let your
Managing Web Servers with IIS 6.0 • Chapter 26 925
301_BD_W2k3_26.qxd 5/14/04 9:52 AM Page 925