The Best Damn Windows Server 2003 Book Period- P98 pptx
Bạn đang xem bản rút gọn của tài liệu. Xem và tải ngay bản đầy đủ của tài liệu tại đây (515.71 KB, 10 trang )
Table 27.1 Preconfigured Bandwidth Settings
Show Contents Menu and
Connection Desktop of Window Window
Speed Selection Background while Dragging Animation Themes Bitmap Caching
Modem X
(28.8 Kbps)
Modem X X
(56 Kbps) –
default
Broadband X X X X
(128 Kbps –
1.5 Mbps)
LAN (10 Mbps X X X X X
or higher)
Custom X X
The Experience tab also contains a check box entitled Reconnect if connection is dropped,
which is selected by default.The versions of Terminal Services included with Windows Server 2003
and Windows XP SP1 or later include the Automatic Reconnection feature. If dropped packets,
network service interruptions, or other network errors cause your Terminal Services connection to
disconnect, this feature will automatically attempt to reconnect to your session without requiring
you to reenter your log-on credentials. By default, there will be a maximum of twenty reconnection
attempts, which occur at five-second intervals. Generally, a notification message will pop up,
informing you that the connection has been lost and counting down the remaining connection
attempts.
Installing and Using the
Remote Desktops MMC Snap-In
The Remote Desktops (RD) MMC snap-in is another utility that can be used to establish Terminal
Services connections to Windows 2003 servers and terminal servers.The RD MMC snap-in can
safely be considered the primary Terminal Services client connection tool for administrators. It con-
tains two outstanding features that are not found in the Remote Desktop Connection (RDC)
utility:
■
The RD MMC can be used to connect to multiple Windows 2003 servers using
Terminal Services. An administrator can configure and save the MMC with connection
information for multiple servers.These connections can be used to establish and switch
between sessions. With the RD MMC, you can quickly click between multiple, running
terminal sessions, as shown in Figure 27.4.
946 Chapter 27 • Managing and Troubleshooting Terminal Services
301_BD_W2k3_27.qxd 5/14/04 12:21 PM Page 946
■
The Remote Desktops MMC enables a remote connection to the console ses-
sion. Inability to connect to the console session has prevented many administrators from
being able to use Terminal Services in the past for remote administration.There was simply
no way for the Administrator to connect to the existing console session and see pop up
messages. RD MMC allows the Administrator to see and respond to these console session
messages.
Install the Remote Desktops MMC Snap-In
To prepare the Remote Desktops MMC snap-in for use, you begin by opening a blank MMC con-
sole. Click Start | Run and type MMC in the Open: dialog box.
In the MMC window that appears, click File | Add/Remove Snap-in…. In the
Add/Remove Snap-in dialog box, click the Add… button. Select Remote Desktops from the
Available Standalone Snap-ins: list in the Add Standalone Snap-in dialog box and click the Add
button followed by the Close button. In the Add/Remove Snap-in dialog box, click the OK
button. Remote Desktops should now be visible in the tree view on the left side of the window
under Console Root. By default, no connections are configured, so if you click the Remote
Desktops node at this point, nothing will appear to happen.
Configure a New Connection in the RD MMC
1. From the Windows Start menu, click Run, and type MMC in the Open: dialog box.
2. In the MMC window that appears, click File | Add/Remove Snap-in….
3. In the Add/Remove Snap-in dialog box, click the Add… button.
4. Select Remote Desktops from the Available Standalone Snap-ins: list in the Add
Standalone Snap-in dialog box and click the Add button; then click the Close button.
5. In the Add/Remove Snap-in dialog box, click the OK button.
6. Right-click the Remote Desktops node in the tree view in the left console pane.
Managing and Troubleshooting Terminal Services • Chapter 27 947
Figure 27.4 The Remote Desktops MMC Snap-In
301_BD_W2k3_27.qxd 5/14/04 12:21 PM Page 947
7. Select Add new connection…from the context menu.
8. In the Server name or IP address: text box, enter the fully qualified domain name
(FQDN), NetBIOS name, or IP address of the server to which you wish to connect.
9. Next type an identifying name for the connection in the Connection Name: text box,
or accept the default.
10. Leave the Connect to console check box selected if you want to connect to the server’s
console. Deselect the check box if you want Terminal Services to create a new session for
you to use.
11. To store your user credentials in the connection, enter your log-on name in the User
name: text box, enter your password in the Password: text box, and enter the name of
the domain in the Domain: text box.
12. Select the Save Password check box if you want the entered password saved.
13. Click the OK button to save the connection.
Configure a Connection’s Properties
You can configure several properties for saved connections. Right-click the node in the left pane of
the MMC that represents the connection you want to modify, and select Properties from the con-
text menu.The Properties window will appear, with the General tab displayed.This tab is essentially
the same as the Add New Connection window and contains the same fields for configuration.You
can change any of the settings you made when you created the connection.
Click the Screen Options tab to bring it to the foreground.This tab enables you to choose the
size of the remote desktop window that will appear in the snap-in.The desktop will appear in the
currently blank space on the right side of the MMC window.You can select the size of desktop that
appears there.The default is for the desktop to fill all the available space in the right pane of the
MMC window.This default setting is called Expand to fill MMC Result Pane in Properties
window.You can change this by selecting the radio button next to one of the other choices on the
tab.The second choice is entitled Choose desktop size:. When selected, it enables a drop-down
box containing two standard resolutions: 640x480 and 800x600.The final option on the tab is
Enter custom desktop size:. When selected, it enables two text boxes: Width: and Height:.If
the other available options do not provide you with the desired desktop size, you can manually enter
the size you want into these text boxes.
Click the Other tab at the top of the Window to view the final set of options.You will see
some settings that are familiar from your experience with the RDC utility: the capability to start a
program and/or redirect local drives.
By default, you will receive a Windows 2003 desktop when you connect to a terminal session.
The first selection on this tab enables you to receive only a specified application instead. If the
check box next to Start the following program on connection: is selected, only that applica-
tion will be available in the session. Selecting the box enables the Program path and file name:
text box. If the path to the application is already contained in one of the Windows path variables,
you can type the filename of the application’s executable file in this box. If not, you must include
948 Chapter 27 • Managing and Troubleshooting Terminal Services
301_BD_W2k3_27.qxd 5/14/04 12:21 PM Page 948
the full path and filename of the executable.The check box also enables the Working directory:
text box. If the application requires the specification of a working directory, enter it here.This is
often the same directory into which the application itself is installed.
At the bottom of this tab is another check box, entitled Redirect local drives when logged
on to the remote computer. If this check box is selected, the drives on the client will be visible
from within the session.This provides you with access to those local drives from Windows Explorer,
as well as Open and Save As dialog boxes within applications. If it is not necessary to allow clients
access to their local drives, you should leave this option disabled for security purposes. Note that
there is no option to redirect local printers, serial ports, and smart cards as with the RDC utility.
Connecting and Disconnecting
When you have your connection added and configured, connecting is a snap.To connect, simply
right-click the node that represents your saved connection in the tree view in the left MMC pane
and select Connect from the context menu. If you did not save your log-on information in the
properties of the connection, the information you provided was incorrect, or you want to log on
with a different account, you will be required to enter a user name and password when the session
appears in the right pane of the snap-in.
Disconnecting is just as simple. Right-click the node that represents your saved connection in
the tree view in the left MMC pane, and then select Disconnect from the context menu.You can
also use some of the other methods for logging off and disconnecting that we mentioned earlier in
the chapter.
Installing and Using the
Remote Desktop Web Connection Utility
The Remote Desktop Web Connection utility is designed to access a Terminal Services session
through Microsoft Internet Explorer (MSIE) over TCP/IP. It consists of an ActiveX component that
is downloaded to the client browser and sample Web pages that the client uses IE to connect to. It
replaces Windows 2000’s Terminal Services Advanced Client (TSAC).
This utility depends on Internet Information Services 6 (IIS6), which is not installed by default.
Thus, to use the Remote Desktop Web Connection utility, you must begin by installing IIS6.This is
accomplished via Start | Programs | Administrative Tools | Add or remove a role.
Install the Remote Desktop Web Connection Utility
The Remote Desktop Web Connection utility does not install automatically with IIS6. It is not
available for installation from the Configure Your Server Wizard, but must be added using Add
or Remove Programs from Control Panel in the Windows Start menu.To install it, follow
these steps:
1. In the Add or Remove Programs utility, click the Add/Remove Windows
Components button on the left side of the screen. A Windows Setup pop-up dialog
box will briefly appear, followed by the Windows Components Wizard.
Managing and Troubleshooting Terminal Services • Chapter 27 949
301_BD_W2k3_27.qxd 5/14/04 12:21 PM Page 949
2. In the Components: list, scroll down to select the check box next to Application
Server and click the Details… button.
3. In the Application Server dialog box that appears, select Internet Information
Services (IIS) and click the Details… button.
4. In the Internet Information Services (IIS) dialog box, select Wor l d W id e Web
Service and click on the Details… button.
5. In the World Wide Web service dialog box, select the check box next to Remote
Desktop Web Connection, as shown in Figure 27.5, and click the OK button. Also click
the OK buttons on the Internet Information Services (IIS) and Application Server
dialog boxes.
6. This will return you to the main screen of the Windows Components Wizard, where
you should click the Next button.You should still have the Windows 2003 CD-ROM in
the drive if you are installing from the CD. If you are installing from a network share, you
will need to enter its path or browse to it again.
7. The wizard will switch to the Configuring Components screen and begin the installa-
tion.The final screen in the wizard is entitled Completing the Windows Component
Wizard. Review the information it contains and click the Finish button to close the
wizard.
8. A small Windows Setup pop-up box may appear briefly. When the wizard disappears, if
you do not wish to add more components, close the Add or Remove Programs utility.
950 Chapter 27 • Managing and Troubleshooting Terminal Services
Figure 27.5 Installing the Remote Desktop Web Connection Utility
301_BD_W2k3_27.qxd 5/14/04 12:21 PM Page 950
Using the Remote Desktop
Web Connection Utility from a Client
To use the Remote Desktop Web Connection utility, open a version of Internet Explorer 5 or later
on a client computer on the network, and connect to the following URL: http://SERVER NAME
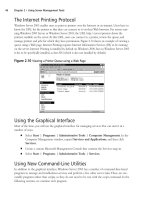
OR IP address/tsweb. When you do so, the default.htm Web page for the utility will appear. It will
automatically detect whether you have the Remote Desktop ActiveX Control installed. If you do
not, a Security Warning dialog box will appear, asking if you’d like to install it. Click the Ye s
button, as shown in Figure 27.6, to proceed with the installation.The control will then download
and install on your system, and the default Web page will appear when installation is complete.
The default Web page contains two options.The Server: text box is used to enter the name or
IP address of the server to which you want to connect.The Size: drop-down box contains a
number of different screen resolutions that can be specified for the connection.The default is Full
Screen, but other available options include: 640x480, 800x600, 1024x768, 1280x1224, and
1600x1200.There is also a check box entitled Send logon information for this connection.
When selected, it adds two text boxes to the screen:
■
User name: can be used to specify the account with which you want to connect
■
Domain: can be used to specify the domain in which the account is located.
If you do not select this check box, you will be prompted for log-on information when you
attempt to connect. After you have made your selections, click the Connect button, shown in
Figure 27.7.
Managing and Troubleshooting Terminal Services • Chapter 27 951
Figure 27.6 Installing the Remote Desktop ActiveX Control
301_BD_W2k3_27.qxd 5/14/04 12:21 PM Page 951
If you select any size setting less than Full Screen, the session will appear in the Web page itself,
as shown in Figure 27.8.
When you scroll through the Web page, the Terminal Services session will move with it. When
you log off using the method described earlier in the chapter, the desktop disappears and the Web
page displays the connection information and text boxes again. If you select Full Screen, a separate
connection window is launched.The Web page changes to display a large blank box with text at the
bottom of the page that indicates you are connected.The Remote Desktop can be minimized, sized,
disconnected from, and logged off, in all the ways mentioned earlier in the chapter.
Regardless of how you connect, a full session is established, which enables you to interact with a
complete Windows 2003 desktop and all applications, as with the other clients. An important advan-
952 Chapter 27 • Managing and Troubleshooting Terminal Services
Figure 27.7 The Remote Desktop Web Connection Log-On Page
Figure 27.8 Viewing a Session that is Embedded in a Browser Window
301_BD_W2k3_27.qxd 5/14/04 12:21 PM Page 952
tage of the Web client is that it does not require any client software to be installed.The ActiveX
control that downloads to the browser upon connection to the default Web page is the only client
software needed. In other words, if you are away from the computer you normally use for adminis-
tration, this client can be used to administer one of your servers in an emergency from anywhere in
the world. All that is needed on the client system is IE 5 or later.
Using Terminal Services Administrative Tools
Microsoft provides several utilities to administer different aspects of Terminal Services.The two pri-
mary tools are as follows:
■
Terminal Services Manager, which is used to administer sessions
■
Terminal Services Configuration, which is use to create and manage the properties of lis-
tener connections
In addition to these tools, Microsoft also provides extensions to the properties of user accounts,
which enable them to receive individual Terminal Services settings. Virtually all of the settings avail-
able at the user properties level, as well as in the properties of a connection in the Terminal Services
Configuration utility, can also be configured within Group Policy. Finally, there are a number of
command-line utilities that can be used for administrative scripting of Terminal Services. In the fol-
lowing sections, we take a detailed look at these tools.
Use Terminal Services Manager to Connect to Servers
Terminal Services Manager is opened from the Start | Programs | Administrative Tools
menu.The left pane contains a tree view that shows servers and sessions.The primary top-level
nodes in the tool are as follows:
■
This Computer
■
Favorite Servers
■
All Listed Servers
If the tool is used on a Terminal Services computer, or from within a session, This Computer
appears in the tree to represent the local computer.You can right-click the name of any Terminal
Services computer in the tree and select Add to Favorites from the menu that appears. Doing so
will add the server under the Favorite Servers node in the tree. Finally, All Listed Servers shows
aggregate information from all the Terminal Services computers to which the utility is connected.
The Action menu can be used to connect to additional Terminal Services computers by
selecting the Connect to Computer option (You can also do this by right-clicking All Listed
Servers and selecting Connect to Computer… in the context menu). New Terminal Services
systems that are added will appear in the tree view on the left side of the screen.
You can disconnect from any server listed in the tree view by right-clicking its name and
selecting Disconnect. When you are connected to a server, the utility tracks statistics, such as which
users are connected, the number of disconnected sessions per server, and much more.This all con-
sumes bandwidth, so if you have added a number of servers to the utility, it may be best not to leave
Managing and Troubleshooting Terminal Services • Chapter 27 953
301_BD_W2k3_27.qxd 5/14/04 12:21 PM Page 953
them all connected to prevent excessive use of network resources by the utility. Microsoft recom-
mends that you connect to only one terminal server at a time with the TS Manager. By default, the
servers to which you connect are not remembered if you close and reopen the TS Manager.To have
them remembered, click Options in the Tools menu and select the check box next to Remember
server connections.
Manage Users with the Terminal Services Manager Tool
When you select any of the server nodes or the All Listed Servers node in the tree view in the
left pane of TS Manager, a series of tabs appears in the Results pane on the right side of the screen,
labeled as follows:
■
Users
■
Sessions
■
Processes
The Users tab can be used to view information about and manage the users who are con-
suming terminal server resources. It shows both currently connected users and users who have dis-
connected sessions still running on the server.The Users tab is shown in Figure 27.9.
Manage Sessions with the Terminal Services Manager Tool
When you select any of the server nodes or the All Listed Servers node in the tree view in the
left pane of the TS Manager, a series of tabs appear in the results pane on the right side of the
screen.The Sessions Tab is used to view information about, and manage, the sessions that are con-
suming terminal server resources.The tab shows currently connected sessions, disconnected sessions,
listener sessions, and the console session.
954 Chapter 27 • Managing and Troubleshooting Terminal Services
Figure 27.9 The Users Tab in Terminal Services Manager
301_BD_W2k3_27.qxd 5/14/04 12:21 PM Page 954
Right-clicking on a session brings up a number of different options, which are the same as
those discussed in regard to the Users tab, except that there is no Log off option, as shown in
Figure 27.10.The Sessions tab is shown in Figure 27.11.
Manage Processes with the Terminal Services Manager Tool
The Processes tab is the third and final tab that is available when you select any of the server nodes
or the All Listed Servers node in the tree view in the left pane of the TS Manager.The Processes tab
can be used to terminate individual processes that are running on the server, including those run-
ning inside sessions.To terminate a process, simply right-click it and select End Process from the
context menu.Then click the OK button in the Terminal Services Manager pop-up box that asks
you to verify the termination.The process will be terminated and removed from the list. Figure
27.12 shows the Processes tab.
Managing and Troubleshooting Terminal Services • Chapter 27 955
Figure 27.10 Sending a Message to a User in a Session
Figure 27.11 The Sessions Tab in Terminal Services Manager
301_BD_W2k3_27.qxd 5/14/04 12:21 PM Page 955