Microsoft SQL Server 2008 R2 Unleashed- P74 docx
Bạn đang xem bản rút gọn của tài liệu. Xem và tải ngay bản đầy đủ của tài liệu tại đây (939.97 KB, 10 trang )
ptg
674
CHAPTER 21 SQL Server Clustering
directories for the root and subfolders, and the FILESTREAM options. Needless to say, the
Data root directory is on the S: drive.
You then are prompted through the Analysis Services Configuration and Reporting
Services Configuration dialogs. Your Analysis Services Data directories are within a
subfolder of S:\OLAP\.
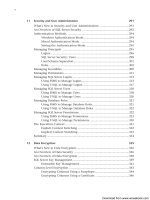
At this point, you have worked your way down to the Cluster Installation Rules check to
determine if everything specified to this point is correct. Figure 21.15 shows this rules
check “passing” status, a summary of what is about to be done, and the location of the
configuration file (and path) that can be used later if you are doing command-line
installs of new nodes in the cluster. A box appears around this configuration file path
location at the bottom right of the Ready to Install dialog to show you where it is being
created (if needed).
The next step is to click on the Install button.
The setup process installs SQL Server binaries locally on each node in the cluster (that is,
in C:\Program Files\Microsoft SQL Server). The database files for the master, model,
tempdb, and msdb databases are placed on the S: drive in this example. This is the shared
disk location that must be available to all nodes in the SQL Server cluster.
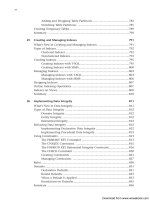
When the process is complete, you can pop over into the Cluster Administrator and see all
the resources just installed within the failover cluster. This is not highly available yet
because you have completed only one node of the two-node failover cluster. But, as you
FIGURE 21.14 Specifying Cluster Security Policy, Server Config and Database Engine Config.
Download from www.wowebook.com
ptg
675
Installing SQL Server Clustering
21
FIGURE 21.15 Cluster Installation Rules check and Ready to Install dialog.
can see in Figure 21.16, the SQL Server components have been successfully installed and
are usable within the cluster.
Adding the next node (and any more subsequent nodes) to the cluster will make this
configuration highly available because you will have other nodes to fail over to. To install
the second node, you must now start back over that the Setup process (using SQL Server
Installation Center). But this time, you can choose the Add Node to a SQL Server Failover
Cluster option, as shown in Figure 21.17. Just as before, the Setup Support Rules check
occurs for the next cluster node (CLUSTER2, in this example). As you can also see, adding a
node is much simpler (many fewer steps) than creating a completely new SQL Server
failover cluster installation.
If all items have passed on the new node, you come to the Cluster Node Configuration
dialog, as shown in Figure 21.18. Here, you can see that the name of this node (CLUSTER2)
is being associated with(added to) the original cluster node (CLUSTER1). This is truly where
the magic occurs. You are then prompted to specify the service accounts and collation
configuration of this second node. Again, you should specify the domain account that was
specified in the first cluster configuration setup (ClusterAdmin in this example).
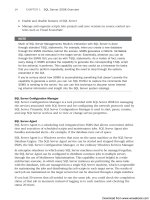
Now you are ready to verify that the rules for adding this node are being followed. If any
check doesn’t pass, you must correct it before the node can be added. Figure 21.19 shows
this Add Node Rules check along with the summary of all the features to be installed as
part of the add node operation.
Again, click the Install button to install the SQL Server features and add this node to
the cluster.
Download from www.wowebook.com
ptg
676
CHAPTER 21 SQL Server Clustering
FIGURE 21.16 SQL Server Failover Cluster Node 1 install complete and within the Cluster
Administrator.
FIGURE 21.17 Adding a node to a SQL Server failover cluster and doing a Setup Support
Rules check for the new cluster node.
Download from www.wowebook.com
ptg
677
Installing SQL Server Clustering
21
FIGURE 21.18 Specifying the cluster node configuration and the service accounts for the
second node.
FIGURE 21.19 Cluster Installation Rules check and Ready to Install second node.
Download from www.wowebook.com
ptg
678
CHAPTER 21 SQL Server Clustering
You must specify what type of authentication mode you want for SQL Server access:
Windows Authentication (only) or mixed mode (Windows Authentication and SQL Server
Authentication). For this example, you should choose the mixed mode option and
provide a password for the sa SQL Server administration login.
Finally, you must specify the collation settings used for sorting order and compatibility
with previous versions of SQL Server.
The SQL Setup program now has enough information to do the complete installation of
the new node in the SQL Server cluster. Figure 21.20 shows the installation of the new
SQL Server Failover Cluster node is complete. In particular, binaries are being installed
locally, additional services are being created on the second node for SQL Server, and SQL
resources are being associated to both cluster nodes.
As you can also see in Figure 21.20, Cluster Administrator shows the online resources
within the cluster group and that both clusters are up and all resources are online (but
controlled by
CLUSTER1 now).
Following are the SQL Server resource entries:
. The SQL Server virtual IP address
. The SQL Server network name
. SQL Server (MSSQLSERVER)
FIGURE 21.20 Second node installed (Complete) and the Cluster Administrator showing both
nodes up.
Download from www.wowebook.com
ptg
679
Installing SQL Server Clustering
21
. SQL Server Agent (for the instance)
. Analysis Services
. Disk S: (physical disks where the DBs reside)
. MSDTC
Each resource entry should say Online in the State column and be owned by the same
node (CLUSTER1 in this example).
In the Cluster Administrator, you can easily view the properties of each of the new SQL
Server resources by right-clicking a resource and selecting Properties. Figure 21.21 shows
the properties of the Networks and Network Interface IP Address resources.
When you right-click a resource entry in the Cluster Administrator, you have an option to
take the resource offline or to initiate a failure. You sometimes need to do this when
you’re trying to fix or test a SQL Server Clustering configuration. However, when you’re
initiating full SQL Server failover to another node (for example, from CLUSTER1 to
CLUSTER2), you typically use the Move Group cluster group technique because you want
all the resources for the cluster group to fail over—not just one specific resource. Figure
21.22 shows that you simply right-click the Cluster Group item entry and select Move
Group. All resources then fail over to CLUSTER2.
Failure of a Node
As you can see in Figure 21.23, one of the nodes in the SQL Server cluster (CLUSTER1) has
failed, and MSCS is in the middle of failing over to the other node in the cluster
(CLUSTER2). As you can also see, the CLUSTER2 node item group has an hourglass on it,
indicating that an MSCS operation is under way. The states of the resources on CLUSTER2
FIGURE 21.21 Properties of the Networks and Network Interfaces.
Download from www.wowebook.com
ptg
680
CHAPTER 21 SQL Server Clustering
FIGURE 21.22 Using Move Group to fail over to another node in a cluster.
are mostly Online Pending. In other words, these resources are in the middle of failing
over to this node. As they come up successfully, Online Pending turns to Online.
In addition, the failure of a node (for any reason) is also written to the System event log.
This example showed an intentional failure of the SQL Server instance via the Cluster
Administrator. SQL Server Failover Clustering does the right thing by failing over to the
FIGURE 21.23 Failing over from CLUSTER1 to CLUSTER2, Online Pending state.
Download from www.wowebook.com
ptg
681
Installing SQL Server Clustering
21
other node. This serves to verify that SQL Server Clustering is working properly. The next
section illustrates what this effect has on a typical client application point of view, using a
custom client test program called Connection Test Program.
Congratulations! You are now up and running, with your SQL Server Failover Cluster
intact and should now be able to start achieving significantly higher availability for your
end users. You ca easily register this new virtual SQL Server (VSQLSERVER2008) within SQL
Server Management Studio (SSMS) and completely manage it as you would any other SQL
Server instance.
The Connection Test Program for a SQL Server Cluster
To help in visualizing exactly what effect a SQL Server failure and subsequent failover may
have on an end-user application, we have created a small test program using Visual Studio
2008. This small C# test program accesses the AdventureWorks2008 database available for
SQL Server 2008 (see the Introduction chapter for information on how to download and
install the AdventureWorks2008 sample database), and it was created in about 10 minutes.
It displays a few columns of data, along with a couple system variables that show connec-
tion information, including the following:
. ProductID, Name, and ProductNumber—This is a simple three-column display of
data from the Product table in the AdventureWorks2008 database.
. SHOWDATETIME—This shows the date and time (to the millisecond) of the data
access being executed.
. SERVERNAME—This is the SQL Server name that the client is connected to.
. SPID—This is the SQL Server process ID (SPID) that reflects the connection ID to
SQL Server itself by the client application.
This type of small program is useful because it always connects to the virtual SQL Server.
This enables you to see what effect a failover would have with your client applications.
To populate this display grid, you execute the following SQL statement:
SELECT ProductID, Name, ProductNumber,
CONVERT (varchar(32), GETDATE(), 9) AS SHOWDATETIME,
@@SERVERNAME AS SERVERNAME,
@@SPID AS SPID
FROM Production.Product WHERE (ProductID LIKE ‘32%’)
You use Visual Studio 2008 to set up a simple Windows form like the one shown in Figure
21.24. You build a simple button that will retrieve the data from the SQL Server database
on the virtual server and also show the date, time, server name, and SPID information for
each access invocation.
Download from www.wowebook.com
ptg
682
CHAPTER 21 SQL Server Clustering
The Visual Studio 2008 project files for the Connection Test Program are available on the
CD included with this book. The program, called WindowsApplication4.sln
SQLClientTest4 Visual Studio 2008 project, is zipped up in a file named SQL Client SQL
Clustering test program .zip. If you want to install this program, you just unzip the
SQLClientTest.zip file and locate the WindowsApplication4.sln solution file. You open
this from your Visual Studio 2008 start page. Then you rebuild and deploy it after you
have modified the connection string of the dataset adapter.
After deploying this simple test program, you simply execute it from anywhere on your
network. As you can see in the App.config XML file for this application, shown here, the
connection string references the VSQLSERVER2008 virtual server name only:
<?xml version=”1.0” encoding=”utf-8” ?>
<configuration>
<configSections>
</configSections>
<connectionStrings>
<add name=”WindowsApplication4.Properties.Settings.
AdventureWorksConnectionString”
connectionString=”Data Source=VSQLSERVER2008;Initial
Catalog=AdventureWorks2008;
Integrated Security=True”
providerName=”System.Data.SqlClient” />
</connectionStrings>
</configuration>
FIGURE 21.24 Visual Studio 2008 Windows form and data adapters needed for the test
client C# program.
Download from www.wowebook.com
ptg
683
Installing SQL Server Clustering
21
Figure 21.25 shows the first execution of the Connection Test Program. If you click the
Retrieve button, the program updates the data grid with a new data access to the virtual
SQL Server machine, shows the name of the server that the client program is connecting
to (SERVERNAME), shows the date and time information of the data access (in the
SHOWDATETIME column), and displays the SQL SPID that it is using for the data access (in
the SPID column). You are now executing a typical C# program against the virtual SQL
Server. Note that the SPID value is 55; this represents the SQL connection to the virtual
SQL Server machine servicing the data request.
Now let’s look at how this high-availability approach works from the client application
point of view. To simulate the failure of the active node, you simply turn off the machine
(CLUSTER1 in this case). This is the best (and most severe) test case of all. Or, if you like,
you can use the Cluster Administrator Move group approach shown earlier.
After you simulate this failure, you click the Retrieve button in the Connection Test
Program again, and an unhandled exception occurs (see Figure 21.26). You can view the
details of the error message, choose to quit the application, or choose to continue. You
should click Continue for now.
FIGURE 21.25 Executing the Connection Test Program with current connection information.
FIGURE 21.26 An unhandled exception has occurred; it is a transport-level error (that is, a
TCP provider error).
Download from www.wowebook.com