Microsoft SQL Server 2008 R2 Unleashed- P87 pdf
Bạn đang xem bản rút gọn của tài liệu. Xem và tải ngay bản đầy đủ của tài liệu tại đây (325.33 KB, 10 trang )
ptg
804
CHAPTER 25 Creating and Managing Indexes
NOTE
If the REBUILD option is run on a heap table (that is, a table with no clustered index),
the rebuild operation does not affect the underlying table. Only the specified nonclus-
tered indexes are rebuilt.
For added flexibility, you can also specify index options as part of the REBUILD operation.
The options available with the REBUILD command are the same options available when
you are creating indexes. The only exception is that the DROP EXISTING option is not
available with the REBUILD operation. (Table 25.2, earlier in this chapter, provides detailed
descriptions of the options.) The following example rebuilds the clustered index on the
Production.Product table and specifies several of the available REBUILD options:
ALTER INDEX [PK_Product_ProductID]
ON [
Production].[Product] REBUILD WITH ( PAD_INDEX = OFF,
STATISTICS_NORECOMPUTE = OFF,
ALLOW_ROW_LOCKS = ON,
ALLOW_PAGE_LOCKS = ON, ONLINE = OFF, SORT_IN_TEMPDB = OFF,
DATA_COMPRESSION = NONE )
An alternative to the REBUILD operation is the REORGANIZE operation. The REORGANIZE
operation is equivalent to the DBCC INDEX DEFRAG command. During the REORGANIZE oper-
ation, the leaf-level pages of the index are physically reordered to match the logical order
of the index keys. The indexes are not dropped. The REORGANIZE operation is always an
online operation and does not require long-term table locks to complete.
TIP
The REORGANIZE operation can generate a large number of transactions during its exe-
cution. You need to be sure to carefully evaluate the amount of space available in the
transaction log and monitor the free space during this operation. If the transaction log
is set to AUTOGROW, you need to make sure you have adequate free space on the drive
where your transaction log lives. This is especially true for very large tables. Several
options are available for mitigating the growth of the log during these operations, such
as setting the recovery model on the database to BULK-LOGGED.
The REORGANIZE operation has just one option: LOB_COMPACTION. When the
LOB_COMPACTION option is set to ON, the data for columns with large object (LOB) data
types is compacted. This consolidates the data and frees disk space. LOB data types include
image, text, ntext, varchar(max), nvarchar(max), varbinary(max), and xml. The follow-
ing example performs a REORGANIZE operation on the clustered index of the
Production.Product table with the LOB_COMPACTION option set to OFF:
ALTER INDEX [PK_Product_ProductID] ON [Production].[Product]
Download from www.wowebook.com
ptg
805
Managing Indexes
25
REORGANIZE WITH ( LOB_COMPACTION = ON )
Disabling an index is another capability introduced with SQL Server 2005 that can be
accomplished with the ALTER INDEX statement. When the DISABLE option is used on an
index, the index is no longer available for retrieving data from a table. If a clustered index
is disabled, the entire table is made unavailable. The data remains in the table, but no
Data Manipulation Language (DML) operations can be performed on the table until the
index is dropped or rebuilt. Unlike dropping an index, when an index is disabled, SQL
Server retains the index definition in metadata so it can easily be re-enabled; index statis-
tics are still maintained for nonclustered indexes that have been disabled.
After an index is disabled, you can re-enable it only by re-creating the index. You can accom-
plish this using the ALTER INDEX REBUILD command or CREATE INDEX WITH DROP_EXISTING
command.
Disabling indexes can be particularly useful for testing purposes. Let’s say you have a
nonclustered index on a table that you believe is used very little. You can disable the
index initially before removing it to evaluate the change. The definition of the index is
still contained in the database. If you ultimately determine that the index is still needed,
you can rebuild the index to make it available again.
TIP
Another reason for disabling a nonclustered index is to reduce the space requirements
when rebuilding the index. If an index to be rebuilt is not disabled, SQL Server
requires enough temporary disk space in the database to store both the old and new
versions of the index. However, if the index is disabled first, SQL Server can reuse the
space required for the disabled index to rebuild it. No additional disk space is neces-
sary except for temporary space required for sorting, which is only about 20% of the
index size.
The following example disables a nonclustered index on the Production.Product table:
ALTER INDEX [AK_Product_Name] ON [Production].[Product] DISABLE
One point to keep in mind when an index is disabled is that it is not readily apparent in
SSMS that the index has been disabled. The index still appears in the Object Explorer tree
under the Indexes node, and there are no indicators on the index display to alert you to
the fact that it has been disabled. You can, however, use other methods to determine if the
index has been disabled. The sys.indexes catalog view is one of these methods. Refer to
the is_disabled column returned with this view. A value of 1 in the is_disabled column
indicates that it has been disabled, and a value of 0 indicates that it is enabled. The follow-
ing SELECT statement shows an example of how to use the sys.indexes catalog view:
select is_disabled,* from sys.indexes
where object_name(object_id) = ‘Product’
Download from www.wowebook.com
ptg
806
CHAPTER 25 Creating and Managing Indexes
FIGURE 25.6 Using Object Explorer to manage indexes.
You can also easily change options on an index with the ALTER INDEX statement. The
following example sets several of the available options for a nonclustered index on the
authors table:
ALTER INDEX [AK_Product_ProductNumber] ON [Production].[Product]
SET (
ALLOW_PAGE_LOCKS = ON,
ALLOW_ROW_LOCKS = OFF,
IGNORE_DUP_KEY = ON,
STATISTICS_NORECOMPUTE = ON
)
Other options exist for managing indexes with T-SQL, but the ALTER INDEX statement
provides the bulk of what you need. Many of the other T-SQL options that you may have
used for managing indexes in SQL Server 2000 and earlier, such as DBCC DBREINDEX, are
still available in SQL Server 2008 for backward compatibility.
For more information and guidelines on managing indexes for performance, such as why
and when to rebuild an index, see Chapter 34.
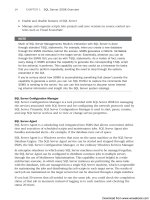
Managing Indexes with SSMS
Several tools are available in SSMS for managing indexes. You can use tools such as the
Database Engine Tuning Advisor, database diagrams, and the Table Designer to view
indexes and make modifications. These tools have many features that are geared toward
specific tasks, but again, in most cases the Object Explorer provides the simplest means for
managing indexes.
Figure 25.6 shows the index options available by right-clicking an index in the Object
Explorer. Many of these options are geared toward index management, including the
options Rebuild, Reorganize, and Disable.
Download from www.wowebook.com
ptg
807
Online Indexing Operations
25
Similar options are also available from the Indexes node of the Object Explorer that
enable you to rebuild, reorganize, or disable all the indexes for the table.
TIP
You can right-cli ck an ind ex in the Object Explorer and choose Proper ties to display the
index columns and other relevant information. This option was not available with the
SQL Server 2000 Object Explorer. You can also run the SP_HELPINDEX command on
any table in a database to list all the indexes on the table and their related columns.
This command must be run in a database engine query window. For example,
sp_helpindex [Production.Product] returns all the indexes for the Product table
in the AdventureWorks database. Make sure to enclose the table name with brackets
when including the schema name.
Dropping Indexes
You can drop indexes by using T-SQL or via tools in the SSMS. To drop indexes with T-
SQL, you use the DROP INDEX command, a simple example of which follows:
DROP INDEX [IX_WorkOrder_ScrapReasonID] ON [Production].[WorkOrder]
This command drops the index named IX_WorkOrder_ScrapReasonID on the
Production.WorkOrder table.
Using the Object Explorer in SSMS is the simplest alternative for dropping indexes. In the
Object Explorer, you simply right-click the index you want to drop and then select Delete.
The same execution options available for adding and modifying indexes are also available
after you select Delete. This includes the option to script the T-SQL statements like that
shown in the preceding DROP INDEX example.
NOTE
If you drop a clustered index on a table, SQL Server needs to rebuild all the remaining
nonclustered indexes on the table. The reason is that when a clustered index exists on
a table, the nonclustered indexes include the clustered index key in the nonclustered
index rows as a pointer to the corresponding data rows. When the clustered index is
dropped, the clustered index key needs to be replaced with page and row pointers. If a
large number of nonclustered indexes exist on the table, the operation to rebuild the
nonclustered indexes can be very time consuming and I/O intensive. For more informa-
tion on the internal structures of clustered and nonclustered indexes, see Chapter 34.
Online Indexing Operations
One of the great features available with SQL Server 2008 is online indexing. This feature,
available only with the Enterprise or Developer Edition, allows you to create, rebuild, or
drop indexes without having exclusive access to the index or table. This means that users
Download from www.wowebook.com
ptg
808
CHAPTER 25 Creating and Managing Indexes
can have concurrent access to the underlying tables and indexes while the index opera-
tion is in progress. This bodes well for high-availability applications and databases that
have limited downtime available for offline operations.
Following is an example of the T-SQL syntax for an online index operation:
ALTER INDEX [PK_Product_ProductID] ON [Production].[Product]
REBUILD WITH ( ONLINE = ON)
The ONLINE = ON parameter is the key to making the index operation an online operation.
To accomplish online indexing, SQL Server must maintain the old and new versions of the
affected indexes during the operation. The old version (referred to as the source) includes
any table or indexes that are affected by the index operation. For example, if a clustered
index is part of the online operation, the clustered index and all the nonclustered indexes
that reference the clustered index are maintained as part of the source. The new version
(referred to as the target) is the new index or indexes that are being created or rebuilt. In
the case of a table without a clustered index, a structure known as a heap is used as the
source and target.
During online index operations, the following three phases occur:
. Preparation—Concurrent activity is temporarily suspended while a snapshot of the
source index structure is taken and written as an empty structure to the target.
. Building—The source index structures are scanned, sorted, merged, and inserted
into the target. User
SELECT statements are satisfied via the source. Insertions,
updates, and deletions to the affected table are written to both the source and target.
. Final—Concurrent activity is temporarily suspended while the source is replaced by
the newly created structures (target).
When the final phase is complete, all the query and update plans that were using the old
structures are invalidated. Future queries utilize the newly created index structures after
this point.
When considering online indexing, you need to account for the following:
. Disk space—Generally, the disk space requirements for online operations are the
same as those for offline operations. The exception to this is online index operations
on clustered indexes. These operations use a temporary mapping index that requires
additional disk space. The temporary mapping index contains one row for each
record in the table.
. Performance—Online index operations are generally slower and take more system
resources than offline operations. Primarily, the reason is that the old and new index
structures are maintained during the index operation. Heavy updates to the tables
involved in the index operation can cause an overall decrease in performance and a
spike in CPU utilization and I/O as the two index structures are maintained.
. Transaction log—Online index operations are fully logged. You may therefore
encounter a heavy burden on your transaction log during online index operations
Download from www.wowebook.com
ptg
809
Indexes on Views
25
for large tables. This can cause your transaction log to fill quickly. The transaction
log can be backed up, but it cannot be truncated during online index operations.
You need to make sure you have enough space for your log to grow; otherwise, the
online index operation could fail.
Indexes on Views
SQL Server 2008 supports the creation of indexes on views. Like indexes on tables, indexes
on views can dramatically improve the performance of the queries that reference the
views. By nature, a view is a virtual table and does not have a separate data structure as
does a table, even though it can be referenced like a table. After an index is created on a
view, the result set of the view is stored in the database, just as it would be for a table. The
indexed view is no longer virtual because it requires maintenance as rows are added to,
deleted from, or modified in the tables referenced by the view. Refer to Chapter 27,
“Creating and Managing Views in SQL Server,” for a more detailed discussion of views.
The first index created on a view must be a unique clustered index. After that is created,
other nonclustered indexes can be built on the view for additional performance gains.
The most difficult part of the index creation process is identifying a view that is valid for
index creation. Many requirements must be met for a view to qualify. Refer to the SQL
Server Books Online documentation for a complete list of all the restrictions. The follow-
ing is a partial list of the most common requirements:
. All the tables in the view must be in the same database as the view and have the
same owner as the view.
. The view must not reference any other views.
. The view must be created with
SCHEMABINDING, and any function referenced in the
view must also be created with SCHEMABINDING.
. A two-part name with the schema prefix must be used for every table or user-defined
function referenced in the view.
. Many SET options, including ANSI_NULLS, ANSI_PADDING, ANSI_WARNINGS,
CONCAT_NULL_YIELDS_NULL, and QUOTED_IDENTIFIER must be set to ON.
. Any functions referenced in the view must be deterministic. (See Chapter 29,
“Creating and Managing User-Defined Functions,” for more information on deter-
ministic functions.)
. Views with aggregate functions must also include COUNT_BIG(*).
The following example shows the creation of a view that can have an index created on it:
CREATE VIEW titleview
WITH SCHEMABINDING AS
select title, au_ord, au_lname, price, ytd_sales, pub_id
from dbo.authors, dbo.titles, dbo.titleauthor
Download from www.wowebook.com
ptg
810
CHAPTER 25 Creating and Managing Indexes
where authors.au_id = titleauthor.au_id
AND titles.title_id = titleauthor.title_id
The SCHEMABINDING clause and database schema qualifier (dbo) for each table are necessary
in the view definition to be able to make the view valid for index creation. The following
example creates an index on the titleview view:
CREATE UNIQUE CLUSTERED INDEX [AK_vw_Employee] ON [dbo].[vw_Employee]
( [JobTitle] ASC, [LoginID] ASC)
After the index is created, you can manage it in much the same way that you manage the
indexes on tables. You can use both T-SQL and SSMS to manage these indexes.
For more information and guidelines on creating and using indexed views, see Chapter 27.
Summary
Index creation is an important part of managing a database. Creating useful indexes can
vastly improve query performance and should not be overlooked. Fortunately, SQL Server
2008 makes the creation and management of indexes quite easy.
In Chapter 26, “Implementing Data Integrity,” you see how you can use indexes and other
methods to enforce data integrity. Subsequent chapters cover the internal working of
indexes and give you more insight into their role in performance.
Download from www.wowebook.com
ptg
CHAPTER 26
Implementing Data
Integrity
IN THIS CHAPTER
. What’s New in Data Integrity
. Ty pes of Data Integrity
. Enforcing Data Integrity
. Using Constraints
. Rules
. Defaults
The value of your data is determined by its integrity. You
may have heard the phrase “garbage in, garbage out.” In the
database world, “garbage in” refers to data that has been
loaded into a database without validation or without data
integrity. This “garbage” data can then be retrieved (“garbage
out”), and erroneous decisions can result because of it.
Implementing good data integrity measures is your best
defense against the “garbage in, garbage out” scenario. This
involves identifying valid values for tables and columns and
deciding how to enforce the integrity of those values. This
chapter covers the different types of data integrity and the
methods for enforcing them.
What’s New in Data Integrity
Much of the functionality related to data integrity has
remained the same in SQL Server 2008. Several features that
were added in SQL Server 2005, such as cascading integrity
constraints, are still supported in SQL Server 2008. The lack
of change in this area is generally a blessing. The tools
available to enforce data integrity were comprehensive in
2005 and remain so in 2008.
Keep in mind that bound defaults, which were deprecated
in SQL Server 2005, are still available in SQL Server 2008.
For now, you can still use this statement to create a default
that is bound to one or more columns. Microsoft
recommends using the
DEFAULT keyword with ALTER TABLE
or CREATE TABLE instead.
Download from www.wowebook.com
ptg
812
CHAPTER 26 Implementing Data Integrity
Types of Data Integrity
How integrity is enforced depends on the type of integrity being enforced. As described in
the following sections, the types of data integrity are domain, entity, and referential
integrity.
Domain Integrity
Domain integrity controls the validation of values for a column. You can use domain
integrity to enforce the type, format, and possible values of data stored in a column. SQL
Server provides several mechanisms to enforce domain integrity:
. You can control the type of data stored in a column by assigning a data type to
the column.
. You can use CHECK constraints and rules to control the format of the data.
. You can control the range of values stored in a column by using FOREIGN KEY con-
straints, CHECK constraints, default definitions, nullability, and rules.
Entity Integrity
Entity integrity requires that all rows in a table be unique. You can enforce entity integrity
in SQL Server by using PRIMARY KEY constraints, UNIQUE constraints, and IDENTITY proper-
ties.
Referential Integrity
Referential integrity preserves the defined relationships between tables. You can define such
a relationship in SQL Server by relating foreign key columns on one table to the primary
key or unique key of another table. When it is defined, referential integrity ensures that
values inserted in the foreign key columns have corresponding values in the primary
table. It also controls changes to the primary key table and ensures that related foreign key
rows are not left orphaned.
Enforcing Data Integrity
You can enforce data integrity by using declarative or procedural methods. Implementing
declarative data integrity requires little or no coding. Implementing procedural data
integrity is more flexible but requires more custom coding.
Implementing Declarative Data Integrity
Declarative integrity is enforced within the database, using constraints, rules, and defaults.
This is the preferred method of enforcing integrity because it has low overhead and
requires little or no custom programming. It can be centrally managed in the database,
and it provides a consistent approach for ensuring the integrity of data.
Download from www.wowebook.com
ptg
813
Using Constraints
26
Implementing Procedural Data Integrity
Procedural integrity can be implemented with stored procedures, triggers, and application
code. It requires custom programming that defines and enforces the integrity of the data.
The biggest benefits of implementing procedural data integrity are flexibility and control.
You can implement the custom code in many different ways to enforce the integrity of
your data. The custom code can also be a detriment; the lack of consistency and potential
inefficiencies in the way the data integrity is performed can be a real problem.
In general, declarative data integrity should be used as the primary means for control.
Procedural data integrity can be used to augment declarative data integrity, if needed.
Using Constraints
Constraints—including PRIMARY KEY, FOREIGN KEY, UNIQUE, CHECK, and DEFAULT—are the
primary method used to enforce data integrity. You can implement defaults as constraints
or as objects in a database; for more information, see the “Defaults” section, later in this
chapter.
The PRIMARY KEY Constraint
The PRIMARY KEY constraint is one of the key methods for ensuring entity integrity. When
this constraint is defined on a table, it ensures that every row can be uniquely identified
with the primary key value(s). The primary key can have one or more columns as part of
its definition. None of the columns in the primary key definition can allow nulls. When
multiple columns are used in the definition of the primary key, the combination of the
values in all the primary key columns must be unique. Duplication can exist in a single
column that is part of a multicolumn primary key.
There can be only one primary key defined for each table. When a primary key is defined
on a table, a unique index is automatically created as well. This index contains all the
columns in the primary key and ensures that the rows in this index are unique. Generally,
every table in a database should have a primary key. The primary key and its associated
unique index provide fast access to a database table.
Figure 26.1 shows the
Adventureworks2008 database Employee table, which is an example
of a table that has a primary key defined. The primary key in this table is EmployeeID, and
it is denoted in the dialog shown in Figure 26.1 with a key symbol in the leftmost
column.
The existing primary key on the Employee table in the Adventureworks2008 database was
generated as a T-SQL script, as shown in the following example:
ALTER TABLE [HumanResources].[Employee]
ADD CONSTRAINT [PK_Employee_BusinessEntityID] PRIMARY KEY CLUSTERED
(BusinessEntityID ASC)
In general, you try to choose a primary key that is relatively short. BusinessEntityID, for
example, is a good choice because it is an integer column and takes only 4 bytes of
Download from www.wowebook.com