Beginning Ajax with PHP (AJAX BASICS Table 2-3. XMLHttpRequest (P.2)) pdf
Bạn đang xem bản rút gọn của tài liệu. Xem và tải ngay bản đầy đủ của tài liệu tại đây (352.69 KB, 30 trang )
Table 2-3. XMLHttpRequest Object Methods
Method Description
abort() Cancels the current request
getAllResponseHeaders() Returns all HTTP headers as a String type variable
getResponseHeader() Returns the value of the HTTP header specified in the method
open() Specifies the different attributes necessary to make a connection to
the server; allows you to make selections such as
GET or POST (more
on that later), whether to connect asynchronously, and which URL
to connect to
setRequestHeader() Adds a label/value pair to the header when sent
send() Sends the current request
While the methods shown in Table 2-3 may seem somewhat daunting, they are not
all that complicated. That being said, let’s take a closer look at them.
abort()
The abort method is really quite simple—it stops the request in its tracks. This function
can be handy if you are concerned about the length of the connection. If you only want
a request to fire for a certain length of time, you can call the
abort method to stop the
request prematurely.
getAllResponseHeaders()
You can use this method to obtain the full information on all HTTP headers that are
being passed. An example set of headers might look like this:
Date: Sun, 13 Nov 2005 22:53:06 GMT
Server: Apache/2.0.53 (Win32) PHP/5.0.3
X-Powered-By: PHP/5.0.3
Content-Length: 527
Keep-Alive: timeout=15, max=98
Connection: Keep-Alive
Content-Type: text/html
CHAPTER 2 ■ AJAX BASICS14
6676CH02.qxd 9/27/06 11:51 AM Page 14
getResponseHeader("headername")
You can use this method to obtain the content of a particular piece of the header. This
method can be useful to retrieve one part of the generally large string obtained from a set
of headers. For example, to retrieve the size of the document requested, you could simply
call
getResponseHeader ("Content-Length").
open ("method","URL","async","username","pswd")
Now, here is where we start to get into the meat and potatoes of the XMLHttpRequest
object. This is the method you use to open a connection to a particular file on the server.
It is where you pass in the method to open a file (
GET or POST), as well as define how the
file is to be opened. Keep in mind that not all of the arguments in this function are
required and can be customized depending on the situation.
setRequestHeader("label","value")
With this method, you can give a header a label of sorts by passing in a string represent-
ing both the label and the value of said label. An important note is that this method may
only be invoked after the
open() method has been used, and must be used before the
send function is called.
send("content")
This is the method that actually sends the request to the server. If the request was sent
asynchronously, the response will come back immediately; if not, it will come back after
the response is received. You can optionally specify an input string as an argument, which
is helpful for processing forms, as it allows you to pass the values of form elements.
XMLHttpRequest Properties
Of course, any object has a complete set of properties that can be used and manipulated
in order for it work to its fullest. A complete list of the
XMLHttpRequest object properties
is presented in Table 2-4. It is important to take note of these properties—you will be
making use of them as you move into the more advanced functionality of the object.
CHAPTER 2 ■ AJAX BASICS 15
6676CH02.qxd 9/27/06 11:51 AM Page 15
Table 2-4. XMLHttpRequest Object Properties
Property Description
onreadystatechange Used as an event handler for events that trigger upon state changes
readyState Contains the current state of the object (0: uninitialized, 1: loading,
2: loaded, 3: interactive, 4: complete)
responseText Returns the response in string format
responseXML Returns the response in proper XML format
status Returns the status of the request in numerical format (regular page
errors are returned, such as the number 404, which refers to a not
found error)
statusText Returns the status of the request, but in string format (e.g., a 404 error
would return the string Not Found)
onreadystatechange
The onreadystatechange property is an event handler that allows you to trigger certain
blocks of code, or functions, when the state (referring to exactly where the process is at
any given time) changes. For example, if you have a function that handles some form of
initialization, you could get the main set of functionality you want to fire as soon as the
state changes to the
complete state.
readyState
The readyState property gives you an in-depth description of the part of the process that
the current request is at. This is a highly useful property for exception handling, and can
be important when deciding when to perform certain actions. You can use this property
to create individual actions based upon how far along the request is. For example, you
could have a set of code execute when
readyState is loading, or stop executing when
readyState is complete.
responseText
The responseText property will be returned once a request has gone through. If you are
firing a request to a script of some sort, the output of the script will be returned through
this property. With that in mind, most scripts will make use of this property by dumping
it into an
innerHTML property of an element, thereby asynchronously loading a script or
document into a page element.
CHAPTER 2 ■ AJAX BASICS16
6676CH02.qxd 9/27/06 11:51 AM Page 16
responseXML
This works similarly to responseText, but is ideal if you know for a fact that the response
will be returned in XML format—especially if you plan to use built-in XML-handling
browser functionality.
status
This property dictates the response code (a list of common response codes is shown in
Table 2-1) that was returned from the request. For instance, if the file requested could not
be found, the status will be set to 404 because the file could not be found.
statusText
This property is merely a textual representation of the status property. Where the status
property might be set to 404, the statusText would return Not Found. By using both the
status and statusText properties together, you can give your user more in-depth knowl-
edge of what has occurred. After all, not many users understand the significance of the
number 404.
Cross-Browser Usage
Although at the time of this writing, Microsoft’s Internet Explorer continues to dominate
the browser market, competitors such as Firefox have been making significant headway.
Therefore, it is as important as ever to make sure your Ajax applications are cross-
browser compatible. One of the most important aspects of the Ajax functionality is that it
can be deployed across browsers rather seamlessly, with only a small amount of work
required to make it function across most browsers (the exception being rather old ver-
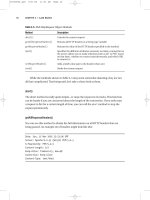
sions of the current browsers). Consider the following code snippet, which instantiates
an instance of the
XMLHttpRequest object, and works within any browser that supports
XMLHttpRequest. Figure 2-1 shows the difference between the Internet Explorer and
non–Internet Explorer outcomes.
//Create a boolean variable to check for a valid Internet Explorer instance.
var xmlhttp = false;
//Check if we are using IE.
try {
//If the Javascript version is greater than 5.
xmlhttp = new ActiveXObject("Msxml2.XMLHTTP");
alert ("You are using Microsoft Internet Explorer.");
} catch (e) {
CHAPTER 2 ■ AJAX BASICS 17
6676CH02.qxd 9/27/06 11:51 AM Page 17
//If not, then use the older active x object.
try {
//If we are using Internet Explorer.
xmlhttp = new ActiveXObject("Microsoft.XMLHTTP");
alert ("You are using Microsoft Internet Explorer");
} catch (E) {
//Else we must be using a non-IE browser.
xmlhttp = false;
}
}
//If we are using a non-IE browser, create a javascript instance of the object.
if (!xmlhttp && typeof XMLHttpRequest != 'undefined') {
xmlhttp = new XMLHttpRequest();
alert ("You are not using Microsoft Internet Explorer");
}
Figure 2-1. This script lets you know which browser you are currently using to perform an
Ajax-based request.
As you can see, the process of creating an
XMLHttpRequest object may differ, but the
end result is always the same; you have a means to create a usable
XMLHttpRequest object.
Microsoft becomes a little more complicated in this respect than most other browsers,
forcing you to check on which version of Internet Explorer (and, subsequently,
JavaScript) the current user is running. The flow of this particular code sample is quite
simple. Basically, it checks whether the user is using a newer version of Internet Explorer
(by attempting to create the
ActiveX Object); if not, the script will default to the older
ActiveX Object. If it’s determined that neither of these is the case, then the user must be
using a non–Internet Explorer browser, and the standard
XMLHttpRequest object can thus
be created as an actual JavaScript object.
Now, it is important to keep in mind that this method of initiating an
XMLHttpRequest
object is not the only way to do so. The following code snippet will do largely the same
thing, but is quite a bit simpler:
CHAPTER 2 ■ AJAX BASICS18
6676CH02.qxd 9/27/06 11:51 AM Page 18
var xmlhttp;
//If, the activexobject is available, we must be using IE.
if (window.ActiveXObject){
xmlhttp = new ActiveXObject("Microsoft.XMLHTTP");
} else {
//Else, we can use the native Javascript handler.
xmlhttp = new XMLHttpRequest();
}
As you can see, this case is a much less code-intensive way to invoke the
XMLHttpRequest object. Unfortunately, while it does the job, I feel it is less thorough, and
since you are going to be making use of some object-oriented technologies, it makes
sense to use the first example for your coding. A large part of using Ajax is making sure
you take care of as many cases as possible.
Sending a Request to the Server
Now that you have your shiny, new XMLHttpRequest object ready for use, the natural next
step is to use it to submit a request to the server. This can be done in a number of ways,
but the key aspect to remember is that you must validate for a proper response, and you
must decide whether to use the
GET or POST method to do so. It should be noted that if you
are using Ajax to retrieve information from the server, the
GET method is likely the way to
go. If you are sending information to the server,
POST is the best way to handle this. I’ll go
into more depth with this later in the book, but for now, note that
GET does not serve very
well to send information due to its inherent size limitations.
In order to make a request to the server, you need to confirm a few basic functionality-
based questions. First off, you need to decide what page (or script) you want to connect
to, and then what area to load the page or script into. Consider the following function,
which receives as arguments the page (or script) that you want to load and the
div (or
other object) that you want to load the content into.
function makerequest(serverPage, objID) {
var obj = document.getElementById(objID);
xmlhttp.open("GET", serverPage);
xmlhttp.onreadystatechange = function() {
if (xmlhttp.readyState == 4 && xmlhttp.status == 200) {
obj.innerHTML = xmlhttp.responseText;
}
}
xmlhttp.send(null);
}
CHAPTER 2 ■ AJAX BASICS 19
6676CH02.qxd 9/27/06 11:51 AM Page 19
Basically, the code here is taking in the HTML element ID and server page. It then
attempts to open a connection to the server page using the
open() method of the
XMLHttpRequest object. If the readyState property returns a 4 (complete) code and the
status property returns a 200 (OK) code, then you can load the response from the
requested page (or script) into the
innerHTML element of the passed-in object after you
send the request.
Basically, what is accomplished here is a means to create a new
XMLHttpRequest object
and then use it to fire a script or page and load it into the appropriate element on the
page. Now you can begin thinking of new and exciting ways to use this extremely simple
concept.
Basic Ajax Example
As Ajax becomes an increasingly widely used and available technique, one of the more
common uses for it is navigation. It is a rather straightforward process to dynamically
load content into a page via the Ajax method. However, since Ajax loads in the content
exactly where you ask it to, without refreshing the page, it is important to note exactly
where you are loading content.
You should be quite used to seeing pages load from scratch whenever a link is
pressed, and you’ve likely become dependent on a few of the features of such a concept.
With Ajax, however, if you scroll down on a page and dynamically load content in with
Ajax, it will not move you back to the top of the page. The page will sit exactly where it is
and load the content in without much notification.
A common problem with Ajax is that users simply don’t understand that anything
has happened on the page. Therefore, if Ajax is to be used as a navigational tool, it is
important to note that not all page layouts will react well to such functionality. In my
experience, pages that rely upon navigational menus on the top of the screen (rather
than at the bottom, in the content, or on the sides) and then load in content below it
seem to function the best, as content is quite visible and obvious to the user.
Consider the following example, which shows a generic web page that loads in con-
tent via Ajax to display different information based on the link that has been clicked.
<!DOCTYPE html PUBLIC "-//W3C//DTD XHTML 1.0 Transitional//EN"➥
" /><html xmlns=" /><head>
<title>Sample 2_1</title>
<meta http-equiv="Content-Type" content="text/html; charset=iso-8859-1" />
<script type="text/javascript">
<!
CHAPTER 2 ■ AJAX BASICS20
6676CH02.qxd 9/27/06 11:51 AM Page 20
//Create a boolean variable to check for a valid Internet Explorer instance.
var xmlhttp = false;
//Check if we are using IE.
try {
//If the Javascript version is greater than 5.
xmlhttp = new ActiveXObject("Msxml2.XMLHTTP");
alert ("You are using Microsoft Internet Explorer.");
} catch (e) {
//If not, then use the older active x object.
try {
//If we are using Internet Explorer.
xmlhttp = new ActiveXObject("Microsoft.XMLHTTP");
alert ("You are using Microsoft Internet Explorer");
} catch (E) {
//Else we must be using a non-IE browser.
xmlhttp = false;
}
}
//If we are using a non-IE browser, create a javascript instance of the object.
if (!xmlhttp && typeof XMLHttpRequest != 'undefined') {
xmlhttp = new XMLHttpRequest();
alert ("You are not using Microsoft Internet Explorer");
}
function makerequest(serverPage, objID) {
var obj = document.getElementById(objID);
xmlhttp.open("GET", serverPage);
xmlhttp.onreadystatechange = function() {
if (xmlhttp.readyState == 4 && xmlhttp.status == 200) {
obj.innerHTML = xmlhttp.responseText;
}
}
xmlhttp.send(null);
}
// >
</script>
<body onload="makerequest ('content1.html','hw')">
<div align="center">
CHAPTER 2 ■ AJAX BASICS 21
6676CH02.qxd 9/27/06 11:51 AM Page 21
<h1>My Webpage</h1>
<a href="content1.html" onclick="makerequest('content1.html','hw'); ➥
return false;"> Page 1</a> | <a href="content2.html"➥
onclick="makerequest('content2.html','hw'); ➥
return false;">Page 2</a> | <a href="content3.html" onclick=➥
"makerequest('content3.html','hw'); return false;">Page 3</a> | ➥
<a href="content4.html" onclick="makerequest('content4.html','hw'); return false;">➥
Page 4</a>
<div id="hw"></div>
</div>
</body>
</html>
<! content1.html >
<div style="width: 770px; text-align: left;">
<h1>Page 1</h1>
<p>Lorem ipsum dolor sit amet, consectetur adipisicing elit, sed do eiusmod➥
tempor incididunt ut labore et dolore magna aliqua. Ut enim ad minim veniam, ➥
quis nostrud exercitation ullamco laboris nisi ut aliquip ex ea commodo consequat.➥
Duis aute irure dolor in reprehenderit in voluptate velit esse cillum dolore eu ➥
fugiat nulla pariatur. Excepteur sint occaecat cupidatat non proident, sunt in➥
culpa qui officia deserunt mollit anim id est laborum.</p>
</div>
<! content2.html >
<div style="width: 770px; text-align: left;">
<h1>Page 2</h1>
<p>Lorem ipsum dolor sit amet, consectetur adipisicing elit, sed do eiusmod ➥
tempor incididunt ut labore et dolore magna aliqua. Ut enim ad minim veniam, ➥
quis nostrud exercitation ullamco laboris nisi ut aliquip ex ea commodo consequat.➥
Duis aute irure dolor in reprehenderit in voluptate velit esse cillum dolore eu ➥
fugiat nulla pariatur. Excepteur sint occaecat cupidatat non proident, sunt in ➥
culpa qui officia deserunt mollit anim id est laborum.</p>
</div>
<! content3.html >
<div style="width: 770px; text-align: left;">
<h1>Page 3</h1>
<p>Lorem ipsum dolor sit amet, consectetur adipisicing elit, sed do eiusmod➥
tempor incididunt ut labore et dolore magna aliqua. Ut enim ad minim veniam,➥
CHAPTER 2 ■ AJAX BASICS22
6676CH02.qxd 9/27/06 11:51 AM Page 22
quis nostrud exercitation ullamco laboris nisi ut aliquip ex ea commodo consequat.➥
Duis aute irure dolor in reprehenderit in voluptate velit esse cillum dolore eu➥
fugiat nulla pariatur. Excepteur sint occaecat cupidatat non proident, sunt in➥
culpa qui officia deserunt mollit anim id est laborum.</p>
</div>
<! content4.html >
<div style="width: 770px; text-align: left;">
<h1>Page 4</h1>
<p>Lorem ipsum dolor sit amet, consectetur adipisicing elit, sed do eiusmod ➥
tempor incididunt ut labore et dolore magna aliqua. Ut enim ad minim veniam, ➥
quis nostrud exercitation ullamco laboris nisi ut aliquip ex ea commodo consequat.➥
Duis aute irure dolor in reprehenderit in voluptate velit esse cillum dolore eu ➥
fugiat nulla pariatur. Excepteur sint occaecat cupidatat non proident, sunt in ➥
culpa qui officia deserunt mollit anim id est laborum.</p>
</div>
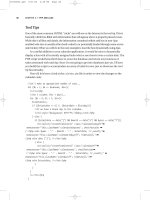
As you can see in Figure 2-2, by making use of Ajax, you can create a fully functional,
Ajax navigation–driven site in a manner of minutes. You include the JavaScript required
to process the links into
<script> tags in the head, and can then make use of the
makerequest() function at any time to send a server-side request to the web server
without refreshing the page. You can call the
makerequest() function on any event (you
are using
onclick() here) to load content into the respective object that is passed to
the function.
Figure 2-2. An Ajax-based application in full effect. Note the address bar, which shows
whether you have refreshed the page as you navigate.
CHAPTER 2 ■ AJAX BASICS 23
6676CH02.qxd 9/27/06 11:51 AM Page 23
Using this method to handle navigation is a very nice way to produce a solid break
between content and design, as well as create a fast-loading web site. Because the design
wrapper only needs to be created once (and content can be loaded on the fly), users will
find less lag when viewing the web site, and have a seamless page in front of them at all
times. While those users without a fast Internet connection typically have to wait while a
site loads using traditional linking methods, they won’t have to wait with Ajax. Using the
Ajax method allows the content being retrieved from the server to be loaded with little to
no obtrusive maneuvering of the web page that the user is viewing.
Summary
To summarize, Ajax can efficiently produce seamless requests to the server while retriev-
ing and manipulating both external scripts and internal content on the fly. It is quite
simple to set up, very easy to maintain, and quite portable across platforms. With the
right amount of exception handling, you can ensure that most of your site users will see
and experience your web site or application exactly as you had envisioned it.
You are well on our way to integrating the concept of Ajax into robust PHP applica-
tions. In Chapter 3, you’ll begin to bring the two web languages together into seamless,
powerful web-based applications.
CHAPTER 2 ■ AJAX BASICS24
6676CH02.qxd 9/27/06 11:51 AM Page 24
PHP and Ajax
While the concept of Ajax contains a handy set of functionality for creating actions on
the fly, if you are not making use of its ability to connect to the server, you are really just
using basic JavaScript. Not that there is anything truly wrong with that, but the real power
lies in joining the client-side functionality of JavaScript with the server-side processing of
the PHP language using the concept of Ajax.
Throughout this chapter, I will run through some examples of how PHP and Ajax can
be used together to design some basic tools that are quite new to Internet applications
but have been accessible to desktop applications for ages. The ability to make a call to the
server without a page refresh is one that is quite powerful, if harnessed correctly. With the
help of the powerful PHP server-side language, you can create some handy little applica-
tions that can be easily integrated into any web project.
Why PHP and Ajax?
So, out of all of the available server-side processing languages (ASP, ASP.NET, ColdFusion,
etc.), why have I chosen to devote this book to the PHP language, as any of them can
function decently with Ajax technologies? Well, the truth is that while any of the afore-
mentioned languages will perform admirably with Ajax, PHP has similarities with the
JavaScript language used to control Ajax—in functionality, code layout, and ideology.
PHP has been and will likely continue to be a very open form of technology. While
code written in PHP is always hidden from the web user, there is a massive community
of developers who prefer to share and share alike when it comes to their code. You need
only scour the web to find an abundance of examples, ranging from the most basic to
the most in-depth. When comparing PHP’s online community against a coding language
such as ASP.NET, it is not difficult to see the differences.
JavaScript has always been an open sort of technology, largely due to the fact that it
does not remain hidden. Because it is a client-side technology, it is always possible to
view the code that has been written in JavaScript. Perhaps due to the way JavaScript is
handled in this manner, JavaScript has always had a very open community as well. By
combining the communities of JavaScript and PHP, you can likely always find the exam-
ples you want simply by querying the community.
25
CHAPTER 3
6676CH03.qxd 9/27/06 2:49 PM Page 25
To summarize why PHP and Ajax work so well together, it comes down to mere func-
tionality. PHP is a very robust, object-oriented language. JavaScript is a rather robust
language in itself; it is sculptured after the object-oriented model as well. Therefore,
when you combine two languages, aged to maturity, you come away with the best of
both worlds, and you are truly ready to begin to merge them for fantastic results.
Client-Driven Communication, Server-Side
Processing
As I have explained in previous chapters, there are two sides to a web page’s proverbial
coin. There is the client-side communication aspect—that is, the functionality happen-
ing right then and there on the client’s browser; and the server-side processing—the
more intricate levels of scripting, which include database interaction, complex formulas,
conditional statements, and much, much more.
For the entirety of this book, you will be making use of the JavaScript language to
handle the client-side interaction and merging it seamlessly with the PHP processing lan-
guage for all your server-side manipulation. By combining the two, the sky is truly the
limit. Anything that can be imagined can come to fruition if enough creativity and hard
work is put into it.
Basic Examples
In order to get geared up for some of the more intricate and involved examples, I will
begin by showing some basic examples of common web mini-applications that work
well with the Ajax ideology. These are examples you are likely to see already in place in
a variety of web applications, and they are a very good basis for showing what can be
accomplished using the Ajax functionality.
Beyond the fact that these applications have become exceedingly popular, this chap-
ter will attempt to guide you as to what makes these pieces of functionality so well-suited
to the Ajax concept. Not every application of Ajax is necessarily a good idea, so it is
important to note why these examples work well with the Ajax concept, and how they
make the user’s web-browsing experience better. What would the same application look
like if the page had to refresh? Would the same functionality have even been possible
without Ajax, and how much work does it save us (if any)?
Expanding and Contracting Content
One spectacular use for Ajax-type functionality is in hiding content away and exposing it
based on link clicks (or hovers, or button presses). This sort of functionality allows you to
CHAPTER 3 ■ PHP AND AJAX26
6676CH03.qxd 9/27/06 2:49 PM Page 26
create access to a large amount of content without cluttering the screen. By hiding con-
tent within expandable and retractable menu links, you can add a lot of information in a
small amount of space.
Consider the following example, which uses Ajax to expand and contract a calendar
based upon link clicks. By using Ajax to hide and show information, and PHP to dynami-
cally generate a calendar based upon the current month, you create a well-hidden
calendar that can be added to any application with relative ease and very little web site
real estate.
In order to start things off, you need a valid web page in which to embed your calen-
dar. The following code will create your very basic web page:
<! sample3_1.html >
<!DOCTYPE html PUBLIC "-//W3C//DTD XHTML 1.0 Transitional//EN"➥
" /><html xmlns=" /><head>
<title>Sample 3_1</title>
<meta http-equiv="Content-Type" content="text/html; charset=iso-8859-1" />
<script type="text/javascript" src="functions.js"></script>
<link rel="stylesheet" type="text/css" href="style.css" />
</head>
<body>
<div id="createtask" class="formclass"></div>
<div id="autocompletediv" class="autocomp"></div>
<div id="taskbox" class="taskboxclass"></div>
<p><a href="javascript://" onclick="showHideCalendar()">➥
<img id="opencloseimg" src="images/plus.gif" alt="" title="" ➥
style="border: none; width: 9px; height: 9px;" /></a>➥
<a href="javascript://" onclick="showHideCalendar()">My Calendar</a></p>
<div id="calendar" style="width: 105px; text-align: left;"></div>
</body>
</html>
//functions.js
//Create a boolean variable to check for a valid IE instance.
var xmlhttp = false;
CHAPTER 3 ■ PHP AND AJAX 27
6676CH03.qxd 9/27/06 2:49 PM Page 27
//Check if we are using IE.
try {
//If the javascript version is greater than 5.
xmlhttp = new ActiveXObject("Msxml2.XMLHTTP");
} catch (e) {
//If not, then use the older active x object.
try {
//If we are using IE.
xmlhttp = new ActiveXObject("Microsoft.XMLHTTP");
} catch (E) {
//Else we must be using a non-IE browser.
xmlhttp = false;
}
}
//If we are using a non-IE browser, create a JavaScript instance of the object.
if (!xmlhttp && typeof XMLHttpRequest != 'undefined') {
xmlhttp = new XMLHttpRequest();
}
//A variable used to distinguish whether to open or close the calendar.
var showCalendar = true;
function showHideCalendar() {
//The location we are loading the page into.
var objID = "calendar";
//Change the current image of the minus or plus.
if (showCalendar == true){
//Show the calendar.
document.getElementById("opencloseimg").src = "images/mins.gif";
//The page we are loading.
var serverPage = "calendar.php";
//Set the open close tracker variable.
showCalendar = false;
var obj = document.getElementById(objID);
xmlhttp.open("GET", serverPage);
xmlhttp.onreadystatechange = function() {
CHAPTER 3 ■ PHP AND AJAX28
6676CH03.qxd 9/27/06 2:49 PM Page 28
if (xmlhttp.readyState == 4 && xmlhttp.status == 200) {
obj.innerHTML = xmlhttp.responseText;
}
}
xmlhttp.send(null);
} else {
//Hide the calendar.
document.getElementById("opencloseimg").src = "images/plus.gif";
showCalendar = true;
document.getElementById(objID).innerHTML = "";
}
}
This looks fairly basic, right? What you need to take into account is the JavaScript
contained within the
functions.js file. A function called showHideCalendar is created,
which will either show or hide the calendar module based upon the condition of the
showCalendar variable. If the showCalendar variable is set to true, an Ajax call to the server
is made to fetch the
calendar.php script. The results from said script are then displayed
within the
calendar page element. You could obviously modify this to load into whatever
element you prefer. The script also changes the state of your plus-and-minus image to
show true open-and-close functionality.
Once the script has made a call to the server, the PHP script will use its server-side
functionality to create a calendar of the current month. Consider the following code:
<?php
//calendar.php
//Check if the month and year values exist
if ((!$_GET['month']) && (!$_GET['year'])) {
$month = date ("n");
$year = date ("Y");
} else {
$month = $_GET['month'];
$year = $_GET['year'];
}
CHAPTER 3 ■ PHP AND AJAX 29
6676CH03.qxd 9/27/06 2:49 PM Page 29
//Calculate the viewed month
$timestamp = mktime (0, 0, 0, $month, 1, $year);
$monthname = date("F", $timestamp);
//Now let's create the table with the proper month
?>
<table style="width: 105px; border-collapse: collapse;" border="1"➥
cellpadding="3" cellspacing="0" bordercolor="#000000">
<tr style="background: #FFBC37;">
<td colspan="7" style="text-align: center;" onmouseover=➥
"this.style.background='#FECE6E'" onmouseout="this.style.background='#FFBC37'">
<span style="font-weight: bold;"><?php echo $monthname➥
. " " . $year; ?></span>
</td>
</tr>
<tr style="background: #FFBC37;">
<td style="text-align: center; width: 15px;" onmouseover=➥
"this.style.background='#FECE6E'" onmouseout="this.style.background='#FFBC37'">
<span style="font-weight: bold;">Su</span>
</td>
<td style="text-align: center; width: 15px;" onmouseover=➥
"this.style.background='#FECE6E'" onmouseout="this.style.background='#FFBC37'">
<span style="font-weight: bold;">M</span>
</td>
<td style="text-align: center; width: 15px;" onmouseover=➥
"this.style.background='#FECE6E'" onmouseout="this.style.background='#FFBC37'">
<span style="font-weight: bold;">Tu</span>
</td>
<td style="text-align: center; width: 15px;" onmouseover=➥
"this.style.background='#FECE6E'" onmouseout="this.style.background='#FFBC37'">
<span style="font-weight: bold;">W</span>
</td>
<td style="text-align: center; width: 15px;" onmouseover=➥
"this.style.background='#FECE6E'" onmouseout="this.style.background='#FFBC37'">
<span style="font-weight: bold;">Th</span>
</td>
<td style="text-align: center; width: 15px;" onmouseover=➥
"this.style.background='#FECE6E'" onmouseout="this.style.background='#FFBC37'">
<span style="font-weight: bold;">F</span>
</td>
<td style="text-align: center; width: 15px;" onmouseover=➥
"this.style.background='#FECE6E'" onmouseout="this.style.background='#FFBC37'">
CHAPTER 3 ■ PHP AND AJAX30
6676CH03.qxd 9/27/06 2:49 PM Page 30
<span style="font-weight: bold;">Sa</span>
</td>
</tr>
<?php
$monthstart = date("w", $timestamp);
$lastday = date("d", mktime (0, 0, 0, $month + 1, 0, $year));
$startdate = -$monthstart;
//Figure out how many rows we need.
$numrows = ceil (((date("t",mktime (0, 0, 0, $month + 1, 0, $year))➥
+ $monthstart) / 7));
//Let's make an appropriate number of rows
for ($k = 1; $k <= $numrows; $k++){
?><tr><?php
//Use 7 columns (for 7 days)
for ($i = 0; $i < 7; $i++){
$startdate++;
if (($startdate <= 0) || ($startdate > $lastday)){
//If we have a blank day in the calendar.
?><td style="background: #FFFFFF;"> </td><?php
} else {
if ($startdate == date("j") && $month == date("n") &&➥
$year == date("Y")){
?><td style="text-align: center; background: #FFBC37;" ➥
onmouseover="this.style.background='#FECE6E'"➥
onmouseout="this.style.background='#FFBC37'">➥
<?php echo date ("j"); ?></td><?php
} else {
?><td style="text-align: center; background: #A2BAFA;" ➥
onmouseover="this.style.background='#CAD7F9'"➥
onmouseout="this.style.background='#A2BAFA'">➥
<?php echo $startdate; ?></td><?php
}
}
}
?></tr><?php
}
?>
</table>
CHAPTER 3 ■ PHP AND AJAX 31
6676CH03.qxd 9/27/06 2:49 PM Page 31
This is simply code to show a calendar of the current month. The code is set up to
allow for alternative years and months, which can be passed in with the
$_GET super-
global; but for now, you are going to concentrate only on the current month. As you
progress with the examples in this chapter, you will see how you can use Ajax to really
improve the functionality of this module and create some very cool applications.
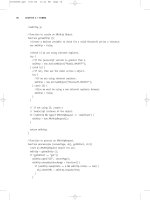
The code itself is fairly simple to decipher. It simply uses the
date function in PHP to
determine the beginning and end dates, and then build the calendar accordingly. This is
a prime example of using PHP’s server-side scripting in conjunction with Ajax to create a
nice little application (as shown in Figure 3-1). Next, you’ll work on progressing your
application.
Figure 3-1. The calendar application pulls an appearing/disappearing act.
Auto-Complete
A nice feature that I first noticed as being received positively by the Internet community
is the auto-complete feature in Gmail. Basically, when you’re entering the e-mail address
of the person you’re sending a message to, Gmail searches your list of contacts (using
Ajax) and automatically drops down a listing of all matches. You are then free to click one
of the dropped-down objects to fill it into the requested field. The whole code integration
is seamless and makes for a handy feature.
The next example will show you how to do the same thing—although it’s not quite as
in-depth as the Gmail solution. Basically, I have built a way to feed a list of objects
CHAPTER 3 ■ PHP AND AJAX32
6676CH03.qxd 9/27/06 2:49 PM Page 32
through an array (a database solution would be more effective, but that is outside of the
scope of this example and will be shown later in the book), and then display them based
on what the user has entered. The user can then click the name to fill out the field (hence
the auto-completion).
I have expanded on the previous example by assuming that a user may want to enter
a reminder for the particular day in question on the calendar. The system allows the user
to enter their name and their task by clicking on an individual day. Ideally, once the task
is entered, the system will then save the task to the database. For now, though, you are
merely concentrating on the auto-complete feature; saving the actual information will be
handled in a later chapter.
Have a look at the following example, which integrates an auto-complete feature and
a pop-up form using Ajax. Pay attention to the
style.css and functions.js files, which
have changed.
/* style.css */
body {
font-family: verdana, arial, helvetica;
font-size: 11px;
color: #000000;
}
.formclass {
position: absolute;
left: 0px;
top: 0px;
visibility: hidden;
height: 0px;
width: 0px;
background: #A2BAFA;
border-style: solid;
border-width: 1px;
border-color: #000000;
}
.autocomp {
position: absolute;
left: 0px;
top: 0px;
visibility: hidden;
width: 0px;
}
CHAPTER 3 ■ PHP AND AJAX 33
6676CH03.qxd 9/27/06 2:49 PM Page 33
.taskboxclass {
position: absolute;
left: 0px;
top: 0px;
visibility: hidden;
width: 0px;
}
.calendarover {
text-align: center;
background: #CAD7F9;
width: 15px;
}
.calendaroff {
text-align: center;
background: #A2BAFA;
width: 15px;
}
.calendartodayover {
text-align: center;
background: #FECE6E;
width: 15px;
}
.taskchecker {
width: 150px;
background-color: #FFBC37;
border-style: solid;
border-color: #000000;
border-width: 1px;
}
CHAPTER 3 ■ PHP AND AJAX34
6676CH03.qxd 9/27/06 2:49 PM Page 34
.tcpadding {
padding: 10px;
}
.calendartodayoff {
text-align: center;
background: #FFBC37;
width: 15px;
}
//functions.js
function createform (e){
theObject = document.getElementById("createtask");
theObject.style.visibility = "visible";
theObject.style.height = "200px";
theObject.style.width = "200px";
var posx = 0;
var posy = 0;
posx = e.clientX + document.body.scrollLeft;
posy = e.clientY + document.body.scrollTop;
theObject.style.left = posx + "px";
theObject.style.top = posy + "px";
//The location we are loading the page into.
var objID = "createtask";
var serverPage = "theform.php";
CHAPTER 3 ■ PHP AND AJAX 35
6676CH03.qxd 9/27/06 2:49 PM Page 35
var obj = document.getElementById(objID);
xmlhttp.open("GET", serverPage);
xmlhttp.onreadystatechange = function() {
if (xmlhttp.readyState == 4 && xmlhttp.status == 200) {
obj.innerHTML = xmlhttp.responseText;
}
}
xmlhttp.send(null);
}
function closetask (){
theObject = document.getElementById("createtask");
theObject.style.visibility = "hidden";
theObject.style.height = "0px";
theObject.style.width = "0px";
acObject = document.getElementById("autocompletediv");
acObject.style.visibility = "hidden";
acObject.style.height = "0px";
acObject.style.width = "0px";
}
function findPosX(obj){
var curleft = 0;
if (obj.offsetParent){
while (obj.offsetParent){
curleft += obj.offsetLeft
obj = obj.offsetParent;
}
} else if (obj.x){
curleft += obj.x;
}
return curleft;
}
CHAPTER 3 ■ PHP AND AJAX36
6676CH03.qxd 9/27/06 2:49 PM Page 36
function findPosY(obj){
var curtop = 0;
if (obj.offsetParent){
while (obj.offsetParent){
curtop += obj.offsetTop
obj = obj.offsetParent;
}
} else if (obj.y){
curtop += obj.y;
}
return curtop;
}
function autocomplete (thevalue, e){
theObject = document.getElementById("autocompletediv");
theObject.style.visibility = "visible";
theObject.style.width = "152px";
var posx = 0;
var posy = 0;
posx = (findPosX (document.getElementById("yourname")) + 1);
posy = (findPosY (document.getElementById("yourname")) + 23);
theObject.style.left = posx + "px";
theObject.style.top = posy + "px";
var theextrachar = e.which;
if (theextrachar == undefined){
theextrachar = e.keyCode;
}
//The location we are loading the page into.
var objID = "autocompletediv";
CHAPTER 3 ■ PHP AND AJAX 37
6676CH03.qxd 9/27/06 2:49 PM Page 37
//Take into account the backspace.
if (theextrachar == 8){
if (thevalue.length == 1){
var serverPage = "autocomp.php";
} else {
var serverPage = "autocomp.php" + "?sstring=" + ➥
thevalue.substr (0, (thevalue.length -1));
}
} else {
var serverPage = "autocomp.php" + "?sstring=" + ➥
thevalue + String.fromCharCode (theextrachar);
}
var obj = document.getElementById(objID);
xmlhttp.open("GET", serverPage);
xmlhttp.onreadystatechange = function() {
if (xmlhttp.readyState == 4 && xmlhttp.status == 200) {
obj.innerHTML = xmlhttp.responseText;
}
}
xmlhttp.send(null);
}
function setvalue (thevalue){
acObject = document.getElementById("autocompletediv");
acObject.style.visibility = "hidden";
acObject.style.height = "0px";
acObject.style.width = "0px";
document.getElementById("yourname").value = thevalue;
}
Now, let’s have a look at what has changed since the last example. Quite a number of
functions have been added. The first is called
createform. The createform function dis-
plays a hidden
div beside where the cursor is currently located, and then loads in a file
called
theform.php through Ajax. This function uses mostly JavaScript to get the job done
(through
hidden and visible style aspects), but Ajax comes into play to load the file. The
code for the
theform.php file (basically a simple entry form) is shown in the following
snippet:
CHAPTER 3 ■ PHP AND AJAX38
6676CH03.qxd 9/27/06 2:49 PM Page 38