Apress bắt đầu ứng dụng với java google - p 5 pdf
Bạn đang xem bản rút gọn của tài liệu. Xem và tải ngay bản đầy đủ của tài liệu tại đây (973.35 KB, 10 trang )
CHAPTER 2 ■ INTRODUCTION TO APP ENGINE
18
• Recipients E-mailed: The total number of recipients to whom the
application has sent e-mail messages.
• Admins E-mailed: The same as the Recipients E-mailed metric but
related to application administrators. You get a separate allocation
for administrators.
• Message Body Data Sent: For each e-mail message that is sent by
your application, App Engine measures the amount of data in the
body of the e-mail. This metric also counts toward your Outgoing
Bandwidth quota.
• Attachments Sent: The total number of attachments sent with your e-
mail messages.
• Attachment Data Sent: For each e-mail message that is sent by your
application, App Engine measures the amount of data sent as
attachments. This is in addition to the Message Body metric and also
counts toward your Outgoing Bandwidth quota.
URL Fetch
App Engine can communicate with other applications or access other resources on
the web by fetching URLs. An application can use this service to issue HTTP and
HTTPS requests and receive responses. Table 2-6 shows the quota limits for the URL
Fetch quota.
Table 2-6. App Engine Quotas for the URL Fetch Service
Resource Daily Limit
(Free)
Maximum Rate
(Free)
Daily Limit
(Billing
Enabled)
Maximum Rate
(Billing Enabled)
URL Fetch API Calls 657,000
calls
3,000 calls /
min
46M calls 32,000 calls /
min
URL Fetch Data Sent 4GB 22MB / min 1,046GB 740MB / min
URL Fetch Data
Received
4GB 22MB / min 1,046GB 740MB / min
CHAPTER 2 ■ INTRODUCTION TO APP ENGINE
19
Here are the descriptions and calculation models for each of these metrics. The URL
Fetch service is covered in Chapter 8 in more detail.
• URL Fetch API Calls: The total number of times the application
accesses the URL Fetch service to perform an HTTP or HTTPS
request.
• URL Fetch Data Sent: Each request to the URL Fetch service gets
measured for data sent as part of the request. This also counts toward
your Outgoing Bandwidth quota.
• URL Fetch Data Received: The amount of data received in response
to a URL Fetch request. This also counts toward your Outgoing
Bandwidth quota.
XMPP
XMPP is new as of version 1.2.5 of the Java SDK for App Engine. This service allows
your App Engine application to interact with XMPP services like Google Talk. We’ll
show an example of that type of application in Chapter 9. Table 2-7 shows the limits
for the XMPP services.
Table 2-7. App Engine Quotas for the XMPP Service
Resource Daily Limit
(Free)
Maximum Rate
(Free)
Daily Limit
(Billing
Enabled)
Maximum Rate
(Billing Enabled)
XMPP API Calls 657,000
calls
3,000 calls /
min
46M calls 32,000 calls /
min
XMPP Data Sent 4GB 22MB / min 1,046GB 740MB / min
XMPP Recipients
Messaged
657,000
recipients
n/a 46M
recipients
n/a
XMPP Invitations Sent 1,000
invitations
n/a 100,000
invitations
n/a
XMPP is a fantastic new addition to the App Engine API. Google Talk users can chat
with the application or send notifications from the application to a Google Talk user
who is online. Chapter 9 covers a few of the more advanced topics around App
CHAPTER 2 ■ INTRODUCTION TO APP ENGINE
20
Engine development, and interacting with a Google Talk user will be one of those
examples. Let’s take a quick look at how the XMPP quota calculates these metrics.
• XMPP API Calls: The total number of times the applications accesses
the XMPP service.
• XMPP Data Sent: The amount of data sent by the XMPP service. As
with the other data metrics, this counts toward your Outgoing
Bandwidth quota.
• XMPP Recipients Messaged: Each time you communicate with a
recipient over the XMPP service, App Engine subtracts from this
quota measurement.
• XMPP Invitations Sent: To initiate a chat with another party you may
need to send invitations. This metric represents the total number of
invitations sent by the application.
Image Manipulation
To manipulate image data, you can use App Engine’s dedicated Images service,
which allows you to resize, rotate, flip, and crop images. You can use the Images
service to construct a composite of multiple images and convert images from one
format to another. The service also provides a predefined algorithm for photo
enhancements. These Images service features count against the following quota. The
exact measurements are listed in Table 2-8.
Table 2-8. App Engine Quotas for the Images Service
Resource Daily Limit
(Free)
Maximum Rate
(Free)
Daily Limit
(Billing Enabled)
Maximum Rate
(Billing Enabled)
Image Manipulation
API Calls
864,000
calls
4,800 calls / min 45M calls 31,000 calls
Data Sent to API 1GB 5MB / min 560GB 400MB / min
Data Received
from API
5GB 28MB / min 427GB 300MB / min
Transformations
executed
2.5M
transforms
14,000
transforms / min
47M
transforms
32,000 transforms
/ min
CHAPTER 2 ■ INTRODUCTION TO APP ENGINE
21
Here’s some more information on how the Images service calculates the
measurements for the quotas described in Table 2-8.
• Image Manipulation API Calls: The total number of times the
application accesses the Images service.
• Data Sent to API: The amount of data sent to the Images service.
Because this is internal to App Engine, this metric does not
consume Outgoing Bandwidth.
• Data Received from API: The amount of data received from the
Images service.
• Transformations executed: The number of times the service has
performed a transformation on an image for the application.
Transformations include resizing, rotating, flipping, and cropping
images. Other more advanced transformations are included in this
metric as well.
Memcache
Sometimes it’s more efficient for your application to create an in-memory data cache
for persistent storage across some tasks. Memcache serves this purpose for App
Engine applications. Table 2-9 outlines the quota measurements for the Memcache
service.
Table 2-9. App Engine Quotas for the Memcache Service
Resource Daily Limit
(Free)
Maximum Rate
(Free)
Daily Limit
(Billing
Enabled)
Maximum Rate
(Billing Enabled)
Memcache API Calls 8.6M 48,000 calls /
min
96M 108,000 calls /
min
Data Sent to API 10GB 56MB / min 60GB 128MB / min
Data Received from API 50GB 284MB / min 315GB 640MB / min
CHAPTER 2 ■ INTRODUCTION TO APP ENGINE
22
The Memcache service is covered in Chapter 8, but here are a few more details on
how the measurements are calculated.
• Memcache API Calls: Total number of times the application
accessed the Memcache service to get, set, or expire values.
• Data Sent to / Received from API: The total amount of data sent to
and from the Memcache service.
Components of an App Engine Application
Building scalable applications with Google App Engine for Java (GAE/J) is similar to
building Java applications in your typical on-premise environment with one large
exception: there’s no need for the network, hardware, operating system, database, or
application-server layers of the stack! With Google App Engine for Java, and Platform as a
Service offerings in general, you can start to innovate and develop on your application
right away and forget about the laborious tasks like setting up the OS and configuring the
database. Google App Engine for Java provides a Java 6 JVM and a Java Servlet interface,
and supports standard Java technologies like JDO, JPA, JavaMail, and JCache. Google App
Engine for Java applications can be developed using the Eclipse IDE, and the Google
Plugin for Eclipse even provides a local development server and deployment tools when
you’re ready to go live with your App Engine application.
There are a few standard components to any Google App Engine for Java application.
Some of these are optional if you’re using other technologies in their place. For example,
the Users service is a great way to provide a trusted authentication mechanism to your
user base. But, if you’re developing a Facebook application on the App Engine platform,
you might be using Facebook Connect from Facebook’s native authentication services,
in which case the Users service might not be relevant. Table 2-10 gives you a quick look at
the basic core components of a standard Google App Engine application.
Table 2-10. Standard App Engine Technology Stack
GAE / J service Description
JRE Google App Engine for Java provides a standard Java 6 JVM and
supports Java 5 and later. It also uses the Java Servlet standard, which
allows you to serve JSP pages and standard files.
Datastore Google App Engine for Java provides a persistent, scalable, fast
datastore built on the DataNucleus Access Platform. You can use JDO
and JPA to interact with the datastore and leverage the Memcache API
for transient distributed storage for queries results and calculations.
CHAPTER 2 ■ INTRODUCTION TO APP ENGINE
23
GAE / J service Description
Schedule Tasks Google App Engine for Java, via the Administration Console, provides
an interface for application owners to create and manage cron jobs
on App Engine. More on that in Chapter 9.
Java Tools The Eclipse IDE, Google Plugin for Eclipse, the local development
server, Apache Ant, and Google Web Toolkit (and much more) are
available for use on Google App Engine for Java.
Summary
Now that we’ve covered how App Engine works and we’ve reviewed the different
quotas and their limits, you’re ready to start coding. It’s important to note that these
quotas can change frequently. Reference the online documentation for the current
limits and pricing. In the next chapter you’ll set up your development environment
and get started coding for Google App Engine for Java. You’ll start by installing the
Google Plugin for Eclipse and creating some small sample projects, and then you’ll
move on to tackle a more complicated application.
CHAPTER 2 ■ INTRODUCTION TO APP ENGINE
24
C H A P T E R 3
■ ■ ■
25
Getting Started with Google App
Engine for Java
In this chapter we’ll walk you through all the components you need to start developing
on Google App Engine. The first steps are acquiring the App Engine SDK, setting up the
local development environment, and creating your first App Engine project using the
local development server.
As we’ve discussed, App Engine provides a set of major features in addition to
the Java 6 JVM. App Engine supports Java servlets, JDO, JPA, JCache, and JavaMail.
In traditional software environments you’d have to replicate your production
environment by building a development environment to properly test your
applications. App Engine provides a lightweight, local development server that
allows for quick testing and debugging of all features. This even includes a
development authentication engine.
Where Do We Start?
Like any other platform or development environment, the first step is to download
and configure the SDK and the development environment. Google App Engine for
Java uses the Google Plugin for Eclipse to enable your Eclipse IDE for App Engine
coding and debugging. The Google Plugin adds the following functionality to your
Eclipse IDE:
• New project wizards to automatically set the framework for App
Engine projects and web development projects leveraging the Google
Web Toolkit (GWT)
• Debugging tools to debug App Engine and GWT applications using
the local development server
• Deployment tools to migrate your App Engine applications to
appspot.com
CHAPTER 3 ■ GETTING STARTED WITH GOOGLE APP ENGINE FOR JAVA
26
Installing the Java SDK
Although App Engine supports both Java 5 and Java 6 we recommend that you run
the Java 6 libraries and JVM for compiling and testing your application, because the
Google App Engine production environment runs Java 6. So, naturally, you’ll want to
test and debug your application on the same platform that it will be running.
The fastest and easiest way to develop, debug, and deploy Java applications for
App Engine is by using the Eclipse IDE and the Google Plugin for Eclipse. In the next
section, we’ll walk through the installation of the Eclipse IDE (Galileo) and the Google
Plugin for Eclipse. Mac and Windows use the same installation process, and Figure 3-1
shows the installation dialog for both environments.
Installing the Google Plugin for Eclipse
Before you can install the Google Plugin for Eclipse you should verify that Java is
running on your machine. (If you’re already developing in Eclipse you can skip
this step. Eclipse requires a JDK to function, so you’re covered.) If you’re installing
Eclipse for the first time, verify that you have a JDK installed by running either of
the following commands from the terminal.
java –version
javac – version
If you need to download a JDK, start by downloading the appropriate release from
Follow the instructions to install the JDK,
and then run the preceding commands again to verify that everything is set up
correctly.
The Google Plugin for Eclipse is available for versions 3.3 (Europa), 3.4
(Ganymede), and 3.5 (Galileo) of the Eclipse IDE. To install the Eclipse IDE on a Mac,
you just navigate to www.eclipse.org and download the distribution for Mac OS X.
You need to extract a tar.gz file to the directory from which you’d like to run Eclipse,
for example, the Documents folder on a Mac. You can choose any location; it won’t
have an affect on the exercises in this book.
Once you have the Eclipse IDE installed you can use the Software Update feature
to install the Google Plugin for Eclipse. The Software Update feature is used to install
common add-ons and third-party packages into your Eclipse environment. You can
get started by launching Eclipse. On the Mac, double-click the file called Eclipse in
the directory where you extracted the distribution.
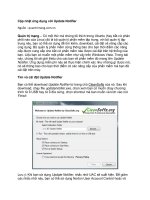
To install the plug-in using Eclipse 3.5 (Galileo) (see Figure 3-1):
1. Select the Help menu and then select the Install New Software
option.
CHAPTER 3 ■ GETTING STARTED WITH GOOGLE APP ENGINE FOR JAVA
27
2. In the Work with text box, enter
plugin/3.5.
3. Expand the “Plugin” and “SDKs” elements in the navigation tree.
Select “Google Plugin for Eclipse 3.5” and “Google App Engine
SDK”. You’ll use the Google Web Toolkit for some examples later in
the book, so make sure you select the “Google Web Toolkit SDK”
option as well. Click Next.
4. Restart Eclipse when prompted. Make sure you are using the Java
perspective.
To install the plug-in, using Eclipse 3.4 (Ganymede):
1. Select the Help menu, and then select the Software Updates
option.
2. Select the Available Software tab and click the Add Site button. In the
Location text box enter
3. Expand the “Google” element in the navigation tree. Select “Google
Plugin for Eclipse 3.4” and “Google App Engine Java SDK”. You’ll
use the Google Web Toolkit for some examples later in the book, so
make sure you select the “Google Web Toolkit SDK” option as well.
Click Next. Follow the prompts to accept the terms of service and
install the plug-in.
4. Restart Eclipse when prompted. Make sure you are using the Java
perspective.
■ Note Eclipse 3.4 takes quite a bit longer to load then 3.5. That’s because Eclipse checks for
updates for all the plug-ins’ dependencies. If you want to prevent Eclipse from checking all the
dependencies, ensure that only Google Plugin for Eclipse 3.4 is selected in the Help ➤ Software
Updates ➤ Available Software ➤ Manage Sites dialog.
Figure 3-1 shows the dialog for Mac, and Figure 3-2 shows the dialog for Windows
versions of Eclipse 3.5 while selecting the Google Plugin for Eclipse options from the
Add Software dialog.