lập trình android (phần 3) ppsx
Bạn đang xem bản rút gọn của tài liệu. Xem và tải ngay bản đầy đủ của tài liệu tại đây (1.19 MB, 50 trang )
76 CHAPTER 3 User interfaces
return super.onMenuItemSelected(featureId, item);
}
@Override
protected void onListItemClick(ListView l, View v,
int position, long id) {
RestaurantFinderApplication application =
(RestaurantFinderApplication) getApplication();
application.setCurrentReview(this.reviews.get(position));
Intent intent = new Intent(Constants.INTENT_ACTION_VIEW_DETAIL);
intent.putExtra(Constants.STARTFROM_EXTRA, getIntent().getIntExtra(
Constants.STARTFROM_EXTRA, 1));
startActivity(intent);
}
private void loadReviews(String location, String cuisine,
int startFrom) {
final ReviewFetcher rf = new ReviewFetcher(location,
cuisine, “ALL”, startFrom,
ReviewList.NUM_RESULTS_PER_PAGE) ;
this.progressDialog =
ProgressDialog.show(this, " Working ",
" Retrieving reviews", true, false);
new Thread() {
public void run() {
reviews = rf.getReviews();
handler.sendEmptyMessage(0);
}
}.start();
}
}
This
Activity
has a menu item that allows the user to get the next page of results or
change the list criteria. To support this we have to implement the
onMenuItemSe-
lected
method
B
. If the
MENU_GET_NEXT_PAGE
menu item is selected, we then define
a new intent to reload the screen with an incremented
startFrom
value (and we use
the
getExtras()
and
putExtras()
intent methods to do this)
C
.
After the menu-related methods, we see a special
onListItemClick()
method
D
.
This method is used to respond when one of the list items in a
ListView
is clicked.
Here we use the position of the clicked item to reference the particular
Review
item
the user chose, and we set this into the
Application
for later usage in the
Review-
Detail
Activity
(which we will begin to implement in section 3.3)
E
. After we have
the data set, we then call the next
Activity
(including the
startFrom
extra)
F
.
Lastly in the
ReviewList
class we have the
loadReviews()
method, which,
strangely enough, loads reviews
G
. This method is significant for several reasons. First
it sets up the
ReviewFetcher
class instance, which will be used to call out to the
Google Base
API over the network and return a
List
of
Review
objects
H
(again, net-
working details are in chapter 6). Then it invokes the
ProgressDialog.show()
method to show the user we are retrieving data
I
. Finally it sets up a new
Thread
J
,
within which the
ReviewFetcher
is used, and the earlier
Handler
we saw in the first
half of
ReviewList
is sent an empty message
1)
. If you refer back to when the
Handler
Override
onListItemClick
D
F
Pass startFrom
extra value
E
Get Application
object and set
state
G
Create loadReviews
method
H
Instantiate
ReviewFetcher
instance
I
Show ProgressDialog
J
Make web
service call
1)
Update handler
Licensed to Deborah Christiansen <>
Download at Boykma.Com
77Working with views
was established, in listing 3.3, you can see that is where, when the message is received,
we dismiss the
ProgressDialog
, populate the
Adapter
our
ListView
is using, and call
setListAdapter()
to update the UI. The
setListAdapter()
method will iterate the
Adapter
it is handed and display a returned
View
for every item.
With the
Activity
created and set up and the
Handler
being used to update the
Adapter
with data, we now have a second screen in our application. The next thing we
need to do is fill in some of the gaps surrounding working with handlers and different
threads. These concepts are not view-specific but are worth a small detour at this point
because you will want to use these classes when trying to perform tasks related to
retrieving and manipulating data needed for the
UI.
3.2.3 Multitasking with Handler and Message
The
Handler
is the Swiss army knife of messaging and scheduling operations for
Android. This class allows you to queue tasks to be run on different threads and allows
you schedule tasks using
Message
and
Runnable
objects.
The Android platform monitors the responsiveness of applications and kills those
that are considered nonresponsive. An Application Not Responding (
ANR) event is de-
fined as no response to a user input for five seconds. (A user touches the screen, or press-
es a key, or the like, and your application must respond). So does this mean your code
always has to complete within five seconds? No, of course not, but the main
UI thread
does have to respond within that time frame. To keep the main
UI thread snappy, any
long-running tasks, such as retrieving data over the network or getting a large amount
of data from a database or complicated calcula-
tions, should be performed in a separate thread.
Getting tasks into a separate thread, then
getting results back to the main
UI thread is
where the
Handler
, and related classes, come
into play. When a
Handler
is created, it is associ-
ated with a
Looper
. A
Looper
is a class that con-
tains a
MessageQueue
and processes
Message
or
Runnable
objects that are sent via the
Handler
.
In the
Handler
usage, shown in listings 3.3
and 3.4, we created a
Handler
with a no-argu-
ment constructor. With this approach, the
Han-
dler
is automatically associated with the
Looper
of the current running thread, typically the main
UI thread. The main UI thread, which is created
by the process of the running application, is an
instance of a
HandlerThread
, which is basically an
Android
Thread
specialization that provides a
Looper
. The key parts involved in this arrange-
ment are depicted in the diagram in figure 3.5.
MainUIThread
(HandlerThread)
Looper
MessageQueue
Handler myHandler = new Handler() {
public void handleMessage (Message m) {
updateUIHere();
}
};
new Thread() {
public void run() {
doStuff();
Message m = myHandler.obtainMessage();
Bundle b = new Bundle();
b.putString("key", "value");
m.setData(b);
myHandler.sendMessage(m);
}
}.start();
Figure 3.5 Usage of the Handler
class with separate threads, and the
relationship of
HandlerThread,
Looper, and MessageQueue
Licensed to Deborah Christiansen <>
Download at Boykma.Com
78 CHAPTER 3 User interfaces
When implementing a
Handler
you will have to provide a
handleMessage(Message
m)
method. This method is the hook that lets you pass messages. When you create a
new
Thread
, you can then call one of several
sendMessage
methods on
Handler
from
within that thread’s run method, as our examples and diagram demonstrate. Calling
sendMessage
puts your message on the
MessageQueue
, which the
Looper
maintains.
Along with sending messages into handlers, you can also send
Runnable
objects
directly, and you can schedule things to be run at different times in the future. You
send messages and post runnables. Each of these concepts supports methods such as
sendEmptyMessage(int
what)
, which we have already used, and the counterparts
sendEmptyMessageAtTime(int
what,
long
time)
and
sendEmptyMessageDelayed(int
what,
long delay)
. Once it is in the queue, your message is processed as soon as pos-
sible (unless you schedule or delay it using the respective
send
or
post
method).
You will see more of
Handler
and
Message
in other examples throughout the book,
and we will cover more detail in some instances, but the main point to remember
when you see these classes is that they are used to communicate between threads and
for scheduling.
Getting back to our RestaurantFinder application and more directly view-oriented
topics, we next need to elaborate on the
ReviewAdapter
our RestaurantFinder
ReviewList
screen now uses, after it is populated with data from a
Message
. This
adapter returns a custom
View
object for each data element it processes.
3.2.4 Creating custom views
Though you can often get away with simply using the views that are provided with
Android, there may also be situations, like the one we are now facing, where you need
a custom view to display your own object in a unique way.
In the
ReviewList
screen we used an
Adapter
of type
ReviewAdapter
to back our
ListView
. This is a custom
Adapter
that contains a custom
View
object,
ReviewList-
View
. A
ReviewListView
is what our
ReviewList
Activity
displays for every row of
data it contains. The
Adapter
and
View
are shown in listing 3.5.
public class ReviewAdapter extends BaseAdapter {
private final Context context;
private final List<Review> reviews;
public ReviewAdapter(Context context, List<Review> reviews) {
this.context = context;
this.reviews = reviews;
}
@Override
public int getCount() {
return this.reviews.size();
}
@Override
public Object getItem(int position) {
return this.reviews.get(position);
}
Listing 3.5 The ReviewAdapter and inner ReviewListView classes
Extend BaseAdapter
B
Include Context and
List<Review>
C
Override basic
Adapter methods
D
Override Adapter
getView
E
Licensed to Deborah Christiansen <>
Download at Boykma.Com
79Working with views
@Override
public long getItemId(int position) {
return position;
}
@Override
public View getView(int position, View convertView, ViewGroup parent) {
Review review = this.reviews.get(position);
return new ReviewListView(this.context, review.name, review.rating);
}
private final class ReviewListView extends LinearLayout {
private TextView name;
private TextView rating;
public ReviewListView(Context context, String name, String rating) {
super(context);
setOrientation(LinearLayout.VERTICAL);
LinearLayout.LayoutParams params = new LinearLayout.LayoutParams(
ViewGroup.LayoutParams.WRAP_CONTENT,
ViewGroup.LayoutParams.WRAP_CONTENT);
params.setMargins(5, 3, 5, 0);
this.name = new TextView(context);
this.name.setText(name);
this.name.setTextSize(16f);
this.name.setTextColor(Color.WHITE);
this.addView(this.name, params);
this.rating = new TextView(context);
this.rating.setText(rating);
this.rating.setTextSize(16f);
this.rating.setTextColor(Color.GRAY);
this.addView(this.rating, params);
}
}
}
The first thing to note in
ReviewAdapter
is that it extends
BaseAdapter
B
.
Base-
Adapter
is an
Adapter
implementation that provides basic event-handling support.
Adapter
itself is an interface in the
android.Widget
package that provides a way to
bind data to a
View
with some common methods. This is often used with collections of
data, such as we saw with
Spinner
and
ArrayAdapter
in listing 3.1. Another common
usage is with a
CursorAdapter
, which returns results from a database (something we
will see in chapter 5). Here we are creating our own
Adapter
, because we want it to
return a custom
View
.
Our
ReviewAdapter
class accepts two parameters in the constructor and sets those
values to two simple member objects:
Context
and
List<Review>
C
. Then this class
goes on to implement the straightforward required
Adapter
interface methods that re-
turn a count, an item, and an
ID (we just use the position in the collection as the ID)
D
.
The next
Adapter
method we have to implement is the important one,
getView()
. This
is where the
Adapter
will return any
View
we create for a particular item in the collection
of data it is supporting. Within this method we get a particular
Review
object based on
the position/
ID, and then we create an instance of a custom
ReviewListView
object to
return as the
View
E
.
D
Override basic
Adapter methods
E
Override
Adapter
getView
F
Define
custom inner
View class
Set layout in code
G
H
Instantiate
TextView
members
Add TextView to tree
I
Licensed to Deborah Christiansen <>
Download at Boykma.Com
80 CHAPTER 3 User interfaces
ReviewListView
itself, which extends
LinearLayout
(something you will learn
more about in section 3.2.4), is an inner class inside
ReviewAdapter
(since we will
never use it outside of returning a view from
ReviewAdapter
)
F
. Within it we see an
example of setting layout and
View
details in code, rather than in XML. Here we set
the orientation, parameters, and margin for our layout
G
. Then we populate the sim-
ple
TextView
objects that will be children of our new
View
and represent data
H
.
Once these are set up via code, we add them to the parent container (in this case the
parent is our custom class
ReviewListView
)
I
. This is where the data binding hap-
pens—the bridge to the
View
from data. Another important thing to note about this is
that we have created not only a custom
View
but a composite one as well. That is, we
are using simple existing
View
objects in a particular layout to construct a new type of
reusable
View
, which shows the detail of a selected
Review
object on screen, as shown
in figure 3.2.
Our
ReviewListView
object, while custom, is admittedly (and intentionally) fairly
simple. In many cases you will be able to create custom views by combining existing
views in this manner. Nevertheless, you should also be aware that you can go deeper
and extend the
View
class itself. Then you can implement core methods as needed.
Using this approach you have access to the lifecycle methods of a
View
(not an
Activ-
ity
as we have already covered, but an individual
View
). These include
onMeasure()
,
onLayout()
,
onDraw()
,
onVisibilityChanged()
, and others. Though we don’t need
that level of control here, you should be aware that extending
View
gives you a great
deal of power to create custom components.
Now that you have seen how we get the data for our reviews and what the
Adapter
and custom
View
we are using look like, the next thing we need to do is take a closer
look at a few more aspects of views, including layout.
3.2.5 Understanding layout
One of the most significant aspects of creating your UI and designing your screens is
understanding layout. In Android, screen layout is defined in terms of
ViewGroup
and
LayoutParams
objects.
ViewGroup
is a
View
that contains other views (has children)
and also defines and provides access to the layout.
On every screen all the views are placed in a hierarchical tree, so every element has
children, and somewhere at the root is a
ViewGroup
. All the views on the screen sup-
port a host of attributes that pertain to background color, color, and so on. We
touched on many of these attributes in section 3.2.2 when we discussed the methods
on the
View
class. Dimensions—width and height—and other properties such as rela-
tive or absolute placement and margins are based on the
LayoutParams
a view
requests and what the parent—based on its type, its own dimensions, and the dimen-
sions of all of its children—can accommodate.
The main
ViewGroup
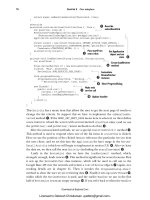
classes are shown in the class diagram you saw in figure 3.4.
The diagram in figure 3.6 expands on this class structure to show the specific
Layout-
Params
inner classes of the view groups and layout properties each type provides.
Licensed to Deborah Christiansen <>
Download at Boykma.Com
81Working with views
As figure 3.6 shows, the base
ViewGroup.LayoutParams
class are
height
and
width
. From there an
AbsoluteLayout
type with
AbsoluteLayout.LayoutParams
allows you to specify the exact X and Y coordinates of the child
View
objects
placed within.
As an alternative to absolute layout, you can use the
FrameLayout
,
LinearLayout
,
and
RelativeLayout
subtypes, which all support variations of
LayoutParams
that are
derived from
ViewGroup.MarginLayoutParams
. A
FrameLayout
is intended to simply
frame one child element, such as an image. A
FrameLayout
does support multiple
children, but all the items are pinned to the top left—meaning they will overlap each
other in a stack. A
LinearLayout
aligns child elements in either a horizontal or a ver-
tical line. Recall that we used a
LinearLayout
in code in our
ReviewListView
in list-
ing 3.5. There we created our
View
and its
LayoutParams
directly in code. And, in our
previous
Activity
examples, we used a
RelativeLayout
in our XML layout files that
was inflated into our code (again, we will cover
XML resources in detail in section 3.3).
A
RelativeLayout
specifies child elements relative to each other (
above
,
below
,
toLeftOf
, and so on).
AbsoluteLayout
AbsoluteLayout.LayoutParams
x (position)
y (position)
FrameLayout
FrameLayout.LayoutParams
gravity
LinearLayout
LinearLayout.LayoutParams
gravity
weight
ViewGroup
RelativeLayout
RelativeLayout.LayoutParams
above
below
alignLeft
alignRight
toLeftOf
toRightOf
centerHorizontal
centerVertical
ViewGroup.MarginLayoutParams
marginBottom
marginLeft
marginRight
marginTop
ViewGroup.LayoutParams
height
width
Figure 3.6 Common ViewGroup
classes with
LayoutParams and
properties provided
Licensed to Deborah Christiansen <>
Download at Boykma.Com
82 CHAPTER 3 User interfaces
So the container is a
ViewGroup
, and a
ViewGroup
supports a particular type of
Lay-
outParams
. Child
View
elements are then added to the container and must fit into the
layout specified by their parents. A key concept to grasp is that even though a child
View
has to lay itself out based on its parents’
LayoutParams
, it can also specify a differ-
ent layout for its own children. This design creates a very flexible palette upon which
you can construct just about any type of screen you desire.
For each dimension of the layout a view needs to provide, based on the
Layout-
Params
of its parents, it specifies one of three values:
■
An exact number
■
FILL_PARENT
■
WRAP_CONTENT
The
FILL_PARENT
constant means take up as much space in that dimension as the par-
ent does (subtracting padding).
WRAP_CONTENT
means take up only as much space as is
needed for the content within (adding padding). A child
View
therefore requests a size,
and the parent makes a decision. In this case, unlike what happens sometimes with
actual kids, the children have to listen—they have no choice, and they can’t talk back.
Child elements do keep track of what size they initially asked to be, in case layout is
recalculated when things are added or removed, but they cannot force a particular
size. Because of this
View
elements have two sets of dimensions, the size and width
they want to take up (
getMeasuredWidth()
and
getMeasuredHeight()
) and the
actual size they end up after a parent’s decision (
getWidth()
and
getHeight()
).
Layout takes place in a two-step process: first measurements are taken, using the
LayoutParams
, then items are placed on the screen. Components are drawn to the
screen in the order they are found in the layout tree: parents first, then children (par-
ents end up behind children, if they overlap in positioning).
Layout is a big part of understanding screen design with Android. Along with plac-
ing your
View
elements on the screen, you need to have a good grasp of focus and
event handling in order to build effective applications.
3.2.6 Handling focus
Focus is like a game of tag; one and only one component on the screen is always “it.”
All devices with
UIs support this concept. When you are turning the pages of a book,
your focus is on one particular page (or even word or letter) at a time. Computer
interfaces are no different. Though there may be many different windows and widgets
on a particular screen, only one has the current focus and can respond to user input.
An event, such as movement of the mouse, a mouse click, or keyboard press, may trig-
ger the focus to shift to another component.
In Android focus is handled for you by the platform a majority of the time. When a
user selects an
Activity
, it is invoked and the focus is set to the foreground
View
.
Internal Android algorithms then determine where the focus should go next (who
should be tagged) based on events (buttons being clicked, menus selected, services
returning callbacks, and so on). You can override the default behavior and provide
Licensed to Deborah Christiansen <>
Download at Boykma.Com
83Working with views
hints about where specifically you want the focus to go using the following
View
class
methods (or their counterparts in
XML):
■
nextFocusDown
■
nextFocusLeft
■
nextFocusRight
■
nextFocusUp
Views can also indicate a particular focus type,
DEFAULT_FOCUS
or
WEAK_FOCUS
, to set
the priority of focus they desire, themselves (default) versus their descendants (weak).
In addition to hints, such as
UP
,
DOWN
, and
WEAK
, you can use the
View.requestFocus()
method directly, if need be, to indicate that focus should be set to a particular
View
at
a given time. Manipulating the focus manually should be the exception rather than
the rule (the platform logic generally does what you would expect).
Focus gets changed based on event-handling logic using the
OnFocusChange-
Listener
object and related
setOnFocusChangedListener()
method. This takes us
into the world of event handling in general.
3.2.7 Grasping events
Events are used for changing the focus and for many other actions as well. We have
already implemented several
onClickListener()
methods for buttons in listing 3.2.
Those
OnClickListener
instances were connected to button presses. The events they
were indicating were “Hey, somebody pressed me.” This is exactly the same pro-
cess that focus events go through when announcing or responding to
OnFocus-
Change
events.
Events have two halves: the component raising the event and the component (or
components) that responds to the event. These two halves are variously known as
Observable
and
Observer
in design pattern terms (or sometimes subject and
observer). Figure 3.7 is a class diagram of the relationships in this pattern.
An
Observable
component provides a way for
Observer
instances to register.
When an event occurs, the
Observable
notifies all the observers that something has
taken place. The observers can then respond to that notification however they see fit.
Interfaces are typically used for the various types of events in a particular
API.
registerObserver() : void
unregisterObserver(): void
notifyObserver(): void
observerCollection : Collection<Observer> (Listeners)
Observable (Source)
notify() : void
Observer
(Listener)
ObserverImpl
ObserveableImpl
For observer in
observerCollection:
notifyObserver()
*
0 1
Figure 3.7 A class diagram depicting the Observer design
pattern. Each
Observable component has zero to many
Observers, which can be notified of changes when
necessary.
Licensed to Deborah Christiansen <>
Download at Boykma.Com
84 CHAPTER 3 User interfaces
With regard to an Android
Button
the two halves are represented as follows:
■
Observable
—
Button.setOnClickListener(OnClickListener listener)
■
Observer
—
listener.onClick(View v)
This pattern comes into play in terms of Android
View
items in that many things are
Observable
and allow other components to attach and listen for events. For example,
most of the
View
class methods that begin with
on
are related to events:
onFocusChanged()
,
onSizeChanged()
,
onLayout()
,
onTouchEvent()
, and the like.
Similarly, the
Activity
lifecycle methods we have already discussed—
onCreate()
,
onFreeze(),
and such—are also event-related (on a different level).
Events happen in the
UI and all over the platform. For example, when an incom-
ing phone call occurs or a
GPS-based location changes based on physical move-
ment, many different reactions may occur down the line; many components may
want to be notified when the phone rings or when the location changes (not just
one and not just the
UI). Views support events on many levels. When an interface
event comes in (a user pressed a button, or scrolled, or selected a portion of a win-
dow), it is dispatched to the appropriate view. In general, click events, keyboard
events, touch events, and focus events are the main types of events you will deal with
in the
UI.
One very important aspect of the
View
in Android is that the interface is single-
threaded. If you are calling a method on a
View
, you have to be on the UI thread. This
is, again, why we used a
Handler
in listing 3.3—to get data outside of the UI thread
and notify the
UI thread to update the
View
via the
setMessage()
event.
We are admittedly discussing events here on a fairly broad level, to make sure that
the overarching concepts are clear. We do this because we cannot cover all of the
event methods in the Android
APIs in one chapter. Yet you will see events in examples
throughout the book and in your day-to-day experiences with the platform. We will
call out event examples when necessary, and we will cover them in more detail as we
come to specific examples.
Our coverage of events in general, and how they relate to layout, rounds out the
majority of our discussion of views, but we still have one notable related concept to
tackle, resources. Views are closely related to resources, but they also go beyond the
UI. In the next section we will address all the aspects of resources, including XML-
defined views.
3.3 Using resources
We have mentioned Android resources in several areas up to now, and they were ini-
tially introduced in chapter 1. Here we will revisit resources with more depth in order
to expand on this important topic and to begin completing the third and final
Activ-
ity
in RestaurantFinder—the
ReviewDetail
screen.
When you begin working with Android you will quickly notice many references to
a class named
R
. This class was introduced in chapter 1, and we have used it in our pre-
vious
Activity
examples in this chapter. This is the Android resources reference
Licensed to Deborah Christiansen <>
Download at Boykma.Com
85Using resources
class. Resources are non-code items that are included with your project automatically
by the platform.
To begin looking at resources we will first discuss how they are classified into types
in Android, and then we will work on examples of each type.
3.3.1 Supported resource types
In source, resources are kept in the res directory and can be one of several types:
■
res/anim —XML representations of frame-by-frame animations
■
res/drawable —.png, .9.png, and .jpg images
■
res/layout —XML representations of
View
objects
■
res/values —XML representations of strings, colors, styles, dimensions, and arrays
■
res/xml —User-defined XML files (that are also compiled into a binary form)
■
res/raw —Arbitrary and uncompiled files that can be added
Resources are treated specially in Android because they are typically compiled into an
efficient binary type (with the noted exception of items that are already binary and
the raw type, which is not compiled). Animations, layouts and views, string and color
values, and arrays can all be defined in an
XML format on the platform. These XML
resources are then processed by the aapt tool, which we met in chapter 2, and com-
piled. Once resources are in compiled form they are accessible in Java through the
automatically generated
R
class.
3.3.2 Referencing resources in Java
The first portion of the
ReviewDetail
Activity
, shown in listing 3.6, reuses many of
the
Activity
tenets we have already learned and uses several subcomponents that
come from
R.java
, the Android resources class.
public class ReviewDetail extends Activity {
private static final int MENU_CALL_REVIEW = Menu.FIRST + 2;
private static final int MENU_MAP_REVIEW = Menu.FIRST + 1;
private static final int MENU_WEB_REVIEW = Menu.FIRST;
private String imageLink;
private String link;
private TextView location;
private TextView name;
private TextView phone;
private TextView rating;
private TextView review;
private ImageView reviewImage;
private Handler handler = new Handler() {
public void handleMessage(Message msg) {
if ((imageLink != null) && !imageLink.equals("")) {
try {
URL url = new URL(imageLink);
URLConnection conn = url.openConnection();
conn.connect();
BufferedInputStream bis = new
BufferedInputStream(conn.getInputStream());
Listing 3.6 First portion of ReviewDetail
showing multiple uses of the R class
Define inflatable
View items
B
Use Handler
to get image
C
Licensed to Deborah Christiansen <>
Download at Boykma.Com
86 CHAPTER 3 User interfaces
Bitmap bm = BitmapFactory.decodeStream(bis);
bis.close();
reviewImage.setImageBitmap(bm);
} catch (IOException e) {
// log and or handle here
}
} else {
reviewImage.setImageResource(R.drawable.no_review_image);
}
}
} ;
@Override
public void onCreate(Bundle savedInstanceState) {
super.onCreate(savedInstanceState);
this.setContentView(R.layout.review_detail);
this.name =
(TextView) findViewById(R.id.name_detail) ;
this.rating =
(TextView) findViewById(R.id.rating_detail) ;
this.location =
(TextView) findViewById(R.id.location_detail);
this.phone =
(TextView) findViewById(R.id.phone_detail) ;
this.review =
(TextView) findViewById(R.id.review_detail) ;
this.reviewImage =
(ImageView) findViewById(R.id.review_image) ;
RestaurantFinderApplication application =
(RestaurantFinderApplication) getApplication();
Review currentReview = application.getCurrentReview();
this.link = currentReview.link;
this.imageLink = currentReview.imageLink;
this.name.setText(currentReview.name);
this.rating.setText(currentReview.rating);
this.location.setText(currentReview.location);
this.review.setText(currentReview.content);
if ((currentReview.phone != null) && !currentReview.phone.equals("")) {
this.phone.setText(currentReview.phone);
} else {
this.phone.setText("NA");
}
}
@Override
public boolean onCreateOptionsMenu(Menu menu) {
super.onCreateOptionsMenu(menu);
menu.add(0, ReviewDetail.MENU_WEB_REVIEW, 0,
R.string.menu_web_review).setIcon(
android.R.drawable.ic_menu_info_details);
menu.add(0, ReviewDetail.MENU_MAP_REVIEW, 1,
R.string.menu_map_review).setIcon(
android.R.drawable.ic_menu_mapmode) ;
menu.add(0, ReviewDetail.MENU_CALL_REVIEW, 2,
R.string.menu_call_review).setIcon(
android.R.drawable.ic_menu_call) ;
return true;
}
. . . remainder of this class is in Chapter 4, when we discuss Intents
Set layout using
setContentView()
D
Inflate
views using
findViewById()
E
Use String
and Drawable
resources
F
Licensed to Deborah Christiansen <>
Download at Boykma.Com
87Using resources
In the
ReviewDetail
class we are first defining
View
components that we will later ref-
erence from resources
B
. From there we see a
Handler
that is used to perform a net-
work call to populate an
ImageView
based on a URL. This doesn’t relate to resources but
is included here for completeness. Don’t worry too much about the details of this here,
as it will be covered more when we specifically discuss networking in chapter 5
C
. After
the
Handler
, we set the layout and
View
tree using
setContentView(R.layout.review_
detail)
D
. This maps to an XML layout file at src/res/layout/review_detail.xml. Next
we also reference some of the
View
objects in the layout file directly through resources
and corresponding
IDs
E
.
Views that are defined in
XML are inflated by parsing the XML and injecting the
corresponding code to create the objects for you. This is handled automatically by the
platform. All of the
View
and
LayoutParams
methods we have discussed previously
have counterpart attributes in the
XML format. This inflation approach is one of the
most important aspects of
View
-related resources, and it makes them very convenient
to use and reuse. We will examine the layout file we are referring to here and the spe-
cific views it contains more closely in the next section.
You reference resources in code, such as we are here, through the automatically
generated
R
class. The
R
class is made up of static inner classes (one for each resource
type) that hold references to all of your resources in the form of an
int
value. This
value is a constant pointer to an object file through a resource table (which is con-
tained in a special file the aapt tool creates and the
R
file utilizes).
The last reference to resources in listing 3.6 is for the creation of our menu items
F
.
For each of these we are referencing a
String
for text from our own local resources, and
we are also assigning an icon from the
android.R.drawable
resources namespace. You
can qualify resources in this way and reuse the platform drawables: icons, images, bor-
ders, backgrounds, and so on. You will likely want to customize much of your own appli-
cations and provide your own drawable resources, which you can do, but the platform
resources are also available if you need them (and they are arguably the better choice
in terms of consistency for the user, if you are calling out to well-defined actions as we
are here: map, phone call, and web page).
We will cover how all the different resource types are handled and where they are
placed in source in the next several sections. The first types of resources we will look at
more closely are those of layouts and views.
3.3.3 Defining views and layouts through XML resources
As we have noted in several earlier sections, views and layout can be, and often are,
defined in
XML rather than in Java code. Defining views and layout as resources in this
way makes them easier to work with, decoupled from the code, and in some cases
reusable in different contexts.
View resource files are placed in the res/layout source directory. The root of these
XML files is usually one of the
ViewGroup
layout subclasses we have already discussed:
RelativeLayout
,
LinearLayout
,
FrameLayout
, and so on. Within these root elements
are child
XML elements that represent the view/layout tree.
Licensed to Deborah Christiansen <>
Download at Boykma.Com
88 CHAPTER 3 User interfaces
An important thing to understand here is that resources in the res/layout direc-
tory don’t have to be layouts. You can define a single
TextView
in a layout file the same
way you might define an entire tree starting from an
AbsoluteLayout
. Yes, this makes
the layout name and path potentially confusing, but that is how it is set up. (It might
make more sense to have separate res/layout and res/view directories, but that might
be confusing too, so just keep in mind that res/layout is useful for more than layout.)
You can have as many
XML layout/view files as needed, all defined in the res/lay-
out directory. Each
View
is then referenced in code based on the type and ID. Our lay-
out file for the
ReviewDetail
screen, review_detail.xml, which is shown in listing 3.7,
is referenced in the
Activity
code as
R.layout.review_detail
—which is a pointer
to the
RelativeLayout
parent
View
object in the file.
<?xml version="1.0" encoding="utf-8"?>
<RelativeLayout
xmlns:android=" /> android:layout_width="fill_parent"
android:layout_height="fill_parent"
android:gravity="center_horizontal"
android:padding="10px"
android.setVerticalScrollBarEnabled="true"
>
<ImageView android:id="@+id/review_image"
android:layout_width="100px"
android:layout_height="100px"
android:layout_marginLeft="10px"
android:layout_marginBottom="5px" />
<TextView android:id="@+id/name_detail"
android:layout_width="fill_parent"
android:layout_height="wrap_content"
android:layout_below="@id/review_image"
android:layout_marginLeft="10px"
android:layout_marginBottom="5px"
style="@style/intro_blurb" / >
<TextView android:id="@+id/rating_label_detail"
android:layout_width="wrap_content"
android:layout_height="wrap_content"
android:layout_below="@id/name_detail"
android:layout_marginLeft="10px"
android:layout_marginBottom="5px"
style="@style/label"
android:text="@string/rating_label" / >
. . . remainder of file omitted for brevity
</RelativeLayout>
In this file we are using a
RelativeLayout
B
. This is the
ViewGroup
at the root of the
View
tree.
LayoutParams
are then also defined in XML using the
android:
layout_[attribute]
convention (where
[attribute]
refers to a layout attribute)
C
.
Along with layout, other
View
-related attributes can also be defined in XML with
Listing 3.7 XML layout resource file for review_detail.xml
Define root View element
B
Define
LayoutParams
C
D
Define View
parameters in XML
E
Include child
element with ID
Reference another
resource
F
G
Reference a
style for a View
Licensed to Deborah Christiansen <>
Download at Boykma.Com
89Using resources
counterpart XML attributes to the methods available in code, such as
android:
padding
, which is analogous to
setPadding()
D
.
After the
RelativeLayout
parent itself is defined, the child
View
elements are
added. Here we are using an
ImageView
and multiple
TextView
components. Each of
the components is given an
ID using the form
android:id="@+id/[name]"
E
. When
an
ID is established in this manner, an
int
reference is defined in the resource table
and named with the specified name. This allows other components to reference the
ID by the friendly textual name.
Once views are defined as resources, the
Activity
method
findViewById()
can
be used to obtain a reference to a particular
View
using the name. That
View
can then
be manipulated in code. For example, in listing 3.6 we grabbed the
rating TextView
as follows:
rating = (TextView) findViewById(R.id.rating_detail).
This inflates and hands off the
rating_detail
element we saw in listing 3.7. Note that
child views of layout files end up as
id
type in
R.java
(they are not
R.layout.name
;
rather they are
R.id.name
, even though they are required to be placed in the res/lay-
out directory).
The properties for the
View
object are all defined in XML, and this includes the
layout. Because we are using a
RelativeLayout
we use attributes that place one
View
relative to another, such as
below
or
toRightOf
. This is done with the
android:
layout_below="@id/[name]
syntax
F
. The
@id
syntax is a way to reference other
resource items from within a current resource file. Using this approach you can refer-
ence other elements defined in the file you are currently working on or other ele-
ments defined in other resource files.
Some of our views represent labels, which are shown on the screen as is and are
not manipulated in code, such as
rating_label_detail
. Others we will populate at
runtime; these don’t have a text value set, such as
name_detail
. The elements that
we do know the values of, the labels, are defined with references to external-
ized strings.
The same approach is applied with regard to styles, using the syntax
style="@style/[stylename]"
G
. Strings, styles, and colors are themselves defined as
resources in another type of resource file.
3.3.4 Externalizing values
It is fairly common practice in the programming world to externalize string literals
from code. In Java this is done with a
ResourceBundle
or a properties file. Externaliz-
ing references to strings in this way allows the value of a component to be stored and
updated separately from the component itself, away from code.
Android includes support for values resources that are subdivided into several
groups: animations, arrays, styles, strings, dimensions, and colors. Each of these items
is defined in a specific
XML format and made available in code as references from the
Licensed to Deborah Christiansen <>
Download at Boykma.Com
90 CHAPTER 3 User interfaces
R
class, just like layouts, views, and drawables. For the RestaurantFinder application we
are using externalized strings, as shown in listing 3.8, strings.xml.
<?xml version="1.0" encoding="utf-8"?>
<resources>
<string name="app_name_criteria">RestaurantFinder – Criteria</string>
<string name="app_name_reviews">RestaurantFinder - Reviews</string>
<string name="app_name_review">RestaurantFinder - Review</string>
<string name="app_short_name">Restaurants</string>
<string name="menu_get_reviews">Get reviews</string>
<string name="menu_web_review">Get full review</string>
<string name="menu_map_review">Map location</string>
<string name="menu_call_review">Call restaurant</string>
<string name="menu_change_criteria">Change review criteria</string>
<string name="menu_get_next_page">Get next page of results</string>
<string name="intro_blurb_criteria">Enter review criteria</string>
<string name="intro_blurb_detail">Review details</string>
. . . remainder omitted for brevity
</resources>
As is evident from the strings.xml example, this is very straightforward. This file uses a
<string>
element with a
name
attribute
B
for each string value you need. We have
used this file for the application name, menu buttons, labels, and alert validation mes-
sages. This format is known as simple value in Android terms. This file is placed in
source at the res/values/strings.xml location. In addition to strings, colors and dimen-
sions can be defined in the same way.
Dimensions are placed in dimens.xml and defined with the
<dimen>
element:
<dimen
name=dimen_name>dimen_value</dimen>
. Dimensions can be expressed in
any of the following units:
■
pixels (px)
■
inches (in)
■
millimeters (mm)
■
points (pt)
■
density-independent pixels (dp)
■
scale-independent pixels (sp)
Colors can be defined in colors.xml and are defined with the
<color>
element:
<color
name=color_name>#color_value</color>
. Colors values are expressed in RGB codes.
Color and dimension files are also placed in the res/values source location.
Although we haven’t defined separate colors and dimensions for the Restaurant-
Finder application, we are using several styles, which we referenced in listing 3.7. The
style definitions are shown in listing 3.9. This is where we move beyond a simple value
layout to a specific style
XML structure (although styles are still placed in source in the
res/values directory, which can be confusing).
Listing 3.8 Externalized strings for the RestaurantFinder application, strings.xml
B
Using a string
element with a
name attribute
Licensed to Deborah Christiansen <>
Download at Boykma.Com
91Using resources
<?xml version="1.0" encoding="utf-8"?>
<resources>
<style name="intro_blurb">
<item name="android:textSize">22sp</item>
<item name="android:textColor">#ee7620</item>
<item name="android:textStyle">bold</item>
</style>
<style name="label">
<item name="android:textSize">18sp</item>
<item name="android:textColor">#ffffff
</item>
</style>
<style name="edit_text">
<item name="android:textSize">16sp</item>
<item name="android:textColor">#000000</item>
</style>
. . . remainder of file omitted for brevity
</resources>
The Android styles approach is a similar concept to using Cascading Style Sheets
(
CSS) with HTML. Styles are defined in styles.xml and then referenced from other
resources or code. Each
<style>
element
B
has one or more
<item>
children that
define a single setting
C
. Styles are made up of the various
View
settings: sizes, colors,
margins, and such. Styles are very helpful because they facilitate easy reuse and the
ability to make changes in one place. Styles are applied in layout
XML files by associat-
ing a style name with a particular
View
component, such as
style="@style/
intro_blurb"
(note that in this case
style
is not prefixed with the
android:
namespace; it is a custom local style and not one provided by the platform).
Styles can be taken one step further and used as themes. While a style refers to a
set of attributes applied to a single
View
element, themes refer to a set of attributes
being applied to an entire screen. Themes can be defined in exactly the same
<style>
and
<item>
structure as styles are. To apply a theme you simply associate a style with
an entire
Activity
, such as:
android:theme="@android:style/[stylename]"
.
Along with styles and themes, Android supports a specific
XML structure for defin-
ing arrays as a resource as well. Arrays are placed in source in res/values/arrays.xml
and are helpful for defining collections of constant values, such as the
cuisines
we
used to pass to our
ArrayAdapter
back in listing 3.1. Listing 3.10 shows how these
arrays are defined in
XML.
<?xml version="1.0" encoding="utf-8"?>
<resources>
<array name="cuisines">
<item>ANY</item>
<item>American</item>
<item>Barbeque</item>
<item>Chinese</item>
<item>French</item>
Listing 3.9 Values resource defining reusable styles, styles.xml
Listing 3.10 Arrays.xml used for defining cuisines and ratings
Use a <style> element
B
Use an
<item> element
C
Define <array> elements
B
C
Define array <item> elements
Licensed to Deborah Christiansen <>
Download at Boykma.Com
92 CHAPTER 3 User interfaces
<item>German</item>
<item>Indian</item>
<item>Italian</item>
<item>Mexican</item>
<item>Thai</item>
<item>Vegetarian</item>
<item>Kosher</item>
</array>
</resources>
Arrays are defined as resources using an
<array>
element with a
name
attribute
B
and
include any number of
<item>
child elements
C
to define each array member. You
can access arrays in code using the syntax shown in listing 3.1:
String[]
ratings
=
getResources().getStringArray(R.array.ratings)
.
Raw files and
XML are also supported through resources. Using the res/raw and
res/xml directories, respectively, you can package these file types with your applica-
tion and access them through either
Resources.openRawResource(int
id
) or
Resources.getXml(int
id)
.
Going past simple values for strings, colors, and dimensions and more involved but
still straightforward structures for styles, arrays, raw files, and raw
XML, the next type
of resources we need to explore are animations.
3.3.5 Providing animations
Animations are more complicated than other Android resources but are also the most
visually impressive. Android allows you to define animations that can rotate, fade,
move, or stretch graphics or text. While you don’t want to go overboard with a con-
stantly blinking animated shovel, an initial splash or occasional subtle animated effect
can really enhance your
UI.
Animation
XML files are placed in the res/anim source directory. There can be
more than one anim file, and, as with layouts, you reference the respective animation
you want by name/id. Android supports four types of animations:
■
<alpha>
—Defines fading, from 0.0 to 1.0 (0.0 being transparent)
■
<scale>
—Defines sizing, X and Y (1.0 being no change)
■
<translate>
—Defines motion, X and Y (percentage or absolute)
■
<rotate>
—Defines rotation, pivot from X and Y (degrees)
In addition, Android provides several attributes that can be used with any animation type:
■
duration
—Duration in milliseconds
■
startOffset
—Offset start time in milliseconds
■
interpolator
—Used to define a velocity curve for speed of animation
Listing 3.11 shows a very simple animation that can be used to scale a
View
.
<?xml version="1.0" encoding="utf-8"?>
<scale xmlns:android="
Listing 3.11 Example of an animation defined in an XML resource, scaler.xml
Use <scale> animation
B
Licensed to Deborah Christiansen <>
Download at Boykma.Com
93Understanding the AndroidManifest file
android:fromXScale="0.5"
android:toXScale="2.0"
android:fromYScale="0.5"
android:toYScale="2.0"
android:pivotX="50%"
android:pivotY="50%"
android:startOffset="700"
android:duration="400"
android:fillBefore="false" />
In code you can reference and use this animation with any
View
object (
TextView
, for
example) as follows:
view.startAnimation(AnimationUtils.loadAnimation(this, R.anim.scaler));.
This will scale
B
the
view
element up in size on both the X and Y axes. Though we do
not have any animations in the RestaurantFinder sample application by default, to see
this work you can simply add the
startAnimation
method to any view element in the
code and reload the application. Animations can come in handy, so you should be aware
of them. We will cover animations and other graphics topics in detail in chapter 9.
With our journey through Android resources now complete, we next need to
address the final aspect of RestaurantFinder we have yet to cover, the AndroidMani-
fest.xml manifest file, which is required for every Android application.
3.4 Understanding the AndroidManifest file
As you learned in chapter 1, Android requires a manifest file for every applica-
tion—AndroidManifest.xml. This file, which is placed in the root directory of the proj-
ect source, describes the application context and any supported activities, services,
intent receivers, and/or content providers, as well as permissions. You will learn more
about services, intents, and intent receivers in the next chapter and about content
providers in chapter 5. For now the manifest for our RestaurantFinder sample applica-
tion, as shown in listing 3.11, contains only the
<application>
itself, an
<activity>
element for each screen, and several
<uses-permission>
elements.
<?xml version="1.0" encoding="utf-8"?>
<manifest xmlns:android="
<application android:icon="@drawable/restaurant_icon_trans"
android:label="@string/app_short_name"
android:name="RestaurantFinderApplication"
android:allowClearUserData="true"
android:theme="@android:style/Theme.Black">
<activity android:name="ReviewCriteria"
android:label="@string/app_short_name">
<intent-filter>
<action android:name="android.intent.action.MAIN" />
<category
android:name="android.intent.category.LAUNCHER" />
</intent-filter>
</activity>
Listing 3.12 The RestaurantFinder AndroidManifest.xml file
Include <manifest> declaration
B
Include RestaurantFinder-
Application
declaration
C
Define Review-
Criteria Activity
D
E
Define MAIN LAUNCHER Intent filter
Licensed to Deborah Christiansen <>
Download at Boykma.Com
94 CHAPTER 3 User interfaces
<activity android:name="ReviewList"
android:label="@string/app_name_reviews">
<intent-filter>
<category
android:name="android.intent.category.DEFAULT" />
<action
android:name="com.msi.manning.restaurant.VIEW_LIST" />
</intent-filter>
</activity>
<activity android:name="ReviewDetail"
android:label="@string/app_name_review">
<intent-filter>
<category
android:name="android.intent.category.DEFAULT" />
<action
android:name="com.msi.manning.restaurant.VIEW_DETAIL" />
</intent-filter>
</activity>
</application>
<uses-permission android:name="android.permission.CALL_PHONE" />
<uses-permission android:name="android.permission.INTERNET" />
</manifest>
In the RestaurantFinder descriptor file we first see the root
<manifest>
element dec-
laration, which includes the application’s package declaration and the Android
namespace
B
. Then we see the
<application>
element with both the name and icon
attributes defined
C
. You don’t have to include the name attribute here unless you
want to extend the default Android
Application
object to provide some global state
to your application (which we did to store the
Review
object each screen is operating
on). The icon is also optional; if not specified, a system default is used to represent
your application on the main menu.
After the application itself is defined, we see the child
<activity>
elements within.
These, obviously, define each
Activity
the application supports
D
(note that the mani-
fest file can use Android resources as well, such as with
@string/app_name
). As was not-
ed when discussing activities in general, one
Activity
in every application is the starting
point; this
Activity
has the
<intent-filter>
action
MAIN
and category
LAUNCHER
des-
ignation
E
. This tells the Android platform how to start an application from the
Launcher
, meaning this
Activity
will be placed in the main menu on the device.
Past the
ReviewCriteria
Activity
we see another
<activity>
designation for
ReviewList
F
. This
Activity
also includes an
<intent-filter>
, but for our own
action,
com.msi.manning.chapter3.VIEW_LIST
G
. This tells the platform that this
Activity
should be invoked for this “intent.” You will learn more about exactly how
this works in the next chapter. Last in our manifest we have a
<uses-permission>
H
element. This also relates to intents and tells the platform that this application needs
the
CALL_PHONE
permission. (We discussed several aspects of security in chapter 2, and
we will touch on this in various contexts throughout the book.)
The RestaurantFinder sample application uses a fairly basic manifest file with three
activities and a series of intents. This is not a comprehensive example, of course, but
all of the elements an Android manifest supports are shown in table 3.4 for reference.
Define ReviewList Activity
F
Define custom Intent filter
G
Add permissions
H
Licensed to Deborah Christiansen <>
Download at Boykma.Com
95Summary
Wrapping up the description of the manifest file completes our discussion of views,
activities, resources, and in general working with
UIs in Android.
3.5 Summary
A big part of the Android platform revolves around the UI and the concepts of activi-
ties and views. In this chapter we explored these concepts in detail and worked on a
sample application to demonstrate them. In relation to activities we addressed the
concepts and methods involved, and we covered the all-important lifecycle events the
platform uses to manage them. With regard to views we looked at common and cus-
tom types, attributes that define layout and appearance, and focus and events.
In addition, we looked at how Android handles various types of resources, from
simple types to more involved layouts, arrays, and animations—and how these relate
to, and are used within, views and activities. We also explored the AndroidMani-
fest.xml application descriptor and how it brings all these pieces together to define an
Android application.
Table 3.4 Supported AndroidManifest.xml elements and their descriptions
Element Position Description
<manifest>
root Defines application package and Android
namespace
<uses-permission>
root Requests a security permission
<permission>
root Declares a security permission
<instrumentation>
root Declares a test instrumentation component
<application>
root Defines an application, class name, label, icon, or
theme (one per manifest)
<activity>
child of <application>
Defines an
Activity class
<intent-filter>
child of <activity>
Declares the
Intents an Activity supports
<action>
child of <intent-filter>
Intent action
<category>
child of <intent-filter>
Intent category
<data>
child of <intent-filter>
Intent MIME type, URI scheme, URI authority, or
URI path
<meta-data>
child of <activity> General metadata, accessible via Compo-
nentInfo.metaData
<receiver>
root
Defines an
IntentReceiver, responds to
Intent
s (also supports <intent-filter>
children)
<service>
root
Defines a background
Service (also supports
<intent-filter> children)
<provider>
root
Defines a
ContentProvider to manage persis-
tent data for access by other applications
Licensed to Deborah Christiansen <>
Download at Boykma.Com
96 CHAPTER 3 User interfaces
This chapter has provided a good foundation for general Android UI develop-
ment; next we need to go deeper into the concepts of
Intent
and
IntentReceiver
classes, the communication layer that Android activities and other components use.
We will cover these items, along with longer-running
Service
processes and the
Android Inter-Process Communication (
IPC) system involving the
Binder
, in chapter
4, where we will also complete the RestaurantFinder application.
Licensed to Deborah Christiansen <>
Download at Boykma.Com
97
Intents and services
The canonical Android application comprises
Activity
and
View
objects on the
front end and
Intent
and
Service
objects on the back end. As we discussed in
chapter 3, activities are roughly comparable to
UI screens, and views are UI compo-
nents. When a user interacts with a screen, that screen usually represents a task,
such as display a list of choices and allow selection, gather information through
form input, or display graphics and data. Once each screen is finished with its indi-
vidual job, it usually hands off to another component to perform the next task.
In Android terms, “hand off to another component” is done with an
Intent
. We
introduced this concept and term in chapter 1, and we saw some limited amounts
of
Intent
-related code in our examples in chapter 3. In this chapter we are going
to expand on the details, including looking more closely at what exactly an
Intent
is and how it is resolved and matched with an
IntentFilter
. Along the way we will
complete the RestaurantFinder application we started in chapter 3, finishing up
This chapter covers:
■
Working with intents and intent filters
■
Listening in with broadcast receivers
■
Building Services
■
Performing Inter-Process Communication and AIDL
Licensed to Deborah Christiansen <>
Download at Boykma.Com
98 CHAPTER 4 Intents and services
the code and elaborating on the
Intent
classes involved. RestaurantFinder uses
Intent
objects internally, to go from
Activity
to
Activity
, and also calls on intents
from Android built-in applications—to phone a restaurant, map directions to a restau-
rant, and visit a restaurant review web page.
After we complete the RestaurantFinder application, we will move on to another
sample application in this chapter—WeatherReporter. WeatherReporter will make use
of the Yahoo! Weather
API to retrieve weather data and display it, along with weather
alerts, to the user on the Android platform. Through the course of the Weather-
Reporter application we will exercise intents in a new way, using a
BroadcastReceiver
and a
Service
.
A
BroadcastReceiver
, as the name implies, also deals with intents but is used to
catch broadcasts to any number of interested receivers, rather than to signal a particu-
lar action from an
Activity
. Services are background processes, rather than UI
screens, but they are also invoked with a call to action, an
Intent
.
Lastly in this chapter, in relation to services, we will examine the Android mecha-
nism for making Inter-Process Communication (
IPC) possible using
Binder
objects
and the Android Interface Definition Language (
AIDL). Android provides a high-
performance way for different processes to pass messages among themselves. This is
important because every application runs within its own isolated process (for security
and performance purposes, owing to the Linux heritage of the platform). To enable
communication between components in different processes, something services often
need to do, the platform provides a path via a specified
IPC approach.
The first thing we need to cover is the basic means to perform an action from
within any component; this means focusing on
Intent
details.
4.1 Working with Intent classes
Intent
classes are the communications network of the applications on the Android
platform. In many ways the Android architecture is similar to larger Service-Oriented
Architecture (
SOA) approaches in that each
Activity
makes a type of
Intent
call to
get something done, without knowing exactly what the receiver of the
Intent
may be.
In an ideal situation you don’t care how a particular task gets performed; rather,
you care that it is done and is completed to your requirements. That way, you can
divide up what you need to get done at a particular time—your intent—and concen-
trate on the problem you are trying to solve, rather than worrying about specific
underlying implementation details.
Intent
classes are late binding, and this is one of the things that makes them a bit
different from what you might be used to. This means they are mapped and routed to
a component that can handle a specified task at runtime rather than at build or com-
pile time. One
Activity
tells the platform, “I need a map to Langtry, TX, US,” and
another component, one the platform determines is capable, handles the request and
returns the result. With this approach, individual components are decoupled and can
be modified, enhanced, and maintained without requiring changes to a larger appli-
cation or system.
Licensed to Deborah Christiansen <>
Download at Boykma.Com
99Working with Intent classes
With that concept and the advantages the design intends in mind, here we will
look at exactly how an
Intent
is defined in code, how an
Intent
is invoked by an
Activity,
how
Intent
resolution takes place using
IntentFilter
classes, and some
intents that are built into the platform ready for you to take advantage of.
4.1.1 Defining intents
Intent
s are made up of three primary pieces of information—action, categories, and
data—and include an additional set of optional elements. An action is simply a
String
,
as is a category, and data is defined in the form of a
Uri
object. A
Uri
is a generic URI
(as defined by RFC 3986) which includes a scheme, an authority, and optionally a path
(you will find out more about these parts in the next section). Table 4.1 lays out all of
the components of an
Intent
object.
Intent definitions typically express a combination of action, data, and attributes such
as category. This designation is used by the system as a sort of language to resolve
exactly which class should be used to fill the request.
When a component such as an
Activity
wants to call upon an
Intent
, it can do so
in one of two ways:
■
Implicit
Intent
invocation
■
Explicit
Intent
invocation
An implicit
Intent
invocation is one in which the platform determines which compo-
nent is the best to run the
Intent
. This happens through a process of
Intent
resolution
using the action, data, and categories. We will explore this resolution process in detail
in the next section. An explicit
Intent
invocation is one in which the code directly spec-
ifies which component should handle the
Intent
. Explicit invocation is done by spec-
ifying either the
Class
or
ComponentName
of the receiver (where
ComponentName
is a
String
for the package and a
String
for the class).
Table 4.1 Intent elements and description
Intent
element
Description
Extras
Extra data to pass to the
Intent that is in the form of a Bundle
Component
Specifies an explicit package and class to use for
Intent, optional, normally
inferred from action, type, and categories
Type Specifies an explicit MIME type (as opposed to being parsed from a URI)
Category
Additional metadata about
Intent (for example,
android.intent.category.LAUNCHER)
Data
Data to work with expressed as a URI (for example,
content://contacts/1)
Action
Fully qualified
String indicating action (for example,
android.intent.action.MAIN)
Licensed to Deborah Christiansen <>
Download at Boykma.Com
100 CHAPTER 4 Intents and services
To explicitly invoke an
Intent
, you can use the following form:
Intent(Context
ctx,
Class
cls)
. With this approach you can short-circuit all the Android
Intent
-resolution
wiring and directly pass in an
Activity
or
Service
class reference to handle the
Intent
.
While this approach is convenient and fast, and therefore sometimes arguably appropriate,
it also introduces tight coupling that may be a disadvantage later.
In listing 4.1 we show the final portion of the
ReviewDetail
Activity
from the
RestaurantFinder sample application. This listing shows several implicit
Intent
invo-
cations. (We began this application in chapter 3; the first half of this class is shown in
listing 3.6.)
@Override
public boolean onMenuItemSelected(int featureId, MenuItem item) {
Intent intent = null;
switch (item.getItemId()) {
case MENU_WEB_REVIEW:
if ((this.link != null) && !this.link.equals("")) {
intent = new Intent(Intent.ACTION_VIEW,
U r i . parse(this.link));
startActivity(intent);
} else {
new AlertDialog.Builder(this)
setTitle(getResources()
.getString(R.string.alert_label))
.setMessage(R.string.no_link_message)
.setPositiveButton("Continue",
new OnClickListener() {
public void onClick(DialogInterface dialog,
int arg1) {
}
}).show();
}
return true;
case MENU_MAP_REVIEW:
if ((this.location.getText() != null)
&& !this.location.getText().equals("")) {
intent = new Intent(Intent.ACTION_VIEW,
U r i . parse("geo:0,0?q=" +
this.location.getText().toString()));
startActivity(intent);
} else {
new AlertDialog.Builder(this)
.setTitle(getResources()
.getString(R.string.alert_label))
.setMessage(R.string.no_location_message)
.setPositiveButton("Continue", new OnClickListener() {
public void onClick(DialogInterface dialog,
int arg1) {
}
}).show();
}
Listing 4.1 Second portion of the ReviewDetail, demonstrating Intent invocation
B
Declare an Intent
Set Intent for
web menu item
C
D
Use
StartActivity(intent)
E
Set Intent for
map menu item
Licensed to Deborah Christiansen <>
Download at Boykma.Com