Exchange SQL And IIS- P101 pdf
Bạn đang xem bản rút gọn của tài liệu. Xem và tải ngay bản đầy đủ của tài liệu tại đây (657.52 KB, 5 trang )
High Availability for Exchange 2007 Mailbox Servers • Chapter 8 477
When you’re partitioning the disks that should be storing the passive copies your storage
groups, it is best practice to take advantage of mount points, because they will let you surpass the
26-drive-letter limitation that exists on a Windows 2003 server. If you end up in a situation where
you need to switch to a passive copy of a storage group, using mount points will make the recovery
process much more painless because you can quickly change drive letters and paths.
As has been the case with mailbox stores and log fi les in previous versions of Exchange, it’s also
recommended that you place the databases and log fi les for a passive copy of a storage group on
separate disks, just as you do with active copies of storage groups.
You should, of course, also make sure that you partition the disks that are to be used for the
passive copies of the storage groups, so they are at least the same size at the disks holding the active
storage group copies. Finally, keep in mind that a Mailbox Server with LCR enabled will use
approximately 30–40 percent more CPU and memory than a Mailbox Server on which LCR
hasn’t been enabled. These extra resources are primarily used by log fi le verifi cation as well as
log fi le replay.
TIP
LCR enables you to offl oad Volume ShadowCopy Service (VSS) backups from the
active storage group to the passive storage group, which will preserve disk I/O on
the disks on which the active storage group is located. This also means that you can
perform restores from a passive copy of a storage group.
As you can understand, LCR is an ideal solution for small or medium-sized organizations
because the functionality allows rapid recovery from database issues and requires only an extra set
of disks for the database copies. LCR increases the availability of databases on an Exchange 2007
standalone server in an affordable way. For small shops that don’t have a big fancy server with
multiple sets of disks, it is possible to keep the LCR copy on an external USB disk.
Enabling Local Continuous Replication
on a Storage Group
The LCR feature is enabled on a Storage Group level under the Mailbox subnode, located beneath
the Server Confi guration work center node in the left pane of the Exchange System Management
Console, as shown in Figure 8.2.
478 Chapter 8 • High Availability for Exchange 2007 Mailbox Servers
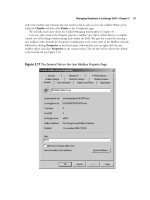
2. This will bring up the Local Continuous Replication Wizard’s Introduction page,
shown in Figure 8.3. As you can see, this page shows us the storage group as well as
mailbox database name. Because there aren’t many interactions on this page, simply
click Next.
Figure 8.2 The Local Continuous Replication Link in the Action Pane
1. To enable LCR for the First Storage Group, select it in the work pane, and click Enable
local continuous replication in the Action pane.
High Availability for Exchange 2007 Mailbox Servers • Chapter 8 479
Figure 8.3 Enable Storage Group Local Continuous Replication
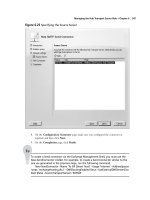
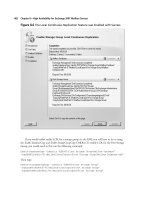
3. Now let’s specify the path to the LCR fi les for the respective storage group (see Figure 8.4).
For the purpose of this example, we’re simply specifying the E: drive, which is a second set
of disks on the server. When the location has been specifi ed, we can click Next.
480 Chapter 8 • High Availability for Exchange 2007 Mailbox Servers
Figure 8.4 Specifying the Paths for the Replicated Log and System Files
4. On the Mailbox Database page, we have to specify the path to the location of the
second copy of the database, as shown in Figure 8.5. When you have done so,
click Next.
High Availability for Exchange 2007 Mailbox Servers • Chapter 8 481
Figure 8.5 Specifying the Path for the Database Copy
5. We have now reached the step where we enable LCR for the storage group, so let’s do so
by clicking Enable and see what happens. As shown in Figure 8.6, the Local Continuous
Replication Wizard completed successfully. Click Finish.