Exchange SQL And IIS- P114 pdf
Bạn đang xem bản rút gọn của tài liệu. Xem và tải ngay bản đầy đủ của tài liệu tại đây (869.59 KB, 5 trang )
542 Chapter 8 • High Availability for Exchange 2007 Mailbox Servers
Click Step 4: Install Microsoft Exchange. Then click Next and accept the License
Agreement. Click Next once again. Decide whether you want to enable error reporting
or not (it’s a good idea to enable this function, since the Exchange Product Group will
receive any obscure errors you should experience in your CCR setup), then click Next.
Figure 8.66 The Exchange Server 2007 Splash Screen
NOTE
If you have installed Windows Server 2003 with Service Pack 1 on each node, you
need to download Microsoft Management Console (MMC) 3.0 and install it manually
(by following the link in Step 2). But since I’m using Windows 2003 R2 Servers in my
environment, the MMC 3.0 is installed by default.
High Availability for Exchange 2007 Mailbox Servers • Chapter 8 543
4. Check Active Clustered Mailbox Role as shown in Figure 8.68 and click Next.
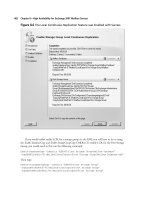
Figure 8.67 Selecting a Custom Exchange Server Installation
3. Now select Custom Exchange Server Installation (see Figure 8.67) and click Next.
544 Chapter 8 • High Availability for Exchange 2007 Mailbox Servers
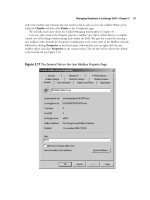
5. Now select Cluster Continuous Replication, then specify a name for the mailbox server
(the name you want your Outlook clients to connect to) and a unique IP address on your
public network. Finally, specify the path for the clustered mailbox server database fi les
(which in the example is E:) or use the default path (see Figure 8.69).
If you’re installing CCR in a production environment, you should keep the transaction
log fi les and database on separate disks, but if you’re deploying CCR in a test environment,
you simply use the default path.
Figure 8.68 Selecting to Install an Active Clustered Mailbox Role
High Availability for Exchange 2007 Mailbox Servers • Chapter 8 545
Figure 8.69 Selecting to Install a Cluster Continuous Replication Cluster and
Specifying the Name and IP Address of the Clustered Mailbox Server
6. Let the readiness check complete, and if no issues are found, click Next to begin the
installation.
The Exchange Server 2007 Installation Wizard will now copy the needed Exchange fi les, install
and confi gure the Mailbox Role, and fi nally create and confi gure the clustered mailbox server
resources locally and create the object in Active Directory. After all steps have been completed,
untick Exit Setup and open Exchange System Manager (yes, this will be corrected in a later build),
then click Finish. We don’t want to open the EMC just yet; we’ll install Exchange on the second
node fi rst.
546 Chapter 8 • High Availability for Exchange 2007 Mailbox Servers
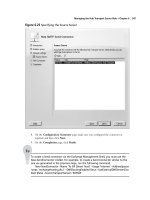
Figure 8.70 Installing the Passive Clustered Mailbox Role on the Second Node
Installing Exchange 2007 on the Passive Node
Log on to EDFS08 with a domain admin account and do the same steps as we did when installing
Exchange Server 2007 on EDFS07. The only difference is that you should select Passive Clustered
Mailbox Role instead of Active Clustered Mailbox Role, as shown in Figure 8.70.