Bắt đầu với IBM Websphere smash - p 4 docx
Bạn đang xem bản rút gọn của tài liệu. Xem và tải ngay bản đầy đủ của tài liệu tại đây (924.95 KB, 10 trang )
ptg
12 Chapter 1 Installing the IBM WebSphere sMash CLI
publish Publish the module to your local repository.
repository Manage repositories.
resolve Determine the module’s dependencies.
rollback Reverts the effects of the last resolve or update.
search Finds and prints all matching modules in the reposi-
tory.
switch Switch the module group.
update Resolves a module to its latest dependencies.
version Displays version information
As you can see, there are a bunch of available commands. Each command may have argu-
ments that it can be given, but again the command line is very helpful. You need only to type the
following to get help on a particular command:
zero help <command>
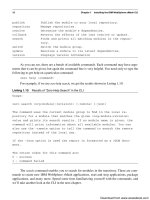
For example, if we use zero help search, we get the results shown in Listing 1.10.
Listing 1.10 Results of “Zero Help Search” in the CLI
Usage:
zero search <org:module[:revision]> [-remote] [-json]
The command uses the current module group to find in the local re-
pository for a module that matches the given <org:module:revision>
value and prints its search results. If no module name is given, the
command will print information about all available modules. You can
also use the -remote option to tell the command to search the remote
repository instead of the local one.
If the -json option is used the report is formatted as a JSON docu-
ment.
The return codes for this command are:
0 - success
1 - command failed
The search command enables you to search for modules in the repository. There are com-
mands to create new IBM WebSphere sMash applications, start and stop applications, package
applications, and many more. Spend some time familiarizing yourself with the commands, and
we’ll take another look at the CLI in the next chapter.
Download from www.wowebook.com
ptg
Conclusion 13
Conclusion
In this chapter, we learned how to install IBM WebSphere sMash and how to test that installa-
tion. We also started working with the command-line interface (CLI) and became familiar with
the available commands. In the next chapter, we’re going to take a look at three different devel-
opment environments that you can use to develop IBM WebSphere sMash applications. The first
is a web browser-based environment called AppBuilder that is built into IBM WebSphere sMash.
The second is an Eclipse-based development environment. Finally, we’ll come back to the CLI
and take a look at what else it can do.
Download from www.wowebook.com
ptg
This page intentionally left blank
Download from www.wowebook.com
ptg
15
Introduction
WebSphere sMash offers three different development environments: AppBuilder, Eclipse, and a
CLI environment. AppBuilder is a fully functional web-based application development environ-
ment. It is lightweight, easy to use, and comes with WebSphere sMash as a sMash application.
Eclipse is a full-feature development environment that is very popular the world over. WebSphere
sMash offers a plugin for the Eclipse environment that enables developers to use the full Eclipse
suite of tools to help develop WebSphere sMash applications. Finally, there is a CLI environment
that enables developers to utilize their own tooling suite to develop WebSphere sMash applica-
tions. This gives developers a broad range of development options and the ability to set up and
configure an environment in which they are comfortable.
AppBuilder
The AppBuilder environment is the quickest and easiest way to get started with WebSphere
sMash and comes included with your WebSphere sMash installation—how nifty that you can
build WebSphere sMash applications with a WebSphere sMash application! The AppBuilder uses
a lightweight browser-based environment and provides some nice features, including a drag-and-
drop client designer for the Dojo Toolkit and a graphical editor for Assemble Flow (see Chap-
ter 11, “Framework Components”). Generally, the AppBuilder is a great way to get your feet wet
and implement small projects.
C
H A P T E R
2
Choose Your
Development
Environment
Download from www.wowebook.com
ptg
16 Chapter 2 Choose Your Development Environment
Getting Started
After you have installed WebSphere sMash, you can start the AppBuilder by running the
appbuilder command from the command line in the zero directory. The first time this script is run,
it will resolve and download all the needed packages; when that has completed, you should be
presented with the usage for the script, as shown in Listing 2.1.
Listing 2.1 appbuilder Usage
Usage: appbuilder command
where command is one of:
open Starts the AppBuilder (if not already started) and
opens it in a browser
start Starts the AppBuilder
stop Stops the AppBuilder
status Prints the started or stopped state of the AppBuilder
update Updates the AppBuilder with the latest dependencies
version Prints the AppBuilder version information
help Prints this help message
Run appbuilder open from the CLI, and the AppBuilder opens in your default browser. Your
development can begin, as shown in Figure 2.1.
As you can see, there are several quick help lists to get you started: Create a new applica-
tion, open an existing application, and copy a sample.
Sample Applications
A great way to get started with WebSphere sMash is to take a look at the samples that are avail-
able. To do that, click Create from repository link. The Create from Repository dialog box
appears, as shown in Figure 2.2. Note that you need an Internet connection for this to work
because AppBuilder connects to the WebSphere sMash repository to retrieve a list of available
modules. When you type demo into the text box, the list of modules will be filtered to show only
available sample applications. The modules that are filtered are the features that can be added to
your WebSphere sMash application. We’ll look at some of them later in the book.
From here, you can select any of the sample applications. There are a number of sample
applications that demonstrate different aspects of WebSphere sMash. Choose any application that
interests you and click Create. AppBuilder will now create a new application from the repository
and open up the MyApplications page, where you can explore the application or run it as
described later in this chapter. Before we do that, though, let’s take a look at how to create an
application from scratch.
Download from www.wowebook.com
ptg
AppBuilder 17
Figure 2.1 Initial AppBuilder screen
Figure 2.2 Create a sample application from the repository.
Download from www.wowebook.com
ptg
Figure 2.3 Create new application dialog
Figure 2.4 My Applications list
Creating a New Application
To create a new application, start by clicking the Create new application link in the left navigation
bar, as shown previously in Figure 2.1. This link pops open a dialog box, which enables you to
type in an application name and choose a path in which to store your application, as shown in
Figure 2.3.
18 Chapter 2 Choose Your Development Environment
Type in an application name and the path where you want it to store the application. We
used “Test application” for our application name. You may use any name you’d like, but the
images all reference “Test application.” After your new application has been created, it will be
displayed in your My Applications list, as shown in Figure 2.4.
Editing Applications
From the application list, you can do several things. By clicking the name of the application or the
pencil icon, you can start editing your application. Click the green arrow to start the application
Download from www.wowebook.com
ptg
Figure 2.5 Initial application edit display
AppBuilder 19
and the last icon to the right to package your application for deployment onto another machine. If
you start editing the application, you’ll see several tabs that enable you to do everything from edit-
ing files and managing dependencies to debugging the running application. Figure 2.5 shows the
initial display when you first begin to edit your application.
From the initial File Editor tab, you can create and edit any of the files in the application.
By clicking the filename in the left navigation bar, you can start editing the given file. Likewise,
you can create new files by selecting the New File link in the left navigation bar. The File Editor
tab opens context-sensitive editors for each type of file. For example, there is a drag-and-drop
HTML editor that has the Dojo Toolkit support. This feature makes it easy to quickly lay out your
HTML client pages.
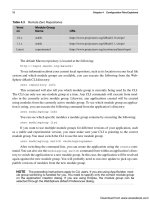
Adding Dependencies
The Dependencies tab enables you to resolve and manage your project dependencies. In Figure
2.6, you can see that the project starts with a dependency on zero.core. The zero.core module is
the base module that WebSphere sMash needs to run.
Download from www.wowebook.com
ptg
20 Chapter 2 Choose Your Development Environment
Figure 2.6 Dependencies tab
Figure 2.7 Add Dependency dialog
You can ad d a de pen de ncy on a not her pac kag e b y cl ick ing th e A dd bu tto n. Th e A dd bu tto n
opens a dialog that displays several packages that can be added to the project, as shown in
Figure 2.7.
Download from www.wowebook.com
ptg
Eclipse 21
After a dependency is added, it shows up in the list of application dependencies. You can, of
course, remove and update dependencies on the main Dependencies tab. The Explorer tab is a file
explorer that allows you to explore the application’s directory and look at files in a read-only
mode. The Console tab provides a command-line console for controlling various aspects of the
project, such as starting and stopping the application and resolving dependencies. The Console is
a web-based CLI environment and can be used like the CLI environment we discuss later in this
chapter. The last tab is the Debug tab. The Debug tab gives the application developer the ability to
set breakpoints and look at variables while the application is running. This is a powerful aspect of
the AppBuilder environment. Breakpoints can be set at any place in the code and variables
inspected to determine their state at that point in the code.
Finally, when your application is complete and you’d like to deploy it to another machine,
you’ll need to package it up. This is made very easy in the AppBuilder. Simply return to the My
Applications page and click the Package button (it looks like a little window with an arrow point-
ing to it), as shown earlier in Figure 2.4. This button enables you to package your application in a
zip file that will be stored in the application’s export directory. There is an option to package the
application as a standalone application. This packages the WebSphere sMash runtime in with the
zip file so that there will be nothing but the application to install.
Overall, the AppBuilder is a nice lightweight environment for developing WebSphere
sMash applications. Because the AppBuilder comes included with WebSphere sMash, it is easy
to get started with it and costs no additional time to set up. This feature of WebSphere sMash is
constantly evolving, so it’s worth looking at in each new release of the product.
Eclipse
Eclipse is an open source-integrated development environment used by many professional devel-
opers. There are more than a thousand commercial and open source plugins created for Eclipse
that enhance the development environment. It is intended for experienced developers and teams
with plugins for several source control systems, database access, and a plethora of others to help
with development tasks. WebSphere sMash offers a plugin for Eclipse that allows a developer to
create, build, and export WebSphere sMash applications in Eclipse. Installation instructions for
the plugin can be found on the Project Zero website ().
Sample Applications
As with the AppBuilder, you can create a sample application from the repository. This is a good
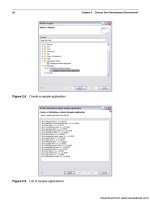
way to get a feel for various features of WebSphere sMash. To create a sample application, go to
File > New > Project and choose Examples > WebSphere sMash Examples > WebSphere sMash
Sample Application, as shown in Figure 2.8.
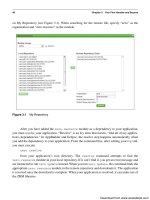
After you press the Next button, a list of sample applications will be retrieved from the
repository, as shown in Figure 2.9.
Download from www.wowebook.com