Bắt đầu với IBM Websphere smash - p 5 docx
Bạn đang xem bản rút gọn của tài liệu. Xem và tải ngay bản đầy đủ của tài liệu tại đây (930.73 KB, 10 trang )
ptg
22 Chapter 2 Choose Your Development Environment
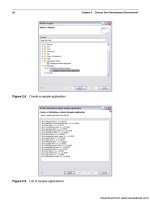
Figure 2.8 Create a sample application.
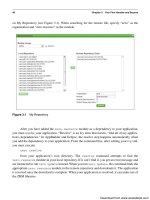
Figure 2.9 List of sample applications
Download from www.wowebook.com
ptg
Eclipse 23
As before, this list is retrieved from the remote WebSphere sMash repository, so you’ll
need an Internet connection to populate this list to. After you select a sample, click Next and then
Finish, and the sample application will be created in your current workspace. After it has been
created, you can poke around and take a look at the sample, edit it, and run it as is discussed later
in this chapter.
Creating a New Project
Creating a new project in Eclipse will be familiar to those who have used Eclipse before. Go to
File > New > Project and choose a WebSphere sMash application; then click the Next button (see
Figure 2.10).
Next, you’ll be prompted to type in a project name, and you’ll have the option to select a
location for the project. When you have completed those tasks, press the Finish button. You’ll
now have a newly created project in your workspace ready to edit or run. If you browse through
the project structure, you’ll find many project-related files to browse or edit. To run the applica-
tion, right-click on the project and select Run As > WebSphere sMash Application, as shown in
Figure 2.11.
When the project is started, the Eclipse console window displays messages to indicate that
the application was started and on which port the application is listening.
Figure 2.10 New Project dialog box
Download from www.wowebook.com
ptg
24 Chapter 2 Choose Your Development Environment
Figure 2.11 Running the application inside Eclipse
Adding Dependencies
To add dependencies, you need to double-click the ivy.xml file inside the project. To do this,
expand the project and then expand the config directory, as shown in Figure 2.12.
After the ivy.xml file is double-clicked, it will open in a dependency editor. Within this edi-
tor, you can click the Add button to add dependencies to the project, as shown in Figure 2.13.
Figure 2.12 Add dependencies by opening the ivy.xml file.
Figure 2.13 Eclipse dependency editor
Download from www.wowebook.com
ptg
Eclipse 25
If you don’t see the particular dependency you need, click the Manage Repository button to
find additional dependencies located in the remote repository. Figure 2.15 shows the Manage
Repository dialog.
On the left side of the Manage Repository dialog, you can see the modules that you cur-
rently have locally stored. On the right side, you can search for new modules that you’d like to
add locally. Then you can add them to your dependency list for use by your own applications.
Finally, when your application is finished, you’ll want to package it for distribution. To do
this, we right-click the project again and select Export. This opens up the Export dialog. In that
dialog, we need to select the WebSphere sMash Export Wizard, as shown in Figure 2.16.
Figure 2.14 Dependency Selection dialog
Clicking the Add button opens the Dependency Selection dialog, shown in Figure 2.14.
From here, you can add specific dependencies to your project that will be stored locally. These
dependencies add particular features to your WebSphere sMash application—for example, the
zero.dojo dependency. It gives the application access to Dojo JavaScript™ libraries objects that
have been created by the WebSphere sMash team for use in your applications.
Download from www.wowebook.com
ptg
26 Chapter 2 Choose Your Development Environment
Figure 2.16 Export dialog
Figure 2.15 Manage Repository dialog
Download from www.wowebook.com
ptg
Command-Line Interface Environment 27
Figure 2.17 WebSphere sMash Export Wizard
After the correct wizard is selected, press Next. This opens the WebSphere sMash Export
Wizard, as shown in Figure 2.17.
From this wizard, you can set the export directory and various options for export, including
Standalone, which packages the WebSphere sMash runtime with the application. After your
options are selected, click Finish, and a zip file of your application will be created in the chosen
destination directory.
Command-Line Interface Environment
The CLI environment is useful for developers who have an established tool chain that they’d like
to keep using. It is also the perfect match for build servers and continuous integration servers.
With WebSphere sMash installed, you can also get right into developing from the com-
mand line. The first thing you may need to do is run zero resolve. The resolve command will
retrieve any needed modules that you haven’t previously retrieved. Open a terminal or command
window and go to the directory where WebSphere sMash was installed, run the resolve, and wait
for it to finish. You may also need to resolve path issues with Java. Typically, these are solved by
Download from www.wowebook.com
ptg
28 Chapter 2 Choose Your Development Environment
setting the JAVA_HOME environment variable and verifying that the java executable is in the
PATH environment variable. The resolve command will retrieve any needed modules that you
haven’t previously retrieved.
Sample Applications
Next, you can get a list of the available sample applications from the local and remote reposito-
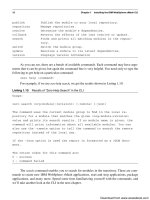
ries. To do this, use this search command:
zero search <org:module[:revision]> [-remote]
To search for the available sample applications, you’ll use the following:
zero search “*demo*” -remote
This returns a list of sample applications similar to the example in Listing 2.2.
Listing 2.2 Sample Applications
zero:zero.openajax.contentprovider.demo:1.1.1.0.28384
zero:zero.connection.demo:1.1.1.0.29382
zero:zero.officemonitor.demo:1.1.1.0.29638
zero:zero.books.demo:1.1.1.0.28384
zero:zero.flow.demo:1.1.1.0.29638
zero:zero.atom.feed.demo:1.1.1.0.28434
zero:zero.employee.demo:1.1.1.0.29363
zero:zero.phpemployee.demo:1.1.1.0.29363
zero:zero.atom.demo:1.1.1.0.28384
zero:zero.openid.demo:1.1.1.0.30292
zero:zero.messaging.broker1.demo:1.1.1.0.24952
zero:zero.iwidgets.demo:1.1.1.0.30273
zero:zero.flickr.demo:1.1.1.0.30273
zero:zero.suggest.demo:1.1.1.0.30023
zero:zero.travelrequest.demo:1.1.1.0.30227
zero:zero.hellodojo.demo:1.1.1.0.30020
zero:zero.messaging.app1.demo:1.1.1.0.25935
zero:zero.kicker.demo:1.1.1.0.26427
zero:zero.openajax.demo:1.1.1.0.29638
zero:zero.messaging.app2.demo:1.1.1.0.25935
CWPZT0600I: Command search was successful
Download from www.wowebook.com
ptg
Command-Line Interface Environment 29
As you can see, there are a number of available samples. You can create these applications
locally by using the create command. This retrieves the sample from the remote repository and
stores it locally for you to use:
zero create <name> from <org:module:revision>
In this case, let’s pick the kicker sample application:
zero create zero.kicker.demo from zero:zero.kicker.demo
This command created a new directory in the current directory named zero.kicker.demo. If
you browse that directory, you’ll notice that the sample application has been created with the
same structure and files as the other two environments. You can use the text editor of your choice
to edit the files and save them. In the next section, we learn how to run applications from the com-
mand line in more detail.
Creating a New Application
The next step is to create an application of your own. If you go back to the WebSphere sMash
directory, you can create a new application by using the create command again, as follows:
zero create myApp
Notice that creating an application from scratch does not require the use of the “from”
clause to specify the module from which we’re creating the application. This has again created a
new directory—the myApp directory—with our application’s base structure in it. The new appli-
cation is already complete and ready to run. To run the application, we need to change only to the
directory and issue the start command, as follows:
zero start
When the command has been executed, it returns a message that tells you the URL and port
on which your new application is listening—for example:
Application started and servicing requests at
http://localhost:8080/
CWPZT0600I: Command start was successful
Again looking at the directory structure, you’ll see all the same files that you would have
seen in the AppBuilder and the Eclipse environments. WebSphere sMash applications are dynam-
ically built so that you can make changes, and the results will generally be seen immediately
within the running application. The only exception to this rule is changes to the zero.config file,
which requires a restart of the application by issuing a stop command followed by a start com-
mand. To stop the application, you need to issue only the stop command, as follows:
zero stop
This stops the application, closing any resources that were opened.
Download from www.wowebook.com
ptg
30 Chapter 2 Choose Your Development Environment
Adding Dependencies
At some point during the course of developing an application, you’ll need to add new dependen-
cies to your project. To do this from the command line, you’ll need to open up the ivy.xml file in
the config directory of the application and add a dependency line, such as the following:
<dependency org=”zero” name=”zero.timer” rev=”[1.0.0.0,
2.0.0.0[“/>
The preceding line would add a dependency on the zero.timer module. After this depend-
ency is added, you should once again issue the resolve command; then you can use the module in
your code. To execute the resolve command, return to the root of your application directory and
issue the following:
zero resolve
This retrieves the module from the remote repository, allowing it to be used in your
application.
Deploying Your Application
At some point, you’ll want to package your application for deployment on other machines. To do
this, use the package command:
zero package [shared | standalone]
By default, the application is packaged as shared and stored in the export directory. A
shared application package is one that is deployed into a WebSphere sMash runtime environ-
ment. That is a server that has WebSphere sMash already installed, whereas a standalone applica-
tion is one that includes the WebSphere sMash runtime as part of the package. No matter which
path you choose, they are both compressed into zip files and stored in the export directory.
Finally, if you need help navigating the WebSphere sMash CLI, you need to use only the help
command:
zero help <command>
Enter any zero command, and all help that is available will be retrieved. To see a list of
available commands, enter only the zero command. The help also shows the return codes and
what each means to allow for easier development of scripts. As you can see, the command line is
easy to use, powerful, and scriptable. The CLI can integrate with nearly any tool chain that you
are already using.
Conclusion
We have looked at three different development environments for WebSphere sMash. The App-
Builder is a built-in environment that is supplied with WebSphere sMash and enables developers
to get started quickly. It works well for learning WebSphere sMash and can be used for small
and quick application development. The Eclipse plugin development environment is an estab-
Download from www.wowebook.com
ptg
Conclusion 31
lished, well-known environment with a lot of features. It has many plugins for source control
and other team-oriented activities. This environment is well suited for teams of developers on
any size project. Finally, we looked at the CLI environment. Individual developers may prefer
this environment because it offers the most flexibility in tooling use and scripting capabilities.
The CLI environment is well suited for use on build and continuous integration servers. With all
these options for development, you’re free to choose whichever suits your needs.
Download from www.wowebook.com