PHP and MySQL Web Development - P102 doc
Bạn đang xem bản rút gọn của tài liệu. Xem và tải ngay bản đầy đủ của tài liệu tại đây (100.62 KB, 5 trang )
477
Implementing the Database
We will begin by implementing the MySQL database for this application as it will be
required for virtually all the other functionality to work.
Then we will work through the code in the order it was written, starting from the
front page, going through the user authentication, to bookmark storage and retrieval, and
finally to recommendations.This order is fairly logical—it’s just a question of working
out the dependencies and building first the things that will be required for later mod-
ules.
Note
For the code in this project to work as written, you will need to have switched on magic quotes. If you have
not done this, then you will need to addslashes() to data being inserted to the MySQL database, and
stripslashes() from data retrieved from the database. We have used this as a useful shortcut.
Implementing the Database
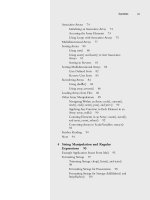
We only require a fairly simple schema for the PHPBookmark database.We need to
store users and their email addresses and passwords.We also need to store the URL of a
bookmark. One user can have many bookmarks, and many users can register the same
bookmark.We therefore have two tables, user and bookmark, as shown in Figure 24.2.
username passwd email
laura 7cbf26201e73c29b
luke 1fef10690eeb2e59
username
user
bookmark
bm_URL
laura
laura
Figure 24.2 Database schema for the PHPBookmark system.
The user table will store the user’s username (which is the primary key), password, and
email address.
The bookmark table will store username and bookmark (bm_URL) pairs.The user-
name in this table will refer back to a username from the user table.
The SQL to create this database, and to create a user for connecting to the database
from the Web, is shown in Listing 24.1.You should edit it if you plan to use it on your
system—change the user’s password to something more secure!
30 525x ch24 1/24/03 3:36 PM Page 477
478
Chapter 24 Building User Authentication and Personalization
Listing 24.1 bookmarks.sql—SQL File to Set Up the Bookmark Database
create database bookmarks;
use bookmarks;
create table user (
username varchar(16) primary key,
passwd char(16) not null,
email varchar(100) not null
);
create table bookmark (
username varchar(16) not null,
bm_URL varchar(255) not null,
index (username),
index (bm_URL)
);
grant select, insert, update, delete
on bookmarks.*
to bm_user@localhost identified by 'password';
You can set up this database on your system by running this set of commands as the root
MySQL user.You can do this with the following command on your system’s command
line:
mysql -u root -p < bookmarks.sql
You will then be prompted to type in your password.
With the database set up, let’s go on and implement the basic site.
Implementing the Basic Site
The first page we’ll build will be called login.php because it provides users with the
opportunity to log in to the system.The code for this first page is shown in Listing 24.2.
Listing 24.2 login.php—Front Page of the PHPBookmark System
<?php
require_once('bookmark_fns.php');
do_html_header('');
display_site_info();
display_login_form();
do_html_footer();
?>
30 525x ch24 1/24/03 3:36 PM Page 478
479
Implementing the Basic Site
This code looks very simple, as it is mostly calling functions from the function API that
we will construct for this application.We’ll look at the details of these functions in a
minute. Just looking at this file, we can see that we are including a file (containing the
functions) and then calling some functions to render an HTML header, display some
content, and render an HTML footer.
The output from this script is shown in Figure 24.3.
Figure 24.3 The front page of the PHPBookmark system is
produced by the HTML rendering functions in login.php.
The functions for the system are all included in the file bookmark_fns.php, shown in
Listing 24.3.
Listing 24.3 bookmark_fns.php—Include File of Functions for the Bookmark
Application
<?php
// We can include this file in all our files
// this way, every file will contain all our functions
require_once('data_valid_fns.php');
require_once('db_fns.php');
require_once('user_auth_fns.php');
require_once('output_fns.php');
require_once('url_fns.php');
?>
As you can see, this file is just a container for the five other include files we will use in
this application.We have structured it like this because the functions fall into logical
30 525x ch24 1/24/03 3:36 PM Page 479
480
Chapter 24 Building User Authentication and Personalization
groups. Some of these groups might be useful for other projects, so we put each function
group into a different file where we will know where to find them when we want them
again.We constructed the bookmark_fns.php file because we will use most of the five
function files in most of our scripts. It is easier to include this one file in each script
rather than having five include statements.
Note that the require_once() construct only exists in PHP from version 4.0.1pl2. If
you are using a prior version, you will need to use require() or include() and ensure
that the files do not get loaded multiple times.
In this particular case, we are using functions from the file output_fns.php.These are
all straightforward functions that output fairly plain HTML.This file includes the four
functions we have used in login.php, that is, do_html_header(), display_site_info(),
display_login_form(),and do_html_footer(),among others.
We will not go through all these functions in detail, but we will look at one as an
example.The code for do_html_header() is shown in Listing 24.4.
Listing 24.4 do_html_header() Function from output_fns.php—This Function
Outputs the Standard Header That Will Appear on Each Page in
the Application
function do_html_header($title)
{
// print an HTML header
?>
<html>
<head>
<title><?php echo $title;?></title>
<style>
body { font-family: Arial, Helvetica, sans-serif; font-size: 13px }
li, td { font-family: Arial, Helvetica, sans-serif; font-size: 13px }
hr { color: #3333cc; width=300; text-align=left}
a { color: #000000 }
</style>
</head>
<body>
<img src="bookmark.gif" alt="PHPbookmark logo" border="0"
align="left" valign="bottom" height="55" width="57" />
<h1> PHPbookmark</h1>
<hr />
<?php
if($title)
do_html_heading($title);
}
As you can see, the only logic in this function is to add the appropriate title and heading
to the page.The other functions we have used in login.php are similar.The function
30 525x ch24 1/24/03 3:36 PM Page 480
481
Implementing User Authentication
display_site_info() adds some general text about the site; display_login_form()
displays the grey form shown in Figure 24.3; and do_html_footer() adds a standard
HTML footer to the page.
The advantages to isolating or removing HTML from your main logic stream are dis-
cussed in Chapter 22,“Using PHP and MySQL for Large Projects.”We will use the
function API approach here, and a template-based approach in the next chapter for con-
trast.
Looking at Figure 24.3, you can see that there are three options on this page—users
can register, log in if they have already registered, or reset their password if they have for-
gotten it.To implement these modules we will move on to the next section, user
authentication.
Implementing User Authentication
There are four main elements to the user authentication module: user registration, login
and logout, changing passwords, and resetting passwords.We will look at each of these in
turn.
Registering
To register a user, we need to get his details via a form and enter him in the database.
When a user clicks on the “Not a member?” link on the login.php page, they will be
taken to a registration form produced by register_form.php.This script is shown in
Listing 24.5.
Listing 24.5 register_form.php—This Form Gives Users the Opportunity to
Register with PHPBookmarks
<?php
require_once('bookmark_fns.php');
do_html_header('User Registration');
display_registration_form();
do_html_footer();
?>
Again, you can see that this page is fairly simple and just calls functions from the output
library in output_fns.php.The output of this script is shown in Figure 24.4.
The grey form on this page is output by the function display_registration_
form(), contained in output_fns.php.When the user clicks on the Register button, he
will be taken to the script register_new.php. This script is shown in Listing 24.6.
30 525x ch24 1/24/03 3:36 PM Page 481