Manning Windows Forms Programming (phần 7) docx
Bạn đang xem bản rút gọn của tài liệu. Xem và tải ngay bản đầy đủ của tài liệu tại đây (388.24 KB, 50 trang )
266 CHAPTER 9 BASIC CONTROLS
This ensures that any new objects added to the project will be created with this
namespace. With this change in place, we can create our base form.
Here we will just create the form and its controls. Later in this section we will cre-
ate some infrastructure that will be useful in our derived forms later in the chapter.
CREATE THE BASEEDITDLG FORM
Action Result
2 Add a new
Form to the MyPhotoAlbum
project called “BaseEditDlg.”
The new class appears in the Solution Explorer
window and the BaseEditDlg.cs [Design]
window is displayed.
3 Add the three buttons to the form. Assign
their settings and position as shown.
4 Add a
Panel to the top of the form.
Note: The
Modifiers property used here
establishes the accessibility level of the
control. The three buttons use the default
setting of Private. The Protected setting
creates a
protected control so that it can
be modified in subclasses.
Settings
Button Property Value
OK (Name) btnOk
DialogResult OK
Text &OK
Reset (Name) btnReset
Text &Reset
Cancel (Name) btnCancel
DialogResult Cancel
Text &Cancel
Settings
Property Value
BorderStyle FixedSingle
Modifiers Protected
FORM INHERITANCE 267
The code generated here is similar to code we have seen for other forms in our appli-
cation. The one exception is the
panel1 control. The three buttons are defined as
private controls as have all the controls we created in earlier chapters. The panel1
object is a protected control. As we shall see, this will allow our child forms to
modify the settings of this panel, and in particular change its size to accommodate the
desired collection of controls.
namespace Manning.MyPhotoAlbum
{
/// <summary>
/// Base form window.
/// </summary>
public class BaseEditDlg : System.Windows.Forms.Form
{
private System.Windows.Forms.Button btnOk;
private System.Windows.Forms.Button btnReset;
private System.Windows.Forms.Button btnCancel;
protected System.Windows.Forms.Panel panel1;
The cause of this change is the Modifiers property setting. This is not an actual
property in the C# sense, and does not appear in the documentation for the
Button
class. This setting appears in the Properties window within Visual Studio to allow the
access level for a control to be set. There are five possible values of this setting, as
shown in the following table:
5 Set the properties for the BaseEditDlg
form to make it a dialog box.
CREATE THE BASEEDITDLG FORM (continued)
Action Result
Settings
Property Value
AcceptButton btnOk
CancelButton btnCancel
FormBorderStyle FixedDialog
MaximizeBox False
MinimizeBox False
ShowInTaskBar False
Size 300, 320
268 CHAPTER 9 BASIC CONTROLS
Based on the table, we could have used either the Protected or Protected Inter-
nal
setting here. Since there is no reason to prevent derived forms in external assem-
blies from modifying the
Panel control, the Protected value will work just fine.
Before we move on, notice that our subclasses will not be able to add
Click han-
dlers for our private buttons. The OK and Cancel buttons have assigned actions due
to their
DialogResult setting. When either button is clicked, the dialog is deacti-
vated and the appropriate value returned. We will require a way to save our modified
settings when the OK button is clicked, and we need a way to perform an action when
the Reset button is clicked.
As a solution, let’s add two protected methods that child classes can implement
to handle these situations. We will create a
SaveSettings method to store the mod-
ified values, and a
ResetSettings method to handle a click of the Reset button.
This continues our previous steps.
Possible values for the Modifiers property
Value C# equivalent Comments for Form inheritance
Public public Any class, regardless of where and how it is defined, can modify
the control. This is not typically used, since you do not normally
want any object to modify the location, size, or other internal
control settings of your form.
Protected protected Any subclass of the form, regardless of where it is defined, can
modify the control.
Protected
Internal
protected
internal
Any subclass of the form that is defined in the same assembly
can modify the control.
Internal internal Any class in the same assembly, regardless of how it is defined,
can modify the control. This is safer than public access, since
you typically have control over the classes common to an
assembly.
Private private No subclass can modify the control. This is the default setting.
CREATE OVERRIDABLE METHODS FOR OK AND RESET BUTTONS
Action Result
6 Create a protected virtual method for
resetting the form.
protected virtual void ResetSettings()
{
// Subclasses override to reset form
}
7 Add a Click handler for the Reset
button to invoke this new method.
private void btnReset_Click
(object sender, System.EventArgs e)
{
ResetSettings();
}
8 Create a protected virtual method for
saving the dialog settings when a
form is deactivated. This should return
whether the save was successful.
protected virtual bool SaveSettings()
{
// Subclasses override to save form
return true;
}
FORM INHERITANCE 269
The
ResetSettings and SaveSettings methods are now available to our
derived forms. Compile your code to make the base form available for inheritance.
Next, let’s create a derived form for editing a photograph’s settings. The
Base-
EditDlg
form will act as the parent of this new form.
9.1.2 Creating a derived form
A new form is derived from an existing form the same way that any new class is derived
from an existing class. The base form is defined as the parent class of the new form.
public class PhotoEditDlg : Manning.MyPhotoAlbum.BaseEditDlg
{
// class definition goes here
}
In our case, we will create a derived form and leave the addition of new members for
the subsequent sections. Visual Studio supports the creation of inherited forms
graphically via an Add Inherited Form… menu in the Project menu, or the context
menu of the project itself. This is detailed in the following steps.
9 Override the OnClosing method for
the form to invoke this new method
when the user clicks the OK button.
Note: This method is discussed in
detail in chapter 8. Note how the set-
tings are saved only if a subclass has
not cancelled the operation.
protected override void OnClosing
(CancelEventArgs e)
{
if (!e.Cancel && (this.DialogResult
== DialogResult.OK))
{
e.Cancel = ! SaveSettings();
}
base.OnClosing(e);
}
CREATE OVERRIDABLE METHODS FOR OK AND RESET BUTTONS (continued)
Action Result
DERIVE THE PHOTOEDITDLG FORM FROM THE BASEEDITDLG FORM
Action Result
1 Open the Add New Item dialog to
add a new
PhotoEditDlg form
inherited from the existing
BaseEditDlg form.
The Add New Item dialog displays with the Inherited
Form template selected by default.
How-to
a. In the Solution Explorer window,
right-click on the MyPhotoAlbum
project.
b. Select Add Inherited Form…
from the Add menu.
c. Enter the name “PhotoEditDlg.”
270 CHAPTER 9 BASIC CONTROLS
View the code generated in the PhotoEditDlg.cs file, an excerpt of which follows.
You will note that the new class is based on the
BaseEditDlg class, and does not yet
contain any controls of its own.
namespace Manning.MyPhotoAlbum
{
public class PhotoEditDlg : Manning.MyPhotoAlbum.BaseEditDlg
{
private System.ComponentModel.IContainer components = null;
. . .
#region Designer generated code
2 Click the Open button to display the
Inheritance Picker dialog.
This window is shown in the next step.
3 Define
BasedEditDlg as the base
class for the new form.
Note: If you get an error here, it
likely means that your
BaseEdit-
Dlg form was never compiled.
Visual Studio looks for inheritable
forms in the existing assembly, so
you must compile before you can
inherit.
4 Click the OK button in the
Inheritance Picker dialog to create
the class file and add it to the
MyPhotoAlbum project.
Settings
Set the Text property to
“PhotoEditDlg” to distinguish this
window from our base form.
A new file PhotoEditDlg.cs is added to the project and
the PhotoEditDlg.cs [Design] window is displayed.
Note: Notice the small graphic on the existing
controls here. This graphic indicates that these
controls are inherited by the form.
DERIVE THE PHOTOEDITDLG FORM FROM THE BASEEDITDLG FORM (continued)
Action Result
LABELS AND TEXT BOXES 271
/// <summary>
/// Required method for Designer support - do not modify
/// the contents of this method with the code editor.
/// </summary>
private void InitializeComponent()
{
components = new System.ComponentModel.Container();
. . .
}
#endregion
. . .
}
}
Take a look at the properties for the PhotoEditDlg object. The form has inherited
all of the settings from our
BaseEditDlg form to make it into a dialog box. The but-
tons and panel from the base class appear on the form as well, and you can examine
the properties for the individual buttons. Note in particular that the OK, Reset, and
Cancel buttons are private and cannot be modified, while the protected
Panel can.
We will leave the topic of inherited forms for now and move on to specific con-
trols for our
PhotoEditDlg form. Before we do, it is worth realizing how powerful
this feature really is. For example, a standard form for a database table could be cre-
ated. Applications that use this table can customize the form for their specific needs,
or libraries that extend the existing database can build a new form based on the orig-
inal. In many cases, changes to the original database can be encoded in the base class
in such a way that no changes are required in the inherited forms.
When you need a set of forms in your application based on a common concept
or theme, consider creating a base form from which other forms can be derived.
9.2 LABELS AND TEXT BOXES
In our MyPhotos application, we have already used the Label and TextBox classes
while creating dialog boxes in chapter 8. Here we will look at these classes in a bit
more detail as we place them on our
PhotoEditDlg form.
To do this, we need to come up with some reasonable properties in our
Photo-
graph
class that will facilitate the creation of these and other controls. The following
features will serve our purposes rather well:
• Caption—a caption for the photo. We created this property in chapter 8.
• Date—the date the photograph was taken. We will present this as a string on
our form here, and convert our dialog to use the
DateTimePicker control in
chapter 11.
• Photographer—the person who took the photo. For now, we will treat this set-
ting as a string. Later in the book this setting will be taken from a list of possi-
ble photographers.
• Notes—random notes or other comments about the photograph.
272 CHAPTER 9 BASIC CONTROLS
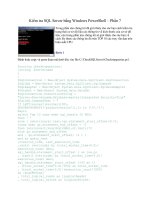
A dialog to support these new settings is shown in figure 9.2. This dialog will be con-
structed and discussed over the next few sections. In this section we will create the
infrastructure required in the
Photograph class to support these new settings, add
the required controls to the dialog, and invoke the dialog from the main form of our
MyPhotos class. We also look at some of the settings and events provided by the
TextBox class for modifying the behavior or appearance of the control.
We will start with the changes required in our
Photograph class.
9.2.1 E
XPANDING THE PHOTOGRAPH CLASS
In order to support the date, photograph, and notes settings in our photos, we need
to make a few changes. This section adds these features to our
Photograph object,
as well as the ability to read and write photographs, and update the
Save and Open
methods in our PhotoAlbum class.
We begin with some variables to hold these values and properties to provide exter-
nal access.
Set the version number of the MyPhotoAlbum library to 9.2.
Figure 9.2
Our Photo Properties dialog adds
Label and Textbox controls to our
inherited form.
ADD NEW MEMBERS TO THE PHOTOGRAPH CLASS
Action Result
1 In the Photograph.cs file, add
some variables to hold the new
settings.
Note: The
DateTime structure
used here represents a spe-
cific day and time.
. . .
private string _caption;
private DateTime _dateTaken;
private string _photographer;
private string _notes;
LABELS AND TEXT BOXES 273
This code is similar to member fields and properties we have seen before, except for
the
DateTime structure. This structure represents an instant in time measured in
100 nanosecond units since 12:00:00 AM on January 1, 0001, with a maximum
value of 11:59:59 PM on December 31, 9999. Each nanosecond unit of time is called
a tick. Members of this structure allow you to add, subtract, format, and otherwise
manipulate date and time values. A related
TimeSpan structure represents an interval
of time. You can look up these structures in the .NET Framework documentation for
more information on these types.
With our fields and properties defined, we next need to store and retrieve these
values in the
Save and Open methods of our PhotoAlbum class. Since the Photo-
graph class is becoming a bit more complex, we will create
Read and Write methods
in this class to encapsulate the logic required. The
Write method will store a photo
into an open
StreamWriter object, while various Read methods will accept an open
StreamReader and return a Photograph object.
In our
PhotoAlbum class, we will use these new methods to save and load a new
version of our album file. It will be version 92, to match the current section of the book.
Let's continue our previous steps and create
Read and Write methods in our
Photograph class.
2 Initialize these new settings in
the constructor.
public Photograph(string fileName)
{
_fileName = fileName;
_bitmap = null;
_caption = Path.
GetFileNameWithoutExtension(fileName);
_dateTaken = DateTime.Now;
_photographer = "unknown";
_notes = "no notes provided";
}
3 Add properties to set and
retrieve these values.
Note: A
Caption property was
added in chapter 8, and is not
shown here.
public DateTime DateTaken
{
get { return _dateTaken; }
set { _dateTaken = value; }
}
public string Photographer
{
get { return _photographer; }
set { _photographer = value; }
}
public string Notes
{
get { return _notes; }
set { _notes = value; }
}
ADD NEW MEMBERS TO THE PHOTOGRAPH CLASS (continued)
Action Result
274 CHAPTER 9 BASIC CONTROLS
ADD READ AND WRITE METHODS TO THE PHOTOGRAPH CLASS
Action Result
4 Create a public
Write method in the
Photograph.cs file to store a
Photograph into a given file.
public void Write(StreamWriter sw)
{
// First write the file and caption.
sw.WriteLine(this.FileName);
sw.WriteLine(this.Caption);
// Write the date and photographer
sw.WriteLine(this.DateTaken.Ticks);
sw.WriteLine(this.Photographer);
// Finally, write any notes
sw.WriteLine(this.Notes.Length);
sw.Write(this.Notes.ToCharArray());
sw.WriteLine();
}
5 Create a ReadVersion66 and
ReadVersion83 method to read in
the data in the existing formats.
Note: These methods are static
since they create a new
Photograph
instance from the data provided by
the given stream.
static public Photograph
ReadVersion66(StreamReader sr)
{
String name = sr.ReadLine();
if (name != null)
return new Photograph(name);
else
return null;
}
static public Photograph
ReadVersion83(StreamReader sr)
{
String name = sr.ReadLine();
if (name == null)
return null;
Photograph p = new Photograph(name);
p.Caption = sr.ReadLine();
return p;
}
How-to
a. Store the file name, caption, and
photographer as a string.
b. Convert the
DateTime to a num-
ber of ticks and store this value.
c. Since the notes may span multiple
lines, store the length of this string
and write its value as an array of
characters.
LABELS AND TEXT BOXES 275
Before we update the
Save and Open methods in the PhotoAlbum class, a short dis-
cussion of our sudden use of the
delegate keyword is in order.
We briefly mentioned in chapter 1 that a delegate acts much like a function
pointer in C++. It identifies the signature for a method without actually defining a
method. The advantage of C# delegates is that they are type safe. It is impossible to
assign a nonconforming method to a delegate.
In our code, we create a delegate called
ReadDelegate. This delegate encapsu-
lates methods that accept a single
StreamReader parameter and return a Photo-
graph
object. It just so happens that this matches the signature of the three read
methods we created in the prior steps. This delegate can be used to great advantage
when opening an album. Let’s see how this looks.
6 Create a static ReadVersion92
method to read in a
Photograph for
our new version 92 of an album file.
static public Photograph
ReadVersion92(StreamReader sr)
{
// Use ReadVer83 for file and caption
Photograph p = ReadVersion83(sr);
if (p == null)
return null;
// Read date (may throw FormatException)
string data = sr.ReadLine();
long ticks = Convert.ToInt64(data);
p.DateTaken = new DateTime(ticks);
// Read the photographer
p.Photographer = sr.ReadLine();
// Read the notes size
data = sr.ReadLine();
int len = Convert.ToInt32(data);
// Read the actual notes characters
char[] notesArray = new char[len];
sr.Read(notesArray, 0, len);
p.Notes = new string(notesArray);
sr.ReadLine();
return p;
}
7 Create a public delegate to use
when selecting the appropriate
reader.
public delegate Photograph
ReadDelegate(StreamReader sr);
ADD READ AND WRITE METHODS TO THE PHOTOGRAPH CLASS (continued)
Action Result
How-to
a. Load the file name and caption
using the
ReadVersion83
method.
b. Read the date as a string and con-
vert it to a
long integer to instanti-
ate a
DateTime object.
c. Read the photographer as a string.
d. For the notes, read in the number
of characters and use this value to
read an equivalent-sized array of
characters. This array can then be
used to create a string.
e. After the
Notes property is set, a
final
ReadLine call is required to
clear the final line in preparation for
reading the next
Photograph
object.
276 CHAPTER 9 BASIC CONTROLS
.
UPDATE THE SAVE AND OPEN METHODS IN PHOTOALBUM CLASS
Action Result
8 In the
PhotoAlbum.cs source code
window, set the current version
constant to 92.
private const int CurrentVersion = 92;
9 Modify the Save method to use the
new
Photograph.Write method.
Note: The initial part of this
method creates the
FileStream
and
StreamWriter objects. This
code does not change, and is not
shown here.
Similarly, the code for the
finally clause is also not shown.
public void Save(string fileName)
{
. . .
try
{
sw.WriteLine(
_CurrentVersion.ToString());
// Store each photo separately
foreach (Photograph photo in this)
{
photo.Write(sw);
}
this._fileName = fileName;
}
finally
. . .
}
10 Modify the Open method to use the
new
ReadDelegate delegate.
public void Open(string fileName)
{
. . .
try
{
Clear();
this._fileName = fileName;
Photograph.ReadDelegate ReadPhoto;
11 In the switch statement, select the
correct version of the
Photograph
reader.
How-to
Use a new statement to instantiate
a new version of the
delegate for
each version.
switch (version)
{
case 66:
ReadPhoto = new
Photograph.ReadDelegate(
Photograph.ReadVersion66);
break;
case 83:
ReadPhoto = new
Photograph.ReadDelegate(
Photograph.ReadVersion83);
break;
case 92:
ReadPhoto = new
Photograph.ReadDelegate(
Photograph.ReadVersion92);
break;
default:
// Unknown version or bad file.
throw (new IOException(. . .));
}
LABELS AND TEXT BOXES 277
This neat little use of delegates makes our code much more readable. A delegate
instance is declared just like any other variable, except that in this case the type is our
delegate.
Photograph.ReadDelegate ReadPhoto;
This variable is assigned by creating a new instance of the delegate object, providing a
method with a matching signature. Note that in our case the method happens to be
static. A delegate tracks both an object and a method, allowing both internal and
static members of a class to be used. In our code, when the version number is 92, the
PhotoReader variable is initialized as follows. If the method provided does not match
the signature assigned to the delegate, a compiler error is generated. Such compiler-
time checking is a big advantage of delegates in C# over function pointers in C++.
case 92:
ReadPhoto = new Photograph.ReadDelegate(Photograph.ReadVersion92);
break;
The delegate is then used like any other function call to invoke the assigned method.
// Read each photograph in the album
Photograph p = ReadPhoto(sr);
while (p != null)
{
this.Add(p);
p = ReadPhoto(sr);
}
Our PhotoAlbum class is now ready. Let’s get back to our PhotoEditDlg form and
begin creating our new form.
9.2.2 C
REATING THE PHOTOEDITDLG PANEL AREA
Looking back at the PhotoEditDlg dialog we wish to create, let’s focus on the
Panel control at the top of the form. In chapter 7 we made use of the Panel class
for its drawing and scrolling capabilities. Here, we will use this class as a container
for other controls to improve the overall appearance of our form. While we will not
12 Use the reader delegate to load the
individual photographs.
Note: The code for the
finally
clause remains the same and is not
shown here.
// Read each photograph in the album
Photograph p = ReadPhoto(sr);
while (p != null)
{
this.Add(p);
p = ReadPhoto(sr);
}
}
finally
. . .
}
UPDATE THE SAVE AND OPEN METHODS IN PHOTOALBUM CLASS (continued)
Action Result
278 CHAPTER 9 BASIC CONTROLS
enable scrolling in our panel, realize that controls can be placed outside of the visible
portion of a panel and made accessible via the automated scroll bars discussed in
chapter 7.
We have used the
Label and TextBox controls previously in our program, so
let’s update our panel before we talk about these classes in more detail. As you recall,
the
Panel object is inherited from the base form, but is modifiable by our class since
it has a protected access level.
CREATE THE PANEL AREA OF THE PHOTOEDITDLG FORM
Action Result
1 In the PhotoEditDlg.cs [Design] window,
modify the
Text property for the new
dialog to be “Photo Properties.”
2 Add the four Label controls to the left
side of the panel, as shown in the graphic.
Resize the panel control if necessary. Set
the properties for each label as shown.
Note: In this step you are placing the con-
trols inside the
Panel, rather than inside
the
Form. This is an important distinction.
Settings
Label Property Value
label1 Text Photo &File:
TextAlign MiddleRight
label2 Text Cap&tion:
TextAlign MiddleRight
label3 Text &Date Taken:
TextAlign MiddleRight
label4 Text &Photographer:
TextAlign MiddleRight
LABELS AND TEXT BOXES 279
Note that the labels and text boxes here are defined within the
Panel control, rather
than within the form. In the
InitializeComponent method, the controls are
added to the
Panel object much like we have seen other controls added to the Form
class in previous chapters.
this.panel1.Controls.AddRange(new System.Windows.Forms.Control[] {
this.txtPhotographer,
this.txtDate,
this.txtCaption,
this.txtPhotoFile,
this.label4,
this.label3,
this.label2,
this.label1 });
3 Add the four
TextBox controls to the right
side of the panel. Position and size these
controls as in the graphic, and use the
following properties.
Note: The
txtPhotoFile text box dis-
plays a gray background to indicate it is
read-only.
4 Set the tab order for these new controls.
How-to
In the tab order view of the page, click
controls within the panel in order. Press
the Esc key when finished.
Note: As you can see in the graphic, the
controls within the panel are numbered to
indicate both the tab index of the panel
and of the specific control.
CREATE THE PANEL AREA OF THE PHOTOEDITDLG FORM
Action Result
Settings
TextBox Property Value
Photo File (Name) txtPhotoFile
ReadOnly True
Text
Caption (Name) txtCaption
Text
Date (Name) txtDate
Text
Photographer (Name) txtPhotographer
Text
280 CHAPTER 9 BASIC CONTROLS
The setting of the tab order in the final step, which internally assigns the TabIndex
property for each control, is very important here. We could have set these values
explicitly in steps 2 and 3, but the method in step 4 allowed us to set all controls at
once. Since the
Label and TextBox controls are located within the Panel object,
the tab order defined applies only within the panel, so the
TabIndex values for our
labels and text boxes start at zero.
While label controls do not participate in the tab order, their
TabIndex setting
is still utilized. When you tab to or activate a label, the next control in the tab order
will receive focus. This is the same behavior provided by the MFC
CStatic class in
Visual C++.
.NET Table 9.1 Label class
The Label class is a control that displays a text string or image within a form. This class is
part of the of the
System.Windows.Forms namespace, and inherits from the Control class.
A
Label object can be assigned a tab index, but when activated the next control in the tab
order will always receive focus. See .NET Table 4.1 on page 104 for a list of members inher-
ited from the
Control class.
Public Properties
AutoSize Gets or sets whether the label should
automatically resize to display its contents.
BorderStyle Gets or sets the border for the label, taken from
the
BorderStyle enumeration. The default is
None.
FlatStyle Gets or sets the flat style for the label, using the
FlatStyle enumeration. The default is
Standard.
Image Gets or sets the image to appear on the label.
ImageList Gets or sets an
ImageList object to associate
with the label. The
ImageIndex property
determines which image is displayed on the
label.
PreferredHeight Gets the height of the control, in pixels,
assuming a single line of text is displayed.
PreferredWidth Gets the width of the control, in pixels, assuming
a single line of text is displayed.
TextAlign Gets or sets the text alignment to use for text in
the control.
UseMnemonic Gets or sets whether an ampersand (&) in the
Text property is interpreted as an access key
prefix character.
Public Events
AutoSizeChanged Occurs when the value of the
AutoSize
property changes.
TextAlignChanged Occurs when the value of the
TextAlign
property changes.
LABELS AND TEXT BOXES 281
This tab order behavior is especially relevant for the assigned access key, also
called a mnemonic. For example, the ampersand character “&” in the Photo File label
defines the ‘F’ character as the access key. Typing the keystroke Alt+F sets the focus
to this label. When you do this, the
txtPhotoFile control actually receives the
focus. Similarly, typing Alt+P for the Caption label will set the focus to the
txtCap-
tion
control. Such mnemonics are very useful for users, myself included, who prefer
to avoid the mouse and keep their fingers on the keyboard.
Labels include other features as well, of course. As we saw in chapter 8, they can
display a border and define an alignment for displayed text. These and other features
of the
Label class are summarized in .NET Table 9.1. The Label class is also the
parent of the
LinkLabel class, which adds the ability to perform an action when the
text on the label is clicked, similar to an HTML link in a web browser. We will use
the
LinkLabel class in chapter 18 while discussing how to include ActiveX controls
on a form.
We will use
Label objects again in future sections. For now, let’s move on to dis-
cuss some of the features of our
TextBox controls, and the TextBox class in general.
9.2.3 C
REATING THE MULTILINE TEXT BOX
The TextBox controls on our form are used to display various properties of the
Photograph object. We have already created the text box controls within the panel
area. In this section we create the text box for displaying the
Photograph.Notes
property in our dialog, and implement the protected members we defined in our base
class earlier in the chapter.
As we saw in the previous section, text boxes can be editable or read-only. In some
ways a read-only text box is similar to a
Label object with a 3D border. The major
difference is that a text box supports cut and paste operations, while a label does not.
The existing
CaptionDlg form in our application used a 3D label to illustrate this
point, so you can verify this for yourself if you prefer.
As a result, a read-only
TextBox should be used when displaying text that a user
may wish to copy. This, in fact, is why our
PhotoEditDlg form uses a read-only
TextBox to display the photograph’s file name.
The
TextBox class is based on the TextBoxBase class, which provides much of
the core functionality for text controls. An overview of this base class appears in .NET
Table 9.2.
282 CHAPTER 9 BASIC CONTROLS
As shown in the table, the TextBoxBase class provides a Multiline property that
indicates whether a derived control can accept multiple lines of text. The bottom part
of our
PhotoEditDlg form is designed to show off such a text box. This control
.NET Table 9.2 TextBoxBase class
The TextBoxBase class is a control that displays editable text and can interact with the
Clipboard class to permit cut and paste operations. This class is part of the of the Sys-
tem.Windows.Forms namespace, and inherits from the Control class. Both the TextBox
and
RichTextBox classes are derived from this abstract class. See .NET Table 4.1 on page
104 for a list of members inherited from the
Control class, and .NET Table 9.3 on page 288
for an overview of the
TextBox class.
Public
Properties
AcceptsTab Gets or sets whether a multiline text box displays a Tab
character or moves focus to the next control when the Tab
key is pressed.
CanUndo Gets or sets whether the user can undo the previous edit
performed in the text box.
Lines Gets or sets the array of strings representing the lines of
text in the control.
MaxLength Gets or sets the maximum number of characters the control
will accept.
Multiline Gets or sets whether this is a multiline text box.
ReadOnly Gets or sets whether the text is read-only.
SelectedText Gets or sets the currently selected text in the control. The
SelectedStart property indicates the location of the first
selected character.
WordWrap Gets or sets whether a multiline control automatically
wraps to the next line as required.
Public
Methods
AppendText Appends a string to the existing text in the control.
Copy Copies the current text into the
Clipboard.
Paste Replaces the current selection with the contents of the
Clipboard.
ScrollToCaret Ensures the current caret position is visible in a multiline
text box.
SelectAll Selects all text in the control. The
Select method can be
used to select a substring.
Undo Undoes the last edit operation in the text box.
Public
Events
AcceptsTab-
Changed
Occurs when the
AcceptsTab property changes.
Multiline-
Changed
Occurs when the
Multiline property changes.
LABELS AND TEXT BOXES 283
displays descriptive text about the photo, and automatically scrolls if the text
becomes too long. The following steps add this control to our dialog:
Our form is now ready, except for the internal logic to process the user’s changes.
Since our dialog is intended to edit a
Photograph object within a PhotoAlbum
collection, we need a reference to the associated PhotoAlbum object within the dia-
log. We should also implement the methods necessary to handle the OK and Reset
buttons, namely the
ResetSettings and SaveSettings methods provided by the
BaseEditDlg class.
The following steps detail these changes:
ADD A MULTILINE TEXTBOX TO THE PHOTOEDITDLG FORM
Action Result
1 Add the Notes label to the
PhotoEditDlg form in the
PhotoEditDlg.cs [Design]
window
The
AutoSize property causes the label to resize to exactly fit
its
Text value.
2 Add the multiline
TextBox
control to the form.
Note: The
Multiline property must be set to true
before the control can be resized to contain multiple lines
of text.
The
AcceptsReturn property causes the control to
treat an Enter key as a new line rather than allowing the
parent form to invoke the OK button.
Settings
Property Value
AutoSize True
TabIndex 4
Text Notes:
Settings
Property Value
(Name) txtNotes
AcceptsReturn True
Multiline True
ScrollBars Vertical
Tab In dex 5
Tex t
284 CHAPTER 9 BASIC CONTROLS
Our dialog is complete, at least for now. Applications can use it to display and modify
information about a photograph. The one exception is the date a photograph was
taken. While it is certainly possible to convert a string provided by the user into a
DateTime structure, this is not really the best way to specify a date on a form. Instead,
the
DateTimePicker control is provided especially for this purpose. We will look at
this control in chapter 11, and simply ignore the value of
txtDate for now.
The next step is to use this new dialog in our main application. This is the topic
of the next section.
INTERACTING WITH THE PHOTOALBUM OBJECT
Action Result
3 In the PhotoEditDlg.cs file add a
private
PhotoAlbum variable to
hold the album containing the
photo to display.
private PhotoAlbum _album;
4 Modify the constructor to accept
a
PhotoAlbum parameter.
public PhotoEditDlg(PhotoAlbum album)
{
5 Within the constructor, set the
album variable and call
ResetSettings to initialize the
dialog’s controls.
// This call is required . . . .
InitializeComponent();
// Initialize the dialog settings
_album = album;
ResetSettings();
}
6 Implement the ResetSettings
method to set the controls to
their corresponding settings in
the current photograph.
protected override void ResetSettings()
{
Photograph photo = _album.CurrentPhoto;
if (photo != null)
{
txtPhotoFile.Text = photo.FileName;
txtCaption.Text = photo.Caption;
txtDate.Text
= photo.DateTaken.ToString();
txtPhotographer.Text = photo.Photographer;
this.txtNotes.Text = photo.Notes;
}
}
7 Implement SaveSettings to
save the contents of the form to
the current photograph.
Note: Here, the settings are
always stored successfully, so
this method always returns
true.
protected override bool SaveSettings()
{
Photograph photo = _album.CurrentPhoto;
if (photo != null)
{
photo.Caption = txtCaption.Text;
// Ignore txtDate setting for now
photo.Photographer = txtPhotographer.Text;
photo.Notes = txtNotes.Text;
}
return true;
}
LABELS AND TEXT BOXES 285
9.2.4 A
DDING PHOTOEDITDLG TO OUR MAIN FORM
Now that our new dialog is ready, we need to display it in our MyPhotos application.
This section integrates the dialog into our application, much like we integrated the
CaptionDlg form in chapter 8.
The
CaptionDlg form does present a slight problem, in that it already allows
the caption to be edited, just like our new
PhotoEditDlg form. We could keep this
dialog around and provide two ways to edit a photograph’s caption. This might be a
little confusing to users, so we will instead remove
CaptionDlg from our application.
The step to remove this dialog follows. We will integrate the
PhotoEditDlg dia-
log into our application in a moment.
Set the version number of the MyPhotos application to 9.2.
With the caption dialog gone, our way is clear to display the PhotoEditDlg form
from our main window. We will reuse the
menuCaption menu for this purpose,
renamed and revamped by the following steps:
REMOVE THE CAPTIONDLG FORM
Action Result
1 In the Solution Explorer window, delete
the
CaptionDlg form.
Alternately
Click on the file and press the Delete key.
After clicking OK, the CaptionDlg.cs class is
removed from the project and deleted from the
file system.
How-to
a. Right-click on the CaptionDlg.cs file.
b. Select Delete from the popup menu.
c. Click OK in the confirmation box.
286 CHAPTER 9 BASIC CONTROLS
Since the dialog itself handles the initialization and storage of any changes made by the
user, and the
using statement disposes of the dialog when we are finished, there is not
much work required by our handler. When the user clicks OK, we mark that the
album has changed and update the status bar with any new caption entered by the user.
DISPLAY THE PHOTOEDITDLG FORM FROM THE MAIN WINDOW
Action Result
2 Double-click the MainForm.cs file in
the Solution Explorer window.
The Windows Forms Designer window appears for
this form.
3 Modify the properties for the Caption
menu item under the Edit menu.
Note: We could elect to use this
menu under its previous name. This
could prove confusing in the future, so
we instead rename the control in line
with its new purpose.
4 Rename the
Click event for this
menu to
menuPhotoProp_Click.
5 Replace the old handler with an
implementation to display the
PhotoEditDlg form.
Note: The old handler was called
menuCaption_Click.
private void menuPhotoProp_Click
(object sender, System.EventArgs e)
{
if (_album.CurrentPhoto == null)
return;
using (PhotoEditDlg dlg
= new PhotoEditDlg(_album))
{
if (dlg.ShowDialog()
== DialogResult.OK)
{
_bAlbumChanged = true;
sbpnlFileName.Text
= _album.CurrentPhoto.Caption;
statusBar1.Invalidate();
}
}
}
6 Update the Popup event handler for
the Edit menu to use the new menu.
private void menuEdit_Popup
(object sender, System.EventArgs e)
{
menuPhotoProp.Enabled
= (_album.Count > 0);
}
Settings
Property Value
(Name) menuPhotoProp
Text &Photo
Properties…
LABELS AND TEXT BOXES 287
So let’s see if your code actually works. Compile and run the application and open
a previously saved album file. Display the Photo Properties dialog. Note in particular
the following features:
• The differences between the read-only and editable text boxes.
• Label text cannot be highlighted, while text within text boxes can, even when
read-only.
• Use the access key for a label and notice how the following text box receives
focus.
• Press the Enter key while editing a single-line text box. The dialog behaves as if
you had clicked the OK button.
• Press the Enter key while editing within the Notes text box. Since we set the
AcceptsReturn property to true, this adds a new line within the Notes box
and does not deactivate the window.
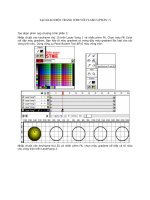
• Right-click on any text box. The default context menu will appear. This con-
text menu contains various commands for editing text, and is shown in
figure 9.3. The items in this menu correspond to methods in the
TextBox-
Base
class, as shown in .NET Table 9.2.
While our form is working just fine, there are some features missing that might make
our dialog a little more friendly. These are the subject of the next section.
9.2.5 U
SING TEXTBOX CONTROLS
So let’s add some interesting features to our text boxes. Most of the events for Text-
Box
controls are inherited from the Control and TextBoxBase classes. Members
Figure 9.3
The standard context menu for Text-
Box controls, shown here for the Date
Taken text box, disables commands
that are not currently available.
288 CHAPTER 9 BASIC CONTROLS
specific to the TextBox class appear in .NET Table 9.3. Here we will look more
closely at the
KeyPress event and the TextChanged event.
The keyboard events inherited from the
Control class are especially interesting,
and consist of the
KeyDown, KeyPress, and KeyUp events. These events are inherited
from the
Control class, and occur when a key on the keyboard is pushed down and
released while the control has focus. The
KeyDown event occurs when the key is first
pressed. The
KeyPress event activates while the key is held down and repeats while
the key remains held down. The
KeyUp event occurs when the key is released. These
events can be used to fine-tune your interfaces as the user types on the keyboard.
We will look at the keyboard events in more detail in chapter 12, but let’s do a quick
example here. Suppose we wanted the
Caption property to only contain letters or
numbers. No punctuation characters and no symbols. The
KeyPress event receives
keyboard characters as they are typed, and allows the event handler to handle or
ignore them. The
KeyPressEventArgs class is used with this event, and provides a
KeyChar property to get the character pressed, and a Handled property to get or set
whether the character has been handled. If
Handled is set to true, then the control
will not receive the character.
The obvious, albeit incorrect, way to implement such a handler would be as follows:
private void txtCaption_KeyPress(object sender, KeyPressEventArgs e)
{
.NET Table 9.3 TextBox class
The TextBox class represents a TextBoxBase control that displays a single font. This control
is part of the
System.Windows.Forms namespace, and inherits from the TextBoxBase con-
trol. Through its parent class, text boxes can support single or multiple lines, and interact with
the clipboard to cut, copy, or paste text.
Public Properties
AcceptsReturn Gets or sets whether the Enter key in a multiline
text box adds a new line of text or activates the
default button for the form.
CharacterCasing Gets or sets how the control modifies the case
of entered characters. This can be used to
display all uppercase or lowercase letters in the
text box.
PasswordChar Gets or sets the character used to mask the text
display in the control. When this property is set,
cutting or copying to the clipboard is disabled.
ScrollBars Gets or sets which scrollbars should appear in a
multiline text box.
TextAlign Gets or sets how displayed text is aligned within
the control.
Public Events
TextAlignChanged Occurs when the
TextAlign property has
changed.
LABELS AND TEXT BOXES 289
char c = e.KeyChar;
// Ignore all non-alphanumerics – not our approach
e.Handled = !(Char.IsLetter(c) || Char.IsDigit(c));
}
This implementation uses members of the System.Char class to see if the category
of the character is a letter or number. It may look good, but it also causes all other
characters to be ignored by the control, such as spaces and backspaces. Clearly, this is
not what we want.
Instead, we will allow all control and white space characters past our event handler.
This will permit the keyboard shortcuts to work, and also allows spaces in our captions.
The caption text box will only receive letters, digits, white space, and all control char-
acters. This may or may not be a good idea, by the way, since a caption such as “one-
way street” is now not permitted, since the dash ‘-’ is a punctuation character. Feel
free to remove this handler if you do not want this behavior in your program.
Another feature we could add to our dialog is to display the caption for the pho-
tograph in the title bar. Of course, this caption can be edited, and we would not want
the text box and the title bar to display different values.
The
TextChanged event occurs as text is entered, and can be used here to update
the title bar while the user is typing. We could also implement this feature using the
KeyPress event we just saw, but would have to deal with the delete and backspace
keys as well as some text-editing controls. The
TextChanged approach is a bit more
straightforward.
Let’s continue our previous steps and make this change.
ADD KEYPRESS EVENT HANDLER FOR TXTCAPTION CONTROL
Action Result
1 In the PhotoEditDlg.cs
Design
window, add a
KeyPress event
for the
txtCaption text box
control.
private void txtCaption_KeyPress
(object sender, KeyPressEventArgs e)
{
2 Implement this handler to only
permit letters and numbers to
appear in captions.
char c = e.KeyChar;
e.Handled = !(Char.IsLetterOrDigit(c)
|| Char.IsWhiteSpace(c)
|| Char.IsControl(c));
}
290 CHAPTER 9 BASIC CONTROLS
Compile and run your application to view these new changes. Verify that the caption
can contain only letters and numbers, and that the title updates automatically as the
caption is modified.
TRY IT!
As an exercise in using some of the methods available to TextBox controls,
see if you can create the standard context menu for text boxes manually and
assign it to the Notes control. You will need to add a ContextMenu ob-
ject to the form and assign it to the
txtNotes.ContextMenu property.
Assigning this property automatically disables the default context menu.
Add the eight menu items to the menu, namely Undo, a separator, Copy,
Cut, Paste, Delete, another separator, and Select All. To make your menu
different than the standard one, also add a Clear menu item at the end of
the context menu to clear the text in the box.
To process this menu, you will need a
Popup event handler for the
menu itself to enable or disable the menu items as appropriate. You will
need to use the
CanUndo, SelectedText, SelectionLength, and Se-
lectionStart
properties, and the Copy, Cut, Paste, SelectAll, and
Undo methods as part of your implementation.
If you run into difficulties, visit the book’s web site and download the
code required for this change.
This ends our discussion of Label and TextBox objects for now. We will see these
objects again in the next section and elsewhere in the book. Our next topic will create
the Album Properties dialog box as a way to introduce the button classes in the .NET
Framework.
9.3 BUTTON CLASSES
So just what is a button, exactly? For graphical interfaces, a button is a control that
establishes a specific state, typically some form of on or off. Buttons are used to per-
form immediate actions in an interface, define the behavior for a specific feature, or
UPDATE TITLE BAR DURING TXTCAPTION MODIFICATION
Action Result
3 Add a
TextChanged event
for the
txtCaption text
box control.
How-to
This is the default event for
text boxes, so you can just
double-click the control.
private void txtCaption_TextChanged
(object sender, System.EventArgs e)
{
4 Modify the title bar to
include the modified text
from the control.
this.Text = String.Format(
"{0} - Photo Properties",
txtCaption.Text);
}