Ảo hóa tài khoản người dùng và tên miền (phần I) pptx
Bạn đang xem bản rút gọn của tài liệu. Xem và tải ngay bản đầy đủ của tài liệu tại đây (160.26 KB, 11 trang )
Ảo hóa tài khoản người dùng và tên miền (phần I)
Trong bài viết sau, chúng tôi sẽ hướng dẫn, giải thích với các bạn
cách cài đặt hệ thống mail server dựa trên Postfix – được xây dựng
trên tài khoản user và domain ảo (ví dụ 2 giá trị này được lưu trữ
trong cơ sở dữ liệu MySQL). Đồng thời chúng tôi cũng xây dựng lại
toàn bộ quá trình cài đặt và thiết lập của Courier (Courier-POP3, Courier-
IMAP), qua đó Courier có thể nhận dạng được luồng thông tin dữ liệu
tương tự như MySQL.
Kết quả của Postfix server là khả năng hỗ trợ cơ chế xác thực SMTP-
AUTH, TLS và quota (quota không được tích hợp cùng với Postfix ở chế
độ mặc định), trong đó mật khẩu sẽ được lưu trữ dưới mẫu encrypted
trong cơ sở dữ liệu. Bên cạnh đó, bài viết cũng sẽ chỉ ra cách cài đặt
Amavisd, SpamAssassin và ClamAV để quét email và phát hiện các hiểm
họa đi kèm.
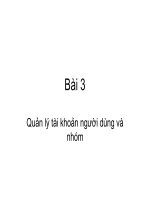
Lưu ý sơ bộ
Hệ thống sử dụng ở đây dựa trên nền tảng Fedora 13 server x86_64, có
địa chỉ IP tĩnh192.168.0.100 và hostname là server1.example.com. Thêm
vào đó, tắt bỏ tính năng firewall và SELinux.
Cài đặt 1 số phần mềm yêu cầu
Trước tiên, chúng ta cần cập nhật 1 số gói ứng dụng trên hệ thống:
yum update
yum groupinstall 'Development Tools'
yum groupinstall 'Development Libraries'
Cài đặt Apache, MySQL, phpMyAdmin
Chỉ với 1 dòng lệnh duy nhất, có bao gồm các gói cần thiết để xây dựng
hệ thống Courier-IMAP sau này:
yum install ntp httpd mysql-server php php-mysql php-mbstring rpm-
build gcc mysql-devel openssl-devel cyrus-sasl-devel pkgconfig zlib-devel
phpMyAdmin pcre-devel openldap-devel postgresql-devel expect libtool-
ltdl-devel openldap-servers libtool gdbm-devel pam-devel gamin-devel
Cài đặt Courier-IMAP, Courier-Authlib, và Maildrop
Thật bất tiện khi không có gói rpm dành cho Courier-IMAP, Courier-
Authlib, và Maildrop, do đó chúng ta cần tự xây dựng mã nguồn. Chú ý
rằng các gói RPM không nên được dựng bằng tài khoản root, courier-
imap sẽ tự động tắt bỏ khỏi quá trình biên dịch nếu phát hiện trình biên
dịch đang thực hiện bằng tài khoản root. Do đó, chúng ta cần tạo 1 tài
khoản bình thường (trong ví dụ này là falko) và tạo mật khẩu đi kèm:
useradd -m -s /bin/bash falko
passwd falko
Chúng ta sẽ cần đến cú pháp sudo sau này, để tài khoản falco có thể biên
dịch và cài đặt các gói rpm. Nhưng trước tiên, chúng ta phải cho phép tài
khoản falko để chạy tất cả câu lệnh sử dụng sudo:
visudo
Trong file vừa mở ra, sẽ có dòng root ALL=(ALL) ALL. Hãy thêm 1 dòng
tương tự dành cho falko ngay bên dưới:
[ ]
## Allow root to run any commands anywhere
root ALL=(ALL) ALL
falko ALL=(ALL) ALL
[ ]
Và bây giờ, chúng ta đã sẵn sàng xây dựng các gói rpm. Trước tiên, đăng
nhập vào tài khoản falko:
su falko
Tạo các biến môi trường:
mkdir $HOME/rpm
mkdir $HOME/rpm/SOURCES
mkdir $HOME/rpm/SPECS
mkdir $HOME/rpm/BUILD
mkdir $HOME/rpm/BUILDROOT
mkdir $HOME/rpm/SRPMS
mkdir $HOME/rpm/RPMS
mkdir $HOME/rpm/RPMS/i386
mkdir $HOME/rpm/RPMS/x86_64
echo "%_topdir $HOME/rpm" >> $HOME/.rpmmacros
Tạo tiếp thư mục downloads và tải bộ mã nguồn từ đây:
mkdir $HOME/downloads
cd $HOME/downloads
wget />authlib-0.63.0.tar.bz2/download
wget />imap-4.8.0.tar.bz2/download
wget
/>2.5.0.tar.bz2/download
Vẫn ở trong thư mục $HOME/downloads, xây dựng gói courier-authlib:
sudo rpmbuild -ta courier-authlib-0.63.0.tar.bz2
Sau đó, gói rpm sẽ có trong $HOME/rpm/RPMS/x86_64
($HOME/rpm/RPMS/i386 nếu bạn sử dụng i386):
cd $HOME/rpm/RPMS/x86_64
Sử dụng lệnh:
ls -l
để liệt kê các gói rpm thích hợp:
[falko@server1 x86_64]$ ls -l
total 516
-rw-r r 1 root root 124304 Jun 10 17:48 courier-authlib-0.63.0-
1.fc13.x86_64.rpm
-rw-r r 1 root root 258896 Jun 10 17:48 courier-authlib-debuginfo-
0.63.0-1.fc13.x86_64.rpm
-rw-r r 1 root root 35064 Jun 10 17:48 courier-authlib-devel-0.63.0-
1.fc13.x86_64.rpm
-rw-r r 1 root root 17424 Jun 10 17:48 courier-authlib-ldap-0.63.0-
1.fc13.x86_64.rpm
-rw-r r 1 root root 13956 Jun 10 17:48 courier-authlib-mysql-0.63.0-
1.fc13.x86_64.rpm
-rw-r r 1 root root 13120 Jun 10 17:48 courier-authlib-pgsql-0.63.0-
1.fc13.x86_64.rpm
-rw-r r 1 root root 8328 Jun 10 17:48 courier-authlib-pipe-0.63.0-
1.fc13.x86_64.rpm
-rw-r r 1 root root 34160 Jun 10 17:48 courier-authlib-userdb-0.63.0-
1.fc13.x86_64.rpm
[falko@server1 x86_64]$
Chọn 1 gói thích hợp và cài đặt như sau:
sudo rpm -ivh courier-authlib-0.63.0-1.fc13.x86_64.rpm courier-authlib-
mysql-0.63.0-1.fc13.x86_64.rpm courier-authlib-devel-0.63.0-
1.fc13.x86_64.rpm
Tiếp theo, quay trở lại thư mục downloads:
cd $HOME/downloads
và chạy lệnh rpmbuild lại lần nữa, nhưng không có sudo nếu không quá
trình biên dịch sẽ thất bại:
rpmbuild -ta courier-imap-4.8.0.tar.bz2
Sau quá trình này, gói rpm sẽ được tìm thấy trong thư mục
HOME/rpm/RPMS/x86_64 ($HOME/rpm/RPMS/i386 nếu bạn đang sử
dụng hệ thống i386):
cd $HOME/rpm/RPMS/x86_64
Dùng lệnh:
ls -l
sẽ liệt kê ra các gói rpm phù hợp:
[falko@server1 x86_64]$ ls -l
total 2300
-rw-r r 1 root root 124304 Jun 10 17:48 courier-authlib-0.63.0-
1.fc13.x86_64.rpm
-rw-r r 1 root root 258896 Jun 10 17:48 courier-authlib-debuginfo-
0.63.0-1.fc13.x86_64.rpm
-rw-r r 1 root root 35064 Jun 10 17:48 courier-authlib-devel-0.63.0-
1.fc13.x86_64.rpm
-rw-r r 1 root root 17424 Jun 10 17:48 courier-authlib-ldap-0.63.0-
1.fc13.x86_64.rpm
-rw-r r 1 root root 13956 Jun 10 17:48 courier-authlib-mysql-
0.63.0-1.fc13.x86_64.rpm
-rw-r r 1 root root 13120 Jun 10 17:48 courier-authlib-pgsql-
0.63.0-1.fc13.x86_64.rpm
-rw-r r 1 root root 8328 Jun 10 17:48 courier-authlib-pipe-0.63.0-
1.fc13.x86_64.rpm
-rw-r r 1 root root 34160 Jun 10 17:48 courier-authlib-userdb-
0.63.0-1.fc13.x86_64.rpm
-rw-r r 1 falko falko 632296 Jun 10 17:58 courier-imap-4.8.0-
1.13.x86_64.rpm
-rw-r r 1 falko falko 1188976 Jun 10 17:58 courier-imap-debuginfo-
4.8.0-1.13.x86_64.rpm
[falko@server1 x86_64]$
Và cài đặt courier-imap như sau:
sudo rpm -ivh courier-imap-4.8.0-1.13.x86_64.rpm
Quay trở lại thư mục downloads:
cd $HOME/downloads
tiếp tục chạy lệnh rpmbuild, lần này là để xây dựng gói maildrop:
sudo rpmbuild -ta maildrop-2.5.0.tar.bz2
Khi hoàn thành, gói rpm sẽ có trong thư mục $HOME/rpm/RPMS/x86_64
($HOME/rpm/RPMS/i386 nếu bạn sử dụng hệ thống i386):
cd $HOME/rpm/RPMS/x86_64
Gõ lệnh:
ls -l
để liệt kê các gói phù hợp:
[falko@server1 x86_64]$ ls -l
total 5400
-rw-r r 1 root root 124304 Jun 10 17:48 courier-authlib-0.63.0-
1.fc13.x86_64.rpm
-rw-r r 1 root root 258896 Jun 10 17:48 courier-authlib-debuginfo-
0.63.0-1.fc13.x86_64.rpm
-rw-r r 1 root root 35064 Jun 10 17:48 courier-authlib-devel-0.63.0-
1.fc13.x86_64.rpm
-rw-r r 1 root root 17424 Jun 10 17:48 courier-authlib-ldap-0.63.0-
1.fc13.x86_64.rpm
-rw-r r 1 root root 13956 Jun 10 17:48 courier-authlib-mysql-
0.63.0-1.fc13.x86_64.rpm
-rw-r r 1 root root 13120 Jun 10 17:48 courier-authlib-pgsql-
0.63.0-1.fc13.x86_64.rpm
-rw-r r 1 root root 8328 Jun 10 17:48 courier-authlib-pipe-0.63.0-
1.fc13.x86_64.rpm
-rw-r r 1 root root 34160 Jun 10 17:48 courier-authlib-userdb-
0.63.0-1.fc13.x86_64.rpm
-rw-r r 1 falko falko 632296 Jun 10 17:58 courier-imap-4.8.0-
1.13.x86_64.rpm
-rw-r r 1 falko falko 1188976 Jun 10 17:58 courier-imap-debuginfo-
4.8.0-1.13.x86_64.rpm
-rw-r r 1 root root 1759056 Jun 10 18:06 maildrop-2.5.0-
1.13.x86_64.rpm
-rw-r r 1 root root 1243400 Jun 10 18:06 maildrop-debuginfo-2.5.0-
1.13.x86_64.rpm
-rw-r r 1 root root 99764 Jun 10 18:06 maildrop-devel-2.5.0-
1.13.x86_64.rpm
-rw-r r 1 root root 62536 Jun 10 18:06 maildrop-man-2.5.0-
1.13.x86_64.rpm
[falko@server1 x86_64]$
Và cài đặt maildrop như sau:
sudo rpm -ivh maildrop-2.5.0-1.13.x86_64.rpm
Sau khi hoàn tất các quá trình trên, đăng nhập vào hệ thống bằng tài
khoản root:
exit
Áp dụng bản vá Quote với Postfix
Ở đây, chúng ta sẽ phải tìm cách patch Quota với Postfix theo cách sau:
tải mã nguồn, áp dụng bản vá, xây dựng gói cài đặt rpm của Postfix và cài
đặt:
cd /usr/src
wget -
esslingen.de/pub/Mirrors/fedora/linux/releases/13/Fedora/source/SRPMS
/postfix-2.7.0-1.fc13.src.rpm
rpm -ivh postfix-2.7.0-1.fc13.src.rpm
Câu lệnh cuối cùng sẽ chỉ ra 1 vài cảnh báo, bạn có thể bỏ qua những
cảnh báo này:
warning: user mockbuild does not exist - using root
warning: group mockbuild does not exist - using root
cd /root/rpmbuild/SOURCES
wget
cd /root/rpmbuild/SPECS/
Tiếp theo, chỉnh sửa file postfix.spec:
vi postfix.spec
Thêm cú pháp Patch0: postfix-vda-2.7.0.patch vào vị trí # Patches, và
%patch0 -p1 -b .vda vào %setup -q:
[ ]
# Patches
Patch0: postfix-vda-2.7.0.patch
Patch1: postfix-2.7.0-config.patch
Patch2: postfix-2.6.1-files.patch
Patch3: postfix-alternatives.patch
Patch8: postfix-large-fs.patch
Patch9: pflogsumm-1.1.2-datecalc.patch
[ ]
%prep
%setup -q
# Apply obligatory patches
%patch0 -p1 -b .vda
%patch1 -p1 -b .config
%patch2 -p1 -b .files
%patch3 -p1 -b .alternatives
%patch8 -p1 -b .large-fs
[ ]
Sau đó, xây dựng gói cài đặt rpm của Postfix với quota và MySQL hỗ trợ:
rpmbuild -ba postfix.spec
Gói rpm cài đặt Postfix được tạo ra ở thư mục
/root/rpmbuild/RPMS/x86_64 (/root/rpmbuild/RPMS/i386 nếu bạn sử
dụng hệ thống i386):
cd /root/rpmbuild/RPMS/x86_64
Sử dụng lệnh:
ls -l
để liệt kê các gói phù hợp:
[root@server1 x86_64]# ls -l
total 8804
-rw-r r 1 root root 2197708 Jun 10 18:17 postfix-2.7.0-
1.fc13.x86_64.rpm
-rw-r r 1 root root 6746304 Jun 10 18:17 postfix-debuginfo-2.7.0-
1.fc13.x86_64.rpm
-rw-r r 1 root root 61460 Jun 10 18:17 postfix-perl-scripts-2.7.0-
1.fc13.x86_64.rpm
[root@server1 x86_64]#
Chọn gói Postfix phù hợp và cài đặt bằng lệnh sau:
rpm -ivh postfix-2.7.0-1.fc13.x86_64.rpm
Thiết lập mật khẩu cho MySQL và thiết lập phpMyAdmin
Khởi động MySQL:
chkconfig levels 235 mysqld on
/etc/init.d/mysqld start
Thiết lập mật khẩu cho tài khoản MySQL root:
mysql_secure_installation
[root@server1 ~]# mysql_secure_installation
NOTE: RUNNING ALL PARTS OF THIS SCRIPT IS RECOMMENDED
FOR ALL MySQL
SERVERS IN PRODUCTION USE! PLEASE READ EACH STEP CA
REFULLY!
In order to log into MySQL to secure it, we'll need the current
password for the root user. If you've just installed MySQL, and
you haven't set the root password yet, the password will be blank,
so you should just press enter here.
Enter current password for root (enter for none): < ENTER
OK, successfully used password, moving on
Setting the root password ensures that nobody can log into the MySQL
root user without the proper authorisation.
Set root password? [Y/n] < ENTER
New password: ← đặt mật khẩu root sql
Re-enter new password: < đặt mật khẩu root sql
Password updated successfully!
Reloading privilege tables
Success!
By default, a MySQL installation has an anonymous user, allowing anyon
e
to log into MySQL without having to have a user account created for
them. This is intended only for testing, and to make the installation
go a bit smoother. You should remove them before moving into a
production environment.
Remove anonymous users? [Y/n] < ENTER
Success!
Normally, root should only be allowed to connect from 'localhost'. This
ensures that someone cannot guess at the root password from the network
.
Disallow root login remotely? [Y/n] < ENTER
Success!
By default, MySQL comes with a database named 'test' that anyone can
access. This is also intended only for testing, and should be removed
before moving into a production environment.
Remove test database and access to it? [Y/n] < ENTER
- Dropping test database
Success!
- Removing privileges on test database
Success!
Reloading the privilege tables will ensure that all changes made so far
will take effect immediately.
Reload privilege tables now? [Y/n] < ENTER
Success!
Cleaning up
All done! If you've completed all of the above steps, your MySQL
installation should now be secure.
Thanks for using MySQL!
[root@server1 ~]#
Tiếp theo, chúng ta phải thiết lập phpMyAdmin, thay đổi Apache để
phpMyAdmin chấp nhận các kết nối không chỉ từ localhost:
vi /etc/httpd/conf.d/phpMyAdmin.conf
# phpMyAdmin - Web based MySQL browser written in php
#
# Allows only localhost by default
#
# But allowing phpMyAdmin to anyone other than localhost should be
considered
# dangerous unless properly secured by SSL
Alias /phpMyAdmin /usr/share/phpMyAdmin
Alias /phpmyadmin /usr/share/phpMyAdmin
#<Directory /usr/share/phpMyAdmin/>
# order deny,allow
# deny from all
# allow from 127.0.0.1
# allow from ::1
#</Directory>
# This directory does not require access over HTTP - taken from the
original
# phpMyAdmin upstream tarball
#
<Directory /usr/share/phpMyAdmin/libraries>
Order Deny,Allow
Deny from All
Allow from None
</Directory>
# This configuration prevents mod_security at phpMyAdmin directories
from
# filtering SQL etc. This may break your mod_security implementation.
#
#<IfModule mod_security.c>
# <Directory /usr/share/phpMyAdmin>
# SecRuleInheritance Off
# </Directory>
#</IfModule>
Tạo đường dẫn khởi động cho Apache và kích hoạt:
chkconfig levels 235 httpd on
/etc/init.d/httpd start
Mở trình duyệt và gõ địa chỉ
hoặc http://192.168.0.100/phpMyAdmin/, đăng nhập bằng tài khoản root
và mật khẩu MySQL khai báo ở phía trên.