Hướng dẫn Nhiếp ảnh Photoshop Tilt-Shift ppsx
Bạn đang xem bản rút gọn của tài liệu. Xem và tải ngay bản đầy đủ của tài liệu tại đây (1.38 MB, 15 trang )
Tilt-Shift Photography Photoshop Tutorial
This tutorial has been produced using Photoshop CS2 on a PC.
Step 1: Photo Selection
When choosing a photograph for the tilt-shift effect, bear in mind that you want to give the
impression of a miniature model. Miniature models are usually viewed from above so try and
choose a photo with an elevated viewpoint. Buildings, roads, traffic and railways are excellent
choices but make sure there is a reasonable wide angle of view.
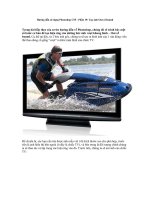
For this tilt-shift photography Photoshop tutorial, we are using a picture of Times Square during
a typical day:
Even before the tilt-shift effect has been applied, it's not too hard to imagine the scene as if it
were a model.
To find an appropriate image, we suggest you browse through the flickr tilt-shift fakes pool. Pay
attention to licensing terms though - if you are going to manipulate and display your work it will
need to be released under the Creative Commons licence.
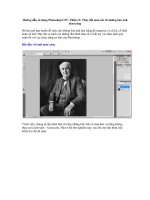
Step 2. Enter Quick Mask Mode
Open the image in Photoshop and enter Quick Mask Mode by pressing Q on the keyboard, or
select the Quick Mask icon as shown in the Tool Palette below:
Step 3. Choose Gradient Tool
Choose the Gradient Tool by pressing G on the keyboard, or select the Gradient Tool icon. Be
sure to choose the Reflected Gradient option (the fourth icon along before the Mode drop-down).
Step 4. Draw A Line
Draw a vertical line; the start point will be the centre of the in-focus area, and the end will be
where the transition from in-focus to out-of-focus is completed. This step, and the subsequent
two steps, will need a fair degree of trial and error. If you look closely at the image below, you
will see the line has been drawn from the back door of the silver car up to just under the word
Hollywood beneath the street lamp.
Once you release the mouse button the area of focus will appear as a red band across the image,
as shown in the next step.
Step 5. View Mask Area
Before progressing, review the position of the red mask. The middle of the mask is where the in-
focus area will be, gradually losing focus towards the edges. Note the out-of-focus effect is yet to
be applied.
Step 6. Return To Standard Mode
Press Q on the keyboard to exit Quick Mask Mode and return to Standard Mode, or press the
icon on the Tool Palette as shown below. The area to apply the focus effect to will be surrounded
by the "marching ants" selection lines:
Step 7. Open Lens Blur Interface
Choose Filter > Blur > Lens Blur:
Step 8. Review Effect And Tweak Settings
Hopefully, you will now see a pleasing focus effect. The Photoshop default settings for Lens
Blur seem to work well, but experiment with them to improve the effect. If you are unhappy with
the position of the focus area, go back to Step 4 and try drawing a line in a different place or with
a different centre of focus.
Step 9. Exit Lens Blur Interface
Assuming you were happy with the image preview in Step 8, click OK to accept the settings:
Step 10. Remove Selection Boundary
Press CTRL-D on the keyboard to remove the "marching ants" selection bounday:
Step 11. Open Hue/Saturation Adjustment Interface
You may want to boost the colour saturation, to improve the effect. Remember that model
scenery is often brightly painted so enhancing the saturation helps trick the eye. Press CTRL-U
on the keyboard or select Image > Adjustments > Hue/Saturation:
Step 12. Boost Saturation
In this example, we boost the Master saturation to +40.
Step 13. Open Curves Adjustment Interface
It may help to increase the contrast of the image slightly using the Curves adjustment. Press
CTRL-M on the keyboard or select Image > Adjustments > Curves:
Step 14. Adjust Curves
In this example we use a very small S-shaped curve to increase contrast. Take care not to over-do
this step; in fact, it may not be necessary at all.
Step 15. Finished
Here's the finished image.