Ebook hướng dẫn thiết kế theme WordPress
Bạn đang xem bản rút gọn của tài liệu. Xem và tải ngay bản đầy đủ của tài liệu tại đây (8.56 MB, 141 trang )
Rockablepress.com
Envato.com
© Rockable Press 2012
All rights reserved. No part of this publication may be
reproduced or redistributed in any form without
the prior written permission of the publishers.
Dedication
To my parents, Louis and Marie; I wouldn’t be who I am without
you. Thank you for encouraging and supporting me, even though I
could be a pain in the neck sometimes.
Table of Contents4
Contents
Dedication 3
Introduction 7
Why I Wrote This 7
Who is this Book for? 7
What this Book Includes 8
WordPress Basics 8
Posts 9
Pages 9
Menus 10
Coding Conventions 11
Plan of Action 12
Converting HTML to a WordPress Theme 15
Building Our HTML Theme 15
Files & Structure 16
Markup & CSS 16
style.css/CSS 20
Functions.php 22
Theme Template Hierarchy 26
Header & Footer 28
The Loop 37
The Post Pages 39
The Index 39
Single Page Template 44
Content Pages 47
Auxiliary Template Pages 49
The Sidebar Template 49
Archives Template 52
The 404 Error Template 54
Building Our Own Framework 56
Principles of Reuse 56
Table of Contents5
Define Your Needs 57
Existing Theme Frameworks 59
Coding Tips for Frameworks/Child Themes 60
Creating Custom Post Types 63
Designing the Custom Post Type 63
Building it into the Theme 65
Setting up the Custom Post Type 65
Modifying the Businesses Admin Panel 77
Listing Custom Post Types 80
Creating a Custom Post Type Single Template 85
Creating the Homepage 90
Querying Posts 91
Creating a Theme Options Page 101
Creating the Admin Page 101
Adding Settings to the Template 109
OptionTree Plugin by Envato 112
Creating Widgets 113
Plugin Development 122
Defining the Plugin 122
The Shortcode 126
The Template Tag 129
Resources 131
Theme & Plugin Directories 131
Coding Resources 135
Final Thoughts 137
Stay Up to Date! 138
About The Author 139
Your Download Links 140
INTRODUCTION
Introduction7
Introduction
When I rst got into web development, all the way back in 2002, a
tool like WordPress did not exist yet. As a matter of fact, it wouldn’t
be until almost a year later that WordPress would be released to
the public for the rst time; not that I was ready to use WordPress
at initial release. I actually didn’t start using it until 2004 (around
WordPress 1.5), when my friend told me about this new blogging
platform that I should consider instead of writing my own.
I instantly fell in love, hacking away, learning the platform, making
my own changes (sometimes to the core
1
), and watching it grow
over the years. What started out as a simple, open source blogging
platform is now a super-powerful content management system
(CMS) that can boast that it’s the most widely-used CMS on the
Internet.
2
In this book, I plan to teach you how to use WordPress,
as well as how to leverage the API to create your own custom
themes, plugins, and content types. In other words, I will show you
how to make WordPress your own.
Why I Wrote This
WordPress is living platform with constant updates and major
enhancements released every 6-12 months. At the time of this writ-
ing, WordPress 3.3 had just been released with quite a few new,
really nice features. Because of this ever-changing landscape, it’s
important to keep users updated on the latest and greatest Word-
Press capabilities.
Who is this Book for?
I’d like to say that this book is for anyone interested in WordPress,
regardless of background. However, to keep it streamlined, I do
make some assumptions about you, dear reader. I assume that you
1
This is really, really not recommended.
2
/>Introduction8
have a solid understanding of HTML, CSS, Javascript, PHP and
MySQL. I also assume that you’ve at least looked at the WordPress
Codex, which can be found at codex.wordpress.org. I will be look-
ing at converting HTML to a WordPress theme, building plugins,
and more, all from scratch. So, if you’ve never done that, this book
should be right up your alley. I do assume you have programmed
before, however, which brings us to…
What this Book Includes
Packaged with this book, you will nd:
1. A set of PSD les for the Homepage, Directory Page, Blog,
and Single Business Page.
2. A set of HTML les created from the PSDs. They will be
used to create the Director WordPress theme. On top of
the four pages created from the PSDs, the HTML folder
includes a /css/ folder for four CSS les: style.css,
reset.css, m a s t e r.c s s , and ie.css. All images used in
theHTML template are also included.
3. A fully functioning WordPress theme called Director. This
can be found in the /director/ folder.
These les and themes may be used freely in your projects, both
commercial and non-commercial. However, they may not be redis-
tributed or resold in any way. As you work through this book you
may choose to either construct your own set of les from scratch,
or use the example les as a guide. The link to download these les
is at the end of the book.
WordPress Basics
In this book, I assume you have at least used WordPress as a blog-
ging platform or CMS. Because of that, during each section I will
not explain how to create a post, a page, or a menu item. I will offer
Introduction9
some quick how-tos here. If you’d like to read more, the WordPress
Codex has a great “Getting Started” site.
2b
Posts
Here are the basics for creating a post in WordPress. It’s in the
Posts section that you will add blog posts, news articles, and
anything else that gets updated regularly. This is also how you
will create custom post types. Just replace “Posts” in the rst
step with the menu name of the Post Types (you will read more on
thatlater).
• Click the Posts tab.
• Click the Add New sub-tab.
• Start lling in the blanks: title, body text, etc.
• As needed, select a category, add tags, and make other
selections from the sections below and to the right of
thepost.
• When you are ready, click Publish.
• To view a post, click the View Post button beneath the
posttitle.
Pages
Adding and editing pages are essentially the same as adding and
editing posts.
• Click the Pages tab.
• Click the Add New sub-tab.
• Start lling in the blanks: title, body text, etc.
• Select the parent, template, and order as needed.
2b
/>Introduction10
• When you are ready, click Publish.
• To view a page, click the View Page button beneath the
page title.
Menus
Since WordPress 3.0, WordPress has added the ability to create
and manage navigation menus from right within WordPress.
To create new menus:
1. Go to Appearance
�
Menus.
2. Create a new menu by pressing the “+” tab.
3. Fill out the menu name and press Create Menu.
4. You can then add custom links, pages, categories, and
custom post types by checking off the corresponding items
on the left and clicking Add to Menu.
5. You can reorder the menu items by dragging and dropping
them. If you want to create a sub- or drop-down menu,
select the menu item, place it underneath the item you want
to be the parent, and drag it slightly to the right.
6. Once your menu is complete, press Save Menu.
7. If your theme supports multiple menus, you may need to
associate your new menu with a “theme location.” You
can do so using the drop down box on the left, under the
Theme Locations heading. We will see how these work
later in thebook.
WordPress has its own extensive documentation on creating
menus in the codex.
2c
2c
/>Introduction11
Coding Conventions
I plan on using the best practices that I know, including the ones
laid out in the WordPress Codex.
3
This means that I will do my best
to write correct markup, name variables properly, create constants
when necessary, and include thorough, clear comments within all
of my programming.
I will also take on the following convention for printing code as
used in previous WordPress books published by Rockable. This
means that all lines of code will appear against a light grey back-
ground in a xed-width typeface, like this:
<?php echo 'Hello World!'; ?>
Sometimes a line of code is too long to t entirely on one line. In
this case, the grey background of the following line (or lines, for a
really long line) will be slightly indented. In most cases, a space
character is permissable between the last character on the ini-
tial line and the rst character on the next line. If a space is not
allowed, there will be a continuation marker ( ▶ ) to remind you. For
example, here a space is permitted between “d o g .' ” and “?>”:
<?php echo 'The quick brown fox jumped over the lazy dog.'
?>
But in the following code, there is no space intended after the
underscore. Therefore “pingback_url” is correct:
<link rel="pingback" href="<?php bloginfo('pingback_ ▶
url'); ?>" />
Note: when copy-pasting the code out of the book, you’ll need to
take out these arrows and accompanying space. With this in mind,
let’s take a look at the plan of action for the rest of this book.
3
/>Introduction12
Plan of Action
This book should read much like a long, multi-part tutorial. I want
to take you through my design process, explaining what I do (and
why I do it) on every step of the way. Here’s what I’ll be doing:
• Converting HTML/CSS to a Dynamic WordPress Theme
– I’ve been provided with a PSD (included with the book)
that I’ve transformed into HTML. The rst part of this book
will be taking the resulting HTML/CSS and converting it to
a WordPress theme. Along the way, I’ll talk about the vari-
ous theme pages we’re working with, the WordPress theme
hierarchy, and of course, the WordPress Loop.
• Creating a Custom Post Type – This, in my humble
opinion, is one of the best additions to WordPress in
recent releases. With the ability to make your own content
types — each with its own theme template — you can take
WordPress from being a CMS limited to blog posts and
pages, to a CMS that can manage any kind of content you
can imagine. In this book, we’ll be creating a business listing
type, which will allow us to create a business directory.
• Theme Options and Widgets – With WordPress, you can
make a theme your own by adding a theme options page
and custom widgets. In these sections, we’ll make it very
easy for people who use our themes to add their own cus-
tomizations without delving into the code or creating a child
theme.
• Creating a Plugin – One of the most powerful facets of
WordPress is the fact that it’s pluggable. We can add func-
tionality to our installation of WordPress without changing
the core WordPress les. There are vast directories of free
4
and premium
5
plugins that vastly expand the capabilities of
4
5
/>Introduction13
WordPress. In the nal section of this book, we will build our
own plugin.
This book should serve as a very linear guide to WordPress devel-
opment. That being said, my hope is that you can visit any chapter
of the book (or at least any of the four sections I’ve laid out) for
quick reference. So without further ado, let’s get started!
Converting HTML to a
WordPress Theme
Building Our HTML Theme
Included with this book are a few things: the Photoshop les
(PSDs) from which the design came, the HTML templates I created
from the PSDs, and the fully functional WordPress theme. While
we won’t be going over slicing and dicing the PSDs, I will take this
opportunity to explain the HTML template to an extent, because I
want you to be somewhat familiar with the basis for our WordPress
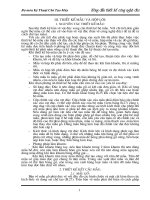
theme. Going forward, keep in mind that we’re building a business
directory website. Here is a screenshot of what the design will
looklike:
Converting HTML to a WordPress Theme16
Files & Structure
You will nd four HTML les we’re going to convert (one for each
PSD):
• index.html – The homepage design
• blog.html – A blog post listing page
• director y.html – A business listing page
• business.html – A single business page
All of our themes pages will be derived from the markup on these
pages.
You will also nd two folders: an /images/ folder, where all theme
images will go (there are not many), and a /css/ folder, where all of
the CSS will go. Within the /css/ folder, there are four CSS les that
make up a simple framework I use for styling my websites (thank
you, Dan Cederholm). They are:
• reset.css – Your standard CSS reset for maximum browser
compatibility.
• m a s t e r.c s s – The crux of the matter. All of the main CSS
liveshere.
• ie.css – Any IE xes go here. Luckily there aren’t too many.
• style.css – This will simply import the other three style-
sheets (in the order I’ve listed them here. That is very
important).
You will also nd a /img/ folder within the /css/ folder. Any images
that are called within the CSS go in this folder.
Markup & CSS
If you take a look at one of the HTML les, I think you will see some
pretty standard markup. I am using HTML5, which requires a few
lines of code to make it work.
Converting HTML to a WordPress Theme17
The rst line is the doctype declaration, which is simply:
<!DOCTYPE html>
Once HTML5 sees adoption from all browsers and older browsers
are phased out, this is all that will be necessary in order to use it.
However, right now we do have older browsers that do not support
it (I’m looking at you, IE), so we need some JavaScript magic in
order to make it work. We will be using the invaluable html5shiv,
6
which will add HTML5 elements to the Document Object Model
(DOM), so that we can add style denitions for them in our CSS,
and if we so desire, we can manipulate them using JavaScript. The
line is simply:
<! [if lt IE 9]> <script src="glecode.▶
com/svn/trunk/html5.js"></script> <![endif] >
In plain English, this is saying, “If the browser is IE8 or lower, call
this JavaScript.” That’s all we need; we can now use HTML5 as we
please!
The CSS (most of which is in m a s t e r.c ss ) is also pretty self-
explanatory. I will point out that I tried to use percentages for
widths whenever I could, giving us a more exible grid to work
with. There is a big trend toward “responsive web design,” which
aims to make a website device agnostic.
7
While that is outside the
scope of this book (not that I’m an expert), exible grids help us
considerably with designing exible, responsive websites.
In order to achieve this exibility, I created a class called
#container with the following denition:
#container {
margin: 0 auto;
text-align: left;
width: 70%; /* Target: 940px; */
6
7
web- design
Converting HTML to a WordPress Theme18
padding: 10px 0;
}
This will ensure that our entire layout takes up 70% of the browser
window and centers the content. The comment tells the reader that
from here on out, I will base my widths on a 940 px wide layout.
In reality, the layout will expand and contract with the size of the
browser window.
8
I also have a few general CSS classes I use throughout the tem-
plate. Since this is a 2-column layout, I created classes for both the
left and right columns:
.left-col {
width: 66%;
float: left;
}
.right-col {
float: right;
width: 32%;
margin-left: 2%;
}
As you can see, .left-col (for left column — I’m very clever) will
take up 66% of #container and oat to the left. Conversely,
.right-col (for… well, I think you’ve got it) will take up 32% of
#container, oating right. This leaves 2% wiggle
9
room, which
I used for a margin to separate the two columns. I also have two
separate but similar CSS classes to easily oat individual elements
left or right:
.left {
float: left;
}
8
For more on exible grids, Ethan Marcotte has an excellent article: http://www.
alistapart.com/articles/fluidgrids/
9
… wiggle, wiggle, wiggle, wiggle. Yeah.
Converting HTML to a WordPress Theme19
.right {
float: right;
}
These classes are also aptly named. To ensure none of these four
classes extend past where they should and end up eating the rest
of the page, I employ a nice little hack that Dan Cederholm came
up with for self-clearing oats:
.group:after {
content: ".";
display: block;
height: 0;
clear: both;
visibility: hidden;
}
Now, for any containing div that has oating elements, we can
also apply the class name group and everything will stay within the
container:
<div id="main" class="group">
<div class="left">One Fish</div>
<div class="right">Two Fish</div>
</div>
There is a x we need to apply to make it work in IE 6 and 7, which
you can nd in the ie.css le:
* html .group { /* IE6 */
height: 1%;
}
*:first-child+html .group { /* IE7 */
min-height: 1px;
}
To read more about self-clearing oats (and better CSS in general),
I strongly recommend Handcrafted CSS by Dan Cederholm.
10
10
Converting HTML to a WordPress Theme20
I’ll explain any other markup or CSS along the way. Right now, let’s
get in to actually building the theme! We’ll start by creating our
theme folder — let’s call it /director/
11
and copying the /css/ folder
into it.
style.css/CSS
Whenever I convert an HTML template to a WordPress theme, I
start rst with style.css, since it’s the easiest le to convert (plus,
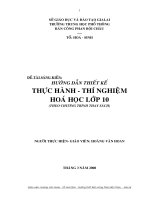
it denes the theme in WordPress). What I do is remove style.css
from the /css/ directory and move it into the root theme directory
(in this case /director/). At this point, our le structure looks like
this:
Now, we’re going to modify style.css a bit. Open it up in your
favorite text editor, and start by adding the theme denition at the
very top, starting at line 1:
/*
Theme Name: Director
Theme URI:
Description: A business directory theme.
Version: 1.0
Author: Joe Casabona
Author URI:
*/
This gives WordPress everything it needs to know to list our theme
in the Themes
�
Appearance section of our WordPress installation.
11
Later on we’ll be uploading this to wp- contents/themes/
Converting HTML to a WordPress Theme21
There is one more thing we need to do to this le, and that’s adjust
the references to the other stylesheets. Since we moved style.css
up one directory, we’ll need to change each import to include
“css/” like so:
@import url("css/reset.css");
@import url("css/master.css");
@import url("css/ie.css");
Much better! Our CSS is now all set up and ready to use. Before
we move on though, I want to add some CSS to css/master.css
to account for WordPress’s default classes to position images
through the editor. So let’s open up m a s ter.c s s and add this code:
img.centered, .aligncenter, div.aligncenter {
display: block;
margin-left: auto;
margin-right: auto;
}
.alignright {
float: right;
}
.alignleft {
float: left;
}
This will ensure that when a user positions an image using the
WordPress editor, the image will behave properly.
12
Next, let’s add
some default styles to be used when the user adds a caption:
.wp-caption {
border: 1px solid #ddd;
text-align: center;
background-color: #d4d4d4;
padding-top: 4px;
12
We can actually consolidate .left and .alignleft, and .right and
.alignright. I left them separate for illustration purposes.
Converting HTML to a WordPress Theme22
margin: 10px;
}
.wp-caption img {
margin: 0;
padding: 0;
border: 0 none;
}
.wp-caption p.wp-caption-text {
font-size: 0.85em;
line-height: 1.214em;
padding: 0 4px 5px;
margin: 0;
}
Perfect! With that taken care of, let’s move on to the second half of
our theme prep-work, which is creating the functions.php le.
Functions.php
The functions.php le is where you make your theme magic
happen. It’s worth noting that you do not need this particular le,
but according to the WordPress codex:
“
This file basically acts like a plugin, and if it is present
in the theme you are using, it is automatically loaded
during WordPress initialization (both for admin pages
and external pages).
”
13
You can add features like sidebars, navigation menus, thumb-
nail support, and more. We’ll also employ the help of our
functions.php le later on to declare our custom post type,
but for now, we’re just going to:
• Dene two constants that we’ll use in our theme.
13
Converting HTML to a WordPress Theme23
• Add menu support.
• Add support for a sidebar.
So in the /director/ folder, create a functions.php le and add the
following lines:
<?php
define( 'TEMPPATH', get_bloginfo('stylesheet_directory'));
define( 'IMAGES', TEMPPATH. "/images");
?>
What we’re doing here is creating two constants. TEMPPATH will be
the path to our theme’s directory. This will make it easier to link to
any extra les we might want to include, such as other stylesheets,
JavaScript, and more. We do this using the get_bloginfo()
function.
The functions get_bloginfo() and bloginfo()
14
are incredibly
useful functions that pull all kinds of general information about
the WordPress installation. Besides the site name, it will grab
the description (or tagline), the RSS URL, the full theme path, the
home/blog URL, the admin email, and more.
15
We will be using
bloginfo() quite a bit as we move forward.
IMAGES uses TEMPPATH and appends our images folder to it, so
that we’ll have an easier time linking to any theme specic images.
Speaking of the /images/ folder, why don’t we go ahead and add
that to the /director/ theme.
Next, we’ll add menu support so that the theme user will be able
to change the navigation without having to rely on a developer or
having to know how to write their own code. Before the closing
PHP tag (?>), add in this code:
add_theme_support('nav-menus');
if ( function_exists('register_nav_menus')) {
14
bloginfo() prints the value, get_bloginfo() returns it.
15
Read all about it here: />Converting HTML to a WordPress Theme24
register_nav_menus(
array(
'main' => 'Main Nav'
)
);
}
There are a couple things going on here. First, we’re using Word-
Press’s built-in function, add_theme_support(), to tell WordPress
that we want to be able to have dynamic nav menus. Then, after
making sure the function is dened,
16
we call register_ nav_
menus(), sending it an array of menus that we’d like to create as
key => value pairs, where the key is the slug and the value is the
display name. In this case, we are only sending one key => value
pair, because we only need one menu, but we could send several
if the theme called for it.
Our last step (for now) is to add in sidebar support for our theme.
Just like with the menu, we’ll make sure the proper function (in
this case, register_sidebar) works, then we’ll call it to create the
sidebar:
if ( function_exists( 'register_sidebar' ) ) {
register_sidebar( array (
'name' => __( 'Primary Sidebar', 'primary-sidebar' ),
'id' => 'primary-widget-area',
'description' => __( 'The primary widget area', 'dir' ),
'before_widget' => '<div class="widget">',
'after_widget' => "</div>",
'before_title' => '<h3 class="widget-title">',
'after_title' => '</h3>',
) );
}
16
We should code our theme to work properly with current and older WordPress
installations.
Converting HTML to a WordPress Theme25
With register_ sidebar(),
17
we’re creating a highly customiz-
able sidebar based on a list of arguments sent as an array. We’re
assigning the sidebar a name, ID, and description, and then we’re
telling WordPress the markup for each section (or widget). The last
four arguments can list any HTML markup, and WordPress will
print it appropriately, but if you look at our HTML template, you’ll
see this markup matches our template perfectly. The arguments
before_widget and after_widget list the markup that the widget
will be wrapped in, and before_title and after_title list the
markup that the widget’s title will be wrapped in. So this:
… will be displayed using this markup, as dened in our functions
le:
<div class="widget">
<h3 class="widget-title">Hello World!</h3>
<p>Here is some content for a widget!</p>
</div>
Later, we’ll dene our entire sidebar using the sidebar template.
That’s everything we’ll need for our functions.php le at this
point, but we will come back to it, I promise! Right now, let’s get
into the good stuff; we will actually convert our HTML template into
a working WordPress theme.
17
Codex link: />