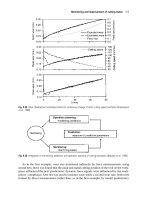
Metal Machining - Theory and Applications Episode 1 Part 8 ppsx
Bạn đang xem bản rút gọn của tài liệu. Xem và tải ngay bản đầy đủ của tài liệu tại đây (227.22 KB, 20 trang )
a ductile cast iron, shows ceramic tools having a larger n-value than a carbide tool – for
the white alumina, n ≈ 1.2. This very high value indicates a mechanical wear mechanism
reducing in intensity with increasing cutting speed. Figure 4.14(b), for turning two differ-
ent Ti-alloys with a carbide tool, is an example of where a break point falls within the prac-
tical cutting speed range. Figure 4.14(c), for face milling a grey cast iron, shows a
condition in which tool life decreases with reducing cutting speed.
Taylor’s equation – influence of feed and depth of cut
Tool life is influenced by feed and depth of cut, as well as by cutting speed. Additional life
equations are
fT
n
2
= C
2
; dT
n
3
= C
3
(4.3)
and these may be combined with equation (4.2) (replacing n there by n
1
) to give
V
1/n
1
f
1/n
2
d
1/n
3
T = C′ (4.4)
When tool life is limited by thermal damage mechanisms, n
1
< n
2
< n
3
: i.e. cutting
speed has a larger influence on life than does feed than does depth of cut, reflecting the
influences of these variables on cutting temperature. If, however, tool life is determined by
chipping and fracture failures, n
2
and n
3
can become smaller.
4.2.3 Tool life fluctuations
It is almost impossible to keep cutting conditions exactly constant in practical machining.
Even if it were possible, it would be found that tool life and failure are phenomena based
on probability. Fluctuations cannot be avoided in these. However, the range of fluctuations
is influenced by the damage mechanism. It is easy to imagine larger fluctuations when
chipping, or fracture rather than abrasion is the main mechanism.
Figure 4.15 shows the cumulative probability of flank wear development after 1 min of
Tool life 133
Fig. 4.15 Distributions of flank wear after turning free-cutting steel B1112 and difficult-to-cut sintered steel and
Inconel 718
0.05
0.02
0.1 0.2 0.5 1.0 2.0
5
10
20
40
60
80
99
85
Flank wear VB (mm)
P10
Sintered steel
P10
B1112
TiC-Al
2
O
3
ceramic
Inconel 718
VB
max
B112 - P10, V = 200m/min, d = 0.5mm, f = 0.1mm/rev
Sintered steel - P10, V = 200m/min, d = 0.5mm, f = 0.1mm/rev
Inconel 718 - Al
2
O
3
-TiC ceramic, V = 200m/min, d = 0.5mm, f = 0.19mm/rev
Cumulative probability (%)
Childs Part 1 28:3:2000 2:41 pm Page 133
turning a resulphurized free machining steel and a sintered steel with a P10 carbide tool
(plotted on a Weibull chart). Abrasion was the main cause of tool wear with the free
machining steel, while edge chipping was the mechanism with the sintered steel. The
different slopes of the Weibull plots are clear. The figure also shows the distribution for
turning Inconel 718 with an Al
2
O
3
/TiC ceramic tool. As well as the greater amount of
wear, the similarity of slope between this and the sintered steel observations is striking.
Figure 4.16 is an example of tool wear and wear distribution influenced by the machine
tool. It gives the results of face milling a quenched die steel with an Al
2
O
3
/TiC ceramic
tool, in the same conditions apart from the machine tool used. Tool wear was by edge chip-
ping or fracture. Machine B obviously provides better resistance against this type of
damage. This is due to a better stiffness, maybe a better dynamic stiffness.
4.3 Summary
This chapter complements Chapter 3 on tool bulk properties, by focusing on the mecha-
nisms of cutting edge damage and their characteristic developments with time. Cutting
edges experience much higher normal and shear stresses than almost any other type of
bearing surface and, at high cutting speeds, high temperatures are also generated. It is not
surprising that tool lives are measured in minutes rather than in hours, and certainly not in
days.
Abrasion occurs with all tools if the work material has hard enough phases, and self-
abrasion follows from other mechanical causes of damage. Mechanical damages, of
134 Tool damage
1000 2000 5000 10
4
2x10
4
5x10
4
99
90
70
50
30
10
3
1
Machine tool A
Machine tool B
Numbers of impact until tool fracture
Cutting speed : 220 m min
-1,
Depth of cut : 0.1 mm,
Feed rate: 0.1 mm/tooth, Cutter Dia. : 80 mm
Fracture probability (%)
Fig. 4.16 Distributions of tool life limited by fracture when milling a quenched die steel (HRC60) with an Al
2
O
3
/TiC
ceramic tool, on two different milling machines
Childs Part 1 28:3:2000 2:41 pm Page 134
increasing size – from attrition, to chipping, to fracture – increase the more brittle is the
tool material and they are relatively insensitive to temperature changes. Thermal damages
follow diffusion and chemical reactions. They are very sensitive to temperature and are
particularly variable from one tool and work combination to another. Adhesive wear
depends on both mechanical and thermal factors, and passes through a maximum rate as
temperature increases.
For all these reasons of complexity and further influences of mode of cutting, and of the
machine tools themselves, on tool life, it has not been attempted to provide comprehensive
guidance on tool damage rates. Rather, the goal has been to emphasize what phenomena
can occur, and what their effects look like, so mechanisms limiting life in different circum-
stances may be recognized and sensible directions for improved performance may then be
investigated.
References
Cook, N. H. (1973) Tool wear and tool life. Trans. ASME J. Eng. Ind. 95B, 931–938.
Dawihl, W. (1941) Die Vorgange beim Verschleiss von Hartmetallegierungen. Stahl und Essen 61,
210–213.
Gregory, B. (1965) Surface interaction of cemented carbide tool material and Armco iron. Brit. J.
Appl. Phys. 16, 689–695.
Kitagawa, T., Maekawa, K., Shirakashi, T. and Usui, E. (1988) Analytical prediction of flank wear
of carbide tools in turning plain carbon steels (Part 1). Bull. Jap. Soc. Prec. Eng. 22(4), 263–269.
Naerheim, Y. and Trent, E. M. (1977) Diffusion wear of cemented carbide tools when cutting steel
at high speeds. Metals Technology 4, 548–556.
Narutaki, N. and Yamane, Y. (1976) Wear mechanism of carbide tool based on the reaction between
tool and work material (Part 1 – reaction test). Bull. Jap. Soc. Prec. Eng. 10(3), 95–100.
Narutaki, N. and Yamane, Y. (1993) High-speed machining of Inconel 718 with ceramic tools.
Annals CIRP 42(1), 103–106.
Takeyama, H. and Murata, R. (1963) Basic investigation of tool wear. Trans ASME J. Eng. Ind. 85,
33–38.
Trent, E. M. (1952) Some factors affecting wear on cemented carbide tools. Proc. I. Mech. E. Lond.
166, 64–74.
Trigger, K. J. and Chao, B. T. (1956) The mechanism of crater wear of cemented carbide tools. Trans
ASME 78,1119–1126.
Uehara, K. (1976) On the generating mechanism of wear particles on carbide cutting tools. J. Japan
Soc. Prec. Eng. 42(6), 445–452.
Usui, E., Shirakashi, T. and Kitagawa, T. (1978) Analytical prediction of three dimensional cutting
process Pt. 3. Trans ASME J. Eng. Ind. 100, 236–243.
Yamane, Y. and Narutaki, N. (1983) The effect of atmosphere on tool failure in face milling (1st
report). J. Jap. Soc. Prec. Eng. 49(8), 521–527.
References 135
Childs Part 1 28:3:2000 2:41 pm Page 135
5
Experimental methods
Previous chapters have presented optical and electron microscope pictures of chip sections
and worn tools, and the results of cutting force and temperature measurements. In addition
to cutting force measurements, acoustic emission is also used to study the health of a
cutting process. This chapter explains a number of these experimental methods.
5.1 Microscopic examination methods
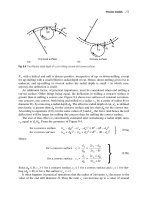
5.1.1 The quick-stop technique
Direct observations as well as theoretical analyses are needed to clarify chip formation
mechanisms. Ideally, such observations would be during cutting, to follow dynamic
Fig. 5.1 The principle of a quick-stop device for use in turning
Childs Part 2 28:3:2000 3:09 pm Page 136
variations of chip flow. Although video cameras have been used to gain an external
overview of dynamic chip motions, and it is possible to look through transparent tools (for
example made from diamond or sapphire) directly at the chip contact, it is difficult, in
general, to resolve much because of the small scale of the deforming region and usually
the high cutting velocities. Experimentalists are prepared to lose dynamic information to
gain microscopic detail, by freezing the motion, for later study. The quick-stop technique
is a popular method for achieving this. The machining process is stopped quickly, by
moving the tool and work material apart at a speed greater – preferably much greater –
than the cutting speed. The chip is left attached to the work (sometimes with a fragment of
the cutting edge attached as well). The photographs in Figure 2.4 are polished and etched
sections of quick-stopped chips.
Figure 5.1 is a schematic view of a quick-stop device for use with a stationary tool and
a moving workpiece, such as in turning, while Figure 5.2 shows a device that could be used
for a stationary work and moving tool, as in milling. In Figure 5.1, the tool is supported at
a pivot point and by a shear pin. A mass M is made to strike the tool holder with a speed
V
M
. If the impact force is much greater than needed to break the shear pin, the mass will
then cause the tool holder to swing quickly away from the chip. The tool holder’s velocity
V
T
does not instantaneously reach the cutting velocity V that is necessary for cutting to
stop, because of its inertia. However, to minimize the retraction time, M and V
M
should be
made large and the inertia of the holder should be made small.
In practice, V
M
is frequently made large by firing the mass M from a gun (although for
low cutting speed turning tests, hitting the tool holder with a hammer can be sufficient).
A device that uses a humane killer gun (normally used for stunning animals prior to
slaughter) with its captive bolt as the mass M was reported to achieve a tool displacement
of 2.5 mm in 1.2 × 10
–4
s (Williams et al., 1970). If this is assumed to have occurred at
approximately constant acceleration, and it is supposed that, for a successful quick-stop,
V
T
must reach V in a cut distance less than f/10, then this device can be used successfully,
provided
Microscopic examination methods 137
Fig. 5.2 The principle of a quick-stop device for use in milling
Childs Part 2 28:3:2000 3:09 pm Page 137
V[m/min] ≤ 354
ͱ⒓⒓⒓⒓⒓⒓
f[mm] (5.1)
For a feed of 0.13 mm, the largest allowable cutting speed is 128 m/min, while for f =
0.5 mm, the largest speed is 250 m/min. These speeds are larger than those represented in
Figure 2.4, but are not large compared with what can be of interest in modern high speed
machining. The acceleration required of the tool increases as the square of the cutting veloc-
ity, so successful quick-stops become rapidly more difficult as the cutting speed increases.
A similar discussion could be developed in terms of the device of Figure 5.2. However,
in milling, it is more difficult to guide the work material away from the cutting edges, and
the work and its holder have higher inertia than the tool and its holder in turning. The
quick-stop must be synchronized with the intermittent cutting action. There must be a very
special reason to pursue a quick-stop in milling, to make the difficulties worthwhile.
Quick-stops can show different results, depending on the adhesion between the chip and
the tool (Figure 5.3). If there is low adhesion, a clean separation between the two will
occur, as shown in Figure 5.3(a). Coated tools usually show this behaviour. If there is high
adhesion relative to the strength of the chip or tool, any of the results of Figure 5.3(b) to
(d) can occur. If it is particularly desired to preserve the chip/tool interface, a result like
Figure 5.3(d) can be engineered by artificially weakening the tool with a notch or crack on
its rake face.
138 Experimental methods
Fig. 5.3 Modes of quick-stop separation
Childs Part 2 28:3:2000 3:09 pm Page 138
5.1.2 Other chip form and wear observations
Careful observation of tools and chips after machining can often reveal useful information,
without the need for quick-stops. For example, the built-up edge (BUE) formed in machin-
ing is usually unstable. It is carried away on the back surface of chips, so observation of
the chips (Figure 5.4) can give information as to whether BUE is formed or not. It is obvi-
ous that information about wear is obtained by looking at the cutting tools at any time after
cutting.
Chapter 4 has shown examples of SEM and EPMA used to study wear and contact
conditions in great detail. The magnifications of these techniques are not always necessary.
In many cases, a low magnification optical microscope, × 10 or × 20, is enough. Such a
microscope on an X–Y measurement stage is commonly used in laboratories or machine
shops to record wear images and their sizes. Wet photography and printing paper used to
be used for archiving information for many years. Now, a high quality CCD camera and a
personal computer with a large memory can do the job.
5.2 Forces in machining
5.2.1 Resultant forces
Forces in machining can be measured in two main ways: directly or indirectly. Direct
measurements involve mounting a tool (in turning) or the tool or workpiece (in milling) on
a dynamometer, which responds to the forces by creating electrical signals in proportion
to them. These measurements are used when the forces need to be known accurately both
in magnitude and direction, for example if thrust, feed and the main cutting forces in turn-
ing are required (Figure 5.5), or the torque and thrust force in drilling are needed.
Indirect measurements involve deductions from the machine tool behaviour. For exam-
ple, the power used by the main spindle motor increases with the main cutting force or
torque; and that used by the feed motions can be related to the feed force. Particularly with
Forces in machining 139
(a) (b)
Fig. 5.4 The back surface of chips formed from 0.15% C steel by P20 carbide tools: (a) with built-up edge,
v
= 40 m
min
–1
,
d
= 2.0 mm,
f
= 0.08 mm rev
–1
; (b) without built-up edge,
v
= 100 m min
–1
, d = 2.0 mm,
f
= 0.12 mm rev
–1
.
Childs Part 2 28:3:2000 3:09 pm Page 139
NC machines, which are fitted with high sensitivity and response main and feed drive
motors, indirect methods can be used to determine the active forces. Indirect methods are
less accurate than direct methods, but can be sufficient for monitoring purposes. The main
consideration here will be direct methods.
Tool dynamometers – general points
A tool dynamometer should have high sensitivity, high rigidity, high frequency response,
high linearity and low drift. Sensitivity is expressed as electrical output per unit force
input. Useful dynamometers must be able to discriminate at least 1% of full scale output.
Rigidity depends strongly on the dynamometer’s construction. The force sensing trans-
ducer is usually the least rigid element of a dynamometer’s structure: different types of
element are considered in the following subsections.
Frequency response depends on a dynamometer’s natural frequency and damping char-
acteristics. In line with elementary dynamics, these may be described in terms of the
response of a viscously damped elastic system subjected to a harmonic forcing system:
mx> + cx˘ + kx = P
m
sin wt (5.2)
Figure 5.6 shows how the amplitude ratio (the response relative to the response in static
conditions) of such a system varies with frequency ratio (the frequency relative to the
system’s undamped natural frequency of
ͱ⒓⒓⒓
k/m) and damping factor c/c
c
, where c
c
is the
critical damping coefficient. The figure shows that for a linear response between amplitude
and force (and hence a linear response between a dynamometer’s output and force), a
damping factor slightly less than 1, around 0.7, is desirable and then a dynamometer could
be used at frequency ratios up to 0.2 to 0.3.
140 Experimental methods
Fig. 5.5 Forces acting on cutting tool in turning
Childs Part 2 28:3:2000 3:10 pm Page 140
Linearity and drift are usually more influenced by the electrical elements (including
signal amplification) than by the mechanical elements of a dynamometer. Systems with
linearity better than 0.5% of full scale output are required. Drift, which describes the stabil-
ity of output (both from the dynamometer transducer and amplification system) over time,
can be a problem with cutting force dynamometers because of the sensitivity of electrical
elements to temperature changes and the tendency of machining to heat its surroundings.
Strain gauge dynamometers
A common type of dynamometer uses strain gauges to sense elastic strains caused by cutting
forces. Figure 5.7 shows a basic elastic beam type dynamometer with gauges bonded to its
surface. It also shows an example of a wire-type gauge and a Wheatstone bridge and ampli-
fier system usually used to measure strain changes in the gauges. The main cutting force F
C
will cause the beam to bend, so that the gauge on the top surface will be placed in tension, that
on the bottom surface will be placed in compression, and those gauges on the side surfaces (at
the neutral axis) will experience no strain. Likewise, a feed force will strain the side-face
gauges but not those at the top or bottom. The arrangement shown in Figure 5.7 is not sensi-
tive to force along the axis of the beam as this causes equal strain changes in all gauges.
The fractional resistance change of a strain gauge (DR/R) is related to its fractional
length change or direct strain (DL/L) by its gauge factor K
s
:
K
s
=(DR/R)/(DL/L) (5.3)
For wire strain gauges, K
s
is typically from 1.75 to 3.5. Strains down to 10
–6
may be
detected with a bridge circuit. The upper limit of strain is around 2 × 10
–3
, determined by
the elastic limit of the beam.
A disadvantage of the simple cantilever dynamometer is that the gauges’ strains depend
Forces in machining 141
Fig. 5.6 The frequency response of a damped forced vibration system
Childs Part 2 28:3:2000 3:10 pm Page 141
basically on the moment applied to the section at which they are positioned. They there-
fore depend on the gauges’ distance from where the load is applied, as well as on the size
of the load. Better designs, less sensitive to where the load is applied, are the octagonal
ring and parallel beam designs shown in Figure 5.8. Supporting the load on well-separated
thin sections results in the sum of the strains in the gauges being unchanged when the point
of application of the load is changed, even though the strains are redistributed between the
sections. It is possible to connect the strain gauges in a bridge circuit so that the output is
not sensitive to where the force is applied.
The choice of parallel beams or octagonal rings is a matter of manufacturing choice.
For both, it is important, as a matter of convenience, to minimize cross-sensitivity between
the different orthogonal components of electrical output and mechanical input. For the
parallel beam design, this is achieved by manufacturing the two sets of beams perpendic-
ular to each other. For the octagonal ring design, it is important to choose a particular shape
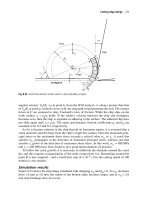
of octagon. When a circular ring (Figure 5.9) is loaded radially there is zero strain at the
positions B and B′, ± 39.9˚ from the point of application of the radial load; likewise when
the ring is loaded tangentially, there is zero strain at A and A′, ± 90˚ from the load. Gauges
placed at A and A′ will respond only to radial loads; and at B and B′ only to tangential
loads. The strains will depend on the loads and the ring dimensions (radius R, thickness t
and width b) and Young’s modulus E as
142 Experimental methods
Fig. 5.7 A strain gauged cantilever dynamometer with its bridge circuit
Childs Part 2 28:3:2000 3:10 pm Page 142
1.09F
P
e
A,A′
= ± ———
Ebt
2
}
(5.4)
2.18F
c
e
B,B′
= ± ———
Ebt
2
The manufacture of the ring outer surface as an octagon rather than a cylinder is just a
practical matter.
The need to generate detectable strain imposes a maximum allowable stiffness on a
dynamometer. This, in turn, with the mass of the dynamometer depending on its size or on
the mass supported on it, imposes a maximum natural frequency. Simple beam
Forces in machining 143
Fig. 5.8 Octagonal ring and parallel beam dynamometer designs: (a) Octagonal ring type tool dynanometer; (b) paral-
lel beam type tool dynanometer
Childs Part 2 28:3:2000 3:10 pm Page 143
dynamometers, suitable for measuring forces in turning from 10 N to 10 kN, can be
designed with natural frequencies of a few kHz. The ring and the strut types of dynamome-
ter tend to have lower values, of several hundred Hz (Shaw, 1984, Chapter 7). These
frequencies can be increased tenfold if semiconductor strain gauges (K
s
from 100 to 200)
are used instead of wire gauges. However, semiconductor gauges have much larger drift
problems than wire gauges. They are used only in very special cases (an example will be
given in Section 5.2.2). An alternative is to use piezoelectric force sensors.
Piezoelectric dynamometers
For certain materials, such as single crystals of quartz, Rochelle salt and barium titanate,
a separation of charge takes place when they are subjected to mechanical force. This is the
piezoelectric effect. Figure 5.10 shows the principle of how it is used to create a three-axis
force dynamometer. Each force component is detected by a separate crystal oriented rela-
tive to the force in its piezoelectric sensitive direction. Quartz is usually chosen as the
piezoelectric material because of its good dynamic (low loss) mechanical properties. Its
piezoelectric constant is only ≈ 2 × 10
–12
coulombs per Newton. A charge amplifier is
therefore necessary to create a useful output. Because the electrical impedance of quartz is
high, the amplifier must itself have high input impedance: 10
5
MW is not unusual.
Figure 5.11 shows the piezoelectric equivalent of the dynamometers of Figure 5.8. The
stiffness is basically that of the crystals themselves. Commercial machining dynamome-
ters are available with natural frequencies from 2 kHz to 5 kHz, depending on size.
5.2.2 Rake face stress distributions
In addition to overall force measurements, the stresses acting on cutting tools are impor-
tant, as has been indicated in earlier chapters. Too large stresses cause tool failure, and fric-
tion stresses strongly influence chip formation. The possibility of using photoelastic
studies as well as split-tool methods to determine tool stresses has already been introduced
in Chapter 2 (Section 2.4). The main method for measuring the chip/tool contact stresses
144 Experimental methods
Fig. 5.9 The loading of a ring by radial and tangential forces
Childs Part 2 28:3:2000 3:10 pm Page 144
is the split-tool method (Figure 2.21), although even this is limited – by tool failure – to
studying not-too-hard work materials cut by not-too-brittle tools.
Figure 5.12 shows a practical arrangement of a strain-gauged split-tool dynamometer.
The part B of the tool (tool 1 in Figure 2.21) has its contact length varied by grinding away
its rake face. It is necessary to measure the forces on both parts B and A, to check that the
Forces in machining 145
Fig. 5.10 The principle of piezoelectric dynamometry
Fig. 5.11 A piezoelectric tool dynamometer
Childs Part 2 28:3:2000 3:10 pm Page 145
sum of the forces is no different from machining with an unsplit tool. It is found that if
extrusion into the gap between the two tool elements (g, in Figure 2.21) is to be prevented,
with the surfaces of tools A and B (1 and 2 in Figure 2.21) at the same level, the gap should
be less than 5 mm wide (although other designs have used values up to 20 mm and a down-
ward step from ‘tool 1’ to ‘tool 2’). The greatest dynamometer stiffness is required. This
is an instance when semiconductor strain gauges are used. Piezoelectric designs also exist.
Split-tool dynamometry is one of the most difficult machining experiments to attempt
and should not be entered into lightly. The limitation of the method – tool failure, which
prevents measurements in many practical conditions that could be used to verify finite
element predicted contact stresses and also to measure friction stresses directly – leaves a
major gap in machining experimental methods.
146 Experimental methods
Fig. 5.12 A split-tool dynamometer arrangement
Childs Part 2 28:3:2000 3:10 pm Page 146
5.3 Temperatures in machining
There are two goals of temperature measurement in machining. The more ambitious is
quantitatively to measure the temperature distribution throughout the cutting region.
However, it is very difficult, because of the high temperature, commonly over 700˚C even
for cutting a plain carbon steel at cutting speeds of 100 m/min, and the small volume over
which the temperature is high. The less ambitious goal is to measure the average temper-
ature at the chip/tool contact. Thermocouple methods can be used for both (the next
section concentrates on these); but thermal radiation detection methods can also be used
(Section 5.3.2 summarizes these). (It is possible in special cases to deduce temperature
fields from the microstructural changes they cause in tools – see Trent, 1991 – but this will
not be covered here.)
5.3.1 Thermocouple methods
Figure 5.13 shows an elementary thermocouple circuit. Two materials A and B are
connected at two junctions at different temperatures T
1
and T
2
. The electro-motive force
(EMF) generated in the circuit depends on A and B and the difference in the temperatures
T
1
and T
2
. A third material, C, inserted at one of the junctions in such a way that there is
no temperature difference across it, does not alter the EMF (this is the law of intermediate
metals).
In common thermocouple instrument applications, A and B are standard materials, with
a well characterized EMF dependence on temperature difference. One junction, usually the
colder one, is held at a known temperature and the other is placed in a region where the
Temperatures in machining 147
Fig. 5.13 An elementary thermocouple circuit (above) with an intermediate metal variant (below)
Childs Part 2 28:3:2000 3:10 pm Page 147
temperature is to be deduced from measurement of the EMF generated. Standard material
combinations are copper-constantan (60%Cu–40%Ni), chromel (10%Cr–90%Ni)–alumel
(2%Al–90%Ni-Si-Mn) and platinum–rhodium. In metal machining applications, it is
possible to embed such a standard thermocouple combination in a tool but it is difficult to
make it small enough not to disturb the temperature distribution to be measured. One alter-
native is to embed a single standard material, such as a wire, in the tool, to make a junc-
tion with the tool material or with the chip material at the tool/chip interface. By moving
the junction from place to place, a view of the temperature distribution can be built up.
Another alternative is to use the tool and work materials as A and B, with their junction at
the chip/tool interface. By this means, the average contact temperature can be deduced.
This application is considered first, with its difficulties stemming from the presence of
intermediate metals across which there may be some temperature drop.
Tool–work thermocouple measurements
Figure 5.14 shows a tool–work thermocouple circuit for the turning process. The hot junc-
tion is the chip/tool interface. To make a complete circuit, also including an EMF recorder,
requires wires to be connected between the recorder and the tool and the recorder and the
work. In the latter case, because the work is rotating, the wire must pass through some slip-
ring device. If the junctions A, B and C, between the work and slip ring, the slip ring and
recorder wire and the tool and the recorder wire, are all at the same (cold junction) temper-
ature, the circuit from A to C is all intermediate and has no effect on the EMF. But this is
often not the case.
148 Experimental methods
Fig. 5.14 A tool–work thermocouple circuit
Childs Part 2 28:3:2000 3:10 pm Page 148
Dry slip rings, with their rubbing interface, frequently create an EMF. The solution is
to use a liquid mercury contact. If an indexable insert is used as the cutting edge, the
distance from the hot junction to the cold junction C may be only 10 mm. In this case, to
eliminate error due to C heating up, either the measurement time must be kept very short,
or the insert must be extended in some way – for example by making the connection at C
from the same material as the insert (but this is often not practical) – or the heating must
be compensated. Figure 5.15 shows a cold junction compensation circuit and its princi-
ple. The single wire connection at C is replaced by a standard thermocouple pair of wires
which are terminated across a potentiometer in a region where the temperature is not
affected by the cutting. The connection to the EMF recorder is then taken from the poten-
tiometer slider. The thermocouple wire materials are chosen so that the tool material has
an intermediate EMF potential between them, relative to some third material, for exam-
ple platinum. The slider is set at the point of interior division of the potentiometer, at the
same ratio a/b as the tool material potential is intermediate between the two thermocou-
ple materials. Copper and constantan are found suitable to span the potentials of most tool
materials.
Tool–work thermocouple calibration
The EMF measured in cutting must be converted to temperature. Generally, the EMF–
temperature relation for tool–work thermocouples is non-linear. It can even vary between
nominally the same tool and work materials. It is essential to calibrate the tool–work ther-
mocouple using the same materials as in the cutting test. Figure 5.16 shows one calibra-
tion arrangement and Figure 5.17 shows its associated measurement circuit. In this
arrangement, the tool–work thermocouple EMF is not measured directly. Instead, the EMF
between the tool and a chromel wire is measured at the same time as that of a
Temperatures in machining 149
Fig. 5.15 A circuit for compensating the cold junction C
Childs Part 2 28:3:2000 3:10 pm Page 149
chromel–alumel thermocouple at the same temperature. Thus, the tool–chromel EMF
versus temperature characteristic is calibrated against the chromel–alumel standard. This
is repeated for the work–chromel combination. The tool–work EMF versus temperature
relation is the difference between the tool–chromel and work–chromel relations.
Figure 5.16 shows an overview of the tool or work in contact with the chromel–alumel
thermocouple (detail in Figure 5.17). The contact is made at one focus of an infrared heat-
ing furnace with reflecting walls, shaped as an ellipsoid of revolution, with a 1 kW halo-
gen lamp at the other focus. The chromel–alumel thermocouple is fixed to the furnace
body and the tool or work is pressed on to it by a spring. It is necessary to prepare the tool
and work materials as rods in this method, but it is possible to heat the hot junction to
1000˚C in about 10 s: the lengths of the rods, to avoid the need for cold junction compen-
sation circuitry, need only be sufficient to be beyond the heat diffusion distance over this
time. Example results, for a P10 carbide tool and a 0.45% plain carbon steel work, are
given in Figure 5.18. Even at 1000˚C the EMF is only 10 mV, so a high sensitivity recorder
is needed.
Inserted thermocouple measurements
Figure 5.19 shows two further possibilities of tool temperature measurement. In Figure
5.19(a), a small diameter hole has been bored in the tool and a fine standard thermocouple
150 Experimental methods
Fig. 5.16 A tool–work thermocouple calibration set-up
Childs Part 2 28:3:2000 3:10 pm Page 150
has been inserted in it. It has the advantage that a precise measurement of temperature at
the bottom of the hole can be made, relying on the standard thermocouple, but a disad-
vantage that the hole may disturb the temperature gradients in the tool. If it is desired to
measure the temperature distribution in the tool, while only boring one hole, the rake and
clearance faces of the tool may be progressively ground away, to vary the position of the
hole relative to the cutting edge.
A finer hole may be bored if only one wire is to be inserted in it. Figure 5.19(b) shows
a single wire, for example chromel, or in this case platinum, making contact with the work
at the chip–tool interface. In this way, the temperature at a specified point can be measured,
Temperatures in machining 151
Fig. 5.17 A detail of the hot junction and the associated measurement circuit
Fig. 5.18 Calibration test results for P10 carbide and a 0.45% plain carbon steel
Childs Part 2 28:3:2000 3:11 pm Page 151
but it is necessary to calibrate the thermocouple, as was done with the tool–work thermo-
couple.
5.3.2 Radiation methods
Inserted thermocouple methods require special modifications to the cutting tools. The
tool–work thermocouple method only determines average contact temperatures; and
cannot be used if the tool is an insulator. Thermal imaging methods, measuring the
radiation from a surface, have a number of attractions, if surface temperatures are of
interest.
152 Experimental methods
Fig.5.19 (a) Inserted thermocouple or (b) thermocouple wire
Childs Part 2 28:3:2000 3:11 pm Page 152