Metal Machining - Theory and Applications Episode 1 Part 7 ppt
Bạn đang xem bản rút gọn của tài liệu. Xem và tải ngay bản đầy đủ của tài liệu tại đây (243.53 KB, 20 trang )
Childs Part 1
28:3:2000 2:40 pm
Page 113
Tool materials 113
h-phase). In any case, using a P-type substrate would give added life to a tool used to cut
steels once the coating wore off or if it failed. To compensate for loss of toughness on
changing from K- to P-type, such substrates were typically manufactured with a greater
%Co for a given grade of duty than if they were uncoated. Thus began the development of
special substrate compositions for coated tools. By the early 1980s, substrates were being
manufactured with surface layers containing from 1.5 to 3 times the amount of cobalt to
that in the bulk, and from 10 mm to 30 mm thick, on near WC-Co bulk compositions.
Toughness is maintained near the surface without reducing the hardness of the bulk.
Considering the high thermal expansion coefficient of cobalt (Table 3.9), the surface layer
of the substrate is better thermally matched to the coating materials and thermal strains are
reduced. CVD-coated tools began to find uses in interrupted turning and light milling operations.
Considering the thicknesses of both the coatings and modified substrate surface layers,
the composition (and hence thermal and mechanical properties) of CVD-coated tools can
vary over depths of up to around 40 mm. This is not insignificant relative to the size of the
stressed and heated regions during cutting. Detailed understanding of the interactions
between the graded surface compositions and the mechanical and thermal fields generated
in machining, leading to still further improvements in tool design, continues to develop.
PVD coatings
An alternative process for manufacturing coatings is Physical Vapour Deposition (PVD).
It is similar to CVD in its productivity (in its basic form, deposition rates are also around
1 mm/hr) but requires substrates to be heated only to a few 100˚C, say 500˚C, so coatings
can be deposited without the need to guard against unfavourable changes to the substrate.
In contrast to CVD, in which the metallic elements of the coating are obtained from gases
at around 10% atmospheric pressure, in PVD the metallic elements are obtained from
solids in a high vacuum chamber environment. There are many variants of the process but
all involve establishing a large electric potential difference (of the order of kV) between
the substrate and a solid source of elements to be deposited on the substrate; and creating
a glow discharge plasma between the two, typically with argon gas at low pressure.
Material is evaporated from the source (by some form of heating or bombardment), is
ionized in the plasma and is accelerated towards and adheres to the substrate. The source
may have the composition of the material of the coating, or more commonly it may be a
metal – for example titanium. In the latter case, for example in forming a TiN coating,
nitrogen gas is also admitted to the plasma. The Ti ions combine with the nitrogen, to
condense as TiN on the substrate.
The microstructure and properties of the coating are controlled by the substrate temperature and the deposition rate. It has been found that coatings can be grown with residual
compressive stresses in them, but thicknesses are limited to about 5 mm. Coatings made by
PVD are much smoother than by CVD and can be deposited on to sharp edges. Experience
has shown that they are more suitable for milling operations (because of their compressive
stresses) and finishing operations (because of the possibility of using sharp edged tools
(down to 10 mm to 20 mm edge radius). The range of coating types is not as wide as with
CVD. TiN was the first coating type successfully to be developed by PVD. This was
followed by TiC and Ti(C,N); and (Ti,Al)N has also been developed. There is great difficulty in generating Al2O3 coatings with a strong, coherent microstructure. Cermets as well
as cemented carbides are being coated by PVD.
Childs Part 1
28:3:2000 2:40 pm
Page 114
114 Work and tool materials
Fig. 3.29 The relation between thermal conductivity and density for coated cemented carbide and cermet substrate
materials
Coating developments and summary
Coating technologies continue to develop. For example, there are intermediate processes
between CVD and PVD in which coatings are formed with the chemical variability of
CVD but in which the substrate needs to be heated only to, say, 800˚C. Today there is a
wide variety of choice in the purchase of coated tools and production engineers rely heavily on the advice of tool manufacturers and their own practical trials. Tool manufacturers
are rather secretive about their manufacturing processes; and even about what the substrate
material is beneath a coating. When an engineer buys a coated tool he or she rarely knows
what is beneath the coating. Short of cutting up a tool and examining it, the next best way
of satisfying curiosity as to what is a tool’s substrate, is to weigh it. There is a strong relation between density and carbide composition – and between that and tool thermal conductivity – as shown in Figure 3.29.
This section has concentrated on TiC, TiN and Al2O3 coatings on cemented carbides.
At the time of writing, there is much activity in trying to develop PCD-coated tools. There
are also many instances in which high speed steel tools are coated with PVD TiN, TiCN
or TiAlN. Chromium nitride, boron nitride and boron carbide coatings are also under
investigation. TiN and TiC coatings have also been found to be useful on silicon nitride
ceramic tools. However, as far as this chapter is concerned, the main lesson is that Surface
Engineering has enabled the substrates of cutting tools to be designed for hardness and
toughness, separately from considerations of wear resistance. As far as CVD-coated tools
are concerned, the depth over which material composition and properties change is significant relative to the distances over which stresses and temperatures penetrate the tool. For
PVD-coated tools, the variations of composition and properties are much more superficial.
3.2.8 Tool insert geometries
At the start of Section 3.2, the stresses in a tool were considered, assuming the tool to have
a plane rake face. This later led to a conclusion of the minimum wedge angle that a tool
should have to avoid failure by yielding or fracture (Figure 3.27). In practice, many tools
Childs Part 1
28:3:2000 2:40 pm
Page 115
Tool materials 115
do not have plane rake faces. This is particularly true of indexable inserts, manufactured
by sintering and first mentioned in Chapter 1.
There are three main reasons for modifying cutting edge geometry: to strengthen the
edge, to reduce cutting forces and to control chip flow. The basic ways of achieving these
are illustrated, in two dimensions, in Figure 3.30.
Edge strengthening involves changing the edge shape over distances of the same order
as the feed length. Figure 3.30(a) shows an edge region chamfered at an angle ac over a
length T and honed to an edge radius R. Recommendations in the early 1990s for edge
preparation of ceramic cutting tools were typically chamfers for a length T between 0.5f
and 0.75f for turning operations and 1.2f to 1.5f for milling; with ac from 15˚ to 30˚
depending on the severity of the machining operation; and edge radii ranging from 0.013
mm to 0.076 mm for finishing operations, up to 0.13 mm in more severe conditions
(Adams et al., 1991). Today, with improved grinding procedures (and perhaps better
ceramic tool toughness too), chamfer lengths for general machining are reduced to 0.1 to
0.4f for turning and 0.5f for milling; and edge radii in general machining are 0.02 to 0.03
mm, with no radiusing – only chamfering – for finishing operations.
Changes to reduce cutting forces involve altering the rake face over lengths of several
times the feed (Figure 3.30(b)). The rake face beyond a land h of length between 1f and 2f
is cut-away to a depth d typically also between 1f and 2f, established over a length L from
3f to 6f. The land restriction causes a reduced chip thickness.
A disadvantage of cutting away the rake as just described is that, generally, the chips
become straighter, and in a continuous process (such as turning) this can lead to long
unbroken chips that are difficult to dispose of. In order to control the flow, the cut-away
region is usually ended in a back wall (Figure 3.30(c)), so that the cut-away forms some
groove shape. When a chip hits the back wall, it is deflected and has a good chance of
Fig. 3.30 Modifications to a square cutting edge for (a) edge strengthening, (b) cutting force reduction and (c) chip
control
Childs Part 1
28:3:2000 2:40 pm
Page 116
116 Work and tool materials
Fig. 3.31 Three-dimensional opportunities for edge strengthening and chip control, not to scale: rake profile varying
(a) smoothly along a cutting edge and (b) in a ‘rib and pocket’ manner
breaking when its tip hits either the tool holder or the work. There is a wide variety of practical groove shapes. They can be curved or triangular, symmetrical or unsymmetrical. The
height d* of the back wall can be greater or less than the groove depth d. In some cases,
the back wall is formed without a groove at all. Inserts can be designed for use over a wide
range of feeds by creating the groove features as a series of terraces, so that the smallest
feeds involve chip contact only with the terrace nearest the cutting edge and larger feeds
result in contact over several terraces. Of course, the larger feed features of Figures 3.30(b)
and (c) can be combined with the sub-feed strengthening features of Figure 3.30(a).
Figure 3.30 takes a two-dimensional view of a cutting edge. Real inserts are three
dimensional – and this gives further opportunity for ingenuity in tool design. Sections as
in Figure 3.30 can be varied along the cutting edge. This possibility is shown in Figure
3.31(a). The rake face groove at the corner of an insert can be shaped differently from that
along the edge, either to ensure that the corner is strong enough or to help guide the chip
away from the corner region, or both.
A different type of modification is shown in Figure 3.31(b). A curling chip is more
likely to break, when it hits an obstruction, the larger is its second moment of area, I. Chips
formed over plane or smoothly varying rake faces are approximately rectangular in section
– and have a relatively small I-value. If they can be corrugated, their I value is raised. The
rib and pocket form of the rake face in Figure 3.31(b) can cause such corrugation, if it is
designed correctly. As an alternative to the rib and pocket style, the whole cutting edge
may be made wavy, or bumps instead of pockets can be formed on the rake. Every manufacturer has a different way in which to achieve the same effect. Interested readers should
look at manufacturers’ catalogues or refer to a recent handbook (Anon, 1994).
Improved tools, combining new shapes with better surface engineering, continue to be
developed. Finite element modelling, introduced in Chapter 6, is starting to contribute to
these better designs. However, amongst its required inputs is material property information
of the sort collected in this chapter.
Childs Part 1
28:3:2000 2:40 pm
Page 117
References 117
References
Adams, J. H., Anschuetz, B. and Whitfield, G. (1991) Ceramic cutting tools. In: Engineered
Materials Handbook Vol. 4 (Ceramics and Glasses). Metals Park, Ohio: ASM.
Anon (1994) Modern Metal Cutting – A Practical Handbook. Sandviken: AB Sandvik Coromant.
Brookes, K. J. A. (1992) World Directory and Handbook of Hardmetals and Hard Materials 5th edn.
East Barnet, UK: International Carbide Data.
Hoyle, G. (1988) High Speed Steels. London: Butterworths.
Kobayashi, S. and Thomsen, E. G. (1959) Some observations on the shearing process in metal
cutting. Trans. ASME 81B, 251–262; and Eggleston, D. M., Herzog, R. and Thomsen, E. G.
Trans. ASME 81B, 263–279.
Komanduri, R. and Samanta, S. K. (1989) Ceramics. In: Metals Handbook 9th edn. Vol. 16
(Machining). Metals Park, Ohio: ASM.
Sata, T. (1968) Machinability of calcium-deoxidised steels. Bull. Jap. Soc. Prec. Eng. 3(1), 1–8.
Santhanam, A. T. and Quinto, D. T. (1994) Surface engineering of carbide, cermet and ceramic
cutting tools. In: Metals Handbook, 10th edn, Vol. 5 (Surface Engineering). Metals Park, Ohio:
ASM.
Santhanam, A. T., Tierney, P. and Hunt, J. L. (1990) Cemented carbides. In: Metals Handbook 10th
edn, Vol. 2 (Properties and Selection: Nonferrous alloys and Special Purpose Materials). Metals
Park, Ohio: ASM.
Trent, E. M. (1991) Metal Cutting, 3rd edn. Oxford: Butterworth Heinemann.
Childs Part 1
28:3:2000 2:40 pm
Page 118
4
Tool damage
Chapter 3 considered cutting tool minimum property requirements (both mechanical and
thermal) to avoid immediate failure. By failure is meant damage so large that the tool has
no useful ability to remove work material. Attention is turned, in this chapter, to the mechanisms and characteristics of lesser damages that accumulate with use, and which eventually cause a tool to be replaced. In reality, there is a continuous spectrum of damage
severities, such that there is no sharp boundary between what is to be considered here and
what might in practice be described as immediate failure. There is some overlap between
this chapter and the previous one.
Chapters 2 and 3 have demonstrated that cutting tools must withstand much higher friction and normal stresses – and usually higher temperatures too – than normal machine tool
bearing surfaces. There is, in most cases, no question of avoiding tool damage, but only of
asking how rapidly it occurs. The damages of a cutting tool are influenced by the stress
and temperature at the tool surface, which in turn depend on the cutting mode – for example turning, milling or drilling; and the cutting conditions of tool and work material,
cutting speed, feed rate, depth of cut and the presence or not of cutting fluid and its type.
In Chapter 2, it was described in general that wear is very sensitive to small changes in
sliding conditions. In machining, the tool damage mode and the rate of damage are similarly very sensitive to changes in the cutting operation and the cutting conditions. While
tool damage cannot be avoided, it can often be reduced if its mode and what controls it is
understood. Section 4.1 describes the main modes of tool damage.
The economics of machining were introduced in Chapter 1. To minimize machining
cost, it is necessary not only to find the most suitable tool and work materials for an operation, but also to have a prediction of tool life. At the end of a tool’s life, the tool must be
replaced or reground, to maintain workpiece accuracy, surface roughness or integrity.
Section 4.2 considers tool life criteria and life prediction.
4.1 Tool damage and its classification
4.1.1 Types of tool damage
Tool damage can be classified into two groups, wear and fracture, by means of its scale
and how it progresses. Wear (as discussed in Chapter 2) is loss of material on an asperity
Childs Part 1
28:3:2000 2:40 pm
Page 119
Tool damage and its classification 119
Machined surface
Chip flow
A
Crater
KM
A
Work surface
KT
Feed
Section A-A
Depth of cut
VB
VC
VN
VBmax
Fig. 4.1 Typical wear pattern of a carbide tool
or micro-contact, or smaller scale, down to molecular or atomic removal mechanisms. It
usually progresses continuously. Fracture, on the other hand, is damage at a larger scale
than wear; and it occurs suddenly. As written above, there is a continuous spectrum of
damage scales from micro-wear to gross fracture.
Figure 4.1 shows a typical damage pattern – in this case wear – of a carbide tool, cutting
steel at a relatively high speed. Crater wear on the rake face, flank wear on the flank faces
and notch wear at the depth of cut (DOC) extremities are the typical wear modes. Wear
measures, such as VB, KT are returned to in Section 4.2.
Damage changes, however, with change of materials, cutting mode and cutting conditions, as shown in Figure 4.2. Figure 4.2(a) shows crater and flank wear, with negligible
notch wear, after turning a medium carbon steel with a carbide tool at high cutting speed.
If the process is changed to milling, a large crater wear with a number of cracks becomes
the distinctive feature of damage (Figure 4.2(b)). When turning Ni-based super alloys
with ceramic tools (Figure 4.2(c)) notch wear at the DOC line is the dominant damage
mode while crater and flank wear are almost negligible. Figure 4.2(d) shows the result
of turning a carbon steel with a silicon nitride ceramic tool (not to be recommended!).
Large crater and flank wear develop in a very short time. In the case of turning b-phase
Ti-alloys with a K-grade carbide tool, large amounts of work material are observed
adhered to the tool, and part of the cutting edge is damaged by fracture or chipping
(Figure 4.2(e)).
Childs Part 1
28:3:2000 2:41 pm
Page 120
120 Tool damage
(a) Turning a 0.45% carbon steel
(b) Face milling a 0.45% carbon steel
(c) Turning Inconel 718
(d) Turning a 0.45% carbon steel
(e) Turning a Ti alloy
Fig. 4.2 Typical tool damage observations – both wear and fracture: (a) Tool: cemented carbide P10, v = 150 m min–1,
d = 1.0 mm, f = 0.19 mm rev–1, t = 5 min; (b) tool: cemented carbide P10, v = 400 m min–1, d = 1.0 mm, f = 0.19
mm tooth–1, t = 5 min; (c) tool: Al2O3/TiC ceramic tool, v = 100 m min–1, d = 0.5 mm, f = 0.19 mm rev–1, t = 0.5 min;
(d) tool: Si3N4 ceramic tool, v = 300 m min–1, d = 1.0 mm, f = 0.19 mm rev–1, t = 1 min; (e) tool: cemented carbide
P10, v = 150 m min–1, d = 0.5 mm, f = 0.1 mm rev–1, t = 2 min.
Childs Part 1
28:3:2000 2:41 pm
Page 121
Tool damage and its classification 121
Thermal damage
Plastic deformation
Thermal diffusion
Chemical reaction
Removal rate
Adhesion
Mechanical damage
Abrasion
Chipping
Fracture
Fatigue
Cutting temperature
Fig. 4.3 Tool damage mechanisms and cutting temperature
Attrition
Abrasion
0.1
Chipping
Micro chipping
1
10
Fracture
100
Damage size (µm)
Fig. 4.4 Classification of mechanical damages
4.1.2 Causes of tool damage
Chapter 2.4 outlined the general conditions leading to abrasive, adhesive and chemical wear
mechanisms. In the context of cutting tool damage, the importance and occurrence of these
mechanisms can be classified by cutting temperature, as shown in Figure 4.3. Three causes
of damage are qualitatively identified in the figure: mechanical, thermal and adhesive.
Mechanical damage, which includes abrasion, chipping, early fracture and fatigue, is basically independent of temperature. Thermal damage, with plastic deformation, thermal diffusion and chemical reaction as its typical forms, increases drastically with increasing
temperature. (It should be noted that thermal diffusion and chemical reaction are not the
direct cause of damage. Rather, they cause the tool surface to be weakened so that abrasion,
mechanical shock or adhesion can then more easily cause material removal.) Damage based
on adhesion is observed to have a local maximum in a certain temperature range.
Mechanical damage
Whether mechanical damage is classified as wear or fracture depends on its scale. Figure
4.4 illustrates the different modes, from a scale of less than 0.1 mm to around 100 mm
(much greater than 100 mm becomes failure).
Abrasive wear (illustrated schematically in Figure 2.29) is typically caused by sliding
Childs Part 1
28:3:2000 2:41 pm
Page 122
122 Tool damage
hard particles against the cutting tool. The hard particles come from either the work material’s microstructure, or are broken away from the cutting edge. Abrasive wear reduces the
harder is the tool relative to the particles and generally depends on the distance cut (see
Section 4.2.2).
Attrition wear occurs on a scale larger than abrasion. Particles or grains of the tool
material are mechanically weakened by micro-fracture as a result of sliding interaction
with the work, before being removed by wear.
Next in size comes chipping (sometimes called micro-chipping at its small-scale limit).
This is caused by mechanical shock loading on a scale that leads to large fluctuations in
cutting force, as opposed to the inherent local stress fluctuations that cause attrition.
Finally, fracture is larger than chipping, and is classified into three types: early stage,
unpredictable and final stage. The early stage occurs immediately after beginning a cut if
the tool shape or cutting condition is improper; or if there is some kind of defect in the
cutting tool or in its edge preparation. Unpredictable fracture can occur at any time if the
stress on the cutting edge changes suddenly, for example caused by chattering or an irregularity in the workpiece hardness. Final stage fracture can be observed frequently at the
end of a tool’s life in milling: then fatigue due to mechanical or thermal stresses on the
cutting edge is the main cause of damage.
Thermal damage – plastic deformation
The plastic deformation type of thermal damage referred to in Figure 4.3 is observed when
a cutting tool at high cutting temperature cannot withstand the compressive stress on its
cutting edge. It therefore occurs with tools having a high temperature sensitivity of their
hardness as their weakest characteristic. Examples are high speed steel tools in general;
and high cobalt content cemented carbide tools, or cermet tools, used in severe conditions,
particularly at a high feed rate. Deformation of the edge leads to generation of an improper
shape and rapid material removal.
Thermal damage – diffusion
Wear as a result of thermal diffusion occurs at high cutting temperatures if cutting tool and
work material elements diffuse mutually into each other’s structure. This is well known
with cemented carbide tools and has been studied over many years, by Dawihl (1941),
Trent (1952), Trigger and Chao (1956), Takeyama and Murata (1963), Gregory (1965),
Cook (1973), Uehara (1976), Narutaki and Yamane (1976), Usui et al. (1978) and others.
The rates of processes controlled by diffusion are exponentially proportional to the
inverse of the absolute temperature q. In the case of wear, different researchers have
proposed different pre-exponential factors: Cook (1973) suggested depth wear h should
increase with time t (equation 4.1(a)); earlier, Takeyama and Murata (1963) also suggested
this and the further possibility of sliding distance s being a more fundamental variable
(equation 4.1(b)); later Usui et al. (1978), following the ideas of contact mechanics and
wear considered in Chapter 2.4, proposed wear should also increase with normal contact
stress sn (equation 4.1(c)). In all these cases, a plot of ln(wear rate) against 1/q gives a
straight line, the slope of which is –C2.
[ ]
dh
C2
— = C1 exp – ——
dt
q
(4.1a)
Childs Part 1
28:3:2000 2:41 pm
Page 123
Tool damage and its classification 123
[ ]
[ ]
dh
C2
— = C1 exp – ——
ds
q
(4.1b)
dh
C2
— = C1sn exp – ——
ds
q
(4.1c)
Figure 4.5 shows experimental results for both the crater and flank depth wear rates of
a 0.25%C and a 0.46%C steel turned by a P20 grade carbide tool, plotted after the manner
of equation (4.1c). Two linear regions are seen: in this case the boundary is at 1/q ≈ 8.5 ×
10–4 K–1 (or q ≈ 1175 K). The slope of the higher temperature data (q > 1175 K) is typical of diffusion processes between steels and cemented carbides (Cook, 1973). The smaller
slope at lower temperatures is typical of a temperature dependent mechanical wear
process, for example abrasion.
Diffusion can be directly demonstrated at high temperatures in static conditions. Figure
4.6 shows a typical result of a static diffusion test in which a P-grade cemented carbide tool
was loaded against a 0.15% carbon steel for 30 min at 1200˚C. A metallographic section
through the interface between the carbide tool and the steel, etched in 4% Nital (nitric acid
Fig. 4.5 Crater and flank depth wear rates for carbon steels turned by a P20 carbide, from Kitagawa et al. (1988)
Childs Part 1
28:3:2000 2:41 pm
Page 124
124 Tool damage
Fig. 4.6 Typical static diffusion test results, for P10 coupled to 0.15% C steel (Narutaki and Yamane, 1976): (a) Section
through the interface etched by Nital; (b) Diffusion of elements analysed by EPMA
and alcohol) shows that the pearlite in the steel has increased from its original level. This
means that carbon from the cemented carbide has diffused into the steel. Furthermore, electron probe micro-analysis (EPMA) shows that Co and W from the tool material also diffuse
into the steel; and iron from the steel diffuses into the tool material. Many researchers agree
that mutual diffusion is the cause of carbide tool diffusion wear, but there is not agreement
in detail as to the mechanism that then results in material removal.
Naerheim and Trent (1977) have proposed that the wear rates of both WC-Co (K-grade)
and WC-(Ti,Ta,W)C-Co (P-grade) cemented carbides are controlled by the rate of diffusion
of tungsten (and Ti and Ta) and carbon atoms together into the work material, as indicated
in Figure 4.7. This view is based on transmission electron microscope (TEM) observations
on crater wear that show no structural changes in the tool’s carbide grains within a distance
Childs Part 1
28:3:2000 2:41 pm
Page 125
Tool damage and its classification 125
WC-Co cemented carbide tools
WC-(Ti, Ta, W)C-Co cemented
carbide tools
Fig. 4.7 Model of diffusion wear, after Naerheim and Trent (1977)
of 0.01 mm of the tool–chip interface. The slower wear of P-grade than K-grade materials
is explained by slower diffusion in the former than the latter case. Naerheim and Trent state
that, in their cutting tests, pulled-out carbide grains were not observed adhering to the
underside of chips. This was not Uehara’s (1976) experience. He collected chips after turning a 0.47% C steel with a K-grade or a P-grade tool, dissolved the chips in acid to extract
adhered carbides and finally passed the solution through a 0.1 mm filter, to classify the
carbide sizes. With K-grade tools, he only observed carbides less than 0.1 mm in size, in
accord with Trent. However, with P-grade tools he observed carbides greater than 0.1 mm in
size. This suggests a different wear mechanism for K- and P-type materials.
Other examples of diffusion wear are the severe wear of diamond cutting tools, silicon
nitride ceramic tools and SiC whisker reinforced alumina ceramic tools when machining
steel. Carbon, silicon and nitrogen all diffuse easily in iron at elevated temperatures; and
silicon nitride and silicon carbide dissolve readily in hot iron.
Thermal diffusion wear of carbide tools can be decreased if a layer acting as a barrier
to diffusion is deposited on the tool. There are two types of layer in practice: one is as
provided by coated tools; the other is a protective oxide layer deposited on the wear
surfaces during cutting special deoxidized steels (for example Ca-deoxidized steels),
commonly known as a ‘belag’ layer.
Thermal damage – chemical reaction
Chemical reaction wear occurs when chemical compounds are formed by reaction of the
tool with the work material (or with other materials, such as oxygen in air or sulphur and
chlorine in a cutting fluid) and when the compounds are then carried away by the chip
(from the rake face) or work (from the flank faces).
Oxidation wear is best known. The cutting tool and/or work material are oxidized; and
the tool surface, either directly weakened by oxidation or by reaction with oxidized work
material, is then carried away by the chip. An example of oxidation wear occurs on the
rake face of cemented carbide tools in high speed milling of steel. In milling, crater wear
increases drastically with an increase of cutting speed, more so than in turning. Figure 4.8
shows the increase of both flank and crater wear with cutting edge engagement time for
two different cutting speeds when turning and milling a 0.45% plain carbon steel under the
same feed and depth of cut conditions. The increase of wear rate with cutting speed is
28:3:2000 2:41 pm
Page 126
126 Tool damage
80
0.4
236 m min-1
Milling
60
Crater depth ( µm)
0.3
Flank wear (mm)
150 m min-1
0.2
Turning
236 m min-1
40
20
0.1
150 m min-1
0
0
0
5
10
Real cutting time (min)
15
0
5
10
Real cutting time (min)
15
DepthDepth of1.0 mm Feed Feed 0.2 mm rev–1 or tooth–1
of cut: cut:1.0mm rate: rate: 0.2 mm rev-1
Fig. 4.8 Comparisons of wear when milling and turning a 0.45% carbon steel with a P10 cemented carbide tool,
after Yamane and Narutaki (1983)
100
Crater depth (µm)
Childs Part 1
50
d:1.0 mm, f: 0.2 mm tooth-1
Real cutting time: 1.9 min
20
10
5
2
0.01
0.1
1
Oxygen content (%)
2
5
10
20
Fig. 4.9 Influence of oxygen on crater wear when milling a 0.45% carbon steel with a P10 carbide tool at 239 m/min
(Yamane and Narutaki, 1983)
much less on the flank face than on the rake face, and the difference between milling and
turning is much less on the flank too, probably because of the lower temperature on the
flank. On the rake face, crater wear is almost the same in turning and milling at the relatively low cutting speed of 150 m/min, but at 236 m/min crater wear in milling becomes
much more rapid than in turning. The wear mechanism is the oxidation of chips adhered
to the rake face during the out-of-cut time in milling, to form FeO, followed by reaction of
the FeO with the cemented carbide tool to weaken it.
Direct evidence of the influence of oxygen on carbide tool wear in milling comes from
machining in a controlled atmosphere environment (Figure 4.9). In the same high speed
Childs Part 1
28:3:2000 2:41 pm
Page 127
Tool damage and its classification 127
cutting conditions as in Figure 4.8, crater wear rate is reduced from its milling towards its
turning level by reducing the amount of oxygen in the atmosphere.
Oxidation wear is also found with alumina ceramic tools in high speed milling of steels.
The same oxidation of steel adhering to the tools’ rake face occurs as with cemented
carbide tools. FeO reacts with alumina at high temperatures to form weak, easily removed,
mixed oxides.
Thermal damage – electro-motive force (EMF) wear
A further thermal wear mechanism, not listed in Figure 4.3, is considered to occur by
several researchers. When cutting with electrically conducting tools, such as high speed
steels and cemented carbides, the tool and work materials generally have different chemical compositions. A thermal EMF, based on the difference between the cutting temperature and room temperature is generated (the Seebeck effect). An electric current then flows
around the closed circuit of work, tool and machine tool. Reports about its effect on wear
do not always agree with one another and further investigation is required to establish if it
is important.
Adhesion
The third damage mechanism in Figure 4.3 is adhesive wear. It occurs when work or chip
material pressure welds (adheres) to the tool – which generally requires high temperature
– and has high strength in that condition. Stainless steels, Ni-based super alloys and Ti
alloys show this behaviour well. If the adhesive shear strength between the tool and welded
chip or work is larger than a failure strength away from the interface, adhesive transfer
between work, chip and tool will occur. Transfer will be from the chip or work to the tool
if the weakest point is in the chip or work – this can lead to one type of built-up edge
formation. Transfer from the tool to the work or chip occurs if the weakest point is in the
tool. Adhesive wear is the repeated adhesion of material to the tool, followed by failure
within the tool. At low cutting temperatures, it is reduced because of a low adhesion
tendency. At high cutting temperatures it is reduced because thermal softening changes
failure from within the tool back to the interface or to within the work or chip. Thus, it
peaks at some intermediate temperature. Its peak magnitude increases as the tool’s resistance to shear failure reduces.
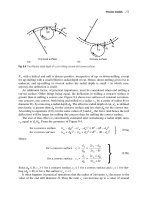
Examples of adhesive wear are shown in Figures 4.10 and 4.11, after turning a Ni-based
super alloy, Inconel 718, with an alumina/TiC ceramic tool. Figure 4.10 shows scanning
electron microscopy (SEM) views of the DOC notch wear region after dissolving adhered
chip material in nitric acid. The damaged surface of region A looks fractured rather than
worn. Figure 4.11 shows the characteristic peaking of the notch wear at some temperature,
in this case near to 1000˚C.
4.1.3 Tool damage and cutting conditions
Figure 4.3 is qualitative. The temperatures at which thermal and adhesion damages occur
vary with the tool material, as well as with what work the tool is machining. Figure 4.12
shows some detail of this – there is some overlap with Chapter 3 (Tables 3.6 and 3.7).
Diamond, the hardest cutting tool material, starts to carbonize in air over 600˚C. It
diffuses into iron or steel at higher temperatures, causing diffusion wear problems with
these work materials.
Childs Part 1
28:3:2000 2:41 pm
Page 128
128 Tool damage
Fig. 4.10 SEM views of DOC region of an Al2O3/TiC tool after turning Inconel 718
Cubic boron nitride (cBN), a material that does not exist naturally but is synthesized
under ultrahigh pressure and temperature, is stable against diffusion for practically all
metals. Its weakness is its failure under shear, so adhesive wear occurs when cutting materials with a tendency to adhere to it.
Among ceramic tools, alumina, silicon nitride and whisker reinforced ceramics,
alumina tools are the most stable. Silicon nitride reacts readily with iron or steel at high
temperature, leading to diffusion wear. Diffusion wear also leads to tool weakening of
whisker reinforced ceramics, if the whisker component reacts with the work material – SiC
whiskers reacting with steel is an example of this. In general, all ceramic tools, because of
their low toughness, are susceptible to adhesive wear when machining materials that
adhere to them.
For cemented carbide tools, thermal diffusion wear increases remarkably at temperatures over 1000˚C, while the main thermal damage of HSS tools is plastic deformation,
caused by hardness reduction over the tempering temperature range.
cBN, ceramic and cemented carbide tools also tend to react at high temperature with
Childs Part 1
28:3:2000 2:41 pm
Page 129
Tool damage and its classification 129
Notch wear at DOC (mm)
1.5
1.0
0.5
0
900
800
1100
1200
1000
Temperature at DOC (°C)
1300
1400
Fig. 4.11 Al2O3/TiC DOC notch wear variation with temperature, turning Inconel 718 for 30 s at various speeds at a
feed of 0.19 mm and a depth of cut of 0.5 mm, after Narutaki and Yamane (1993)
Diamond
cBN
Ceramic(Alumina)
Carbide
HSS
600
800
1000
1200
Temperature (°C)
Adhesion:
Thermal wear:
Fig. 4.12 Tool damage and cutting temperature
unstable oxides, such as FeO, or sulphides, such as MnS. If such oxides or sulphides are
present at the tool/chip or work interface, thermal wear based on reactions with them must
be considered.
In the case of coated tools, wear of the tool depends on the coated material, until it is
worn away. TiC, TiN, (TiAl)N and Al2O3 are the most popular as they have high thermal
stability and low reactivity with steels, compared with WC. Therefore, coated tools can
Childs Part 1
28:3:2000 2:41 pm
Page 130
130 Tool damage
withstand thermal wear at higher cutting temperature. After the layer is worn away, the
tool’s wear rate, in general, returns to that of the substrate.
4.2 Tool life
As tool damage, by wear or fracture, increases, the surface roughness and accuracy of the
machined surface deteriorates. Eventually the tool must be changed. Some criteria must be
developed to decide when to do this. In factories there is a tendency to adopt flexible criteria according to the needs of a particular operation, while in laboratories inflexible criteria
are adopted to evaluate tool and work material machining capabilities.
4.2.1 Tool life criteria
In factories, where the concern is acceptable accuracy or surface roughness, the most suitable way to judge tool life is by measuring the size or roughness of machined parts. Life
is determined when the measured levels exceed a limit. In this approach, it is the parts that
must always be measured; however, this is not always easy or cost-effective. An alternative is to monitor the wear of the tool and to judge the state of the part from a tool wear
criterion. Unfortunately, there is not always a unique relation between tool wear and work
material surface roughness or accuracy; and measuring tool wear increases non-productive
time. Since chip shape sometimes changes with tool wear, change of chip shape is occasionally used as a criterion; but commonly in mass production industries, as a consequence
of difficulties of measurement and interpretation, the simple approach is taken to specify
the number of machined parts expected from a tool. The number is determined from a
primary test, but it must be set with some safety factor – so this leads to machining costs
being greater than they could be.
In laboratories, tool wear is almost always used as a life criterion because it is easy to
determine quantitatively. The amount of flank wear is often used as the criterion because
it is flank wear that influences work material surface roughness and accuracy. When abrasion is the main cause of flank wear, the wear pattern is relatively uniform and easy to
measure. A standard measure of tool life is the time to develop a flank wear land (VB, see
Figure 4.1) length of 300 mm, although this is more related to a life limited by failure than
by surface finish or accuracy. However, when chipping generated by adhesion or thermal
cracking is the main cause of flank wear, the wear pattern is usually irregular, the more so
the more difficult-to-cut is the material. The mean flank wear width does not then determine life. It is recommended that the wear width at both the mid-point of the depth of cut
and at its maximum position are checked. The maximum and where it occurs give useful
information of the wear mechanism and hence how the wear might be reduced.
Unlike flank wear, crater wear does not influence surface roughness and accuracy. It
can, in thermal damage conditions and for some work materials, result in tool failure. It is
therefore also a useful measure of wear, able to distinguish between the machinability of
different tool and work combinations. A crater depth (KT) from 0.05 mm to 0.1 mm is
generally used as an end of life criterion.
Complete failure of a cutting edge is hardly ever used as a tool life test criterion for
turning and milling operations because it causes cutting to stop and can seriously damage
the work material and even sometimes the tool holder or machine tool. However, it is used
Childs Part 1
28:3:2000 2:41 pm
Page 131
Tool life 131
in drilling, particularly with HSS drills, because drill breakage is a common practical failure mode and it is usually possible to recover from it.
4.2.2 Tool life equations
The ability to predict tool life is obviously important for tool management. However, the
previous sections’ considerations of what is tool life, together with life dependence on the
tool (material, geometry, surface integrity and internal defects), the work (hardness,
strength, chemical composition, etc), the cutting conditions (speed, feed, depth of cut,
cutting fluids), the cutting mode (turning, milling, drilling and others) and the machine
tool (for example stiffness, state of maintenance), make a universal life criterion an impossibility.
It is, however, possible to develop tool life equations if the cutting mode and machine
tool are limited and the tool wear is simple and dominated by a single mechanism. At the
end of the 19th century, F. W. Taylor machined 30 000 tons of work material to collect tool
life data to establish the first tool management system. These data, although promoting
machining technology (as introduced in Chapter 1), are almost useless today because tool
and work materials have changed. However, his tool life equation (Taylor’s equation, also
introduced in Chapter 1) remains well known and is still widely used.
Taylor’s equation – influence of cutting speed on tool life
Over limited ranges of cutting speed V, tool life T is often observed to vary linearly with
V on a log-log scale, as shown in Figure 4.13. An example has already been given in
Chapter 1 (Figure 1.24). Taylor’s tool life equation for such a limited speed range has also
been given (Equation (1.3)), but is repeated here for convenience:
VT n = C
(4.2)
Cutting speed (log V )
C is the cutting speed that gives a lifetime of one (in whatever units are being used). n is
an exponent that shows the sensitivity of life to change of speed. In practice, it usually
Tool life (logT )
Fig. 4.13 Relation between tool life and cutting speed over a wide speed range
Childs Part 1
28:3:2000 2:41 pm
Page 132
132 Tool damage
takes a value in the range 0.2 to 1.0 although, in Figure 4.13, the dashed line covers a range
of speeds for which n is negative.
If a wear mechanism is independent of temperature, it is expected that, after some runningin period, wear increases in proportion to cut distance (Archard’s wear law – Chapter 2.4). A
tool subject to that wear mechanism would have a life determined by cut distance, independent of cutting speed (unless the amount of running-in varied with speed). It would thus have
a lifetime inversely proportional to cutting speed. n would equal 1.0. Simple mechanical wear
modes are characterized by n values close to 1. When thermal damage occurs, because
temperature increases with cutting speed and thermal damage increases with temperature, n
values reduce, the more so the more temperature sensitive is the wear.
The break points shown in Figure 4.13 indicate changes of wear mechanism, such as
the increase of thermal wear at higher cutting speeds, or increasing chipping or fracture at
lower speeds. It is always necessary to exercise care when relying for tool management on
tool life curves based on small amounts of data (and, for economic reasons, they are often
in practice based on small amounts of data). It is sensible to support measurements of the
amount of wear by observations of wear patterns and mechanisms as well.
Figure 4.14 shows some examples of tool life observations. Figure 4.14(a), for turning
Fig. 4.14 Examples of tool life curves: (a) Turning of ductile cast iron; (b) turning of different types of Ti-alloys; (c) face
milling of grey cast iron