Metal Machining - Theory and Applications Episode 1 Part 3 pot
Bạn đang xem bản rút gọn của tài liệu. Xem và tải ngay bản đầy đủ của tài liệu tại đây (230.08 KB, 20 trang )
compete with grinding processes. Attention is also being paid to environmental issues:
how to machine without coolants, which are expensive to dispose of to water treatment
plant.
Developments in milling have a different emphasis from turning. As has been seen, the
intermittent nature of the milling process makes it inherently more expensive than turn-
ing. A strategy to reduce the force variations in milling, without increasing the average
force, is to increase the number of cutting edges in contact while reducing the feed per
edge. Thus, the milling process is often carried out at much smaller feeds per edge – say
0.05 to 0.2 mm – than is the turning process. This results in a greater overall cutting
distance in removing a unit volume of metal and hence a greater amount of wear, other
things being equal. At the same time, the intermittent nature of cutting edge contact in
milling increases the rate of mechanical and thermal fatigue damage relative to turning.
The two needs of cutting tools for milling, higher fatigue resistance and higher wear resis-
tance than for similar removal rates in turning, are to some extent incompatible. At the
same time, a productivity push exists to achieve as high removal rates in milling as in
turning. All this leads to greater activity in milling development at the present time than
in turning development.
Perhaps the biggest single and continuing development of the last 20 years has been
the application of Surface Engineering to cutting tools. In the early 1980s it was confi-
dently expected that the market share for newly developed ceramic indexable insert
cutting tools (for example the alumina tools considered in Section 1.4) would grow
steadily, held back only by the rate of investment in the new, more powerful and stiffer
machine tools needed for their potential to be realized. Instead, it is a growth in ceramic
(titanium nitride, titanium carbide and alumina) coated cutting tools that has occurred.
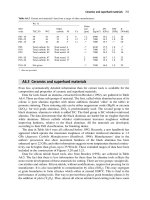
Figure 1.29 shows this. It is always risky being too specific about what will happen in the
future.
A forward look 33
Fig. 1.29 Sales of insert cutting tips in Japan, 1980 to 1996
Childs Part 1 28:3:2000 2:35 pm Page 33
References
Ashby, M. F. (1992) Materials Selection in Mechanical Design. Oxford: Pergamon Press.
Boothroyd, G. and Knight, W. A. (1989) Fundamentals of Machining and Machine Tools, 2nd edn.
New York: Dekker.
Dieter, G. E. (1991) Engineering Design, 2nd edn. New York: McGraw-Hill.
Groover, M. P. and Zimmers, E. W. (1984) CAD/CAM. New York: Prentice Hall.
Hitomi, K. (1979) Manufacturing Systems Engineering. London: Taylor & Francis.
Trent, E. M. (1991) Metal Cutting, 3rd edn. Oxford: Butterworth-Heinemann.
34 Introduction
Childs Part 1 28:3:2000 2:35 pm Page 34
2
Chip formation fundamentals
Chapter 1 focused on the manufacturing organization and machine tools that surround the
machining process. This chapter introduces the mechanical, thermal and tribological (fric-
tion, lubrication and wear) analyses on which understanding the process is based.
2.1 Historical introduction
Over 100 years ago, Tresca (1878) published a visio-plasticity picture of a metal cutting
process (Figure 2.1(a)). He gave an opinion that for the construction of the best form of
tools and for determining the most suitable depth of cut (we would now say undeformed
chip thickness), the minute examination of the cuttings is of the greatest importance. He
was aware that fine cuts caused more plastic deformation than heavier cuts and said this
was a driving force for the development of more powerful, stiffer machine tools, able to
make heavier cuts. At the same meeting, it was recorded that there now appeared to be a
mechanical analysis that might soon be used – like chemical analysis – systematically to
assess the quality of formed metals (in the context of machining, this was premature!).
Three years later, Lord Rayleigh presented to the Royal Society of London a paper by
Mallock (Mallock, 1881–82). It recorded the appearance of etched sections of ferrous and
non-ferrous chips observed through a microscope at about five times magnification (Figure
Fig. 2.1 Early chip observations by (a) Tresca (1878) and (b) Mallock (1881–82)
Childs Part 1 28:3:2000 2:35 pm Page 35
2.1(b)). Mallock was clear that chip formation occurred by shearing the metal. He argued
that friction between the chip and tool was of great importance in determining the defor-
mation in the chip. He commented that lubricants acted by reducing the friction between
the chip and the tool and wrote that the difficulty is to see how the lubricant gets there. He
also wrote down equations for the amount of work done in internal shear and by friction
between the chip and tool. Surprisingly, he seemed unaware of Tresca’s work on plasticity
and thought that a metal’s shear resistance was directly proportional to the normal stress
acting on the shear plane. As a result, his equations gave wrong answers. This led him to
discount an idea of his that chips might form at a thickness that minimized the work of
friction. With hindsight, he was very close to Merchant’s law of chip formation, which in
fact had to wait another 60 years for its formulation (Section 2.2.4).
Tresca’s and Mallock’s papers introduce two of the main elements of metal cutting
theory, namely plasticity and the importance of the friction interaction between chip and
tool. Tresca was also very clear about the third element, the theory of plastic heating, but
his interest in this respect was taken by reheating in hot forging, rather than by machining.
In his 1878 paper, he describes tests that show up to 94% conversion of work to heat in a
forging, and explicitly links his discussion to the work of Joule.
In machining, the importance of heating for tool life was being tackled practically by
metallurgists. A series of developments from the late 1860s to the early 1900s saw the
introduction of new steel alloy tools, with improved high temperature hardness, that
allowed higher and higher cutting speeds with correspondingly greater productivities. A
classic paper (Taylor, 1907) describes the early work, from 1881 onwards, on productivity
optimization through improved tool materials (high speed steels) and their best use.
Thus, the foundations of machining theory and practice were laid between around 1870
and 1905. At this stage, with the minor exception of Mallock’s work, the emphasis was on
observing rather than predicting behaviour. This remained the case for the next 30 years,
with huge collections of machinability (force and tool life) data (for example, Boston,
1926; Herbert, 1928), and of course the introduction of even more heat resistant cemented
carbide tools. By the late 1920s, there was so much data that the need for unifying theo-
ries was beginning to be felt. Herbert quotes Boston (1926) as writing: ‘If possible, a
theory of metal cutting which underlies all types of cutting should be developed. . . . All
this is a tremendous problem and should be undertaken in a big way.’
The first predictive stage of metal cutting studies started about the late 1930s–mid-
1940s. The overriding needs of the Second World War may have influenced the timing, and
probably the publication, of developments but also created opportunities by focusing the
attention of able people onto practical metal plasticity issues. This first phase, up to around
1960/65, was, in one sense, a backwards step. The complexity of even the most straight-
forward chip formation – for example the fact that most chips are curled (Figure 2.1) – was
ignored in an attempt to understand why chips take up their observed thicknesses. This is
the key issue: once the chip flow is known, forces, stresses and temperatures may all be
reasonably easily calculated. The most simple plastic flow leading to the formation of
straight chips was assumed, namely shear on a flat shear plane (as described in more detail
later in this chapter). The consequent predictions of chip thickness, the calculations of chip
heating and contemporary developments in tribology relevant to understanding the
chip/tool interaction are the main subjects of this chapter.
This first stage was not successful in predicting chip thickness, only in describing its
consequences. It became clear that the flow assumptions were too simple; so were the
36 Chip formation fundamentals
Childs Part 1 28:3:2000 2:35 pm Page 36
chip/tool friction law assumptions; and furthermore, that heating in metal cutting (and the
high strain rates involved) caused in-process changes to a metal’s plastic shear resistance
that could not be ignored. From the mid-1960s to around 1980 the main focus of mechan-
ics research was exploring the possibilities and consequences of more realistic assump-
tions. This second phase of predictive development is the subject of Chapter 6. By the
1980s it was clear that numerical methods were needed to analyse chip formation properly.
The development of finite element methods for metal cutting are the subject of Chapter 7
and detailed researches are introduced in Chapter 8.
The rest of this chapter is organized into three main sections: on the foundations of
mechanics, heating and tribology relevant to metal machining. Appendices 1 to 3 contain
more general background material in these areas, relevant to this and subsequent chapters.
Anyone with previous knowledge may find it is not necessary to refer to these Appendies,
at least as far as this chapter is concerned.
2.2 Chip formation mechanics
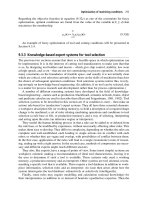
The purpose of this section is to bring together observations on the form of chips and the
forces and stresses needed to create them. The role of mechanics in this context is more to
aid the description than to be predictive. First, Section 2.2.1 describes how chip formation
in all machining processes (turning, milling, drilling and so on) can be described in a
common way, so that subsequent sections may be understood to relate to any process.
Section 2.2.2 then reports on the types of chips that have been observed with simple shapes
of tools; and how the thicknesses of chips have been seen to vary with tool rake angle, the
friction between the chip and the tool and with the work hardening behaviour of the
machined material. Section 2.2.3 describes how the forces on a tool during cutting may be
related to the observed chip shape, the friction between the chip and the tool and the plas-
tic flow stress of the work material. It also introduces observations on the length of contact
between a chip and tool and on chip radius of curvature; and discusses how contact length
observations may be used to infer how the normal contact stresses between chip and tool
vary over the contact area. Sections 2.2.2 and 2.2.3 only describe what has been observed
about chip shapes. Section 2.2.4 introduces early attempts, associated with the names of
Merchant (1945) and Lee and Shaffer (1951), to predict how thick a chip will be, while
Section 2.2.5 brings together the earlier sections to summarize commonly observed values
of chip characteristics such as the specific work of formation and contact stresses with
tools. Most of the information in this section was available before 1970, even if its presen-
tation has gained from nearly 30 years of reflection.
2.2.1 The geometry and terminology of chip formation
Figure 2.2 shows four examples of a chip being machined from the flat top surface of a
parallel-sided metal plate (the work) by a cutting tool, to reduce the height of the plate. It
has been imagined that the tool is stationary and the plate moves towards it, so that the
cutting speed (which is the relative speed between the work and the tool) is described by
U
work
. In each example, U
work
is the same but the tool is oriented differently relative to the
plate, and a different geometrical aspect of chip formation is introduced. This figure illus-
trates these aspects in the most simple way that can be imagined. Its relationship to the
Chip formation mechanics 37
Childs Part 1 28:3:2000 2:35 pm Page 37
turning milling and drilling processes is developed after first describing what those aspects
are.
Orthogonal and non-orthogonal chip formation
In Figure 2.2(a) the cutting edge AD of the plane tool rake face ABCD is perpendicular to
the direction of U
work
. It is also perpendicular to the side face of the plate. As the tool and
work move past one another, a volume of rectangular section EFGH is removed from the
plate. The chip that is formed flows with some velocity U
chip
, which is perpendicular to
the cutting edge. All relative motions are in the plane normal to the cutting edge. In this
condition, cutting is said to be orthogonal. It is the most simple circumstance. Apart from
at the side faces of the chip, where some bulging may occur, the process geometry is fully
described by two-dimensional sections, as in Figure 2.1(b).
It may be imagined that after reducing the height of the plate by the amount HG, the
tool may be taken back to its starting position, may be fed downwards by an amount equal
to HG, and the process may be repeated. For this reason the size of HG is called the feed,
f, of the process. The dimension HE of the removed material is known as the depth of cut,
38 Chip formation fundamentals
Fig. 2.2 (a and b) Orthogonal, (c) non-orthogonal and (d) semi-orthogonal chip formation.
Childs Part 1 28:3:2000 2:35 pm Page 38
d. Figure 2.2(a) also defines the tool rake angle a as the angle between the rake face and
the normal to both the cutting edge and U
work
. (a is, by convention, positive as shown.)
When, as in Figure 2.2(a), the cutting edge is perpendicular to the side of the plate, its
length of engagement with the plate is least. If it is wished to spread the cutting action over
a longer edge length (this reduces the severity of the operation, from the point of view of
the tool), the edge may be rotated about the direction of the cutting velocity. This is shown
in Figure 2.2(b). AD from Figure 2.2(a) is rotated to A′D′. As long as the edge stays
perpendicular to U
work
, the chip will continue to flow perpendicular to the cutting edge and
the cutting process remains orthogonal. However, the cross-sectional shape of the removed
work material is changed from the rectangle EFGH to the parallelogram E′F′G′H′. If the
amount of rotation is described by the angle k
r
between E′F′ and E′H′, the length of cutting
edge engagement increases to d′ = d/sink
r
and the thickness of the removed layer, f ′,
known as the uncut chip thickness, reduces to fsink
r
. k
r
is called the major cutting edge
angle, although it and other terms to be introduced have different names in different
machining processes – as will be considered later. The uncut chip thickness is more
directly important to chip formation than is the feed because, with the cutting speed, it
strongly influences the temperature rise in machining (as will be seen in Section 2.3).
In Figure 2.2(b), rotation of the cutting edge causes the chip flow direction to be
inclined to the side of the plate. Another way of achieving this is to rotate the cutting edge
in the plane ADHE (Figure 2.2(a)) so that it is no longer perpendicular to U
work
. In Figure
2.2(c) it is shown rotated to A*D*. The section of removed material EFGH stays rectan-
gular but U
chip
becomes inclined to the cutting edge.
Neither U
work
nor U
chip
are perpendicular to the cutting edge. Chip formation is then
said to be non-orthogonal. The angle of rotation from AD to A*D* is called the cutting
edge inclination angle, l
s
. The mechanics of non-orthogonal chip formation are more
complicated than those of orthogonal chip formation, because the direction of chip flow is
not fixed by l
s
.
Finally, Figure 2.2(d) shows a situation in which the cutting edge AD is lined up as in
Figure 2.2(a), but it does not extend the full width of the plate. In practice, as shown, the
cutting edge of the tool near point D is rounded to a radius R
n
– the tool nose radius.
Because the cutting edge is no longer straight, it is not possible for the chip (moving as a
rigid body) to have its velocity U
chip
perpendicular to every part of the cutting edge. Even
if every part of the cutting edge remains perpendicular to U
work
, the geometry is not
orthogonal. This situation is called semi-orthogonal. If R
n
<< d, the semi-orthogonal case
is approximately orthogonal.
Turning
The turning process has already been introduced in Chapter 1 (Figure 1.7). In that case,
orthogonal chip formation with a 90˚ major cutting edge angle was sketched. Figure 2.3
shows a non-orthogonal turning operation, with a major cutting edge angle not equal to
90˚. The feed and depth of cut dimensions are also marked. In this case, the cutting speed
U
work
equals pDW m/min (if the units of D and W are m and rev/min).
In turning, the major cutting edge angle is also known by some as the approach angle,
and the inclination angle as the back rake. The rake angle of Figure 2.2(a) can be called
the side rake. Table 2.1 summarizes these and other alternatives. (See, however, Chapter
6.4 for more comprehensive and accurate definitions of tool angles.)
The uncut chip thickness in turning, f ′, is fsink
r
. It is possible to reach this obvious
Chip formation mechanics 39
Childs Part 1 28:3:2000 2:35 pm Page 39
40 Chip formation fundamentals
Fig. 2.3 Turning, milling and drilling processes
Childs Part 1 28:3:2000 2:35 pm Page 40
conclusion in a rather more general way which, although it has no merit for turning,
becomes useful for working out the uncut chip thickness in a milling process. Equation
(2.1a) is a statement of that more general way. It is a statement that the volume removed
from the work is the volume swept out by the cutting edge. In turning, the volume removed
per unit time is fdU
work
. The distance that the cutting edge sweeps through the work in unit
time is simply U
work
. The truth of equation (2.1a) is obvious.
Volume removed per unit time sin k
r
f ′ = ———————————————————— ——— (2.1a)
Distance swept out by cutting edge per unit time d
Milling
There are many variants of the milling process, described in detail by Shaw (1984) and
Boothroyd and Knight (1989). Figure 2.3 shows face milling (and could also represent the
end milling process). A slab is reduced in thickness by an amount d
A
over a width d
R
by
movement at a linear rate U
feed
normal to the axis of a rotating cutter. d
A
is called the axial
depth of cut and d
R
is the radial width of cut. The cutter has N
f
cutting edges (in this exam-
ple, N
f
= 4) on a diameter D and rotates at a rate W. Each cutting edge is shown with a
major cutting edge angle k
r
and inclination angle l
s
, although in milling these angles are
also known as the entering angle and the axial rake angle (Table 2.1). For some cutters,
with long, helical, cutting edges, the axial rake angle is further called the helix angle. The
cutting speed, as in turning, is pDW.
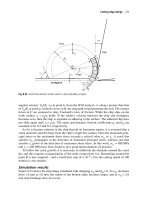
In Figure 2.3, the cutter is shown rotating clockwise and travelling through the work so
that a cutting edge A enters the work at a and leaves at e. A chip is then formed from the
work with an uncut chip thickness increasing from the start to the end of the edge’s travel.
If the cutter were to rotate anticlockwise (and its cutting edges remounted to face the other
way), a cutting edge would enter the work at e and leave at a, and the uncut chip thickness
would decrease with the edge’s travel.
In either case, the average uncut chip thickness can be found from (2.1a). The work
volume removal rate is d
A
d
R
U
feed
. The distance swept out by one cutting edge in one revo-
lution of the cutter is the arc length ae, or (D/2)q
C
, where q
C
can be determined from D
and d
R
. The distance swept out by N
f
edges per unit time is then N
f
W(D/2)q
C
. d in equa-
tion (2.1a) is d
A
. Substituting all these into equation (2.1a) gives
2d
R
U
feed
f ′
av.,milling
= ———— sin k
r
(2.1b)
N
f
WDq
C
Chip formation mechanics 41
Table 2.1 Some commonly encountered near-alternative chip formation terms (see Chapter 6.4 for a more
detailed consideration of three-dimensional tool geometry)
Equivalent name in
General name and symbol Turning Milling Drilling
Rake angle,
α
Side rake angle Radial rake angle Rake angle
Inclination angle,
λ
s
Back rake angle Axial rake angel Helix angle
Major cutting edge angle,
κ
r
Approach angle Entering angle Point angle
Feed Feed per rev. Feed per edge Feed per rev.
Depth of cut Depth of cut Axial depth of cut Hole radius
Childs Part 1 28:3:2000 2:35 pm Page 41
The relation between the uncut chip thickness’s average and maximum values depends
on the detailed path of the cutting edge through the work. In the case shown in Figure 2.3
in which the uncut chip thickness near a is zero, the maximum value at e is twice that of
equation (2.1b), but there are other circumstances (in which neither at entry nor exit is the
cutting edge path nearly tangential to the cut surface) in which the maximum and average
values can be almost equal.
Table 2.1 contains the term ‘feed per edge’. This is the distance moved by the work for
every cutting edge engagement. It is U
feed
/(N
f
W). The ratio of the uncut chip thickness to
this differs from the value sink
r
that is the ratio in turning.
Drilling
Finally, Figure 2.3 also shows a drilling process in which a hole (diameter D) is cut from
an initially blank plate. The simpler case (from the point of view of chip formation) of
enlarging the diameter of a pre-existing hole is not considered. The figure shows a two-
flute (two cutting edges) drill with a major cutting edge angle k
r
(in drilling called the
point angle). The inclination angle in drilling is usually zero. The depth of cut is the radius
of the hole being drilled. The axial feed of a drill is usually described, as in turning, as feed
per revolution.
Drilling has an intermediate position between milling and turning in the sense that,
although a drill has more than one cutting edge (usually two), each edge is engaged contin-
uously in the work. The special feature of drilling is that the cutting speed varies along the
cutting edge, from almost zero near the centre of the drill to the circumferential speed of
the drill at its outer radius. The uncut chip thickness can be obtained from equation (2.1a).
The volume removed per revolution of the drill is (pD
2
/4)f. The distance per revolution
swept out by N
f
cutting edges, at the average radius (D/4) of the drill, is (pD/2)N
f
.
Substituting these, and d ≡ D/2, into equation (2.1a) gives
f
f ′
drilling
= — sin k
r
(2.1c)
N
f
This, as in the case of turning, could have been obtained directly.
On feed, uncut chip thickness and other matters
The discussion around Figure 2.2 introduced some basic terminology, but it is clear from
the descriptions of particular processes that there are many words to describe the same
function, and sometimes the same word has a different detailed meaning depending on the
process to which reference is being made. Feed is a good example of the latter. In turning
and drilling, it means the distance moved by a cutting edge in one revolution of the work;
in milling it means the distance moved by the work in the time taken for each cutting edge
to move to the position previously occupied by its neighbour. However, in every case, it
describes a relative displacement between the cutting tool and work, set by the machine
tool controller.
Feed and depth of cut always refer to displacements from the point of view of machine
tool movements. Uncut chip thickness and cutting edge engagement length are terms
closely related to feed and depth of cut, but are used from the point of view of the chip
formation process. It is a pity that the terms uncut chip thickness and cutting edge engage-
ment length are so long compared with feed and depth of cut.
42 Chip formation fundamentals
Childs Part 1 28:3:2000 2:35 pm Page 42
In the case of turning with a 90˚ major cutting edge or approach angle, there is no differ-
ence between feed and uncut chip thickness nor between depth of cut and cutting edge
engagement length. Further, the cutting speed is the same as the work speed U
work
. In the
remainder of this book, chips will be described as being formed at a cutting speed U
work
,
at a feed f and depth of cut d – meaning at an uncut chip thickness f and a cutting edge
engagement length d. This is correct only for turning, as just described. The reader,
however, should be able to convert that convenient terminology to the description of other
processes, by the relations that have been developed here.
2.2.2 Chip geometries and influencing factors
Figure 2.1 shows views of chips observed more than 100 years ago. Figure 2.4 shows more
modern images, photographs taken from polished and etched quick-stop sections (in the
manner described in Chapter 5). It shows the wide range of chip flows that are free to be
formed, depending on the material and cutting conditions. All these chips have been
created in turning tests with sharp, plane rake face cutting tools. Steady or continuous chip
formation is seen in Figure 2.4(a) (as has been assumed in Figure 2.2). This example is for
70/30 brass, well known as an easy to machine material. Some materials, however, can
form a more segmented, or saw tooth, chip (e.g. stainless steel – Figure 2.4(b)). Others do
not have sufficient ductility to form continuous chips; discontinuous chips are formed
instead. Figures 2.4(c) (for a brass made brittle by adding lead) and 2.4(d) (for a mild steel
cut at very low cutting speed) are, respectively, examples of discontinuous chips showing
a little and a lot of pre-failure plastic distortion. In other cases still (mild steel at an inter-
mediate cutting speed – Figure 2.4(e)) work material cyclically builds up around, and
breaks away from, the cutting edge: the chip flows over the modified tool defined by the
shape of the built-up edge. The built-up edge has to withstand the loads and temperatures
generated by the chip formation. As cutting speed, and hence the temperature, increases,
the built-up edge cannot survive (or does not form in the first place): Figure 2.4(f) (mild
steel at higher speed) shows the thin layer of build-up that can exist to create a chip geom-
etry that does not look so different from that of Figure 2.4(a).
This chapter will be concerned with only the most simple type of chip formation –
continuous chip formation (Figures 2.4(a) and (f)) by a sharp, plane rake face tool. Further,
only the orthogonal situation (Section 2.2.1) will be considered. The role of mechanics is
to show how the force and velocity boundary conditions at the chip – tool interface and the
work material mechanical properties determine the flow of the chip and the forces required
for cutting. For continuous chip formation, determining the flow means at least determin-
ing the thickness of the chip, its contact length with the tool and its curvature: none of these
are fixed by the tool shape alone. In fact, determining the chip shape is the grand challenge
for mechanics. Once the shape is known, determining the cutting forces is relatively
simple; and determining the stresses and temperatures in the work and tool, which influ-
ence tool life and the quality of the machined surface, is only a little more difficult.
The main factors that affect the chip flow are the rake angle of the tool, the friction
between the chip and the tool and the work hardening of the work material as it forms the
chip. Some experimental observations that establish typical magnitudes of the quantities
involved will now be presented, but first some essential notation and common simplifica-
tions to the flow (to be removed in Chapter 6) will be introduced. Figure 2.5(a) is a sketch
of Figure 2.4(a). It shows the chip of thickness t being formed from an undeformed layer
Chip formation mechanics 43
Childs Part 1 28:3:2000 2:35 pm Page 43
44 Chip formation fundamentals
Fig. 2.4 Chip sections from turning at a feed of about 0.15 mm – cutting speeds as indicated (m/min): (a) 70/30 brass
(50), (b) austenitic stainless steel (30), (c) leaded brass (120): (d) mild steel (5), (e) mild steel (25), (f) mild steel (55)
(a) (b)
(c) (d)
(e) (f)
Childs Part 1 28:3:2000 2:36 pm Page 44
of thickness f (the feed) by a tool of rake angle a. The contact length with the tool, OB, is
l and the chip radius is r. Regions of plastic flow are identified by the hatched markings.
The main deformation zone, known as the primary shear zone, exists around the line OA.
Further strain increments are frequently detectable next to the rake face, in the secondary
shear zone. A simplified flow (Figure 2.5(b)) replaces the primary zone by a straight
surface, the shear plane OA and neglects the additional deformations in the secondary zone
(although the region might still be at the plastic limit). Figure 2.5(b) shows OA inclined at
an angle f to the cutting speed direction. f is called the shear plane angle. As the length of
the shear plane OA can be obtained either from (f/sin f) or from (t/cos(f – a)),
t cos(f – a)
— = ————— (2.2)
f sin f
Figure 2.5 also identifies the velocity change, U
primary
, that occurs on the primary shear
plane, which converts U
work
to U
chip
. It further shows the resultant force R responsible
for the flow, inclined at the friction angle l to the rake face normal (tan l = the friction
coefficient m) and thus at (f + l – a) to OA. It also introduces other quantities referred
to later.
The magnitude of U
primary
, and of the resulting U
chip
, relative to U
work
, can be found
from the velocity diagram for the simplified flow (Figure 2.5(c)):
U
primary
U
chip
U
work
———— = ——— = ————— (2.3)
cos a sin f cos(f – a)
The shear strain that occurs as the chip is formed is the ratio of the primary shear velocity
to the component of the work velocity normal to the shear plane. The equivalent strain is
Chip formation mechanics 45
Fig. 2.5 Chip flow (a) sketched from Figure 2.4(a); (b) simplified and (c) its velocity diagram
Childs Part 1 28:3:2000 2:36 pm Page 45
1/√3 times this (Appendix 1). Combining this with equations (2.3) and (2.2), the equiva-
lent strain is:
g U
primary
cos a cos a t
e
–
≡ — = ————— = ——————— = —————— — (2.4a)
ͱ⒓
3
ͱ⒓
3U
work
sin f
ͱ⒓
3 sin f cos(f – a)
ͱ⒓
3 cos
2
(f – a) f
Thus, the severity of deformation is determined by a,(f – a) and the chip thickness ratio
(t/f ). The ratio cos a/cos
2
(f – a), as will be seen, is almost always in the range 0.9 to 1.3.
So
e
–
≈ (0.5 to 0.75)(t/f) (2.4b)
Mallock’s (1881–82) observation that chip thickness is strongly influenced by lubrica-
tion has already been mentioned. Figure 2.6 dramatically illustrates this. It is a quick-stop
view of iron cut by a 30˚ rake angle tool at a very low cutting speed (much less than 1
m/min). In an air atmosphere the chip formed is thick and straight. Adding a lubricating
fluid causes the chip to become thinner and curled. In this case, adding the lubricant
caused the friction coefficient between the chip and tool to change from 0.57 to 0.25
(Childs, 1972).
The lubricating fluid used in this study was carbon tetrachloride, CCl
4
, found by early
46 Chip formation fundamentals
Fig. 2.6 Machining iron at low speed: (a) dry (in air) and (b) with carbon tetrachloride applied to the rake face
(a) (b)
Childs Part 1 28:3:2000 2:36 pm Page 46
researchers to be one of the most effective friction reducing fluids. However, it is toxic and
not to be recommended for use today. In addition, CCl
4
only acts to reduce friction at low
cutting speeds. Figure 2.7 brings together results from several sources on the cutting of
copper. It shows, in Figure 2.7(a), friction coefficients measured in air and CCl
4
atmos-
pheres at cutting speeds from 1 to 100 m/min, at feeds between 0.1 and 0.25 mm and with
cutting tools of rake angle 6˚ to 40˚. At the higher speeds the friction-reducing effect of the
CCl
4
has been lost. Mallock was right to be puzzled by how the lubricant reaches the inter-
face between the chip and tool. How lubricants act in metal cutting is considered further
in Section 2.4.2.
The range of friction coefficients in Figure 2.7(a) for any one speed and lubricant partly
comes from the range of rake angles to which the data apply. Higher friction coefficients
are associated with lower rake angles. Figure 2.7(a) also shows how both lubricating fluid
and rake angle affect the chip thickness ratio. Both low friction and high rake angles lead
to low chip thickness ratios. General experience, for a range of materials and rake angles,
is summarized in Figure 2.7(b). In the context of metal cutting, low friction coefficients
and chip equivalent strains (from equation 2.4(b)) are 0.25 to 0.5 and 1 to 3 respectively;
whereas high friction coefficients and strains are from 0.5 to 1 (and in a few cases higher
still) and up to 5.
High work hardening rates are also found experimentally to lead to higher chip thick-
ness ratios – although it is difficult to support this statement in a few lines in an introduc-
tory section such as this. The reason is that it is difficult to vary work hardening behaviour
without varying the friction coefficient. One model material, with a friction coefficient
more constant than most, is a-brass (70%Cu/30%Zn). Figure 2.8(a) shows the work hard-
ening characteristics of this metal. The chips from work material pre-strained, for exam-
ple to point C, may expect to be work hardened to their maximum hardness by machining.
The friction coefficients and chip thickness ratios obtained when forming chips from vari-
ously pre-strained samples, with a 15˚ rake angle high speed steel tool, at feeds around 0.2
mm and cutting speeds from 1 to 50 m/min are shown in Figure 2.8(b) (Childs et al.,
1972). Anticipating a later section, the measure of work hardening used as the independent
Chip formation mechanics 47
Fig. 2.7 (a) Collected data on the machining of copper, dry (•) and lubricated (o); and (b) lubricant effects for a range
of conditions at cutting speeds around 1 m/min
Childs Part 1 28:3:2000 2:36 pm Page 47
variable in Figure 2.8(b) is the ratio of the increase in equivalent stress to the maximum
equivalent stress caused by machining. For materials D, C and B, thicker chips occur the
greater is the work hardening, despite a constant friction coefficient. Material A shows a
thicker chip still, but its friction coefficient is marginally increased too. Comparing Figures
2.8(b) and 2.7(b), changes in work hardening and friction coefficient have similar influ-
ences on chip thickness ratio.
Thus, rake angle, friction and work hardening are established as all influencing the chip
formation. To make further progress in describing the mechanical conditions of machin-
ing, the constraints of force and moment equilibrium must be introduced.
2.2.3 Force and moment equilibrium
Cutting and thrust forces
The resultant force R has already been introduced in Figure 2.5(b). Its inclination to the
primary shear plane is, from geometry, (f + l – a). From the previous section, the shear
stress k on the shear plane is expected to be that of the fully work hardened material.
Resolving R onto the shear plane, dividing it by the area of the plane and equating the
result to k leads to
kfd
R = ———————— (2.5a)
sin f cos(f + l < a)
where d is the width of the shear plane (depth of cut) out of the plane of Figure 2.5. The
cutting and thrust force components, F
c
and F
t
, also defined in Figure 2.5, are
kfd cos(l < a) kfd sin(l < a)
F
c
= ———————— ; F
t
= ———————— (2.5b)
sin f cos(f + l < a) sin f cos(f + l < a)
48 Chip formation fundamentals
Fig. 2.8 (a) The work hardening of 70/30 brass and (b) friction coefficients and chip thickness ratios measured for
samples pre-strained by amounts A to D as marked
Childs Part 1 28:3:2000 2:36 pm Page 48
Alternatively, k may be directly related to F
c
and F
t
:
kfd = (F
c
cos f – F
t
sin f)sin f (2.5c)
Many experimental studies of continuous chip formation have confirmed these relations.
Indeed, departures are a clear indication of a breakdown in the assumptions, for example
of the presence of a built-up edge changing the tool geometry. One particularly thorough
study was carried out by Kobayashi and Thomsen (1959), measuring forces and chip thick-
nesses in the machining of ferrous and non-ferrous metals, and using equation (2.5c) to
estimate k. Figure 2.9 shows their results converted to equivalent stress (s– = k
ͱ⒓
3),
compared with data obtained from compression testing.
Chip/tool contact lengths
The contact length between the chip and tool, as well as the chip thickness, is of interest
in metal cutting. Chip moment equilibrium may be applied to relate the contact length to
the chip thickness. Figure 2.5(b) shows the resultant force R passing through the centres
of pressure C
p
and C
r
on the primary shear plane and rake face respectively. Zorev (1966)
introduced the length ratios m = OC
p
/OA and n = OC
r
/OB: from the moment equilibrium
about O, contact length l and chip thickness t are related by
m
l = — t[m + tan(f < a)] (2.6)
n
Zorev gives experimental results obtained from turning a large range of carbon steels (0.12
to 0.83%C) and low alloy engineering steels, at feeds from 0.15 to 0.5 mm and cutting
speeds from 15 to 300 m/min, that agree well with equation (2.6) if (m/n) is taken to be in
the range 3.5 to 4.5. However, the contact length is a difficult quantity to measure, and
even to define. Zorev himself commented that the 45% of the contact length furthest from
the cutting edge may carry only 15% of the rake face load. Other researchers have obtained
lower values for (m/n). Figure 2.10(a) shows Zorev’s mean value data as the solid line,
with observations by the present authors obtained from restricted contact and split tool
tests. (m/n) values as low as 1.25 have been observed, and values of 2 are common. To put
Chip formation mechanics 49
Fig. 2.9 Equivalent stress-strain data for (a) a mild steel, (b) an aluminium alloy; and (c) an
α
-brass obtained from
compression testing (—) and values from metal cutting tests (hatched), after Kobayashi and Thomsen (1959)
Childs Part 1 28:3:2000 2:36 pm Page 49
these values in perspective, a uniform pressure along the shear plane and a triangular pres-
sure distribution along the rake face (with a peak at the cutting edge) would give (m/n) =
1.5. The range of (m/n) found in practice suggests that different materials machine with
different pressure distributions along the shear plane or rake face, or both.
Chip/tool contact pressures
The question of what contact pressure distributions exist between the chip and tool and on
the primary shear plane will be covered in later chapters in some detail. However, the
elementary mechanics considerations here may be developed to give some insight into
possible contact pressure distributions. The procedure is first to consider the primary shear
plane pressure distribution and the associated likely range of the parameter m. m and m/n
together then enable the size range of n to be deduced. Different values of n are associated
with different tool contact pressure distributions.
First of all, suppose that the contact pressure is not uniform along the primary shear
plane OA (Figure 2.5(a)), but falls from a maximum value at A to a lower value at O.
Oxley (1989) pointed out that this will be the case for a work hardening material.
Figure 2.11(a) is developed from his work. It shows the shear plane OA imagined as a
parallel-sided zone of width w and length s (s = f/sin f). Work hardening results in the
shear stress k
max
at the exit to the zone being more than that k
o
at the entry. A force
balance on the hatched region establishes that p must reduce towards O, from some
maximum value p
s
at the free surface. When the shear zone is parallel sided, the reduc-
tion is uniform with distance from A. At O the reduction has become (s/w)Dk, where Dk
is (k
max
– k
o
). The average pressure is half the sum of the pressures at A and O. The
ratio of the average pressure to the shear stress on the shear plane is equal to the tangent
of the angle between the resultant force R and the shear plane. This is tan(f + l – a). It
follows that
p
s
1 s Dk
tan(f + l < a) = ——–———— (2.7)
k
max
2 wk
max
50 Chip formation fundamentals
Fig. 2.10 Chip/tool contact length and chip radius observations. (a) Measured dependence of chip/tool contact length
on chip thickness; and (b) wide variations of dimensionless chip radius (
r
/
t
) with (
m
/
n
)
Childs Part 1 28:3:2000 2:36 pm Page 50
Further, by taking moments about the cutting edge O, m can be expressed in terms of p
s
,
(s/w) and (Dk/k
max
), as shown in equation (2.8a). Then (s/w) can be eliminated with the
help of equation (2.7), as shown in (2.8b)
11 (Dk/k
max
)(s/w)
m = —
[
1 + — ———————————
]
(2.8a)
26p
s
/k
max
– 1/2(Dk/k
max
)(s/w)
11 p
s
/k
max
m = — + — —————— (2.8b)
3 6 tan(f + l < a)
Data exist to test equation (2.7) and hence to deduce values of m. It is commonly
observed that (f + l – a) varies from material to material (a range of data will be given in
Section 2.2.4). It reduces the more the material work hardens. Figure 2.11(b) shows, as
solid circles, data obtained from the same set of tests that led to Figure 2.8, while the open
circles are for steels, aluminium alloys and brass (from the work of Kobayashi and
Thomsen, 1959). The data support equation (2.7), with p
s
/k
max
≈ 1.4 ± 0.2. From equation
(2.8b), with p
s
/k
max
≈ 1.4 and with tan(f + l – a) varying from 0.6 to 1.4, values of m from
0.5 to 0.72 are obtained.
The gradient of –1 in Figure 2.11(b) implies s/w = 2. This is less than expected, given
quick-stop views of how narrow is the shear zone. For example, the hatched primary shear
region of Figure 2.5(a) has s/w ≈ 4. However, other studies (considered in Chapter 6) have
suggested values for s/w as small as 2.6. It all depends how carefully one defines where
are the edges of the zone. For now it is enough to point out that the shear plane model
approximation clearly loses some essential detail of force analysis in machining, even
though it has a use in obtaining a range of values of m.
The range of m from 0.5 to 0.72 is not wide compared with the variation of (m/n) from
1.25 to 3.8 (equation (2.6) and Figure 2.10(a)). It seems that n is a more variable quantity
Chip formation mechanics 51
Fig. 2.11 (a) The primary shear region modelled as a parallel-sided zone of thickness
w
, showing pressure variations
due to work hardening; and (b) observed reductions of tan(
φ
+
λ
–
α
) with increasing work hardening
Childs Part 1 28:3:2000 2:36 pm Page 51
than m. The common (m/n) value of 2 (from Figure 2.10(a)) is consistent with n ≈ 0.3. This
would be expected of a triangular distribution of contact pressure between the chip and
tool. However, extreme n values are derived from 0.55 to 0.15. The former describes an
almost uniform contact pressure on the rake face, while the latter corresponds almost to a
fourth power law variation. These pressure distributions lead to different peak pressures at
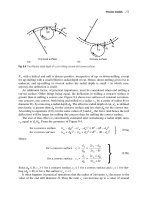
the cutting edge. Figure 2.12 shows, for the arbitrary example of a = 0˚, f = 10˚ and l =
35˚, three chips identical but for their contact length and pressure distribution with the tool.
The pressures have been calculated, relative to k, from the tool forces and chip/tool contact
length, by combining equations (2.2), (2.5) and (2.6). Figure 12(c) is associated with a
peak contact stress with the cutting edge 50% larger than that for Figure 12(a). What
contact stress distribution actually occurs is clearly relevant to tool failure and is consid-
ered further in subsequent sections and chapters.
Chip radii
Chip curvature has been ignored in simplifying the description of chip flow in Figure 2.5.
However, comments may still be made on what is observed. First of all, lubricated chip
flows are almost invariably highly curled. A good example is seen in Figure 2.6. Free-
machining steels (containing MnS or MnS and Pb) also give tightly curled chips in their
free-machining speed range (even in the absence of built-up edge formation). Beyond this,
there seems to be no generalization that can be made, or relationship derived between chip
curvature and other machining parameters.
One reason is that chip curvature is very sensitive to external interference, for example
from interaction of the chip with the tool holder or from collision with the workpiece. Even
if care is taken to avoid such real (and common) considerations, there are no simple laws
governing chip curvature. For example, it could be imagined that chips with long contacts
with the tool relative to their thickness might have larger radii than chips with shorter
contact lengths. Figure 2.10(b) collects data on dimensionless chip radius (the radius rela-
tive to the chip thickness) and (m/n). It includes results from machining brass and iron
(already referenced in Figures 2.6 and 2.8) and low carbon non-free and free cutting steels
which have already featured in Figure 2.10(a). There is certainly no single valued relation
between (r/t) and (m/n) although widely spaced boundaries can be drawn around the data.
52 Chip formation fundamentals
Fig. 2.12 A range of possible rake face contact pressure distributions
σ
n
/
k
, for
α
= 0º,
φ
= 10º and
λ
= 35º and
n
=
(a) 1/2, (b) 1/3 and (c) 1/6
Childs Part 1 28:3:2000 2:36 pm Page 52