Advanced Vehicle Technology Episode 2 Part 6 doc
Bạn đang xem bản rút gọn của tài liệu. Xem và tải ngay bản đầy đủ của tài liệu tại đây (247.19 KB, 20 trang )
reaction force at ground level known as the corner-
ing force. As the cornering force centre of pressure
is to the rear of the geometric centre of the wheel
and the side force acts perpendicularly through the
centre of the wheel hub, the offset between the
these two forces, known as the pneumatic trail,
causes a moment (couple) about the geometric
wheel centre which endeavours to turn both steer-
ing wheels towards the straight ahead position.
This self-generating torque attempts to restore the
plane of the wheels with the direction of motion
and it is known as the self-aligning torque (Fig.
8.35). It is this inherent tyre property which helps
steered tyres to return to the original position after
negotiating a turn in the road. The self-aligning
torque (SAT) may be defined as the product of
the cornering force and the pneumatic trail.
i:e: T
SAT
F
c
 t
p
(Nm)
Higher tyre loads increase deflection and accord-
ingly enlarge the contact patch so that the pneu-
matic trail is extended. Correspondingly this causes
a rise in self-aligning torque. On the other hand
increasing the inflation pressure for a given tyre
load will shorten the pneumatic trail and reduce
the self-aligning torque. Other factors which influ-
ence self-aligning torque are load transfer during
braking, accelerating and cornering which alter the
contact patch area. As a general rule, anything
which increases or decreases the contact patch
length raises or reduces the self-aligning torque
respectively. The self-aligning torque is little
affected with small slip angles when braking or
accelerating, but with larger slip angles braking
decreases the aligning torque and acceleration
increases it (Fig. 8.36).
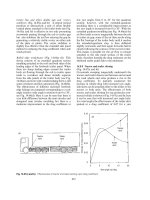
Fig. 8.34 Effect of tyre inflation pressure on cornering
force
Fig. 8.35 Illustration of self-aligning torque
292
Static steering torque, that is the torque needed
to rotate the steering when the wheels are not roll-
ing, has nothing to do with the generated self-
aligning torque when the vehicle is moving. The
heavy static steering torque experienced when the
vehicle is stationary is due to the distortion of
the tyre casing and the friction created between
the tyre tread elements being dragged around
the wheels' point of pivot at ground level. With
radial ply tyres the more evenly distributed tyre
to ground pressure over the contact patch
makes manoeuvring the steering harder than
with cross-ply tyres when the wheels are virtually
stationary.
8.4.9 Camber thrust (Figs 8.37 and 8.38)
The tilt of the wheel from the vertical is known as
the camber. When it leans inwards towards the
turning centre it is considered to be negative and
when the top of the wheel leans away from the
turning centre it is positive (Fig. 8.37). A positive
camber reduces the cornering force for a given slip
angle relative to that achieved with zero camber but
negative camber raises it.
Constructing a vector triangle of forces with the
known vertical reaction force and the camber inclin-
ation angle, and projecting a horizontal component
perpendicular to the reaction vector so that it inter-
sects the camber inclination vector, enables the
magnitude of the horizontal component, known
as camber thrust, to be determined (Fig. 8.37).
The camber thrust can also be calculated as the
product of the reaction force and the tangent of
the camber angle.
i:e: Camber thrust Wheel reaction Âtan
The total lateral force reaction acting on the tyre
is equal to the sum of the cornering force and
camber thrust.
i:e: F F
c
Æ F
t
Where F total lateral force
F
c
cornering force
F
t
camber thrust
When both forces are acting in the same direc-
tion, that is with the wheel tilting towards the
centre of the turn, the positive sign should be
used, if the wheel tilts outwards the negative sign
applies (Fig. 8.38).
Thus negative camber increases the lateral reac-
tion to side forces and positive camber reduces it.
Fig. 8.36 Variation of self-aligning torque with cornering
force
Fig. 8.37 Illustrating positive and negative camber and camber thrust
293
8.4.10 Camber scrub (Fig. 8.39)
When a wheel is inclined to the vertical it becomes
cambered and a projection line drawn through the
wheel axis will intersect the ground at some point.
Thus if the wheel completes one revolution a cone
will be generated about its axis with the wheel and
tyre forming its base.
If a vehicle with cambered wheels is held on a
straight course each wheel tread will advance along
a straight path. The distance moved along the road
will correspond to the effective rolling radius at the
mid-point of tyre contact with the road (Fig. 8.39).
The outer edge of the tread (near the apex) will have
a smaller turning circumference than the inner edge
(away from apex). Accordingly, the smaller outer
edge will try to speed up while the larger inner edge
will tend to slow down relative to the speed in the
middle of the tread. As a result, the tread portion in
the outer tread region will slip forward, the portion
of tread near the inner edge will slip backwards and
only in the centre of tread will true rolling be
achieved.
To minimize tyre wear due to camber scrub mod-
ern suspensions usually keep the wheel camber
below 1
1
¤
2
degrees. Running wheels with a slight
negative camber on bends reduces scrub and
improves tyre grip whereas positive camber increases
tread scrub and reduces tyre to road grip.
8.4.11 Camber steer (Fig. 8.40)
When a vehicle's wheels are inclined (cambered) to
the vertical, the rolling radius is shorter on one side
of the tread than on the other. The tyre then forms
part of a cone and tries to rotate about its apex
(Fig. 8.40(a and b)). Over a certain angular motion
of the wheel, a point on the larger side of the tyre
will move further than a point on the smaller side of
the tyre and this causes the wheel to deviate from
the straight ahead course to produce camber steer.
Positive camber will make the wheels turn away
from each other (Fig. 8.40(b)), i.e. toe-out, whereas
negative camber on each side will make the wheels
turn towards each other, i.e. toe-in. This is one of
the reasons why the wheel track has to be set to
match the design of suspension to counteract the
inherent tendency of the wheels to either move
away or towards each other.
Slightly inclining both wheels so that they lean
towards the centre of turn reduces the angle of turn
needed by the steered wheels to negotiate a curved
path since the tyres want to follow the natural
directional path of the generated cone (Fig.
8.41(a)). Conversely, if the wheels lean outwards
from the centre of turn the tyres are compelled to
follow a forced path which will result in a greater
steering angle and consequently a degree of camber
scrub (Fig. 8.41(b)).
8.4.12 Lateral weight transfer
(Figs 8.42 and 8.43)
For a given slip angle the cornering force generally
increases with the increase in vertical load. This
increase in cornering force with respect to vertical
load is relatively small with small slip angles, but as
larger slip angles are developed between the tyre
and ground increased vertical load enables much
greater cornering forces to be generated (Fig. 8.42).
Unfortunately the relationship between cornering
force and vertical load is non-linear. This is because
Fig. 8.38 Effect of slip angle on cornering force with
various camber angles
Fig. 8.39 Illustration of camber scrub
294
Fig. 8.40 Camber steer producing toe-out
Fig. 8.41 (a and b) Principle of camber steer
295
an initial increase in vertical wheel load where the
curve rise is steep produces a relatively large
increase in cornering force, but as the imposed
loading on the wheel becomes much larger a similar
rise in vertical load does not produce a correspond-
ing proportional increase in cornering force.
Consider a pair of tyres on a beam axle
(Fig. 8.43), each with a normal vertical load of
3 kN. The cornering force per tyre with this load
will be 2 kN for a given slip angle of 6
. If the
vehicle is subjected to body roll under steady state
movement on a curved track, then there will be
certain amount of lateral weight transfer. Thus if
the normal load on the inside wheel is reduced
by 1.5 kN, the load on the outer wheel will be
increased by the same amount.
As a result the total cornering force of the two
tyres subjected to body roll will be 1.3 2.3 3.6 kN
(Fig. 8.42) which is less than the sum of both tyre
cornering forces when they support their normal
vertical load of 2 Â 2 4 kN. The difference
between the normal and body roll tyre loading
thus reduces the cornering force capability for a
given slip angle by 0.4 kN. This demonstrates that
a pair of tyres on the front or rear axle to develop
the required amount of cornering force to oppose a
given centrifugal force and compensate for lateral
weight transfer must increase the slip angles of both
tyres. Thus minimizing body roll will reduce the
slip angles necessary to sustain a vehicle at a given
speed on a circular track.
8.5 Vehicle steady state directional stability
8.5.1 Directional stability along a straight track
Neutral steer (Fig. 8.44) Consider a vehicle mov-
ing forward along a straight path and a side force
due possibly to a gust of wind which acts through
the vehicle's centre of gravity which for simplicity is
assumed to be mid-way between the front and rear
axles. If the side force produces equal steady state
slip angles on the front and rear tyres, the vehicle
will move on a new straight line path at an angle to
the original in proportion to the slip angles gener-
ated (Fig. 8.44). This motion is without a yaw
velocity; a rotation about a vertical axis passing
through the centre of gravity, and therefore is
known as neutral steer.
Note that if projection lines are drawn perpendi-
cular to the tyre tread direction of motion when the
front and rear tyres are generating equal amounts
of slip angle, then these lines never meet and there
cannot be any rotational turn of the vehicle.
Oversteer (Fig. 8.45) If, due possibly to the sus-
pension design, tyre construction and inflation
pressure or weight distribution, the mean steady
static slip angles of the rear wheels are greater
than at the front when a disturbing side force acts
through the vehicle centre of gravity, then the path
Fig. 8.42 Effect of transverse load transfer on the
cornering force developed by a pair of tyres attached to
axle
Fig. 8.43 Load transfer with body roll
296
of the vehicle is in a curve towards the direction of
the applied side force (Fig. 8.45). The reason for
this directional instability can be better understood
if projection lines are drawn perpendicular to the
direction the tyres roll with the generated slip
angles. It can be seen that these projection lines
roughly intersect each other at some common
point known as the instantaneous centre, and
therefore a centrifugal force will be produced
which acts in the same direction as the imposed
side force. Thus the whole vehicle will tend to
rotate about this centre so that it tends to swing
towards the disturbing force. To correct this
condition known as oversteer, the driver therefore
has to turn the steering in the same direction as the
side force away from the centre of rotation.
Fig. 8.44 Neutral steer on straight track
Fig. 8.45 Oversteer on straight track
297
Understeer (Fig. 8.46) Now consider the situation
of a vehicle initially moving along a straight path
when a disturbing side force is imposed through the
vehicle's centre of gravity. This time there is a
larger slip angle on the front tyres than at the rear
(Fig. 8.46). Again project lines perpendicularly to
the tyre tread direction of motion when they are
generating their slip angles but observe that these
projections meet approximately at a common point
on the opposite side to that of the side force. The
vehicle's directional path is now a curve away from
the applied side force so that a centrifugal force will
be produced which acts in opposition to the dis-
turbing side force. Thus the vehicle will be encour-
aged to rotate about the instantaneous centre so
that it moves in the same direction as the disturbing
force. Correction for this steering condition which
is known as understeer is achieved by turning the
steering in the opposite direction to the disturbing
force away from the instantaneous centre of rota-
tion. It is generally agreed that an oversteer condi-
tion is dangerous and undesirable, and that the slip
angles generated on the front wheels should be
slightly larger than at the rear to produce a small
understeer tendency.
8.5.2 Directional stability on a curved track
True rolling of all four wheels can take place when
projection lines drawn through the rear axle and
each of the front wheel stub axles all meet at a
common point somewhere along the rear axle pro-
jected line. This steering layout with the front
wheels pivoted at the ends of an axle beam is
known as the Ackermann principle, but strictly it
can only be applied when solid tyres are used and
when the vehicle travels at relatively slow speeds.
With the advent of pneumatic tyres, the instant-
aneous centre somewhere along the extended projec-
tion from the rear axle now moves forwards relative
to the rear axle. The reason for the positional change
of the instantaneous centre is due to the centrifugal
force produced by the vehicle negotiating a corner
generating an opposing cornering force and slip
angle under each tyre. Therefore projection lines
drawn perpendicular to the direction each wheel
tyre is moving due to the slip angles now converge
somewhere ahead of the rear axle. This is essential if
approximate true rolling conditions are to prevail
with the vehicle travelling at speed.
Oversteer (Fig. 8.47) If the slip angles of the rear
wheel tyres are made greater than on the front tyres
when the vehicle is turning a corner (Fig. 8.47), the
projected lines drawn perpendicular to the direc-
tion of motion of each tyre corresponding to its slip
angle will all merge together at some common
point (dynamic instantaneous centre) forward of
the rear axle, further in and therefore at a shorter
radius of turn than that produced for the Acker-
mann instantaneous centre for a given steering
wheel angle of turn.
Under these driving conditions the vehicle will
tend to steer towards the bend. Because the radius
of the turn is reduced, the magnitude of the
Fig. 8.46 Understeer on straight track
298
centrifugal force acting through the vehicle centre
of gravity will be larger; it therefore raises the
oversteer tendency of the vehicle. At higher vehicle
speeds on a given circular path, the oversteer
response will become more pronounced because
the rise in centrifugal force will develop more tyre
to ground reaction and correspondently increase
the slip angles at each wheel. This is an unstable
driving condition since the vehicle tends to turn
more sharply into the bend as the speed rises unless
the lock is reduced by the driver. For a rear wheel
drive vehicle the application of tractive effort dur-
ing a turn reduces the cornering stiffness and
increases the slip angles of the rear wheels so that
an oversteering effect is produced.
Understeer (Figs 8.48 and 8.49) If the slip angles
generated on the front wheel tyres are larger than
those on the rear tyre when the vehicle is turning
a corner (Fig. 8.48) then projection lines drawn
perpendicular to the direction of motion of each
tyre, allowing for its slip angle, will now all inter-
sect approximately at one point also forward of the
rear axle, but further out at a greater radius of turn
than that achieved with the Ackermann instant-
aneous centre.
With the larger slip angles generated on the front
wheels the vehicle will tend to steer away from the
bend. Because the radius of turn is larger, the mag-
nitude of the centrifugal force produced at the
centre of gravity of the vehicle will be less than
for the oversteer situation. Thus the understeer
tendency generally is less severe and can be cor-
rected by turning the steering wheels more towards
the bend. If tractive effort is applied when negotiat-
ing a circular path with a front wheel drive vehicle,
the cornering stiffness of the front tyres is reduced.
As a result, the slip angles are increased at the
front, thereby introducing an understeer effect.
A comparison between the steered angle of the
front wheels or driver's steering wheel angle and
vehicle speed for various steering tendencies is
shown in Fig. 8.49. It can be seen that neutral
steer maintains a constant steering angle through-
out the vehicle's speed range, whereas both under-
and oversteer tendencies increase with speed. An
important difference between over- and understeer
is that understeer is relatively progressive as the
speed rises but oversteer increases rapidly with
speed and can become dangerous.
8.6 Tyre marking identification (Tables 8.1
and 8.2)
To enable a manufacturer or customer to select
the recommended original tyre or to match an
equivalent tyre based on the vehicle's application
Fig. 8.47 Oversteer on turns
Fig. 8.48 Understeer on turns
299
requirement, wheel and tyre dimensions, tyre pro-
file, maximum speed and load carrying capacity,
a standard marking code has been devised.
8.6.1 Car tyres
Current tyres are marked in accordance with the
standards agreed by the European Tyre and Rim
Technical Organisation. Tyres with cross-ply con-
struction and normal 82% aspect ratio do not indi-
cate these features but radial construction and
lower aspect ratios are indicated. Tyre section
width, speed capacity, wheel rim diameter and
tread pattern are always indicated.
Example 1
a) 165 SR 13 Mx
b) 185/70 VR 15 XWX
165 or 185 = nominal section width of tyre in
millimetres
70 = 70% aspect ratio (Note no figures
following 165 indicates 82%
aspect ratio)
S or V = letter indicates speed capability
(S=180, V=210 km/h)
R = radial construction
13 or 15 = nominal wheel rim diameter in
inches
MX, XWX = manufacturer's tread pattern
In some instances section width is indicated in
inches.
Example 2 6.45 Q 14
6.45 = nominal section width of tyre in inches
Q = letter indicates speed capability
(speed symbol Q=160 km/h)
14 = nominal wheel rim diameter in inches
Note No aspect ratio or construction indicated.
Therefore assume 82% aspect ratio and cross-ply
construction.
A revised form of marking has been introduced
to include the maximum speed and load carrying
capacity of the tyre under specified operating con-
ditions.
A letter symbol indicates the maximum speed
(Table 8.1) and a numerical code will identify the
load carrying capacity (Table 8.2).
Example of new form of marking 205/70 R 13 80 S
MXV
205 =normal section width in millimetres
70 =70% aspect ratio
R =radial construction
13 =nominal wheel rim diameter in inches
80 =load index (from Table 8.2: 80 = 450 kg)
S =speed symbol (from Table 8.1: S = 180 km/h)
MXV=manufacturer's tread pattern code
Fig. 8.49 Relationship of steer angle speed and vehicle
speed of neutral steer, understeer and oversteer
Table 8.1 Speed symbols (SS)
Speed
symbol
(SS)
Speed
(km/h)
SS Speed
(km/h)
SS Speed
(km/h)
SS Speed
(km/h)
A4 20 E 70 L 120 R 170
A6 30 F 80 M 130 S 180
A8 40 G 90 N 140 T 190
B 50 J 100 P 150 U 200
C 60 K 110 Q 160 H 210
(V over 210)
Table 8.2 Load index (LI)
LI kg LI kg LI kg LI kg
10 60 80 450 150 3350 220 25000
20 80 90 600 160 4500 230 33500
30 106 100 800 170 6000 240 45000
40 140 110 1060 180 8000 250 60000
50 190 120 1400 190 10600 260 80000
60 250 130 1900 200 14000 270 106000
70 335 140 2500 210 19000 280 140000
300
8.6.2 Light, medium and heavy truck tyres
Truck tyres sometimes include ply rating which
indicates the load carrying capacity.
Example 10 R 20.0 PR12 XZA
10 nominal section width of tyre in inches
R radial construction
20.0 nominal wheel rim diameter in inches
PR12 ply rating
XZA manufacturer's tread pattern
The revised form of marking indicates the load
carrying capacity and speed capability for both
single and twin wheel operation. The ply rating
has been superseded by a load index because with
improved fabric materials such as rayon, nylon and
polyester as opposed to the original cotton cord
ply, fewer ply are required to obtain the same
strength using cotton as the standard, and there-
fore the ply rating does not give an accurate indi-
cation of tyre load bearing capacity.
Example 295/70 R 22.5 Tubeless 150/140L XZT
295 nominal section width of tyre in
millimetres
70 70% aspect ratio
R radial construction
22.5 nominal rim diameter in inches
150 load index for singles (from
Table 8.2: 150 3350 kg per tyre)
140 load index for twins (from
Table 8.2: 140 2500 kg per tyre)
L speed symbol (from Table 8.1:
L 120 km/h)
XZT manufacturer's tread pattern
8.7 Wheel balancing
The wheel and tyre functions are the means to sup-
port, propel and steer the vehicle forward and back-
ward when rolling over the road surface. In addition
the tyre cushions the wheel and axle from all the
shock impacts caused by the roughness of the road
contour. For the wheel and tyre assembly to rotate
smoothly and not to generate its own vibrations, the
wheel assembly must be in a state of rotatory balance.
An imbalance of the mass distribution around
the wheel may be caused by a number of factors as
follows:
a) tyre moulding may not be fitted concentric on
the wheel rim,
b) wheel lateral run out or buckled wheel rim,
c) tyre walls, crown tread thickness may not be
uniform all the way round the carcass when
manufactured,
d) wheel lock when braking may cause excessive tread
wear over a relatively small region of the tyre,
e) side wall may scrape the curb causing excessive
wear on one side of the tyre,
f) tyre over or under inflation may cause uneven
wear across the tread,
g) tyre incorrectly assembled on wheel relative to
valve.
Whichever reason or combination of reasons has
caused the uneven mass concentration (or lack of
mass) about the wheel, one segment of the wheel
and tyre will become lighter and therefore the tyre
portion diametrically opposite will be heavier.
Hence the heavy region of the tyre can be consid-
ered as a separate mass which has no diametrically
opposing mass to counteract this inbalance.
Consequently the heavier regions of the wheel
and tyre assembly when revolving about its axis
(the axle or stub axle) will experience a centrifugal
force. This force will exert an outward rotating pull
on the support axis and bearings. The magnitude of
this outward pull will be directly proportional to
the out of balance mass, the square of the wheel
rotational speed, and inversely proportional to the
radius at which the mass is concentrated from its
axis of rotation.
i:e
: Centrifugal force (F)
mV
2
R
(N)
where F = centrifugal force (N)
m out of balance mass (kg)
V linear wheel speed (m/s)
R radius at which mass is concentrated
from the axis of rotation (m)
Example If, due to excessive braking, 100 g of
rubber tread has been removed from a portion of
the tyre tread 250 mm from the centre of rotation,
determine when the wheel has reached a speed of
160 km/h the following:
a) angular speed of wheel in revolutions per
minute,
b) centrifugal force.
Linear speed of wheel V
160 Â10
3
60
2666:666 m=min
or V
2666:666
60
44:444 m=s
301
a) Angular speed of wheel N
V
D
2666:666
0:5
1697:65 rev=min
:
b) Centrifugal force F
mV
2
R
0:1 (44:444)
2
0:25
790:1N
From this calculation based on a vehicle travel-
ling at a speed of one hundred miles per hour
(160 km/h) and a typical wheel size for a car, the
hundred gramme imbalance of the tyre produces a
radial outward pull on the wheel axis of 790 New-
tons. The magnitude of this 790 Newton force can
be best appreciated by converting it to weight
(mass) (79 kg) and then imagine lifting and carry-
ing 79 one kilogramme bags of sugar for some
distance.
8.7.1 Cyclic movement of a heavy spot on a wheel
relative to the ground (Fig. 8.50)
When a road wheel rolls over a flat surface for one
complete revolution, a point P on its circumference
starting and finishing at ground level plots a curve
known as a cycloid which represents the changing
linear speed of the point P during each cycle of
rotation (Fig. 8.50). For the short time point P is
at ground level, its velocity remains at zero and at
its highest position from the ground its forward
velocity will be at a maximum. The average for-
ward velocity of point P is at mid-height axle level,
this also being the vehicle's forward speed. Thus
the top of the tyre moves at twice the speed of the
vehicle and in the same direction.
If point P is a heavy spot on the tyre, it will
accelerate from zero to a maximum velocity for
half a revolution and then decelerate to zero velo-
city again to complete the second half revolution.
Since this spot has mass and changes its velocity, it
will be subjected to a varying acceleration force
which acts in a direction tangential to this curve.
Consequently the direction of the inertia pull
caused by this heavy spot constantly changes as
the wheel moves forwards. The greatest reaction
experienced on the wheel occurs within the short
time the heavy spot decelerates downwards to
ground level, momentarily stops, changes its direc-
tion and accelerates upwards. Hence at the end of
each cycle and the beginning of the next there will
be a tendency to push down and then lift up the
tyre from the ground. At very low speeds this effect
may be insignificant but as the vehicle speed
increases, the magnitude of the accelerating force
acting on this out of balance mass rises and thereby
produces the periodic bump and bounce or jerking
response of the tyre.
The balancing of rotating masses can be con-
sidered in two stages: firstly the static balance in
one plane of revolution, this form of balance is
known as static balance, and secondly the balance
in more than one plane of revolution, commonly
referred to as dynamic balance.
8.7.2 Static balance (Fig. 8.51)
This form of imbalance is best illustrated when a
wheel and tyre assembly has been mounted on the
hub of a wheel balancing machine which is then spun
around by hand and released. The momentum put
Fig. 8.50 Cyclic movement of a heavy spot on wheel relative to the road
302
into rotating the wheel tends to spin it a few times.
It then stops momentarily and starts to oscil-
late to and fro with decreasing amplitude until even-
tually coming to rest. If a chalk mark is made on the
tyre at its lowest point and the wheel is now turned
say 90
and then released again, it will immediately
commence to rotate on its own, one way and then
the other way, until coming to rest with the chalk
mark at the lowest point as before. This demon-
strates that the heaviest part of the wheel assembly
will always gravitate to the lowest position. If a small
magnetic weight is placed on the wheel rim dia-
metrically opposite the heavy side of the wheel and
it has been chosen to be equivalent to the out of
balance mass, then when the wheel is rotated to
any other position, it remains in that position without
any tendency to revolve on its own. If, however,
there is still a slight movement of the wheel, or if
the wheel wants to oscillate faster than before the
magnetic weight was attached, then in the first case
the balancing weight is too small and in the second
case too large. This process of elimination by either
adding or reducing the amount of weight placed
opposite the heavy side of the wheel and then moving
round the wheel about a quarter of a turn to observe
if the wheel tries to rotate on its own is a common
technique used to check and correct any wheel
imbalance on one plane. When the correct balancing
weight has been determined replace the magnetic
weight with a clip-in weight of similar mass. With a
little experience this trial and error method of static-
ally balancing the wheel can be quick, simple and
effective.
The consequences of a statically unbalanced
wheel and tyre is that the heavy side of the wheel
will pull radially outwards as it orbits on a fixed
circular path around its axis of rotation, due to the
centrifugal force created by the heavier side of the
wheel (Fig. 8.51). If the swivel pins and the centre
of the unbalanced mass are offset to each other,
Fig. 8.51 (a and b) Illustration of static wheel imbalance
303
then when the heavy spot is in the horizontal plane
pointing towards the front of the vehicle a moment
of force is produced (M FR) which will endea-
vour to twist the stub axle and wheel assembly
anticlockwise about the swivel pins (Fig. 8.51(a)).
As the wheel rolls forward a further half turn, the
heavy spot will now face towards the rear so that
the stub axle and wheel assembly will try to swivel
in the opposite direction (clockwise) (Fig. 8.5(b)).
Hence with a statically unbalanced tyre the stub
axle will twist about its pivot every time the heavier
side of the wheel completes half a revolution
between the extremities in the horizontal plane.
The oscillations generated will thus be transmitted
to the driver's steering wheel in the form of tremors
which increase in frequency and magnitude as the
vehicle's speed rises. If there is a substantial amount
of swivel pin or kingpin wear, the stub axle will be
encouraged to move vertically up or down on its
supporting joints. This might convey vibrations to
the body via the suspension which could become
critical if permitted to resonate with possibly the
unsprung or sprung parts of the vehicle.
8.7.3 Dynamic balance (Fig. 8.52)
If a driven drum is made to engage the tread of the
tyre so that the wheel is spun through a speed range
there is a likelihood that the wheel will develop a
violent wobble which will peak at some point as the
wheel speed rises and then decreases as the speed is
further increased.
This generated vibration is caused by the balance
weight having been placed correctly opposite the
heavy spot of the tyre but on the wheel rim which
may be in a different rotational plane to that of the
original out of balance mass. As a result the tyre
heavy spots pull outwards in one plane while the
balance weight of the wheel rim, which is being
used to neutralize the heavy region of the tyre,
pulls radially outwards in a second plane. Conse-
quently, due to the offset of the two masses, a
rocking couple is produced, its magnitude being
proportional to the product of centrifugal force
acting through one of the masses and the distance
between the opposing forces (C FX). The higher
the wheel speed and the greater the distance
between the opposing forces, the greater the
magnitude of the rocking couple will be which is
causing the wheel to wobble.
The effects of the offset statically balanced
masses can be seen in Fig. 8.52(a, b and c). When
the heavy spot and balancing weight are horizontal
(Fig. 8.52(a)), the mass on the outside of the wheel
points in the forward direction of the vehicle and
the mass on the inside of the wheel points towards
the rear so that the wheel will tend to twist in an
anticlockwise direction about the swivel pins. With
a further 180
rotation of the wheel, the weights
will again be horizontal but this time the outer
weight has moved to the rear and the inner weight
towards the front of the vehicle. Thus the sense of
the unbalanced rocking couple will have changed
to a clockwise one. For every revolution of the
wheel, the wheel will rock in both a clockwise and
anticlockwise direction causing the driver's steering
wheel to jerk from side to side (Fig. 8.52(c)). Note
that when the masses have moved into a vertical
position relative to the ground, the swivel pins
constrain the rocking couple so that no movement
occurs unless the swivel ball joints or kingpins are
excessively worn.
The characteristics of the resulting wheel wobble
caused by both static and dynamic imbalance can
be distinguished by the steady increase in the
amplitude of wheel twitching about the swivel
pins with rising wheel speed in the case of static
unbalanced wheels, whereas with dynamic imbal-
ance the magnitude of wheel twitching rises to a
maximum and then declines with further wheel
speed increase (Fig. 8.53). Thus with dynamic
imbalance, a wheel can be driven at road speeds
which are on either side of the critical period of
oscillation (maximum amplitude) without sensing
any undue instability. If the wheel is driven within
the relative narrow critical speed range violent
wheel wobble results.
Slackness in the swivel pins or steering linkage
ball joints with unbalanced tyres will promote
excessive wheel twitch or wobble, resulting not
only in the steering wheel sensing these vibrations,
but causing heavy tyre tread scrub and wear.
8.7.4 Methods of balancing wheels
Wheel balancing machines can be of the on- or
off-vehicle type. The on-vehicle wheel balancer
has the advantage that it balances the wheel
whole rotating wheel assembly which includes
the hub, brake disc or drum, wheel and tyre.
However, it is not really suitable for drive axles
because the transmission drive line does not per-
mit the wheel hub to spin freely (which is essential
when measuring the imbalance of any rotating
mass). Off-vehicle balancing machines require
the wheel to be removed from the hub and to be
mounted on a rotating spindle forming part of the
balancing equipment.
304
Balancing machine which balances statically and
dynamically in two separate planes (Fig. 8.54)
The wheel being balanced is mounted on the
spindle of the mainshaft which is supported by a
pair of spaced out ball bearings. This machine
incorporates a self-aligning ball bearing at the
wheel end mounted rigidly to the balancing
machine frame, whereas the rear bearing is sup-
ported between a pair of stiff opposing springs
which are themselves attached to the balancing
machine frame. An electric motor supplies the
drive to the spindle by way of the engagement
drum rubbing hard against the tyre tread of the
wheel assembly being balanced.
When the wheel and tyre is spun and the assem-
bly commences to wobble about the self-aligning
bearing, the restraining springs attached to the sec-
ond bearing absorb the out of balance forces and
the deflection of the mainshaft and spindle.
An electro-magnetic moving coil vibration detec-
tor (transducer) is installed vertically between
the second bearing and the machine frame. When
Fig. 8.52 (a±c) Illustration of dynamic wheel imbalance
Fig. 8.53 Relationship of wheel speed and oscillating
amplitude for both static and dynamic imbalance
305
the wheel assembly wobbles, the armature (rod) in
the centre of the transducer coil moves in and out
of a strong magnetic field provided by the perma-
nent magnet. This causes the armature coil to gen-
erate a voltage proportional to the relative
movement of the rod. The output signal from the
detector is a direct measure of the imbalance of the
wheel assembly. It is therefore fed into a compen-
sating network which converts the signals into the
required balance weight to be attached to the out-
side of the wheel rim in the left hand plane. These
modified, but still very weak, electrical signals are
then passed through a filter which eliminates
unwanted side interference. They are then ampli-
fied so that they can activate the stroboscope device
and the weight indicator meter.
The weight indicator meter computes the voltage
amplitude signal coming from the detector and,
when calibrated, indicates the size of the weight to
be added to the plane of balance, in this case the
outside of the wheel. Conversely, the stroboscope
determines the angular phase of the balance weight
on the wheel. This is achieved by the sinusoidal
voltage being converted into a sharply defined
bright flash of light in the stroboscope lamp.
A rotating numbered transparent drum is illu-
minated by the stroboscope flash and the number
which appears on the top of the drum relates to the
phase position of the required balance weight.
Mounting of wheel on balancing machine spindle
(Fig. 8.54) Mount the wheel onto the flanged
multi-hole steel plate. Align the wheel stud holes
with corresponding threaded holes in the flange
plate and screw on the wheel studs provided. Slide
the wheel hub assembly along the spindle until the
inside of the wheel rim just touches the adjustable
distance rod and then lock the hub to the spindle via
the sleeve nut. The positioning of the wheel assem-
bly relative to the supporting self-aligning bearing
Fig. 8.54 Wheel balancing machine which balances statically and dynamically in two different planes
306
is important since the inside wheel rim now is in the
same rotating plane as the centre of the bearing. Any
couple which might have been formed when the
balance weights were attached to the inside of the
wheel rim are eliminated as there is now no offset.
Dynamic balance setting (Fig. 8.54) To achieve
dynamic balance, switch on the power, pull the
drive roller lever until the roller is in contact with
the tyre and allow the wheel to attain full speed.
Once maximum speed has been reached, push the
lever so that the roller is freed from the tyre. If the
wheel assembly is unbalanced the wheel will pass
through a violent period of wobble and then it will
steady again as the speed falls. While the wheel is
vibrating, the magnitude and position of the imbal-
ance can be read from the meter and from the
stroboscope disc aperture respectively. A correc-
tion factor is normally given for the different
wheel diameters which must be multiplied by the
meter reading to give the actual balance weight.
Select the nearest size of balance weight to that
calculated, then rotate the wheel by hand to the
number constantly shown on the stroboscope disc
when the wheel was spinning and finally attach the
appropriate balance weight to the top of the wheel
on the outside (away from the machine). Thus the
outer half of the wheel is balanced.
Static balance setting (Fig. 8.54) Static balance is
obtained by allowing the wheel to settle in its own
position when it will naturally come to rest with the
heaviest point at bottom dead centre. Select a mag-
netic weight of say 50 grammes and place this on
the inside rim at top dead centre and with this in
position turn the wheel a quarter of a revolution. If
the magnetic weight is excessive, the weighted side
will naturally gravitate towards the bottom but if it
is insufficient, the weight will rise as the wheel slowly
revolves. Alter the size of the magnetic weight and
repeat the procedure until there is no tendency for
the wheel to rotate on its own whatever its position.
The wheel is now statically and dynamically
balanced and a quick check can be made by repeat-
ing the spin test for dynamic balance. Once the
correct static balance weight has been found, replace
the magnetic weight by a clip-on type.
Balancing machine which dynamically balances in
two planes (Fig. 8.55) The machine is so con-
structed that the wheel being balanced is mounted
on the spindle of the mainshaft which is supported
by a pair of spaced out ball bearings housed in a
cylindrical cradle, which itself is supported on four
strain rods which are reduced in diameter in their
mid region (Fig. 8.55). An electric motor supplies
the drive to the mainshaft via a rubberized flat belt
and pulleys.
Vibration detectors are used to sense the out of
balance forces caused by the imbalance of the
wheel assembly. They are normally of electro-
mechanical moving coil type transducers. The tran-
ducer consists of a small armature in the form of a
stiff rod which contains a light weight coil. The rod
is free to move in a strong magnetic field supplied
by a permanent magnet. The armature rods are
rigidly attached to the mainshaft and bearing
cradle and the axes of the rods are so positioned
as to coincide with the direction of vibration. The
housing and permanent magnets of the detectors
are mounted onto the supporting frame of the
cradle. The relative vibratory motion of the arma-
ture rod to the casing causes the armature coil to
generate a voltage proportional to the relative
vibrational velocity.
The output signals from the two detectors are fed
into a compensating network and then into the
selector switch. The compensating network is so
arranged that the output signals are proportional
to the required balance weights in the left and right
hand balancing planes respectively. The output
voltages from the selector switch are very small
signals and will include unwanted frequency com-
ponents. These are eliminated by the filter. At the
same time the signals are amplified so that they can
operate the stroboscope device and both weight
indicating meters. These weight indicating meters
measure the amplitude of the voltage from the
detectors and when calibrated indicate the actual
weights to be added in each plane. The stroboscope
device changes the sinusoidal voltage into a sharply
defined pulse which occurs at the same predeter-
mined point in every cycle. This pulse is converted
into a very bright flash of light in the stroboscope
lamp when focused on the rotating numbered
transparent drum; one number will appear on the
top of the apparently stationary surface. The num-
ber is a measure of the relative phase position of the
voltage and is arranged to indicate the position of
the required balance weight.
Dynamic balance setting in two planes (Fig. 8.55)
Mount the wheel over the spindle and slide the
conical adaptor towards the wheel so that its
taper enters the central hole of the wheel. Screw
the sleeve nut so that the wheel is centralized and
wedged against the flanged hub (Fig. 8.55). Any
307
existing balance weights should now be removed
and the wheel should also be brushed clean.
Before the wheel assembly is actually balanced
on the machine, the two basic wheel dimensions
must be programmed into the electronic network
circuit. This is carried out by simply moving the
wheel diameter indicator probe against the inside
of the wheel rim and reading off the wheel diameter
and also measuring with a caliper gauge normally
provided the wheel width. The wheel diameter and
wheel rim width measurements are then set by
rotating the respective potentiometer knob on the
display console to these dimensions so that the
electronic network is altered to correct for changes
in the centrifugal force and rocking couples which
will vary with different wheel sizes.
Fig. 8.55 Wheel balancing machine which dynamically balances in two planes
308
Balancing machines of this type usually measure
and provide correction for wheel imbalance for both
static and dynamic balance with respect to both the
outer and inner wheel rim rotating planes.
The start button is now pressed to energize the
electric motor. As a result the drive belt will rotate
the mainshaft and spin the wheel assembly under
test.
First the state of wheel balance in the outer wheel
rim plane of rotation is measured by pressing the
outer rim weight indicator meter switch. The meter
pointer will align on the scale with size of balance
weight required in grammes; the stroboscope indi-
cator window will also show a number which cor-
responds to the wheel position when a balance
weight is to be attached.
Once the balance weight size and angular pos-
ition has been recorded, the wheel assembly is
brought to a standstill by pressing the stop button
and then releasing it when the wheel just stops
rotating.
The wheel should now be rotated by hand until
the number previously observed through the strobo-
scope window again appears, then attach the
selected size of balance weight to the top of the
outer wheel rim.
The whole procedure of spinning the wheel
assembly is then repeated but on the second time
the inner rim weight indicator button is pressed so
that the balance weight reading and the phase pos-
ition of the wheel refer to the inner rim rotating
plane. Again the wheel is braked, then turned by
hand to the correct phase position given by the
stroboscope number. Finally the required balance
weight is attached, this time to the inner wheel rim
at the top of the wheel.
8.7.5 Wheel and tyre run-out
Before proceeding to balance the wheel asseembly
the wheel should be checked for run-out in both
lateral and radial directions relative to the axis of
rotation. If the wheel or tyre run-out is excessive it
should be corrected before the wheel assembly is
balanced.
Lateral run-out (Fig. 8.56) If the wheel being
examined has been jacked clear of the ground and
when spun appears to wobble so that the wheel rim
or tyre wall moves axially inward or outward in a
wavy fashion lateral (sideway), run-out is taking
place. This may be caused by either the wheel rim
being buckled or the tyre being fitted unevenly
around the rim of the wheel so that the wheel
assembly will produce dynamic imbalance. Deflat-
ing the tyre and repositioning the bead against the
inside of the wheel rim will usually correct any tyre
lateral run-out. Lateral run-out of the wheel itself
should be no greater than 2.0 mm.
Radial run-out (Fig. 8.57) If with the wheel jacked
clear of the ground, the wheel and tyre assembly
appears to lift and fall every time the wheel com-
pletes one revolution, then the distance from the
axis of rotation to the tyre tread instead of being
constant around the periphery of the tyre is varying.
Fig. 8.56 Illustration of lateral tyre run-out
309
This error is usually caused by the tyre having been
fitted eccentrically about the wheel rim so that
when the wheel assembly is spun, radial run-out
will be observed, and as a result, the wheel assem-
bly will be in a state of static imbalance. Tyre
eccentricity can usually be cured by repositioning
the tyre on the wheel rim. The maximum wheel
eccentricity should not exceed 2.0 mm.
Fig. 8.57 Illustration of radial tyre run-out
310
9 Steering
9.1 Steering gearbox fundamental design
9.1.1 Steering gearbox angular ratios
The steering gearbox has two main functions: it
produces a gear reduction between the input steer-
ing wheel and the output drop arm (Pitman arm)
and it redirects the input to output axis of rotation
through a right angle.
Generally, the steering road wheel stub axles
must be capable of twisting through a maximum
steering angle of 40
either side of the straight
ahead position. The overall angular gear ratio of
a steering gearbox may be as direct as 12:1 for
light small vehicles or as indirect as 28:1 for heavy
vehicles. Therefore, lock to lock drop arm angular
displacement amounts to 80
and with a 12:1 and
28:1 gear reduction the number of turns of the steer-
ing wheel would be derived as follows:
Lock to lock steering wheel
turns for 12:1
80 Â 12
360
2:66 revolutions
Lock to lock steering wheel
turns for 28:1 reduction
80 Â 28
360
6:22 revolutions
From these results plotted in Fig. 9.1 it can be
seen that the 12:1 reduction needs the steering
wheel to be rotated 1.33 turns from the straight
ahead position. The 28:1 reduction will require
more than twice this angular displacement, namely
3.11 turns. Thus with the 12:1 gear reduction, the
steering may be heavy but can be turned from the
straight ahead position to full lock and back again
relatively quickly. However the 28:1 reduction will
provide a light steering wheel but the vehicle will be
compelled to corner much slower if the driver is to
be able to complete the manoeuvre safely.
9.1.2 Screw and nut steering gear mechanism
(Fig. 9.2)
To introduce the principles of the steering gearbox,
the screw and nut type mechanism will be examined
as this is the foundation for all the other types of
steering box gear reduction mechanisms.
A screw is made by cutting an external spiral
groove around and along a cylindrical shaft,
whereas a nut is produced by cutting a similar
spiral groove on the internal surface of a hole
made in a solid block.
The thread profile produced by the external and
internal spiral grooves may take the form of a vee,
trapezoidal, square or semicircle, depending upon
the actual application.
A nut and screw combination (Fig. 9.2) is a
mechanism which increases both the force and
Fig. 9.1 Relationship of overall angular gear ratio and
steering wheel lock to lock revolutions
Fig. 9.2 Screw and nut friction steering gear
mechanism
311