Encapsulation and Abstraction ppt
Bạn đang xem bản rút gọn của tài liệu. Xem và tải ngay bản đầy đủ của tài liệu tại đây (909.45 KB, 34 trang )
Encapsulation and
Abstraction
Chapter 4
Objects contain data and methods to send and
receive messages. Data members of objects can have
a different scope or visibility. You use access
specifier to define the scope of data member and
method.
This chapter introduces the concept of abstraction
and encapsulation. It discusses the implementation
of encapsulation by using access specifiers. It also
explains the concept of using methods. In addition,
the chapter also discusses the static variables and
static functions.
In this chapter, you will learn to:
Define abstraction and encapsulation
Implement encapsulation by using access
specifiers
Use methods
Use static variables and static functions
Objectives
Encapsulation and Abstraction 4.3
¤NIIT
Abstraction and encapsulation are important features of any OOPs language. Abstraction
involves extracting only the relevant information. Encapsulation involves packaging one
or more components together.
Consider the following example:
An automobile salesperson is aware that different people have different preferences.
Some people are interested in the speed of a car, some in its price, some in the engine, and
the some in its style. Although all of them want to buy a car, each of them is interested in
a specific attribute or feature. The salesman knows all the details of a car, but he presents
only the relevant information to a potential customer. As a result, the salesman practices
abstraction and presents only relevant details to customer.
In other words, abstraction means ‘looking for what you want’ in an object or a class.
Consider abstraction from the perspective of a programmer who wants a user to be able to
add items to a list. However, the detail of how a particular task in a program is
accomplished is hidden. Abstraction does not mean that information is unavailable. It
means that all the information exists, but only the relevant information is provided to the
user.
Encapsulation literally means ‘to enclose in or as if in a capsule’. Encapsulation is defined
as the process of enclosing one or more items within a physical or logical package. It
involves preventing access to nonessential details.
For example, when you plug in the cord of the vacuum cleaner and turn on the switch, the
vacuum cleaner starts. You do not see the complex processes needed to actually convert
electricity into suction power. In other words, the exact working of the cleaner has been
encapsulated. Therefore, encapsulation is also explained as information hiding or data
hiding because it involves hiding many of the important details of an object from the user.
Abstraction and encapsulation are different but related features. Abstraction enables you
to make the relevant information visible. Encapsulation enables you to package
information to implement the desired level of abstraction. Therefore, encapsulation assists
abstraction by providing a means of suppressing the nonessential details. Encapsulation
allows some information to be hidden but it also allows some information to be visible.
Introducing Abstraction and Encapsulation
Defining Abstraction
Defining Encapsulation
4.4 Encapsulation and Abstraction
¤NIIT
An access specifier defines the scope of a class member. A class member refers to the
variables and functions in a class. A program can have one or more classes. You may
want some members of a class to be accessible to other classes. But, you may not want
some other members of the class to be accessible outside the class.
It is the privilege of the programmer to decide the use of access specifiers to implement
encapsulation and abstraction in C#.
Consider the world of modern advertising. Viewers are bombarded with hundreds of
advertising messages every day. If they were to listen to, understand and respond to all of
them, they would probably not have much time and energy left for anything else. Instead,
they concentrate only on messages that are of specific interest to them. Thus, for example,
if they want to buy a refrigerator they will pay attention to the advertisements that feature
refrigerators.
Similarly, a housewife would typically pay attention to the size, ease of handling, and
durability of a vacuum cleaner. She would not be interested in the gadgetry inside it,
which is in the purview of the maintenance man. Sales personnel may concentrate on
entirely different factors. There is a term given to the preceding process: abstraction.
You use various types of access specifiers to specify the extent of the visibility of a class
member.
C# supports the following access specifiers:
public
private
protected
internal
protected internal
The public Access Specifier
The public access specifier allows a class to expose its member variables and member
functions to other functions and objects. Any member that is declared public can be
accessed from outside the class.
Types of Access Specifiers
Implementing Encapsulation by Using Access
Specifiers
Encapsulation and Abstraction 4.5
¤NIIT
The following is an example of the use of the public access specifier:
using System;
class Car
{
private string CarColor; //Since the variable is private, it
//cannot be accessed outside the class definition.
}
class Bike
{
public string BikeColor; //Since the variable is public, it
//can be accessed outside the class definition.
}
class Result
{
static void Main(string[] args)
{
Car Ford = new Car(); ;
Bike Honda = new Bike();
/* The . operator is used to access member data and functions */
Ford.CarColor = "red"; /* Error! Cannot access private
members*/
Honda.BikeColor = "blue";
Console.ReadLine();
}
}
In the preceding example, the CarColor variable cannot be accessed from any function
outside the
Car class. On the other hand, the BikeColor variable is a public member.
Therefore, it can be accessed from outside the class.
The following is another example of the use of the
public access specifier:
using System;
class Car
{
public string Color;
public void Honk()
{
Console.WriteLine("BEEP BEEP!" );
}
}
class Result
{
static void Main(string[] args)
{
Car Ford = new Car(); ;
Ford.Honk(); //Displays BEEP BEEP!
Console.ReadLine();
}
}
4.6 Encapsulation and Abstraction
¤NIIT
In the preceding example, the Honk() function will be accessible from anywhere in the
program and can be accessed by using the objects of the
Car class.
The private Access Specifier
The private access specifier allows a class to hide its member variables and member
functions from other class objects and functions. Therefore, the private member of a class
is not visible outside a class. If a member is declared private, only the functions of that
class can access the member. Even the instance of the class cannot access its private
members. Therefore, the data is hidden and cannot be altered by any function other than
the member functions of the class.
The following is an example of the use of
private access specifier:
using System;
class Car
{
private string Model;
void Honk()
{
Console.WriteLine("PARRP PARRP!");
}
public void SetModel()
{
Console.WriteLine("Enter the model name: ");
Model = Console.ReadLine();
}
public void DisplayModel()
{
Console.WriteLine("The model is: {0}", Model);
}
}
class Display
{
static void Main(string[] args)
{
Car Ford = new Car();
Ford.SetModel(); //Accepts the model name
Ford.DisplayModel(); //Displays the model name
Ford.Honk(); //error! private members cannot be
accessed outside the class definition
Console.WriteLine(Ford.Model); //error! private members cannot
be accessed outside the class definition
}
}
Encapsulation and Abstraction 4.7
¤NIIT
In the preceding example, the SetModel() and DisplayModel() functions can be called
from the
Ford object, created in the Main() function because these are public member
functions. Similarly, the
Honk() function cannot be accessed through the Ford object
because it is a private member function.
When you do not specify any data member as public, protected, or private, then the
default access specifier for a data member is
private. In the following example, the data
member
Model is private, even though it has not been specified explicitly:
class Car
{
char Model;
}
The protected Access Specifier
This specifier allows a class to hide its member variables and member functions from
other class objects and functions, except the child class. The
protected access specifier
becomes important while implementing inheritance.
The following example shows that the protected member of the class will have the same
visibility as a private member of the class:
using System;
class Car
{
protected string Model;
void Honk()
{
Console.WriteLine("PARRP PARRP!");
}
public void SetModel()
{
Console.WriteLine("Enter the model name: ");
Model = Console.ReadLine();
}
public void DisplayModel()
{
Console.WriteLine("The model is: {0}", Model);
}
}
class Display
{
static void Main(string[] args)
4.8 Encapsulation and Abstraction
¤NIIT
{
Car Ford = new Car();
Ford.SetModel(); //Accepts the model name
Ford.DisplayModel(); //Displays the model name
Ford.Honk(); /*error! private members cannot be
accessed outside the class definition */
Console.WriteLine(Ford.Model); /*error! protected members
cannot be accessed*/
//outside the class definition
}
}
In the preceding example, the SetModel() and DisplayModel() functions can be called
from the
Ford object defined in the Main() function. However, the Model variable cannot
be accessed through the
Ford object because it is a protected member variable. Similarly,
the
Honk() function cannot be accessed through the Ford object because it is also a
private member function.
The internal Access Specifier
The internal access specifier allows a class to expose its member variables and member
functions to other functions and objects. Any member that is declared internal can be
accessed from any class or method defined within the application in which the member is
defined. The default access specifier for a class is
internal.
The following is an example of the use of the
internal access specifier:
using System;
class Car
{
private string CarColor; //Since the variable is private, it
cannot be accessed outside the class
//definition.
internal void Honk()
{
Console.WriteLine("BEEP BEEP!" );
}
}
class Bike
{
internal string BikeColor;//Since the variable is internal, it can
//be accessed outside the class
//definition.
}
class Result
{
static void Main(string[] args)
{
Encapsulation and Abstraction 4.9
¤NIIT
Car Ford = new Car(); ;
Bike Honda = new Bike();
Ford.CarColor = "red"; /* Error! Cannot access private
members*/
Honda.BikeColor = "blue";
Ford.Honk(); //Displays BEEP BEEP!
Console.ReadLine();
}
}
In the preceding example, the CarColor variable cannot be accessed from any function
outside the
Car class. On the other hand, the BikeColor variable is an internal member.
Hence, it can be accessed from outside the class. Also, the
Honk() function will be
accessible from anywhere in the program and can be accessed by using the objects of the
Car class.
The protected internal Access Specifier
This specifier allows a class to show its member variables and member functions to the
containing class, derived classes, or to classes within the same application. The
protected internal access specifier becomes important while implementing
inheritance.
The following example shows that the protected internal member of the class will have
the same visibility as a private member of the class:
using System;
class Car
{
protected internal string Model;
void Honk()
{
Console.WriteLine("PARRP PARRP!");
}
public void SetModel()
{
Console.WriteLine("Enter the model name: ");
Model = Console.ReadLine();
}
public void DisplayModel()
{
Console.WriteLine("The model is: {0}", Model);
}
}
class Display
{
static void Main(string[] args)
4.10 Encapsulation and Abstraction
¤NIIT
{
Car Ford = new Car();
Ford.SetModel(); //Accepts the model name
Ford.DisplayModel(); //Displays the model name
Ford.Honk(); /*error! private members cannot be
accessed outside the class definition */
Console.WriteLine(Ford.Model); /*error! protected internal
members cannot be accessed outside*/
the class definition
}
}
In the preceding example, the SetModel() and DisplayModel() functions can be called
from the
Ford object defined in the Main() function. However, the Model variable cannot
be accessed through the
Ford object because it is a protected internal member variable.
Similarly, the
Honk() function cannot be accessed through the Ford object because it is
also a private member function.
The following table shows the visibility of the class members for the access specifiers.
Access
Specifiers
Visible to objects
of other classes
inside the
namespace
collection
Visible to
objects of
child classes
within the
namespace
collection
Visible to objects of
other classes outside
the namespace
collection
Visible to objects of
child classes outside
the namespace
collection
public Yes Yes Yes Yes
private No No No No
protected No Yes No Yes
internal Yes No No No
protected
internal
Yes Yes No No
Visibility of Class Members
Encapsulation and Abstraction 4.11
¤NIIT
Problem Statement
Write a program to calculate the area of a rectangle and a square.
Solution
To develop the required program, perform the following steps:
1. Select StartÆAll ProgramsÆAccessoriesÆNotepad.
2. Write the following program code in Notepad:
using System;
class Area
{
static int Result;
public static void AreaRec()
{
int Length,Breadth;
Console.WriteLine("Enter the Length of Rectangle");
Length = Convert.ToInt32(Console.ReadLine());
Console.WriteLine("Enter the Breadth of Rectangle");
Breadth = Convert.ToInt32(Console.ReadLine());
Result = Length*Breadth;
Console.WriteLine("The Area of Rectangle
is{0}",Result);
}
public static void AreaSqu()
{
int Side;
Console.WriteLine("Enter the Side of the Square");
Side = Convert.ToInt32(Console.ReadLine());
Result = Side *Side ;
Console.WriteLine("The Area of Square is{0}",Result);
}
static void Main(string[] args)
{
int Option;
Console.WriteLine("Main Menu");
Activity: Calculating Area and Volume by Using
Access Specifiers
4.12 Encapsulation and Abstraction
¤NIIT
Console.WriteLine("1.Area of Rectangle");
Console.WriteLine("2.Area of Square");
Console.WriteLine("Enter your choice (1, 2)");
Option = Convert.ToInt32(Console.ReadLine());
switch (Option)
{
case 1:
AreaRec();
break;
case 2:
AreaSqu();
break;
default:
Console.WriteLine("Incorrect Choice");
break;
}
Console.ReadLine();
}
}
3. Select FileÆSave to save the program file. The Save As dialog box is displayed.
4. Enter “Area.cs” in the File name text box.
5. Click the Save button in the Save As dialog box.
6. Select StartÆAll ProgramsÆMicrosoft Visual Studio 2005ÆVisual Studio
ToolsÆVisual Studio 2005 Command Prompt to open the Visual Studio 2005
Command Prompt window.
7. In the Visual Studio 2005 Command Prompt window, move to the location where
the program file is saved.
8. Compile the program file by using the following command:
csc Area.cs
9. Execute the compiled program as:
Area.exe
10. Verify the output of the executed program.
Encapsulation and Abstraction 4.13
¤NIIT
The output of the preceding code is as follows.
Output of the Area Volume Application
4.14 Encapsulation and Abstraction
¤NIIT
A method is a set of one or more program statements, which can be executed by referring
to the method name.
Methods play a key role in modular programming. When a complex application is divided
into methods, code is more flexible and easy to maintain and to debug. Methods are useful
for performing repetitive tasks, such as fetching specific records and text. They allow you
to break an application into discrete logical units, which makes the application more
readable. You can reuse code written in a method because it can be executed any number
of times by calling the method with little or no modification.
To use methods, you need to:
Define methods
Call methods
Defining a method means declaring the elements of its structure. Consider the syntax of
defining a method:
<Access specifier> <Return Type> <Method Name>(Parameter List)
{
Method Body
}
The elements of the method declaration include the method name, the parameters list, the
return type, and the method body. The following are the elements of a method:
Access specifier: This determines the extent to which a variable or method can be
accessed from another class.
Return type: A method can return a value of any type. If the method is not returning
any value, use void as the return type.
Method name: This is a unique identifier and is case-sensitive. The method name
cannot be the same as the variable name or any other non-method item declared in
the class.
Parameter list: This is used to pass and receive the data from a method. It is
enclosed between parentheses. The parentheses are included even if there are no
parameters.
Method body: This contains the set of instructions needed to complete the required
activity.
Using Methods
Defining Methods
Encapsulation and Abstraction 4.15
¤NIIT
Consider the following code snippet of method definition:
Class Calculator
{
public int AddNumber(int num1, int num2)
{
int result;
result=num1+num2;
return result;
}
}
In the preceding code snippet, the public access specifier states that the method can be
accessed from outside the class. The method is returning an integer value as specified in
the method declaration. AddNumber is the name of the method. It is a good practice to
specify the method name in
Pascal Case. The method is taking two integers as the
parameters and returning the value stored in
result variable.
After defining the method, you can call it by using the name of the method. The method
name is followed by parentheses even if the method call has no parameters, as shown in
the following example:
MethodName();
The following is an example of calling methods:
using System;
class Calculator
{
public int AddNumber(int num1, int num2)
{
int result;
result = num1 + num2;
return result;
}
static void Main(string[] args)
{
Calculator cal = new Calculator();
// The following statement is calling the
AddNumber method and //passing 10 and
// 20 as the parameter list.
int value=cal.AddNumber(10, 20);
Console.WriteLine("The result is {0}", value);
Console.ReadLine();
}
}
Calling Methods
4.16 Encapsulation and Abstraction
¤NIIT
The preceding example begins at the start of the Main() method of the Calculator class.
An object named
cal is created to access the method of the class. When you call the
method
AddNumber(int num1, int num2), pass two integer values AddNumber(10,20)
to the method. This method returns an integer value, which is stored in the variable,
value.
The output of the preceding code is as follows.
Output of the Calculator Class Program
Since the return type of Main() is void, the return statement is not returning any value.
The
return statement is used to make a method return immediately to the caller. Without
a return statement, the execution returns to the caller by default when the last statement in
the method is reached. This type of return is called an immediate return.
You can also call public methods from other classes by using the object of the class. The
following example shows how to call the method of
Calculator class from Test class:
using System;
class Calculator
{
public int AddNumber(int num1, int num2)
{
int result;
result = num1 + num2;
return result;
}
}
class Test
{
Encapsulation and Abstraction 4.17
¤NIIT
static int Main(string[] args)
{
//Creating an object of a class Calculator
Calculator cal = new Calculator();
//Calling method AddNumber(10,20) of a class Calculator
int value= cal.AddNumber(10,20);
Console.WriteLine("The result is {0}", value);
return 0;
}
}
A method can call itself. This is known as recursion.
The following is an example of the recursive method:
using System;
class Number
{
public int factorial(int n)
{
int result;
if (n == 1)
return 1;
else
{
result = factorial(n - 1) * n;
return result;
}
}
static void Main(string[] args)
{
Number obj = new Number();
Console.WriteLine("Factorial of 3 is " +
obj.factorial(3));
Console.WriteLine("Factorial of 4 is " +
obj.factorial(4));
Console.WriteLine("Factorial of 5 is " +
obj.factorial(5));
Console.ReadLine();
}
}
In the preceding code, the factorial() method is recursive method. If the value entered
by the user is not
1, this method will call itself.
4.18 Encapsulation and Abstraction
¤NIIT
The output of the preceding code is as follows.
Output of the Recursive Method Program
As discussed earlier, parameters allow information to be passed in and out of a method.
When you define a method, you can include a list of parameters in parentheses.
Declaring Methods with Parameters
Each parameter has a type and a name. You can declare parameters by placing parameter
declarations inside parentheses. A syntax that is used to declare parameters is similar to
the syntax that is used to declare local variables. However, you can separate each
parameter declaration with a comma.
The following example shows how to declare a method with parameters:
void MethodWithParameters(int n, string y)
{
//
}
The preceding code declares the method MethodWithParameters with two parameters, n
and
y. The first parameter is of type int, and the second parameter is of type string.
Using Methods with Parameters
Encapsulation and Abstraction 4.19
¤NIIT
Calling Methods with Parameters
When a method with parameters is called, you must pass the parameters to the method.
Parameters can be passed by using any one of the following mechanism:
Value: Are sometimes called in parameters, therefore, the data can be transferred
into the method but cannot be transferred out.
Reference: Are sometimes called in/out parameters, therefore, the data can be
transferred into the method and out again.
Output: Are sometimes called out parameters, therefore, data can be transferred out
of the method.
Pass Parameter by Value
Pass by value is the default mechanism for passing parameters to a method. The simplest
definition of a value parameter is a data type name followed by a variable name. When a
method is called, a new storage location is created for each value parameter. The values of
the corresponding expressions are copied into them. The expression supplied for each
value parameter must be similar to the declaration of the value parameter. Or it must be a
type that can be implicitly converted to the value type.
The syntax of declaring value parameter is as follows:
<return type> MethodName(<data type> variableName)
{
\\\
}
Within the method, you can write code that changes the value of the parameter. A
parameter will have no effect on any variables outside the method call.
In the following example, the variable
var inside AddOne() method is separate from the
variable
number in the Main() method and it can be changed in AddOne(), without
effecting
var:
class Calculator
{
void AddOne(int var)
{
var++;
}
public static void Main()
{
Calculator obj = new Calculator();
int number = 6;
obj.AddOne(number);
Console.WriteLine(number); // Display the value 6, not 7
}
}
4.20 Encapsulation and Abstraction
¤NIIT
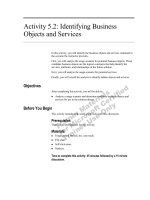
The graphical representation of the memory allocated to the variables is shown in the
following figure.
Memory Allocated to Value Type Parameters
Pass Parameter by Reference
A reference parameter is a reference to a memory location of a data member. Unlike a
value parameter, a reference parameter does not create a new storage location. Instead, a
reference parameter represents the same location in memory as the variable that is
supplied in the method call.
You can declare a reference parameter by using the
ref keyword before the data types, as
shown in the following example:
void ShowReference(ref int nId, ref long nCount)
{
//
}
Main()
AddOne() AddOne()
6
76
number
va
r
va
r
Before method call
After method call
Encapsulation and Abstraction 4.21
¤NIIT
The ref keyword only applies to the parameter following it and not to the whole
parameter list. Consider the following method, in which
nId is passed by reference but
longVar is passed by value:
void OneRefOneVal(ref int nId, long longVar)
{
//
}
When calling the method, you supply reference parameters by using the ref keyword,
which is followed by a variable name. The value supplied in the call to the method must
exactly match the type in the method definition. And, it must be a variable, not a constant
or a calculated expression.
The following is an example of calling a method with reference type parameters:
class Calculator
{
void AddOne(ref int var)
{
var++;
}
public static void Main()
{
Calculator obj = new Calculator();
int number = 6;
obj.AddOne(ref number);
Console.WriteLine(number); // Displays the value 7
}
}
4.22 Encapsulation and Abstraction
¤NIIT
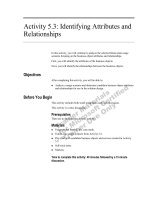
The graphical representation of the memory allocated to the variables of the preceding
code is shown in the following figure.
Memory Allocated to Reference Type Parameters
If you omit the ref keyword or if you supply a constant or a calculated expression, the
compiler will reject the call. You will receive an error message that is similar to the
message: “Cannot convert from ‘int’ to ‘ref int’”.
Pass Parameter by Output
As discussed earlier, to return a value from a method you can use the return statement. A
return statement can be used to return only a single value. This limitation is overcome by
the output parameter.
Output parameters are like reference parameters, except that they transfer data out of the
method rather than into it. An output parameter is a reference to a storage location
supplied by the caller. However, the variable that is supplied for the output parameter
does not need to be assigned a value before the call is made, and the method will assume
that the parameter has not been initialized on entry.
AddOne() AddOne()
******
va
r
va
r
At method call
Main()
6
number
Main()
7
number
After execution of
var++ statement
Encapsulation and Abstraction 4.23
¤NIIT
Output parameters are useful when you want to return values from a method by means of
a parameter without assigning an initial value to the parameter. To declare an output
parameter, use the keyword out before the data type and the variable name.
The following is an example of output parameters:
static void OutDemo(out int variable1)
{
//
}
The out keyword only affects one parameter, and each output parameter must be marked
separately. When calling a method with an output parameter, place the
out keyword
before the variable to be passed, as shown in the following example:
int var;
OutDemo(out var);
In the body of the method being called, no initial assumptions about the contents of the
output parameter are made. It is treated like an unassigned local variable. The output
parameter must be assigned a value inside the method.
4.24 Encapsulation and Abstraction
¤NIIT
Problem Statement
Write a program to swap two numbers by using reference type parameters in a method.
Solution
To write the required program, perform the follows steps:
1. Select StartÆAll ProgramsÆAccessoriesÆNotepad.
2. Write the following program code in Notepad:
using System;
public class SwapNumber
{
void SwapNum(ref int a, ref int b)
{
int temp;
temp = a;
a = b;
b = temp;
}
static void Main(string[] args)
{
SwapNumber classobj = new SwapNumber();
int Number1, Number2;
Console.WriteLine("Enter the first number");
Number1 = Convert.ToInt32(Console.ReadLine());
Console.WriteLine("Enter the second number");
Number2 = Convert.ToInt32(Console.ReadLine());
Console.WriteLine("The value of first number is {0}",
Number1);
Console.WriteLine("The value of second number is {0}",
Number2);
classobj.SwapNum(ref Number1,ref Number2);
Console.WriteLine("Now the value of first number after
swaping is {0}", Number1);
Console.WriteLine("Now the value of second number after
swapping is {0}", Number2);
Console.ReadLine();
Activity: Swapping Two Numbers by Using Methods
with Parameters
Encapsulation and Abstraction 4.25
¤NIIT
}
}
3. Select FileÆSave to save the program file. The Save As dialog box opens.
4. Enter “SwapNumber.cs” in the File name text box.
5. Click the Save button in the Save As dialog box.
6. Select StartÆAll ProgramsÆMicrosoft Visual Studio 2005ÆVisual Studio
ToolsÆVisual Studio 2005 Command Prompt to open the Visual Studio 2005
Command Prompt window.
7. In the Visual Studio 2005 Command Prompt window, move to the location where
the program file is saved.
8. Compile the program file by using the following command:
csc SwapNumber.cs
9. Execute the compiled program as:
SwapNumber.exe
10. Verify the output of the executed program.
The following window verifies the output of the executed program.
Output of the Swap Number Program