Inspection Evaluation And Repair Of Steel structures Part 4 docx
Bạn đang xem bản rút gọn của tài liệu. Xem và tải ngay bản đầy đủ của tài liệu tại đây (371.05 KB, 10 trang )
EM 1110-2-6054
1 Dec 01
3-6
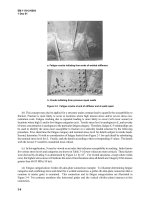
a. Fatigue cracks initiating from ends of welded stiffeners
b. Cracks initiating from previous repair welds
Figure 3-3. Fatigue cracks at end of stiffener and at weld repair
(b)
This concept may also be applied for a structure under constant load to quantify the susceptibility to
fracture. Fracture is most likely to occur at locations where high tension stress and/or severe stress con-
centration exist. Fatigue cracking due to repeated loading is more likely to occur (will occur sooner) at
locations where high S
r
and/or low fatigue categories exist. Tensile stress level is analogous to S
r
, and severity
of stress concentration is analogous to the particular fatigue category. Therefore, fatigue S
r
-N relationships can
be used to identify the areas most susceptible to fracture in a statically loaded structure by the following
procedure. First, determine the fatigue category and nominal stress level for details subject to tensile loads.
Second, determine N (with no consideration of fatigue limits) from Figure 2-1 for each detail by substituting
the nominal stress level for S
r
. Finally, rank the details according to their corresponding N values. The details
with the lowest N would be considered most critical.
(c) In this application, N may be viewed as an index that indicates susceptibility to cracking. Index factors
for various stress levels and categories are shown in Table 3-1 (lower values are more critical). These factors
were derived by dividing N as determined by Figure 2-1 by 10
5
. For riveted structures, except where welds
exist, the highest stress areas will indicate the most critical locations since all details are Category D for stresses
greater than 68.95 MPa (10 ksi).
(4) Fatigue categorization: Girder-rib-skin-plate connection example. To illustrate determining fatigue
categories and combining stress and detail for a welded connection, a girder-rib-skin-plate connection that is
common to tainter gates is examined. This connection and its fatigue categorization are illustrated in
Figure 3-4. Two primary members (the horizontal girder and the vertical rib/skin plate) intersect at this
connection.
EM 1110-2-6054
1 Dec 01
3-7
Table 3-1
Index Factor for Stress and Detail
Fatigue Category
Stress Level
MPa (ksi)
A
B
B’
C
D
E
E’
41 (6)
1,170
560.0
82.0
214.0
94.0
51.0
18.0
55 (8)
495
238.0
119.0
90.0
40.0
22.0
7.6
69 (10)
250
122.0
61.0
46.0
21.0
11.0
3.9
83 (12)
147
71.0
35.0
27.0
12.0
6.4
2.2
97 (14)
92
44.0
22.0
17.0
7.5
4.0
1.4
110 (16)
62
30.0
15.0
11.0
5.0
2.7
0.95
124 (18)
43
21.0
10.0
7.9
3.5
1.9
0.67
138 (20)
32
15.0
7.6
5.8
2.6
1.4
0.49
152 (22)
24
12.0
5.7
4.3
1.9
1.0
0.37
165 (24)
18
8.8
4.4
3.3
1.5
0.79
0.28
179 (26)
14
6.9
3.5
2.6
1.2
0.62
0.22
193 (28)
12
5.6
2.8
2.1
0.9
0.50
0.18
(a) The first member to be considered is the girder, and the structural action is flexure. Details to evaluate
include the longitudinal web-to-flange weld, the attachment of the welded stiffener (if present) to the girder,
and the attachment of the rib flange to the girder flange.
• Web-to-flange weld
Illustrative example: No. 4 (Table 2-1)
General condition: Built-up member
Situation: Continuous fillet weld parallel to direction of the applied stress
Fatigue category: B
• Welded stiffener
Illustrative example: No. 6 (Table 2-1)
General condition: Built-up member
Situation: Toe of transverse stiffener welds on girder webs or flanges
Fatigue category: C
• Rib flange to girder flange
Illustrative example: No. 15 (Table 2-1)
General condition: Fillet-welded attachments longitudinally loaded
Situation: Base metal adjacent to details attached by fillet welds
Fatigue category: C, D, E, or E' depending on weld length (rib flange width) and detail thickness
(rib flange thickness)
Based on the most critical weld detail for flexural action of the girder (the rib-to-girder fillet weld), the
connection is a fatigue category E or E' depending on the rib flange thickness. This assumes a continuous fillet
weld across a rib flange of at least 10 cm (4 in.).
EM 1110-2-6054
1 Dec 01
3-8
Figure 3-4. Girder-rib-skin-plate connection
EM 1110-2-6054
1 Dec 01
3-9
(b) The second member to be considered is the vertical rib/skin plate, and the structural action is flexure
about the supporting girder. Details to be evaluated include the longitudinal rib-to-skin-plate weld, the
attachment of the welded stiffener to the rib and skin plate, and the attachment of the rib flange to the girder
flange. Since the structural action for the skin plate and rib is flexure, the rib-to-skin-plate weld is a
Category B and the attachment of the welded stiffener to the rib and skin plate is a Category C, similar to the
first two details evaluated for the girder. It is not obvious how to classify the fillet weld joining the rib to the
girder. For this example, it is assumed that this weld is similar to one at the end of a cover plate that is wider
than the flange.
Rib flange to girder flange
Illustrative example: No. 7 (Table 2-1)
General condition: Built-up member
Situation: Welded cover plate wider than flange with welds across the ends
Fatigue category: E or E' depending on rib flange thickness
Based on the most critical weld detail for flexural action of the rib/skin plate (the rib-to-girder fillet weld), the
connection is a fatigue category E or E' depending on the rib flange thickness. If fatigue loading is not a
concern, however, only nominal tensile stresses are significant, and these exist at the weld details attached to
the skin plate. Under hydrostatic loading, compressive flexural stresses exist in the rib flange. Therefore,
considering details subject to nominal tensile stresses that are not cyclic, this connection should be classified as
a Category C. For fatigue loading, the connection is Category E or EN.
(5) Fatigue Categorization: Bracing-to-Girder Connection Example. To illustrate determining fatigue
categories and combining stress and detail for a welded connection, a bracing-girder connection that is
common on miter gates, tainter gates, and lift gates is examined. This connection and its fatigue categorization
are illustrated in Figure 3-1. The main member for this connection is the girder, and the structural action is
flexure. Details to be evaluated include the longitudinal web-to-flange weld, the attachment of the welded
stiffener to the girder, and the attachment of the gusset plate to the girder flange. The web-to-flange weld is a
Category B, and the attachment of the welded stiffener to the girder is a Category C, similar to the first two
details evaluated for the girder connection presented in (4) above.
Gusset-plate-to-girder-flange weld
Illustrative example: No. 16 (Table 2-1)
General condition: Groove-welded attachments longitudinally loaded
Situation: Base metal adjacent to details attached by groove welds with a transition radius
less than 50 mm (2 in.)
Fatigue category: E
Based on the most critical weld detail (the gusset-plate-to-girder-flange weld), the connection is a fatigue
category E.
(6) Combining stress and detail example. The process of combining stress and detail for tainter gate
connections described in (4) and (5) above will be discussed in general terms. For this example, it is assumed
that fatigue loading is not a concern.
(a) For the girder-rib-skin-plate connection, the rib-to-girder weld was determined to be a Category E or E'
for girder flexure (assume a Category E). This connection is located at each vertical rib on the upstream girder
flange along the length of the girder. Without fatigue loading, only nominal tensile stresses should be
considered. Along the length of the girder near midspan, the flexural stresses due to hydrostatic loading are
EM 1110-2-6054
1 Dec 01
3-10
compressive in the upstream flange. Therefore, this connection is not critical near midspan. However, near the
end frames, the flexural stress in the upstream flange is tensile with the highest stresses nearest the end frames.
Assuming a structural analysis shows that the stress in the upstream flange near the end frames is about 103
MPa (15 ksi), the index factor for the rib-to-girder weld (Category E) is approximately 3.3 (Table 3-1). For
rib/skin plate flexure, the most critical weld detail (stiffener attachment) under tensile stresses is a Category C.
Under hydrostatic loading, compressive flexural stresses exist in the rib flange. Assuming that a structural
analysis shows that the maximum tensile stress in the skin plate is 68.9 MPa (10 ksi), the index factor is 46.
(b) For the bracing-to-downstream-girder-flange connection, the most critical weld detail (the gusset-plate-
to-girder-flange weld) is a fatigue category E. Under hydrostatic loading, tensile flexural stresses exist in the
downstream girder flange at areas away from the end frames with the highest stresses at midspan. Assuming
that bracing is located at midspan, and the stress in the downstream girder flange at midspan is about
124.1 MPa (18 ksi), the index factor for the gusset-plate-to-girder weld is 1.9 (Table 3-1).
(c) Based on the stress levels in this example, the most critical areas for inspection are at the gusset-plate-
to-girder-flange weld on the downstream girder flange at midspan of the girder (index factor 1.9) and at the rib-
to-girder weld on the upstream girder flange, near the end frame where the upstream flange of the girder is in
tension (index factor 3.3). Although it depends on the size and geometry of individual girders, the lower
girders generally have the highest stress levels and are, therefore, more critical.
b. Critical areas for corrosion damage. Chapter 2 discusses several types of corrosion that can occur on
hydraulic steel structures. Corrosion can occur at any location on a structure, but certain areas are
more susceptible to corrosion damage than others. Sensitivity to corrosion is enhanced at crevices, areas where
dissimilar metals come in contact, areas subject to erosion, and areas where ponding water or debris may
accumulate. Other areas often susceptible to corrosion are those where it is difficult to apply a protective
coating adequately, such as at sharp corners, edges, intermittent welds, and rivets and bolts.
(1) Galvanic corrosion occurs at the contact surfaces of dissimilar metals or between steels with different
electrochemical potential. For example, ASTM A7-67 steel is more electrochemically active than
ASTM A588/A588M steel (a low-carbon weathering steel containing copper) and would corrode when
coupled with A588/A588M steel. There may also be a potential difference between rivet steel and the adjoin-
ing plate or angle. If different steels have been used in the construction or repair of a structure, these locations
should be inspected for galvanic corrosion.
(2) Other corrosion-susceptible areas are those where abrasion may occur. This type of corrosion may
occur around moving parts such as at the guide wheels on vertical lift gates or at the trunnion assemblies or
chain locations on tainter gates.
(3) Webs of the structural members on many gates, bulkheads, and valves are oriented horizontally or
radially, providing corrosion-susceptible locations where ponding or debris accumulation may occur. To
prevent ponding, the webs of these members are penetrated by drain holes. The hole locations can be
corrosion-susceptible areas, especially if they are covered with debris. Areas where ponding may occur and the
location of web drain holes should be determined prior to inspection.
(4) Seals on hydraulic steel structures are common locations of corrosion damage. Seals are subject to
crevice corrosion between the contact surfaces of the structure and seal, galvanic corrosion if the seal plate is of
a dissimilar metal to that of the structure itself, or erosion corrosion if abrasive sand and silt particles are
passing through.
(5) Other areas susceptible to corrosion include heater locations (promotes oxidation) and the normal
waterline (wetting and drying promotes corrosion).
EM 1110-2-6054
1 Dec 01
3-11
(6) Areas with loose rivets or bolts are potential locations for crevice corrosion or fretting corrosion if the
base components of the connection are loose.
(7) In addition to consideration of the previously described susceptible areas, certain findings during the
physical inspection may indicate possibilities of corrosion. Generally, any failure of the paint system is an
indication of underlying corrosion. A widespread failure of the paint system may indicate general corrosion
resulting in a slow, relatively uniform thinning of the base metal. Moreover, some localized pitting corrosion
may be present. If there is a localized failure of the paint system, localized corrosion may be occurring. Paint
failure where the edges of two or more surfaces contact, such as at the edge of a rivet head or at the edge of an
angle riveted to a plate, may indicate crevice corrosion. Paint failure near electrical connections may indicate
stray current corrosion. If the paint failure is patterned or preferential in appearance, it may be due to filiform
corrosion under the paint or to mechanically assisted corrosion, either fretting or erosion corrosion.
c. Critical areas for other effects. As discussed in Chapter 2, many factors other than nominal stress
levels, severity of stress concentration, or corrosion aspects may contribute to the deterioration of a structure.
These include effects of material thickness (affects residual stress, toughness, and constraint) and fabrication
(i.e. weld quality, tack welds, intersecting welds, or poor accessibility), operational vibration or overload,
displacement-induced secondary stress, and concentrated loads. The following paragraphs discuss some of
these concerns.
(1) Details fabricated from thick plate sections and/or with large amounts of welding in a concentrated area
are susceptible to cracking. Trunnion assemblies on tainter gates and lifting connections on all structures are
examples. Locations where weld quality is poor are particularly susceptible to cracking. In welded joints there
is a potential for many types of discontinuities, as illustrated in Chapter 4. Intersecting welds are often located
on hydraulic steel structures at uncoped stiffeners and where diaphragm webs frame into girder webs and
flanges.
(2) Where vibrational loads have been reported, components subjected to high-frequency flow-induced
vibration may be critical. The lower sill of tainter gates and valves, the apron assembly of roller gates, and the
end shield of roller gates are examples. Furthermore, any location where previous damage (buckling, plastic
deformation, cracking, extreme corrosion) has been reported should be considered critical.
(3) Additional considerations are locations where extreme stresses occur in components subject to
unforeseen secondary or displacement-induced stresses. One example is at the diaphragm-flange-to-girder-
flange connections on welded lift gates. Under vertical loading, the horizontal girder flanges displace in a
vertical plane similar to a uniformly loaded simple beam. The ends of diaphragm flanges are forced to rotate
with the displaced girder flanges, which causes a large tensile force on one edge of the diaphragm; the girder
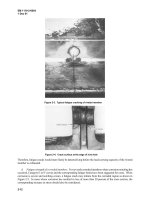
flange rotation is greatest near the ends of the girders (Figure 3-5). Another example is at connections between
a roller drum cylinder and the end shields (Figure 3-6). The rigidity of the connection prevents the movement
of one component against the other. When a hydraulic steel structure is being opened or closed or when high-
velocity water flows by the structure, relative local displacement may occur between two rigidly connected
components and induce high stresses. Concentrated loads may induce high local stresses and/or displacements
between connected components. Concentrated loads occur at support locations on all structures (i.e., trunnion
assembly of gates and valves, end posts of lift gates, and end disks of roller gates), lifting connections, and
areas where skin plate ribs are attached to horizontal girders on a tainter gate.
EM 1110-2-6054
1 Dec 01
3-12
Figure 3-5. Distortion-induced high-stress location
Figure 3-6. Fatigue crack at weld repair on roller gate end shield
EM 1110-2-6054
1 Dec 01
3-13
3-4. Visual Inspection
a. Visual inspection is the primary inspection method and shall be used to inspect all critical elements as
determined according to paragraph 3-3. A visual inspection is hands-on and requires careful and close
examination. The inspector should look closely at the members and connections and not just view them from a
distance. Inspectors should use various measuring scales, magnifying glasses, and other hand tools to identify,
measure, and locate areas of concerns. Boroscopes, flashlights, and mirrors may be necessary to inspect areas
of limited accessibility. Weld gauges should be available to check the dimensions of weld beads. Critical areas
should be cleaned prior to inspection, and additional lighting should be used when necessary.
b. Inspection methods other than visual inspection may be used for the periodic inspection of hydraulic
steel structures, if necessary. These methods, discussed in Chapter 4, include dye penetrant, magnetic particle,
or eddy-current methods for inspection of cracks, and ultrasonic methods for inspection of cracks or corrosion
loss.
3-5. Critical Area Checklist
For the periodic inspection of any hydraulic steel structure, a critical area checklist should be developed prior
to inspection as part of the preinspection assessment discussed in paragraph 3-2. Critical areas are likely com-
mon for a given type of hydraulic steel structure; however, detailed lists may be individually structure
dependent.
a. General. Based on the discussion in this chapter and Chapter 2, the following common areas should be
inspected on all hydraulic steel structures:
(1) All nonredundant and/or fracture critical components. These typically include main framing members
and lifting and support assemblies.
(2) Locations identified as susceptible to fracture or weld-related cracking as outlined in paragraph 3-3a.
(3) Corrosion-susceptible areas as outlined in paragraph 3-3b (normal waterline, abrasion areas, crevices,
locations with dissimilar metals).
(4) Lifting connections or hitches. These are subjected to high concentrated loads, are often of welded
thick-plate construction, and are fracture critical. The lifting chain or cable used to lift the gate is also critical.
(5) Support locations: trunnion (tainter gate, valves), end post (lift gate), top anchorage and pintle areas
(miter gate), and end disk (roller gate) assemblies. These are subjected to high concentrated loads, are often of
welded thick-plate construction, and are fracture critical.
(6) Intersecting welds. These occur at uncoped stiffeners and diaphragm web-to-girder welds.
(7) Previous cracks repaired by welding. Figure 3-6 shows an example of cracks redeveloped at weld
repairs.
(8) Locations of previous repairs or where damage has been reported. This includes buckling or plastic
deformation, cracking, or corrosion.
EM 1110-2-6054
1 Dec 01
3-14
b. Roller gates. Additional critical areas common for roller gates include the following (Figure 3-7):
(1) Attachments and connections at midspan (high tensile stress, stress concentration).
(2) The apron assembly connection to the roller (high stress, stress concentration).
(3) Connections between the roller drum cylinder and the end shields (displacement-induced stresses).
c. Tainter gates. Additional critical areas common for tainter gates include the following (Figure 3-8):
(1) Girder-rib-skin-plate connection on the upstream girder flange near the end frames and the bracing-to-
downstream-girder-flange connection near midspan (critical tension stress/detail combinations).
(2) Connections of main framing members such as the girder-to-strut connection (fracture critical, high
moments).
(3) Seal lip plate if it is fabricated from stainless steel or other dissimilar metal (galvanic and/or crevice
corrosion).
d. Lift gates. Additional critical areas common for lift gates include the following (Figure 3-9):
(1) Horizontal girder-to-end-box-girder connection and the bracing-to-downstream-girder-flange connec-
tion near midspan (critical tension stress/detail combinations).
(2) The ends of diaphragm flanges where attached to downstream girder flanges (displacement-induced
stresses).
e. Miter gates. Additional critical areas common for miter gates include the following (Figure 3-10):
(1) Horizontal girder-to-miter and quoin post connections (thick plates, high constraint, high stress).
(2) The ends of diaphragm flanges where attached to downstream girder flanges (high stress, stress
concentration).
(3) Connections at ends of diagonal members (high stress, fracture critical).
3-6. Inspection Intervals
The maximum time interval between periodic inspections of hydraulic steel structures is established in
ER 1110-2-100. Visual inspections should also be performed if unusual loading situations occur. Such
situations include barge impact, earthquake, excessive ice load, increase in frictional forces between seals and
embedded plates, and movement of the supporting monoliths. Additional detailed inspections may be required
to pursue concerns resulting from the periodic inspections or investigate reported distress from lock personnel.
If discontinuities exist, fracture mechanics concepts can also be applied to determine appropriate inspection
intervals as discussed in Chapter 6.
EM 1110-2-6054
1 Dec 01
3-15
Figure 3-7. Critical areas for roller gates


