CRC.Press A Guide to MATLAB Object Oriented Programming May.2007 Episode 2 Part 3 doc
Bạn đang xem bản rút gọn của tài liệu. Xem và tải ngay bản đầy đủ của tài liệu tại đây (890.29 KB, 20 trang )
214 A Guide to MATLAB Object-Oriented Programming
28 case 'Color'
29 if isempty(this)
30 varargout = {};
31 else
32 varargout = cell(size(this)); % trick next function's
nargout
33 % either index(2:end) or varargin{1} should be empty
34 [do_sub_indexing, do_assignin, this, varargout{:}] =
35 Color_helper('get', this, [index(2:end)
varargin{:}]);
36 end
37 case 'LineWidth'
38 if isempty(this)
39 varargout = {};
40 else
41 varargout = {this.mLineWidth};
42 end
43 case 'LineHandle'
44 if isempty(this)
45 varargout = {};
46 else
47 varargout = {this.mLineHandle};
48 end
49 otherwise
50 found = false; % didn't find it in the public section
51 end
52
53 % concealed member variables, not strictly public
54 if ~found && called_by_name
55 found = true;
56 switch index(1).subs
57 case 'mDisplayFunc' % class-wizard reserved field
58 if isempty(this)
59 varargout = {};
60 else
61 varargout = {this.mDisplayFunc};
62 end
63 otherwise
64 found = false; % didn't find it in the concealed section
65 end
66 end
67
68 % parent forwarding block
69 if ~found
70 if called_by_name
71 forward_index = index(1).subs;
C911X_C016.fm Page 214 Friday, March 30, 2007 11:42 AM
General Assignment and Mutator Helper Functions 215
72 else
73 forward_index = index;
74 end
75
76 if nargout == 0
77 varargout = cell(size(this));
78 else
79 varargout = cell(1, nargout);
80 end
81
82 for parent_name = parent_list' % loop over parent cellstr
83 try
84 parent = [this.(parent_name{1})];
85 [varargout{:}] = get(parent, forward_index,
varargin{:});
86 found = true; % catch will assign false if not found
87 do_sub_indexing = false; % assume parent did all sub-
indexing
88 break; % can only get here if field is found
89 catch
90 found = false;
91 err = lasterror;
92 switch err.identifier
93 case 'MATLAB:nonExistentField'
94 % NOP
95 otherwise
96 rethrow(err);
97 end
98 end
99 end
100 if do_assignin
101 parent = num2cell(parent);
102 [this.(parent_name{1})] = deal(parent{:});
103 end
104 end
105
106 % error checking
107 if ~found
108 error('MATLAB:nonExistentField',
109 'Reference to non-existent field identifier %s',
110 index(1).subs);
111 end
112
113 % nargout adjustment
114 if length(varargout) > 1 & nargout <= 1
115 if iscellstr(varargout) || any([cellfun('isempty',
varargout)])
C911X_C016.fm Page 215 Friday, March 30, 2007 11:42 AM
216 A Guide to MATLAB Object-Oriented Programming
The first changes occur in lines 3 and 4. The local variables do_sub_indexing and
do_assignin guard code blocks near the end of this now standard version of get. Helper
functions return values for these two variables, but we never know in advance whether a direct-
link public variable or a non-direct-link variable is being accessed. Lines 3 and 4 assign initial
values compatible with direct-link access. During non-direct-link access, the helper function assigns
values to these variables.
116 varargout = {varargout};
117 else
118 try
119 varargout = {[varargout{:}]};
120 catch
121 varargout = {varargout};
122 end
123 end
124 end
125
126 % special syntax block, see book section 3
127 if do_assignin
128 var_name = inputname(1);
129 if isempty(var_name)
130 warning('get with assignment is only for non-indexed
objects');
131 else
132 assignin('caller', var_name, this);
133 caller = evalin('caller', 'mfilename');
134 if ~isempty(strmatch(caller, {'subsref' 'subsasgn' 'get'
'set'}))
135 assignin('caller', 'do_assignin', true);
136 end
137 end
138 end
139
140 % deep indexing block
141 if do_sub_indexing
142 index = [index(2:end) varargin{:}];
143 if length(index) > 0
144 if length(this) == 1
145 varargout = {subsref([varargout{:}], index)};
146
147 else
148 [err_id, er_msg] =
array_reference_error(index(1).type);
149 end
150 end
151 end
C911X_C016.fm Page 216 Friday, March 30, 2007 11:42 AM
General Assignment and Mutator Helper Functions 217
The next change brings us into the public member variable section. The case for ‘Color’,
lines 28–36, uses a helper function. As before, line 28 identifies the ‘Color’ case, and when
the object is empty, line 30 returns an empty varargout. When the object is not empty, line 32
prepares for the helper call by preallocating varargout. Lines 34–35 call the helper. There are
three input arguments and three plus length(varargout) outputs.
The first input, ‘get’, tells the helper to perform an access operation. The second input,
this, is the source of the access. The third input is a concatenation of index(2:end) and
varargin{:}. The values in index and varargin depend on the path leading up to the helper
call. If the path began with dot-reference syntax, index(2:end) will contain additional indices
converted from operator notation and varargin will be empty. If the path began with a call to
get, index(2:end) will be empty but varargin might include an additional substruct
index. The concatenation assembles the entire index and passes it into the helper.
One important thing to notice is the fact that there is no limit imposed on the length of the
index passed into the helper. Ordinarily MATLAB places limits on indexing into nonscalar variables.
In most situations, the group-of-eight implementation also places limits on indexing. The length
of the index passed into the helper is an exception because the helper is responsible for these
decisions. When the helper accepts this responsibility it returns a value of false in
do_sub_indexing.
The helper returns values for do_sub_indexing, do_assignin, this, and varar-
gout. Allowing the helper to index into the dot-referenced value and return a do_sub_indexing
value of false means that values returned from the helper might be fully indexed. This has
implications for subsref because, currently, subsref will incorrectly reindex the values. To
fix this problem, indexing code is moved out of subsref and into lines 140–151. The code
previously shown in Code Listing 98 will no longer exist in the standard version of subsref.
Instead, all standard versions of get will include the ability to perform deeper indexing. It should
come as no surprise that the do_sub_indexing flag guards this ability.
The helper also returns a value for do_assignin. Do_assignin is used as a guard value
for lines 127–138. These lines implement some special syntax that will be described in Part 3.
Until we take up that discussion, the value returned by the helper will always be false. That
way, until we discuss the pros and cons of returning a true value, we will skip over 127–138.
You might also notice other do_assignin-related additions. These additions are also discussed
in Part 3.
The final addition occurs on line 87 inside the parent-forwarding section. When the get forward
in line 85 executes without error, line 86 sets found equal to true and line 87 sets
do_sub_indexing to false. Now that we have moved the indexing code into get, the parent’s
version will have already performed any necessary indexing and we don’t want to reindex the
values. Of course, this also means that all of our classes need to be updated with the new group-
of-eight functions described in this chapter.
16.1.2.3 Final Template for set.m
Case code for set is shown in Code Listing 101.
Code Listing 101, Final Version of set.m Implemented for cLineStyle
1 function varargout = set(this, index, varargin)
2
3 do_assignin = false; % special variable, see book section 3
4
5 if nargin < 3 % one or two arguments, display info and return
C911X_C016.fm Page 217 Friday, March 30, 2007 11:42 AM
218 A Guide to MATLAB Object-Oriented Programming
6 possible = fieldnames(this, '-possible');
7 possible_struct = struct(possible{:});
8 if nargout == 0
9 if nargin == 1
10 disp(possible_struct);
11 else
12 try
13 temp_struct.(index) = possible_struct.(index);
14 disp(temp_struct);
15 catch
16 warning(['??? Reference to non-existent field '
17 index '.']);
18 end
19 end
20 else
21 varargout = cell(1,max([1, nargout]));
22 varargout{1} = possible_struct;
23 end
24 return;
25 end
26
27 called_by_name = ischar(index);
28
29 % the set switch below needs a substruct
30 if called_by_name
31 index = substruct('.', index);
32 end
33
34 % public-member-variable section
35 found = true; % otherwise-case will flip to false
36 switch index(1).subs
37 case 'Color'
38 [do_sub_indexing, do_assignin, this] =
39 Color_helper('set', this, index(2:end), varargin{:});
40 case 'LineWidth'
41 [do_sub_indexing, do_assignin, this] =
42 LineWidth_helper('set', this, index(2:end),
varargin{:});
43 case 'LineHandle'
44 if length(index) > 1
45 if length(this) == 1
46 this.mLineHandle =
47 subsasgn(this.mLineHandle,
48 index(2:end), varargin{:});
49 else
50 [err_id, err_msg] = array_reference_error(index(1)
.type);
C911X_C016.fm Page 218 Friday, March 30, 2007 11:42 AM
General Assignment and Mutator Helper Functions 219
51 error(err_id, err_msg);
52 end
53 else
54 [this.mLineHandle] = deal(varargin{:});
55 end
56 otherwise
57 found = false;
58 end
59
60 % concealed member variables, not strictly public
61 if ~found && called_by_name
62 found = true;
63 switch index(1).subs
64 case 'mDisplayFunc'
65 if length(index) > 1
66 this.mDisplayFunc =
67 subsasgn(this.mDisplayFunc,
68 index(2:end), varargin{:});
69 else
70 [this.mDisplayFunc] = deal(varargin{:});
71 end
72 otherwise
73 found = false; % didn't find it in the special section
74 end
75 end
76
77 % parent forwarding block
78 if ~found
79 if called_by_name
80 forward_index = index(1).subs;
81 else
82 forward_index = index;
83 end
84
85 for parent_name = parent_list' % loop over parent cellstr
86 try
87 parent = set([this.(parent_name{1})], forward_index,
varargin{:});
88 parent = num2cell(parent);
89 [this.(parent_name{1})] = deal(parent{:});
90 found = true; % catch will assign false if not found
91 break; % can only get here if field is found
92 catch
93 found = false;
94 err = lasterror;
95 switch err.identifier
96 case 'MATLAB:nonExistentField'
C911X_C016.fm Page 219 Friday, March 30, 2007 11:42 AM
220 A Guide to MATLAB Object-Oriented Programming
The first change to set occurs in line 3. The logical variable do_assignin guards entry
into the block of code added in lines 110–122. Behavior related to do_assignin will be described
in Part 3. Until then, do_assignin should be false and line 3 assigns false as the initial
value.
The next change brings us into the public member variable section. The case for ‘Color’,
lines 37–39, uses a helper function. Line 37 identifies the ‘Color’ case, and lines 38–39 call
the helper. This time the first argument is ‘set’ because we want to execute the mutator. The
remaining three arguments are the object, the additional indices, and the assignment values. The
helper returns values for do_sub_indexing, do_assignin, and the mutated object. In this
case, do_sub_indexing is a dummy variable because it is never used by set.
The case for ‘LineWidth’ is interesting because get uses direct-link code but set uses a
helper. This is typical because the standard organization moves input-value-checking code into the
helper. The mutator needs to check the input values, but the accessor does not. Thus, the mutator
uses a helper but the accessor does not. Finally, the case for LineHandle uses the standard direct-
link syntax.
97 % NOP
98 otherwise
99 rethrow(err);
100 end
101 end
102 end
103 end
104
105 if ~found
106 error('MATLAB:nonExistentField',
107 '??? Reference to non-existent field ',
108 index(1).subs);
109 end
110
111 if do_assignin % set used in special way, see book section 3
112 var_name = inputname(1);
113 if isempty(var_name)
114 warning('MATLAB:invalidInputname',
115 'No assignment: set with assignment needs a non-
indexed object');
116 else
117 assignin('caller', var_name, this);
118 caller = evalin('caller', 'mfilename');
119 if ~isempty(strmatch(caller, {'subsref' 'subsasgn'
'get' 'set'}))
120 assignin('caller', 'do_assignin', true);
121 end
122 end
123 end
124
125 varargout{1} = this;
C911X_C016.fm Page 220 Friday, March 30, 2007 11:42 AM
General Assignment and Mutator Helper Functions 221
16.1.2.4 Color Helper Function
Code for one combined accessor–mutator helper function is shown in Code Listing 102. This
particular helper is used for the public member variable color. Code in the listing should look
familiar because most of the lines came directly from member functions in Chapter 15. Of course,
the organization is different and there is a lot going on in this function.
Code Listing 102, Final Version of cLineStyle’s Color_helper.m
1 function [do_sub_indexing, do_assignin, this, varargout] =
2 Color_helper(which, this, index, varargin)
3
4 switch which
5
6 case 'get' % ACCESSOR
7 do_sub_indexing = true; % true and get will index deeper
8 do_assignin = false; % typically false, see book section 3
9 rgb = hsv2rgb([this.mColorHsv]')'; % convert color format
10 varargout = num2cell(rgb, 1); % num2cell instead of
mat2cell
11
12 case 'set' % MUTATOR
13 do_sub_indexing = false; % mutator must do deeper indexing
14 do_assignin = false; % typically false, see book section 3
15 varargout = {}; % mutator doesn't use varargout
16 if isempty(index) % only an initial dot-reference value
17 rgb = [varargin{:}]; % input values are rgb
18 else % deeper indexing
19 if length(this) == 1
20 rgb = subsasgn(get(this, 'Color'), index,
varargin{:});
21 else
22 [err_id, err_msg] = array_reference_error(index(1).
type);
23 error(err_id, err_msg);
24 end
25 end
26 hsv = num2cell(rgb2hsv(rgb')', 1); % convert rgb to hsv
27 [this.mColorHsv] = deal(hsv{:}); % assign new hsv values
28
29 for k = 1:length(this(:))
30 try
31 set(this(k).mLineHandle, 'Color', get(this(k),
'Color'));
32 end
33 end
34
C911X_C016.fm Page 221 Friday, March 30, 2007 11:42 AM
222 A Guide to MATLAB Object-Oriented Programming
First notice the file is separated into two sections: accessor (lines 3–10) and mutator (lines
12–37). This is not necessarily required, but it is a convenient organization. Both sections assign
values to do_sub_indexing, do_assignin, and varargout. The accessor code can allow
get to finish deeper indexing by setting do_sub_indexing equal to true. That is what this
helper does on line 7. The accessor code can also elect to perform deeper indexing by setting
do_sub_indexing equal to false. The mutator code must always perform deeper indexing
and will always set do_sub_indexing equal to false.
The accessor code then converts private HSV values into RGB values on line 9. To populate
the varargout cell array, line 10 converts the RGB array values into a cell array. The mutator
code doesn’t return values via varargout, so it sets varargout to empty in line 15.
Instead of using varargout, mutator code performs the mutation in place and returns the
mutated object. When the variable name is the only index, line 17 copies input RGB values into
a temporary variable. When there are additional indices, line 19 checks the size of the object array.
If the array is scalar, line 20 uses subsasgn to assign the subset. If the array is nonscalar, lines
22–23 throw an error by calling array_reference_error.
After populating the rgb temporary variable, line 26 converts the RGB values into HSV values
and stores the HSV values in a cell array. Line 27 then deals the cell values into the correct locations.
Finally, lines 29–33 loop over all the objects in the array and set their line colors to the newly
assigned values. Just like before, using the handle-graphics set silently does nothing when the
handle is empty.
16.1.2.5 The Other Classes and Member Functions
Before cLineStyle can be used in our current collection of classes, we need to code
LineWidth_helper. The implementation follows the same strategy used for Color_helper.
The code is included in the Chapter 16 @cLineStyle/private directory. The mutator section
includes index checking, value checking, and input size checking identical to Chapter 15’s set case.
While not technically required, we should also be able to convert member functions for
cShape, cStar, and cDiamond into this chapter’s newly established, group-of-eight format.
The old class organization will work with the new version of cLineStyle because its public
interface didn’t change. The problem with keeping the old class organization is one of consistency.
A collection of classes is much easier to maintain if they all consistently conform to the
same internal strategy. Affected group-of-eight member functions are get, set, subsref, and
subsasgn.
The new organization also uses helper functions for non-direct-link public variables. The
previous implementations for cShape, cStar, and cDiamond were also reorganized to use
helpers. Implementations of the various helper functions follow the same strategy laid out in this
chapter. The newly organized class files can be found in the chapter_16 directory. You should
look at these files and pay close attention to the helper functions in the private directories.
16.2 TEST DRIVE
The code in this chapter represents reorganization with no new functionality. All of the commands
from previous chapters should still work the same as they did before. We need to rerun some of
our test commands to make sure our classes still behave the same. Some of the Chapter 15
35 otherwise
36 error('OOP:unsupportedOption', ['Unknown helper option: '
which]);
37 end
C911X_C016.fm Page 222 Friday, March 30, 2007 11:42 AM
General Assignment and Mutator Helper Functions 223
commands for cStar objects are repeated in Code Listing 103. The commands confirm that the
helper-function interface is working correctly across our parent–child and primary-secondary hier-
archies. The figure that results from the command in line 6 is shown in Figure 16.1.
16.3 SUMMARY
The focus of this chapter was the organization of get and set. By changing the organization, we
improved the modularity of the standard group of eight. To do this we considered two situations:
direct-link variables and variables that use a helper function. Direct-link variables are easy to access
and mutate because there is no data conversion or input checking. The code to access and mutate
these variables is short and essentially the same every time. Public variables that use a helper
include those that convert data from one representation to another and those that perform any sort
if input check during mutation.
FIGURE 16.1 cStar graphic after implementing helper-function syntax.
Code Listing 103, Chapter 16 Test Drive Command Listing: The cStar Interface
1 >> cd '/oop_guide/chapter_16'
2 >> clear classes; fclose all; close all force; diary off;
3 >> star = [cStar cStar];
4 >> star(2).ColorRgb = [1;0;0];
5 >> star(1) = 1.5 * star(1);
6 >> star = draw(star);
7 >> star(1).Title = 'Shooting Star';
8 >> star(1).LineWeight = 'bold';
9 >> star(1)
10 ans =
11 Size: [2x1 double]
12 ColorRgb: [3x1 double]
13 Points: [2x6 double]
14 LineWeight: 'bold'
15 Title: 'Shooting Star'
2
1
0
–1
–2
10
Shooting Star
–1–2 2
C911X_C016.fm Page 223 Friday, March 30, 2007 11:42 AM
224 A Guide to MATLAB Object-Oriented Programming
Moving accessor and mutator code outside of get and set also has another benefit. It allows
computer-aided-software-engineering (CASE) tools to manage the addition and removal of private,
public, and concealed variables. Without helper functions and their standard interface, every time
a class changes, a lot of hand tailoring is required. The next chapter introduces a very capable
CASE tool that exploits all of the group of eight’s organizational elements.
16.4 INDEPENDENT INVESTIGATIONS
1. Repeat the same commands using a cDiamond object instead of a cStar object.
2. Experiment with the implementation by accessing and mutating elements using multiple
indexing levels.
C911X_C016.fm Page 224 Friday, March 30, 2007 11:42 AM
225
17
Class Wizard
With sixteen chapters under your belt, you can now create sophisticated, robust MATLAB classes
on your own. During the first few implementations, it is easy to stay motivated because there are
many new twists and turns. After the first few, however, the repetitive syntax can quickly become
monotonous and time-consuming. At some point, you need to shift back into a product focus but
the implementation mechanics are too tedious to allow your attention to waver. Once you shift
from “How do I implement objects?” back to “How do I use objects to implement products?” you
are likely to find yourself wishing for some sort of class-generation tool. Standard, repetitive tasks
like building the group-of-eight functions are ideally suited for automation. Of course, this did not
happen by accident. Modularity along with a constant drive to isolate class-dependent code into a
small subset of functions makes automation possible.
This chapter introduces an automated code-generation tool that simplifies group-of-eight devel-
opment for MATLAB classes. Using the tool, you can define a collection of public and private
member variables along with an associated collection of public and private member functions. The
tool will use these to generate fully functional class code that follows the guidelines developed in
the previous sixteen chapters. All of the various bells and whistles are included. The tool will even
give you a head start on class tailoring by generating a function template for public functions and
helpers. The template includes the function definition along with reasonably complete header
comments. This is convenient because it gives variable names and comment headers a consistent
form with shared comments across all members of the class.
The automation tool is called
class_wizard.m
. The Class Wizard tool uses a graphical
interface entirely developed using MATLAB’s standard development tools. Dialog screens and
callback functions were developed using Guide* and MATLAB 7.0. In addition, all of the code in
class_wizard.m
is native MATLAB. The main Class Wizard function along with other required
functions can be found on the source disk in
/oop_guide/utility/wizard_gui
. I recom-
mend that you add this directory to the MATLAB path or copy all the files to a directory already
on the path. If you don’t want to put the wizard on your path, you can
cd
into its directory to run it.
The first time you run Class Wizard
,
you will immediately recognize its organization. Data-
entry areas on the main dialog correspond to specific areas in the group of eight. There are entry
areas for parent classes, private variables, concealed variables, public variables, and constructors.
The
more…
button opens another dialog where details for public functions and some other
advanced elements can be entered. We will discuss these advanced elements in Part 3.
In this chapter, you will find a concise introduction to Class Wizard. The introduction describes
the various data-entry screens, field formats, file operations, and class generation. The descriptions
assume that you are already familiar with the organization and implementation strategy behind the
group of eight and their helpers. For example, descriptions in this chapter assume that you are
familiar with private, concealed, and public variables and understand how they relate to one another.
This chapter describes data entry for the code-generation tool, but in reality, the full documentation
for Class Wizard is the topic of this book.
* Guide is a standard MATLAB utility that can be used to efficiently create cross-platform graphical user interfaces.
MATLAB version 7.0 added button groups to the standard set of graphical components, and Class Wizard uses button
groups. For this reason Class Wizard will not run properly under versions of MATLAB below 7.0. There were also some
changes to the object model; however, Class Wizard produces class code that is backward compatible with MATLAB
version 6.5.
C911X_C017.fm Page 225 Friday, March 2, 2007 8:50 AM
226
A Guide to MATLAB Object-Oriented Programming
The collection of member functions and their internal syntax mirrors the code examples already
discussed. We can easily enter data that will result in a collection of shape classes that behave the
same as the previous examples. In fact, that is the goal of the next chapter. Between this chapter
and the next, you will discover that implementing class code is quick and easy. This is exactly how
it should be because you need to reserve most of your time and effort for the most difficult part
of object-oriented development, design.
17.1 FILE DEPENDENCIES
The prime motive for developing both the group-of-eight idiom and a code-generation tool is
coupling. Here the coupling isn’t exactly between modules of code but rather between the class
definition and the associated m-file implementation. Early on, we organized group-of-eight func-
tions to eliminate as much module-to-module coupling as possible. Now, Class Wizard will help
control the coupling between the class definition and its implementation. The coupling can’t be
eliminated, only managed.
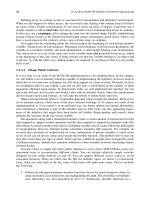
Let’s first examine what is meant by definition-to-module coupling. The most basic class
definition specifies a class name along with a small collection of public and private member
variables. These names are distributed into group-of-eight code according to the diagram in Figure
17.1. Arrows connect the names used in the class definition to the modules where these names
need to appear in code. The lines represent connections to class-independent modules. The depen-
dencies in this figure are modest because dependency reduction was one of the main focal points
for group-of-eight development. Even so, the arrows are still tangled and that creates a development
headache. Class evolution requires that we keep several files in synch. Trying to implement several
changes at once is a recipe for disaster. Making the situation even worse is the fact that an omission
in one file can go undetected until the class is in use. For example, suppose you add a public
member variable to
get
and
set
but forget to update
fieldnames
. This type of error doesn’t
usually cause a crash, but the lack of consistency can be very annoying to clients.
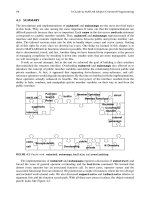
The lines and arrows on the dependency graph become even more entwined when parent–child
inheritance is considered. This graph is shown in Figure 17.2. Here,
parent_list
joins with
get
,
set
, and
fieldnames
to form a Maginot line that prevents the coupling from extending
deeply into the group of eight. Unless we make concessions to functionality, the arrows can’t be
untangled. This is where Class Wizard comes to the rescue. Using a single definition, Class Wizard
keeps the standard member functions in synch. Changes to the class definition automatically migrate
into every affected function. Organizing the code into the group of eight plus associated helper
functions allows Class Wizard to manage the coupling. Allowing Class Wizard to manage this
complexity aids development, evolution, and maintenance. The result is quality.
17.2 DATA-ENTRY DIALOG BOXES
The main class-generation file is
class_wizard.m
and can be found in the
/oop_guide/utility/wizard_gui
directory. This is the third version of the tool but the
first version to use a graphical user interface (GUI) for definition entry. The GUI was developed
FIGURE 17.1
Dependency diagram for a simple class.
Class Name
Constructor
struct.m
get.m
set.m
fieldnames.m
subsref.m
subsasgn.m
display.m
Private Variables
Public Variables
C911X_C017.fm Page 226 Friday, March 2, 2007 8:50 AM
Class Wizard
227
using Guide and MATLAB 7.0. The main screen uses dialog elements that are not available in
MATLAB 6.5. Because of these elements, MATLAB 7.0 or higher is required to enter class
definitions and generate files. All of the generated code is backward compatible with MATLAB
6.5 and higher.
The GUI is organized around a main screen containing buttons and menus. Each button or
menu selection opens a secondary dialog dedicated to data entry for one small subset of the
definition. There are separate dialog boxes for parent classes, public and private member variables,
and public and private member functions. Most of these will be immediately familiar because they
follow directly from the group-of-eight organization. Navigating into the dialogs and entering data
requires additional explanation. That is the purpose of this chapter.
The most important content of a source file is the code; however, the total cost of development
is lower when certain conventions are established and followed. Common code idioms generally
improve the overall code quality. In addition, tightly integrating a class into the help system makes
the class easier to use and evokes quality. The primary output from Class Wizard is code; however,
the output includes features that make it easier to include the code in a larger project. A significant
amount of Class Wizard’s functionality centers on managing and formatting this sort of data. For
example, class definitions can include comments for both functions and variables. All files generated
for the class will include these comments in their headers. These headers can be displayed by
MATLAB’s help system, and they yield big payoffs in productivity. As long as you fill the definition
with content, Class Wizard will manage it by writing it out to the appropriate files.
17.2.1 M
AIN
C
LASS
W
IZARD
D
IALOG
The main Class Wizard dialog gives you direct access to all class elements shown on the left-hand
side of Figure 17.2. These include class name, parent classes, superiority, inferiority, member
variables, and member functions. The red arrows indicate how these elements flow into the various
class files. The primary access functions
get.m
and
set.m
see the largest amount of customiza-
tion, with
ctor_ini.m
running a close third.
The main dialog with a small amount of entered data is shown in Figure 17.3. The main screen
includes items that represent the basic elements that are important for nearly every class. There are
three direct-entry text fields, and an assortment of radio buttons, check boxes, buttons, and menus.
The main screen displays a lot of summary information, but the details and the ability to change
data require a button click or a menu selection. A few definition items are accessible on the main
dialog, primarily
Class Name
,
Superior To
, and
Inferior To
.
The string entered into the
Class Name
field is used as the name of the constructor. The
same name should also be used in the directory name, but the directory name is specified separately
during file save operations. The suggested naming convention for classes includes a lowercase “
c
”
as the first character. To help remind you of this convention, the field for
Class Name
initially
FIGURE 17.2
Dependency diagram with inheritance.
parent_list.m
Constructor
fieldnames.m
struct.m
get.m
set.m
display.m
Private Variables
Public Variables
Class Name
subsref.m
subsasgn.m
Superior To
Inferior To
Parent Name(s)
Concealed Variables
C911X_C017.fm Page 227 Friday, March 2, 2007 8:50 AM
228
A Guide to MATLAB Object-Oriented Programming
contains a lowercase
c
. The lowercase
c
is not required, and you can enter any legal class name
in the field.
Comma-separated names in the
Superior To
and
Inferior To
fi elds are used to set
the function-selection hierarchy. Comma-separated lists are transcribed as written into the input
arguments for calls to
superiorto
or
inferiorto
, respectively. These function calls must be
made during the construction process. If the fields are populated,
superiorto
and
inferiorto
commands will be written into the constructor.
Along the left-hand side of the dialog, check boxes and radio buttons are grouped according
to the files they control: group-of-eight files, accessor or mutator helper files, and constructor helper
files. Check boxes and radio buttons exert generation control over individual group-of-eight files,
and they exert control over all files in each group of helper functions. The radio buttons are more
important than the check boxes because they control what happens to files that already exist. There
are three choices:
Overwrite
: When the file already exists, the original file is deleted and the new file is
written in its place. When this happens, there is no way to recover the contents of the
original file. Do not choose this option for files with tailored changes because the
changes will be lost when the file is regenerated. Code in the group of eight should not
normally require tailoring. Thus, the normal radio selection for the group-of-eight files is
FIGURE 17.3
Class Wizard, main dialog.
C911X_C017.fm Page 228 Friday, March 2, 2007 8:50 AM
Class Wizard
229
Overwrite
. Helper functions always require tailoring. Thus, the normal radio selection
for both groups of helpers is
New
.
Backup
: When the file already exists, the original file is renamed before the new file is
written. The backup name includes the original filename along with a condensed version
of the current date and time. Multiple backup copies for a particular file can coexist in a
directory because the date and time for each will be different. This option is not usually
selected unless new calling arguments or header information needs to be generated for a
tailored function. After the new function template is generated, tailored code from the
backup copy must be manually cut and inserted in the new file.
New
: When this radio button is selected, only new files will be created. If a file already
exists, Class Wizard does not regenerate the file but rather leaves the existing file alone.
Under normal conditions, this is the best option to choose for files outside the group of
eight.
By default,
Overwrite
is the selected action for group-of-eight functions and
New
is selected
for all other files. These default values are the best selections for most situations. Group-of-eight
functions are organized so that hand tailoring is almost never required. Allowing Class Wizard to
overwrite these files keeps the interface in synch with the data enters through the GUI. All other
files are usually a target for extensive tailoring. Selecting
New
for these files prevents them from
being overwritten.
When a check box is checked, Class Wizard will attempt to create the file. Whether the file is
saved to disk depends on the radio state. When a check box is unchecked, Class Wizard will skip
file creation. Each group-of-eight file has its own check box, and by default, each box is checked.
For normal operation, leave the box checked. Accessor and mutator helper functions and constructor
helper functions also have check boxes. The default value is checked. Presently, there is no way
to control the creation of individual helpers except through the radio buttons. For normal operation,
leave the boxes checked.
Additional data-entry screens are accessed through various buttons or through menu selections.
Buttons are arranged with a summary view of the data they control. There are buttons for additional
header information
Header Info …
, parent-class definition
Parents …
, private member
variables
Private Variables …
, concealed member variables
Concealed Variables
…
, public member variables
Public Variables …
, and constructor helper functions
Con-
structors …
. The
More …
button displays another dialog with even more class fields. The
Build Class Files
button runs the class-generation code. Descriptions of the data-entry
dialogs associated with these buttons are included in the following sections.
17.2.1.1 Header Information Dialog
Clicking the
Header Info …
button on the main screen opens the header-input dialog box
shown in Figure 17.4. The header-info dialog contains fields that are written into the header of
every automatically generated member function. Input fields left blank are ignored and do not
create a blank line in the header. For a new class, the first time you open the header-info dialog,
all the fields will be empty. After entering data in individual fields, the values can be saved to a
separate file. A menu selection allows you to recall the standard values for the next class. This way,
you can avoid repeatedly typing the same information.
The menu item
DefaultHeaderInfo
has two options:
Load <ctrl-L>
and
Save
<ctrl-S>
. Selecting
DefaultHeaderInfo::Save
will save the field contents in the file
default_header.mat
. This file is always located in the same directory where Class Wizard
is stored. There is not a filename option and there are no overwrite warnings. Selecting
Default-
HeaderInfo::Load will read the previously saved values.
C911X_C017.fm Page 229 Friday, March 2, 2007 8:50 AM
230 A Guide to MATLAB Object-Oriented Programming
For the most part, these fields are self-explanatory. If you enter values shown in Figure 17.4
and generate class files, all file headers will contain the values. For example, the header from
subsref.m is shown in Code Listing 104. In line 1, we find the generated function call. The
arguments are always consistent with data in class definition. Line 2 includes the class name,
function name, and text entered into the HeaderInfo::H1 Line textbox. The class name
and function name are still included in the header even if HeaderInfo::H1 Line is blank.
Line 3 includes the string from the Classification field. The Classification string
is also appended as the last line in each file. Line 5 repeats the function declaration as comment.
When help displays the header information, the function declaration is an important part of that
display. MATLAB does not automatically include the declaration, so Class Wizard writes it in
as a comment. Lines 7–8 contain the comment specified in the Common Header Comments
field. As this comment says, it is repeated in the header of every file. Lines 10–12 are unique to
subsref. Other files will contain different comments tailored for their contents. Since sub-
sref deals with public variables, a listing of the public member variables is included. Lines
14–21 include the Author Info data, including the contents of the author notes. Line
22 comes from the Revision Control Line field. Finally, line 23 reminds you of the
amount of tedious work saved by using Class Wizard. Sometimes, it is nice to know the tool
version and the generation date.
FIGURE 17.4 Class Wizard, Header Info … dialog.
Code Listing 104, Header Comments Generated by Class Wizard
1 function varargout = subsref(this, index)
2 %SUBSREF for class cExample, Global H1 Line
3 % UNCLASSIFIED
4%
C911X_C017.fm Page 230 Friday, March 2, 2007 8:50 AM
Class Wizard 231
17.2.1.2 Parents … Dialog
Clicking the Parents … button brings up the dialog shown in Figure 17.5. The dialog shown in
the figure contains entries for one parent class. For a new class, the fields in this dialog would be
empty except for a leading c in the Parent Class Name field. Like most of the tool’s dialogs,
the parent dialog is organized into three sections: input fields, action buttons, and a display. In the
top of the dialog, data are entered in the various text fields. In the middle, buttons are used to save
data, delete a line, or go back to the previous dialog. At the bottom, input data are displayed using
the same format written into the member functions.
For the parent dialog box, two data-entry fields are described by the following:
Parent Class Name: holds the name of a class that will serve as a parent. The dialog
accepts more than one parent name, but each name-varargin pair is added separately.
varargin: holds a comma separated list of input arguments. Enter the comma-separated
list exactly as it should appear in a call to the constructor. The values in the input list can
be values, variable names, or function calls. A somewhat complicated example is shown
in Figure 17.5. This is the same constructor value previously used to initialize corner
points for cStar objects.
Clicking the Save Change button will commit the changes and display a function call to
the parent-class constructor. The display shows the constructor call made during default construction
of the child. The parent-constructor call doesn’t make its way into generated code exactly as
displayed, but functionally the result is the same. During file generation, data from these fields are
written into the parent_list function. Parent-class names are formatted as a cellstr and
5 % function varargout = subsref(this, index)
6%
7 % A global comment that applies to all files of the example
class. This
8 % comment is included in every automatically generated file
for the class.
9%
10 % Public Member Variables
11 % Size: double (2x1): The horiz (1,1) and vert (2,1) size
of the
12 % shape's bounding box
13 %
14 % Author Info
15 % The ABC Corporation
16 % John Doe
17 %
18 % (800) 222-1212
19 % Refactored interface 3/17/2005 Jane Doe
20 % [AHR] Added new fields 5/2/05
21 % (c) 2005
22 % RCS Info: ($Date: $) ($Author: $) ($Revision: $)
23 % A Class Wizard v.3 assembled file generated: 20-Dec-2005
13:23:23
C911X_C017.fm Page 231 Friday, March 2, 2007 8:50 AM
232 A Guide to MATLAB Object-Oriented Programming
their corresponding input arguments are formatted into a cell array. The format of the resulting
code is identical to a hand-coded parent_list.
The Save Change button and two additional buttons located between the data-entry fields
and the display list box cooperate to allow you to manage parent data. If parent lines already exist
in the display list box, you can click on a line and it will become active. The line is highlighted
and data from the line are copied into the data-entry fields. At this point, field values can be changed;
however, those changes are not automatically reflected in the definition. The change must be
committed by clicking the Save Change button. If you click anything other than Save Change,
all changes to the line will be lost. This includes clicking another line or another button. You can
also delete a parent by selecting the parent in the lower display and clicking the Delete button.
Establish a new parent-class dependency by selecting the first blank line in the lower display.
If the list box is empty, point and click where the first line would normally appear. When you select
an empty line, the parent name field will contain a c to remind you of the suggested convention.
When you are finished entering data for the new parent, clicking Save Change will commit the
new data and insert another blank line.
When you finish modifying the object’s parent data, click the Done button. This will save
your changes and return you to the main dialog. Parent-class names are shown in the list box
adjacent to the Parents … button. The names provide a quick summary. In the main dialog
view, they are not active. You have to open the parent-class dialog to make any changes or see
more detail.
17.2.1.3 Private Variable … Dialog
Clicking the Private Variables … button brings up the dialog shown in Figure 17.6. The
dialog shown in the figure contains an entry for one variable. Like most of the tool’s dialogs, the
private-variable dialog is organized into three sections: input fields, action buttons, and a display.
In Figure 17.6, the input fields contain values because a variable name in the display is selected.
Selecting a blank line will insert an m in Private Variable Name, and the other fields will
be blank. A leading m is the suggested convention for naming private member variables. The naming
FIGURE 17.5 Class Wizard, Parents … dialog.
C911X_C017.fm Page 232 Friday, March 2, 2007 8:50 AM
Class Wizard 233
convention is optional, and any legal variable name except mDisplayFunc can be entered in the
field. The variable name mDisplayFunc is reserved for Class Wizard’s use, and Class Wizard
will include it in class code when necessary.
The three data-entry fields in the private variable dialog are described by the following:
Private Variable Name: holds the name of a private member variable. Private
variables are added one at a time.
Initial Value: holds the default value that will be assigned to the variable by the
constructor. The field value is entered using the exact syntax required in the assignment.
The display list box formats the input exactly as it will be written into ctor_ini.m.
What you see in the display list box is exactly what you get in ctor_ini.m. Virtually
any legal syntax can be used.
Comment: holds a text description of the variable. The text description is important because
it will show up in the header of ctor_ini.m, where it will serve as a future reference
for developers.
The three buttons, Save Change, Delete, and Done, are the same three buttons used in
the parent-class dialog. Refer to §17.2.1.2 for a description of their behavior. When you finish
modifying the object’s parent data, click the Done button. This will save your changes and return
you to the main dialog. Private member variable names are shown in the list box adjacent to the
Private Variables … button. The names provide a quick summary, and in the main dialog
view they are not active. You have to open the private variable dialog to make changes or see more
detail.
FIGURE 17.6 Class Wizard, Private Variables … dialog.
C911X_C017.fm Page 233 Friday, March 2, 2007 8:50 AM