CRC.Press A Guide to MATLAB Object Oriented Programming May.2007 Episode 2 Part 4 ppsx
Bạn đang xem bản rút gọn của tài liệu. Xem và tải ngay bản đầy đủ của tài liệu tại đây (1.42 MB, 20 trang )
234 A Guide to MATLAB Object-Oriented Programming
17.2.1.4 Concealed Variables … Dialog
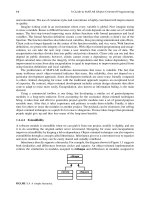
Clicking the Concealed Variables … button brings up the dialog shown in Figure 17.7.
The dialog shown in the figure contains an entry for one variable. Like most of the tool’s dialogs,
the concealed variable dialog is organized into three sections: input fields, action buttons, and a
display. In Figure 17.7, the input fields contain values because a variable name in the display is
selected. Selecting a blank line will empty all values in the input fields. Even the name field will
be empty because there is no suggested naming convention. Any legal variable name except
mDisplayFunc can be entered in the field. The variable name mDisplayFunc is reserved for
Class Wizard’s use, and Class Wizard will include it in class code when necessary.
The five data-entry fields in the concealed variable dialog are described by the following:
Concealed Variable Name: holds the name of a concealed member variable.
Concealed variables are added one at a time.
Type: holds a string that describes the variable’s type. In response to get(obj) or
set(obj), concealed variables are not displayed; however, the type string is included
in the header comments of several files, get and set for example.
Accessor Expression: holds the expression used for accessing the variable. The
contents of this field are limited to two special cases: the exact name of a private member
variable or the keyword %helper. When the name of a private member variable is used,
direct-link accessor code is included in get.m. This option also allows clients to
specify additional indices beyond the first dot-reference. The %helper keyword causes
FIGURE 17.7 Class Wizard, Concealed Variables … dialog.
C911X_C017.fm Page 234 Friday, March 2, 2007 8:50 AM
Class Wizard 235
helper-function syntax (non-direct-link) to be used inside get.m. The %helper keyword
also triggers the generation of a helper-function stub. The stub contains a complete header
along with some initial code and comments. Accessing a concealed variable with a default
helper will not cause an error, but the return value will be empty until the helper is
customized.
Mutator Expression: holds the expression used for assigning values into the variable.
Like the accessor, the contents of this field are limited to two special cases: the exact name
of a private member variable or the keyword %helper. When the name of a private
member variable is used, direct-link mutator code is included in set.m. This option also
allows clients to specify additional indices beyond the first dot-reference. The %helper
keyword causes helper-function syntax to be used inside set.m. The %helper keyword
also triggers the generation of a helper-function stub. The stub contains a complete header
along with some initial code and comments. Mutating a concealed variable with a default
helper will not cause an error, but values in the object will not be modified until the helper
is customized.
Comment: holds a text description of the variable. The text description is important because
it will show up along with the variable name and variable type in various header comments,
where it will serve as a reference to other developers.
In this case, the display list box does not provide a what-you-see-is-what-you-get (WYSIWYG)
format. WYSIWYG is not possible because each name links to multiple files in the group-of-eight
and each file uses the name differently. Instead of WYSIWYG, the display box shows individual
fields separated by double colons. This achieves the goal of providing a good one-line overview
without the complications involved in writing the exact syntax.
The three buttons, Save Change, Delete, and Done, are the same three buttons used in
the parent-class dialog. Refer to §17.2.1.2 for a description of their behavior. When you finish
modifying the object’s concealed data, click the Done button. This will save your changes and
return you to the main dialog. Concealed-variable names are shown in the list box adjacent to the
Concealed Variables … button. The names provide a quick summary, and in the main
dialog view they are not active. You have to open the concealed variable dialog to make changes
or see more detail.
17.2.1.5 Public Variables … Dialog
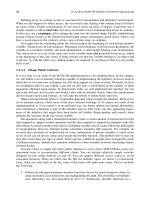
Clicking the Public Variables … button brings up the dialog shown in Figure 17.8. The
dialog shown in the figure contains an entry for one variable. Like most of the tool’s dialogs, the
public variable dialog is organized into three sections: input fields, action buttons, and a display.
In Figure 17.8, the input fields contain values because a variable name in the display is selected.
Selecting a blank line will empty all values in the input fields. Even the name field will be empty
because there is no suggested naming convention. Any legal variable name can be entered in the
name field.
The fields in this dialog are identical to those for concealed variables because in reality the
only difference is the simplified syntax used to access public variables. Public variables can be
accessed or mutated using the dot-reference operator via subsref and subsasgn, while access
to concealed-variables is limited to get and set. In the code, public variables are written into
the public section of get and set while concealed variables are written into the concealed section.
Beyond that, there is little difference between public and concealed. The five data-entry fields in
the public variable dialog are as follows:
C911X_C017.fm Page 235 Friday, March 2, 2007 8:50 AM
236 A Guide to MATLAB Object-Oriented Programming
Public Variable Name: holds the name of a public member variable. Public variables
are added one at a time.
Type: holds a string that describes the variable’s type. This string is displayed along with
the variable name when get(obj) or set(obj) is used to display member variable
hints. The type string also shows up in the header comments of various files, get and
set for example.
Accessor Expression: holds the expression used for accessing the variable. The
contents of this field are limited to two special cases: the exact name of a private member
variable or the keyword %helper. When the name of a private member variable is used,
direct-link accessor code is used inside get.m. This option also allows clients to specify
additional indices beyond the first dot-reference. The %helper keyword causes helper-
function syntax (non-direct-link) to be used inside get.m. The %helper keyword also
triggers the generation of a helper-function stub. The stub contains a complete header
along with some initial code and comments. Accessing a public variable with a default
helper will not cause an error, but the return value will be empty until the helper is
customized.
Mutator Expression: holds the expression used for assigning values into the variable.
Like the accessor, the contents of this field are limited to two special cases: the exact name
of a private member variable or the keyword %helper. When the name of a private
member variable is used, direct-link mutator code is used inside set.m. This option also
allows clients to specify additional indices beyond the first dot-reference. The %helper
keyword causes helper-function syntax to be used inside set.m. The %helper keyword
also triggers the generation of a helper-function stub. The stub contains a complete header
FIGURE 17.8 Class Wizard, Public Variables … dialog.
C911X_C017.fm Page 236 Friday, March 2, 2007 8:50 AM
Class Wizard 237
along with some initial code and comments. Mutating a public variable with a default
helper will not cause an error, but values in the object will not be modified until the helper
is customized.
Comment: holds a text description of the variable. The text description is important because
it will show up along with the variable name and variable type in various header comments,
where it will serve as a reference to other developers.
In this case, the display list box does not provide a what-you-see-is-what-you-get (WYSIWYG)
format. WYSIWYG is not possible because each name links to multiple files in the group of eight
and each file uses the name differently. Instead of WYSIWYG, the display box shows individual
fields separated by double colons. This achieves the goal of providing a good one-line overview
without the complications involved in writing the exact syntax.
The three buttons, Save Change, Delete, and Done, are the same three buttons used in
the parent-class dialog. Refer to §17.2.1.2 for a description of their behavior. When you finish
modifying the object’s public data, click the Done button. This will save your changes and return
you to the main dialog. Public variable names are shown in the list box adjacent to the Public
Variables … button. The names provide a quick summary, and in the main dialog view they
are not active. You have to open the public variable dialog to make changes or see more detail.
17.2.1.6 Constructors … Dialog
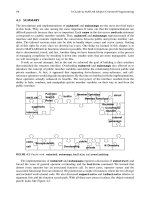
Clicking the Constructors … button brings up the dialog shown in Figure 17.9. The dialog
shown in the figure contains an entry for one constructor in addition to the default. Like most of
the tool’s dialogs, the constructor dialog is organized into three sections: input fields, action buttons,
and a display. In Figure 17.9, the lone input field contains a value because a constructor name in
the display is selected. Selecting a blank line will empty this field.
FIGURE 17.9 Class Wizard, Constructors … dialog.
C911X_C017.fm Page 237 Friday, March 2, 2007 8:50 AM
238 A Guide to MATLAB Object-Oriented Programming
In the selected case, the constructor-helper function will be named ctor_1 because there is
one input argument. This is consistent with the constructor-helper naming convention previously
discussed. Inputs are specified using the comma-separated list, and Class Wizard generates a stub
for the helper.
The single data-entry field in the constructor dialog is described by the following:
Input Argument List: holds a comma-separated list of input arguments for each
constructor-helper function. The variable name this should never be included in the
input argument list. When files are generated, helper-function names are set according to
the number of variables in each comma-separated list. The function prototype for each
helper includes this along with the names in the comma-separated list. Functional stubs
for each constructor helper are written into the class’ private directory. The default stub
does not know how to use the input arguments, so you must tailor each helper according
to the specific application. Variables from each comma-separated list are added to the data
dictionary. Comments can be associated with each dictionary name using the main dialog’s
Data menu item.
The display list box provides a WYSIWYG format for the function definition of each helper. In
this case displayed in Figure 17.9, the function name is ctor_1 because the constructor is meant
for the case when an object is constructed from one input. The function prototype for ctor_1
actually contains two inputs: this and the variable from the Input Argument List field.
The object itself is passed in and out of the constructor because the whole purpose is to populate
the object with values other than default. The constructor helper can modify the value’s existing
private variables but cannot add new fields. This helps protect the integrity of the objects.
The three buttons, Save Change, Delete, and Done, are the same three buttons used in
the parent-class dialog. Refer to §17.2.1.2 for a description of their behavior. When you finish
modifying the object’s public data, click the Done button. This will save your changes and return
you to the main dialog. Helper names are shown in the list box adjacent to the Constructors
… button. The names provide a quick summary, and in the main dialog view they are not active.
You have to open the constructor dialog to make changes or see more detail.
17.2.1.7 More … Dialog
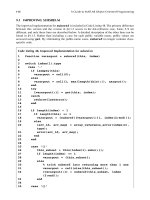
Clicking the More … button brings up the dialog shown in Figure 17.10. This dialog provides
access to a group of data-entry dialogs for additional class features. Most of these features involve
Part 3 topics; however, Private Functions … and Public Functions … are immediately
useful. With these buttons, you can enter data for class-specific public and private functions. Dialogs
are activated by respectively clicking the buttons Public Functions … and
Private Functions …. Unlike functions in the group of eight, Class Wizard does not know
how to configure code for general public and private functions. Instead, Class Wizard resorts to the
same strategy used for helper functions and generates a function stub. The function stub will contain
a consistently formatted function call and a header that includes detailed function comments. These
comments draw from the data dictionary to include information for input–output variables. As a
result, the generated member functions usually have more detailed comments compared to those
that are not automatically generated. The stub also includes enough code to allow the function to
execute, albeit at a greatly reduced level of function.
The other buttons in the dialog represent class features that are less common but no less useful
under the right circumstances. At first, the number of buttons is daunting; however, the layouts of
the underlying dialogs are very similar if not identical to those we have already discussed. Entering
data follows the same procedure. The data end up in slightly different locations. You already know
the most important locations, and the next section discusses a few more elements.
C911X_C017.fm Page 238 Friday, March 2, 2007 8:50 AM
Class Wizard 239
17.2.1.8 Static Variables … Dialog
Clicking the Static Variables … button brings up the dialog shown in Figure 17.11. The
dialog shown in the figure contains an entry for one variable. Like most of the tool’s dialogs, the
static variable dialog is organized into three sections: input fields, action buttons, and a display. In
Figure 17.11 the input fields contain values because a variable name in the display is selected.
Selecting a blank line will insert an m in Static Variable Name, and the other fields will
be blank. A leading m shows up by default because a static variable is a special kind of private
variable. The difference between static and private is scope. With a private variable, every object
gets its own copy; but with a static variable, every object of the class shares one copy. If one object
sets the value, that value shows up in all objects of the class.
When static variables are defined, the private helper function static.m is used to manage
them. The interface to static.m is very similar to the interface defined for accessor–mutator
helpers. The details are described in Chapter 20.
The three data-entry fields in the static variable dialog are described by the following:
Static Variable Name: holds the name of a static member variable. Static variables
are added one at a time.
Initial Value: holds the default value that will be assigned to the variable by the
constructor. The field value is entered using the exact syntax required in the assignment.
The display list box formats the input exactly as it will be written into ctor_ini.m.
What you see in the display list box is exactly what you get in ctor_ini.m. Virtually
any legal syntax can be used.
Comment: holds a text description of the variable. The text description is important because
it will show up in the header of ctor_ini.m, where it will serve as a future reference
for developers.
The three buttons, Save Change, Delete, and Done, are the same three buttons used in
the parent-class dialog. Refer to §17.2.1.2 for a description of their behavior. When you finish
modifying the object’s parent data, click the Done button. This will save your changes and return
you to the more dialog. Static member variable names are shown in the list box adjacent to the
Static Variables … button. The names provide a quick summary, and in the more dialog
FIGURE 17.10 Class Wizard, More … dialog.
C911X_C017.fm Page 239 Friday, March 2, 2007 8:50 AM
240 A Guide to MATLAB Object-Oriented Programming
view they are not active. You have to open the static variable dialog to make changes or see more
detail.
17.2.1.9 Private Functions … Dialog
Clicking the Private Functions … button brings up the dialog shown in Figure 17.12. The
dialog shown in the figure contains an entry for one function. Like most of the tool’s dialogs, the
private-function dialog is organized into three sections: input fields, action buttons, and a display.
In Figure 17.12, the input fields contain values because a function name in the display is selected.
Selecting a blank line will empty all values in the input fields. Even the name field will be empty
because there is no suggested naming convention. Any legal function name can be entered in the
name field.
In reality, constructor helpers, accessor–mutator helpers, and parent_list.m are private
functions; however, these are part of the group-of-eight interface and are managed separately from
class-specific private functions. Only class-specific private functions show up in this list.
Private functions, like most functions, can be described by a function name, a list of input
arguments, a list of output arguments, and a comment. The data-entry fields for these four function
elements are described by the following:
Function Name: holds the desired name for the function. Any valid function name can
be used.
Input Argument List: holds a comma-separated list of input arguments for the
function. If a copy of the object must be passed, this must be included in the argument
list. By convention, when it exists, this should usually be the first argument in the list.
In addition, notice there is no way to enter comments for individual arguments. Instead,
variable names are added to the data dictionary using the Data menu on the main screen.
FIGURE 17.11 Class Wizard, Static Variables … dialog.
C911X_C017.fm Page 240 Friday, March 2, 2007 8:50 AM
Class Wizard 241
Output Argument List: holds a comma-separated list of output arguments for the
function. If a copy of the object is passed, this must be included in the argument list.
By convention, when it exists, this should usually be the first argument in the argument
list. As with variables in the input argument list, output variable names are added to the
data dictionary.
Comment: holds a text description of the function. The text description will be added to
the header comments when the function is generated.
Clicking the Save Change button commits the changes and displays the function prototype in
WYSIWYG format. During file generation, Class Wizard writes the same function prototype into
the private function and follows the prototype with header comments. Of course, Class Wizard
doesn’t know how to write the real function body, but it can write a body that runs without error.
The body of the private function must be manually modified to include the desired class-specific
functionality.
The three buttons, Save Change, Delete, and Done, are the same three buttons used in
the parent-class dialog. Refer to §17.2.1.2 for a description of their behavior. When you finish
modifying the object’s private-function data, click the Done button. This will save your changes
and return you to the more dialog. Private-function names are shown in the list box adjacent to the
Private Functions … button. The names provide a quick summary, and in the more dialog
view they are not active. You have to open the private-function dialog to make changes or see more
detail.
FIGURE 17.12 Class Wizard, Private Function … dialog.
C911X_C017.fm Page 241 Friday, March 2, 2007 8:50 AM
242 A Guide to MATLAB Object-Oriented Programming
17.2.1.10 Public Functions … Dialog
Clicking the Public Functions … button brings up the dialog shown in Figure 17.13. The
dialog shown in the figure contains an entry for one function. Like most of the tool’s dialogs, the
public-function dialog is organized into three sections: input fields, action buttons, and a display.
In Figure 17.13, the input fields contain values because a function name in the display is selected.
Selecting a blank line will empty all values in the input fields. Even the name field will be empty
because there is no suggested naming convention. Any legal function name can be entered in the
name field.
In reality, standard group-of-eight functions are public functions; however, group-of-eight
functions are managed separately from class-specific public functions. Only class-specific public
functions show up in this list.
Public functions, like most functions, can be described by a function name, a list of input
arguments, a list of output arguments, and a comment. The data-entry fields for these four function
elements are described by the following:
Function Name: holds the desired name for the function. Any valid function name can
be used.
Input Argument List: holds a comma-separated list of input arguments for the
function. If a copy of the object must be passed, this must be included in the argument
FIGURE 17.13 Class Wizard, Public Function … dialog.
C911X_C017.fm Page 242 Friday, March 2, 2007 8:50 AM
Class Wizard 243
list. By convention, when it exists, this should usually be the first argument in the list.
In addition, notice there is no way to enter comments for individual arguments. Instead,
variable names are added to the data dictionary using the Data menu on the main screen.
Output Argument List: holds a comma-separated list of output arguments for the
function. If a copy of the object is passed, this must be included in the argument list.
By convention, when it exists, this should usually be the first argument in the argument
list. As with variables in the input argument list, output variable names are added to the
data dictionary.
Comment: holds a text description of the function. The text description will be added to
the header comments when the function is generated.
Clicking the Save Change button commits the changes and displays the function prototype in
WYSIWYG format. During file generation, Class Wizard writes the same function prototype into
the private function and follows the prototype with header comments. Of course, Class Wizard
doesn’t know how to write the real function body, but it can write a body that runs without error.
The body of the private function must be manually modified to include the desired class-specific
functionality.
The three buttons, Save Change, Delete, and Done, are the same three buttons used in
the parent-class dialog. Refer to §17.2.1.2 for a description of their behavior. When you finish
modifying the object’s public-function data, click the Done button. This will save your changes
and return you to the more dialog. Public-function names are shown in the list box adjacent to the
Public Functions … button. The names provide a quick summary, and in the more dialog
view they are not active. You have to open the public-function dialog to make changes or see more
detail.
17.2.1.11 File Menu
The main Class Wizard dialog has two menu items: File and Data. The File menu allows you
to create a New class definition, Open … an existing definition, Save the current definition, or
Save as … to save the current definition using a different file name. These menu items behave
the same as any application that opens and saves files. Their behaviors are described as follows:
File::New: Select this item to begin a new class definition. The hot-key sequence is
ctrl-N. All fields are reset to default initial values, usually empty. Currently, using
File::New does not check for changes to the currently loaded values before loading a
new file. You will not be warned to save your changes.
File::Open : Selecting this item allows you to open an existing file using the
standard fi
le-open dialog box. The hot-key combination is ctrl-O. This familiar dialog
is shown in Figure 17.14. The file format for definition files is .mat. This format is
convenient because it allows you to load the definition file directly in MATLAB and tweak
the data in ways not available through Class Wizard.
File::Save: Selecting this item saves the current class definition file to the current file
name. The hot-key sequence is ctrl-S. If there is no current filename, you will be
prompted to enter one.
File::Save As : Selecting this item opens a standard dialog box for specifying
the file name during a save. The hot-key sequence is ctrl-A. The familiar dialog is shown
in Figure 17.15. The definition file can be stored anywhere; however, the best location is
in the class directory. When class functions are generated, the definition file is automatically
saved in the same directory as the functions.
C911X_C017.fm Page 243 Friday, March 2, 2007 8:50 AM
244 A Guide to MATLAB Object-Oriented Programming
17.2.1.12 Data Menu
In most class definitions, the same variable names are used in several functions. Rather than commenting
these variables in several places, a data dictionary approach collects the variables into a central location.
That way, comments only need to be entered once; and from there, Class Wizard can perform the
tedious task of repeating the comments into each header. The Data menu is used to enter type and
comment information for the function arguments defined for constructor helper functions, public
functions, and private functions. The information entered through Data::Dictionary are
written into header comments when the file is generated. The Data::Dictionary dialog is
shown in Figure 17.16.
Like most of the tool’s dialogs, the data dictionary dialog is organized into three sections: input
fields, action buttons, and a display. In Figure 17.16, the input fields contain values because a
variable name in the display is selected. The Variable Name field is grayed out because the
name of the variable cannot be changed. This also means that new names can’t be added to the
definition via the dictionary. Names can only be added by defining a new name in a function call.
Data in the other fields can be modified to reflect the appropriate descriptions. The three data fields
in the data dictionary variable dialog are described by the following:
FIGURE 17.14 Class Wizard, standard File::Open … dialog.
FIGURE 17.15 Class Wizard, standard File::Save As … dialog.
C911X_C017.fm Page 244 Friday, March 2, 2007 8:50 AM
Class Wizard 245
Variable Name: displays the name of the variable. This name can’t be changed because
it is linked to the definition of one or more member functions.
Variable Type(s): holds a comma-separated list of types expected. Any descriptive
text can be entered in this field. The text is not used to generate code, but rather it is used
to comment on the variable in the header of every function where it is used. The field is
intended to be a description of the allowed types.
Comment: holds a string description pertaining to the variable. This comment is copied
into the header comments for each function that uses the variable in its input argument list.
The three buttons, Save Change, Delete, and Done, are the same three buttons used in
the parent-class dialog. Refer to §17.2.1.2 for a description of their behavior. When you finish
modifying the object’s parent data, click the Done button. This will save your changes and return
you to the main dialog.
17.2.1.13 Build Class Files Button
After entering class data, class files are generated by clicking the Build Class Files button.
This button first displays the standard dialog that allows you to select the directory where the files
should be written. The dialog includes a button that allows you to create a new class directory.
Don’t forget to include @ in the directory name. An example view of the dialog is shown in Figure
17.17.
Selecting a directory and clicking OK allows Class Wizard to generate the collection of
class files. In addition to generating class functions, the class definition file is also saved in the
selected directory in mat-file format. The group-of-eight files are completely functional, and
FIGURE 17.16 Class Wizard, Data File::Dictionary … dialog.
C911X_C017.fm Page 245 Friday, March 2, 2007 8:50 AM
246 A Guide to MATLAB Object-Oriented Programming
class-specific member functions exist as simple function stubs. If new public or private member
variables need to be added, it is a simple process to reload the definition file, add the new variables,
and rebuild the files. The class organization and default wizard settings make this possible.
17.3 SUMMARY
For building a robust MATLAB class, Class Wizard has no equal. The various dialog screens are
organized along the same divisions used to describe an object-oriented design. This makes data
entry much less of a chore. Once the design data are entered, Class Wizard builds a full imple-
mentation of the group of eight and takes care of some of the more mundane details. In short, Class
Wizard allows you to focus on the design and on the application-specific aspects of the class.
There are several ways that Class Wizard can be used in a development environment. The least
effective way is to use Class Wizard to generate an initial set of class functions and then never use
it again. I don’t recommend this approach because it is very difficult to keep all of the various files
in synch. The file dependency graph in Figure 17.2 is too complicated. Some changes seem easy,
but eventually, something will be omitted or updated incorrectly. It is easy and much safer to let
Class Wizard manage changes to the group of eight.
One viable approach is to enter only parent, constructor, and variable information into Class
Wizard. This allows Class Wizard to manage changes to group-of-eight functions while you manage
private and public member functions outside of the group of eight. You lose the advantage of
uniform headers and variable descriptions, but that might be an acceptable trade-off in some
development environments. For a well-documented class, these data will still need to be entered;
however, they do not have to be entered through Class Wizard fields. Keeping default check box
and radio button selections and never entering data for private and public member variables enable
this approach.
The third approach extends definition data to include names and arguments for public and
private functions. Comments associated with arguments should also be documented in the data
dictionary. The first time a class-specific function is generated, the header will include a complete
set of comments. After that, selecting new will prevent the file from being overwritten. It would
be nice to be able to regenerate header comments yet leave the files code intact. That way the
definition would always be consistent with the Class Wizard–generated section of each file. That
FIGURE 17.17 Class Wizard, Build Class Files dialog.
C911X_C017.fm Page 246 Friday, March 2, 2007 8:50 AM
Class Wizard 247
capability does not currently exist, but there are plans for future upgrades that will fill this and
other known deficiencies.
In this chapter, we focused on the mechanics of entering data into Class Wizard. There are
some idiosyncrasies due to Guide, but overall the GUI interface makes it much easier to enter data
and keep the design organized. Data contained in individual dialogs mirror the implementation
model discussed throughout the first two sections of this book. The functions generated from data
entered through these dialogs also mirror the code developed in the first two sections. In the next
chapter, we will redevelop the complete cShape example using Class Wizard. Differences in
development time and coding accuracy will be very apparent.
17.4 INDEPENDENT INVESTIGATIONS
1. Open Class Wizard (the command is class_wizard) and enter a few variables and
functions.
2. Practice saving and loading definition files. You can use the .mat files for Chapter 18
and get a preview of the next chapter.
3. Navigate into the Header Info dialog box and enter your pertinent information. Use the
Default Header Info menu to save the data for future reference.
4. After entering some data, select Build Class Files and follow the process. After
building the files, inspect a few of them and note their close similarity to the standard
idioms.
C911X_C017.fm Page 247 Friday, March 2, 2007 8:50 AM
C911X_C017.fm Page 248 Friday, March 2, 2007 8:50 AM
249
18
Class Wizard Versions of the
Shape Hierarchy
In Chapter 17, we covered Class Wizard’s various input dialogs along with their general operation.
In this chapter, we demonstrate the complete Class Wizard process of developing a collection of
classes. To do this, we will recreate our now familiar collection of classes that includes
cLine-
Style
,
cShape
,
cStar
, and
cDiamond
. Creating a collection of familiar classes is important
because it allows us to spot logical errors. It also allows us to compare automatically generated
files with the handcrafted versions. The collection also includes a rich hierarchy with both par-
ent–child inheritance and composition. This is important because the hierarchy exercises most of
the available options.
The primary activity in this chapter involves entering data into the various Class Wizard dialog
screens. As data are entered, the lower-list box in each dialog shows a line-by-line summary of the
data. To assist you in data entry, a screen shot of each completed dialog is included. That way, all
variables and functions are provided as you will see them displayed on your screen. The syntax of
each line in the lower-list box is easy, and converting from the display to individual fields quickly
becomes obvious. If the translation isn’t clear, you can always refer back to Chapter 17. In addition,
a shorthand table description of the data in each field is provided.
The first step is of course entering data. The second step allows Class Wizard to generate class
files. At this point, group-of-eight functions are fully functional. Objects can be created and
displayed, and direct-link public variables can be accessed and mutated. Even so, this is not the
final step. Some files will require postgeneration tailoring. The list of files includes most of the
public and private functions that give each class their unique behavior. Enter the names and
arguments for these functions, and Class Wizard will give you a head start by generating the initial
version. The initial version contains full header comments but not much more. For example, a
description for
draw
can be included in the
Public Functions
dialog, but until it is tailored,
calling
draw
will not do anything. The implementation isn’t complete until code for the application-
specific member functions has been added. The example code for this chapter includes a copy of
the as-generated files in a directory separate from the full solution.
18.1 CLINESTYLE CLASS WIZARD DEFINITION DATA
Begin by running the graphical interface for Class Wizard. To do this, the directory
/utils/wizard_gui
must be on or added to the MATLAB path. You can add the path in one
of three ways:
cd
into the directory, use an
addpath
command, or use MATLAB’s
File::Set
Path
menu item. After adding the directory, the command to run Class Wizard is simply
>> class_wizard
The current version accepts no input arguments. The
class_wizard
command opens the main
Class Wizard dialog with empty fields and default options. You must now fill in fields that describe
your particular class definition. After doing this for
cLineStyle
, the main dialog will look like
Figure 18.1. The full definition file can be found in
chapter_17/@cLineStyle/cLine-
Style.mat
. You can follow along and enter data, but if data entry becomes too tedious, you can
load the full
.mat
file at any time. Similarly, the definition files for the other classes are located
in their respective class directories. As with the other chapters, the class directories under chapter_17
C911X_C018.fm Page 249 Friday, March 2, 2007 9:06 AM
250
A Guide to MATLAB Object-Oriented Programming
are fully functional. Since these directories become fully functional only after tailoring, a copy of
the fi les prior to tailoring can be found in the class directories under
chapter_17/as_generated
.
Open a new session of Class Wizard and type in
cLineStyle
as the class name. Leave the
other fields on the main dialog blank or filled with their default values. This gives Class Wizard
control over the group of eight (
Overwrite
) and allows Class Wizard to generate other files only
when the definition data are new (
New
). The remaining definition data are entered into each
corresponding dialog. Dialog order doesn’t matter, and each dialog can be opened and changed
any number of times. In the text that follows, a separate subsection is devoted to each dialog.
18.1.1
C
L
INE
S
TYLE
H
EADER
I
NFO
A good place to begin is the header info dialog. Click the
Header Info …
button and enter
the data shown in the various fields of Figure 18.2. Of course, you can replace the example text
with your own name, company information, and so on. After entering all header information, save
the fields for future use. Before clicking
Okay
, select the menu item Default Header Info::Save.
There are no prompts; however, the fields contained in the dialog are now stored in the file
default_header.mat
located in the same directory as
class_wizard.m
. For a new class,
you can recall the fields by opening the
header info
dialog and selecting
Default Header
Info::Load
.
Dialog names associated with each field are merely a suggestion because Class Wizard doesn’t
inspect the values. All fields use a free format, and you can commandeer any field to write other
FIGURE 18.1
Class Wizard, main dialog for cLineStyle.
C911X_C018.fm Page 250 Friday, March 2, 2007 9:06 AM
Class Wizard Versions of the Shape Hierarchy
251
information into the files. In the header, each string gets a comment delimiter and the order of appearance
is fixed. Once you figure out where each string is written, you will be able to bend the header information
to your specific needs. A little later when we look at specific code examples, we can observe the header
output. For now, simply click
Okay
to commit the data and return to the main dialog. If you click
Cancel
, you will return to the main dialog but changes will not be committed.
18.1.2
C
L
INE
S
TYLE
P
RIVATE
V
ARIABLES
The next dialog we will visit defines the private variables. Click the
Private Variables …
button
and enter the data shown in Figure 18.3. Initially, the lower display will be empty. If the first blank
line in the lower display block is not highlighted, select the first empty line by clicking on it. The data
fields are active, and you can start entering private variable data. After entering
mColorHsv
data,
click the
Save Change
button to commit the changes. The data are displayed in WYSIWYG format
in the display box, and the selection moves to an empty line. Follow the same procedure to enter data
for the other private variables. The field data are summarized in Table 18.1.
As you enter data, the contents of the lower display are almost identical to the code included
in
ctor_ini.m
. Even the default-value assignment is correctly formatted. The
Initial Value
string is copied verbatim into the display and into
ctor_ini.m
. Virtually any value that can be
written on the right-hand side of an assignment can be used as an initial value. For example, a
function call generates the initial value for
mColorHsv
. Click
Done
to commit the changes and
return to the main dialog.
When Class Wizard generates
/@cLineStyle/private/ctor_ini
, the private variable
names and their default values are included in the code. The names and comments are included in
the header. If you return to the main screen and click
Build Class Files
, Class Wizard will
generate the file
@cLineStyle/private/ctor_ini.m
shown in Code Listing 105. Other
files will also be generated, but
ctor_ini
is the current focus.
FIGURE 18.2
Class Wizard, cLineStyle header information dialog.
C911X_C018.fm Page 251 Friday, March 2, 2007 9:06 AM
252
A Guide to MATLAB Object-Oriented Programming
FIGURE 18.3
Class Wizard, cLineStyle private variable dialog.
TABLE 18.1
cLineStyle Private Variable Dialog Fields
Private Variable Name Initial Value Comment
mColorHsv rgb2hsv
([0 0 1])’
[H; S; V] color of border; default
is blue
mLineWidth 1 handle graphic LineWidth attribute
mLineHandle [] graphics handle of the line plot
Code Listing 105, Constructor Helper from Class Wizard, @cLineStyle/private/ctor_ini.m
1 function [this, superior, inferior] = ctor_ini
2 %CTOR_INI for class cLineStyle, Replace with a short note
3 % Replace with something like UNCLASSIFIED
4%
5 % function [this, superior, inferior] = ctor_ini
6%
7 % Replace with text that you would like to have copied into
the header of
8 % every file in this class
9%
10 % Private Member Variables
11 % mColorHsv: HSV Line Color Value
12 % mLineWidth: handle-graphic LineWidth attribute
13 % mLineHandle: graphics handle of the line plot
C911X_C018.fm Page 252 Friday, March 2, 2007 9:06 AM
Class Wizard Versions of the Shape Hierarchy
253
Line 1 contains the function definition and lines 2–24 contain the header comments. Line 2
identifies the class and function along with a truncated one-line description. For this line to be
meaningful, the header-info defined
H1 Line
field needs to be short and the first few words of
the function comment should be concise. Line 3 and line 32 contain the
classification
string.
Line 5 repeats the function definition because
help
does not automatically display it. Lines 7–8
contain the contents of the
Common Header Comments
field from header info. Lines 10–13
list the private variables and their comments. The remaining header comments are generated from
various fields in header info. Lines 26–38 are code; here the private structure is created and private
variables are added and initialized. Notice the private variable
mDisplayFunc
in line 31. This
variable was not in the private variable list, but it shows up in the default constructor because
cLineStyle
has no parents. If you compare Code Listing 105 with
ctor_ini
from Chapter
16, the code lines are identical.
18.1.3
C
L
INE
S
TYLE PUBLIC VARIABLES
Moving down the collection of dialog buttons brings us to the public variables. Click the
Public Variables … button and enter the data shown in Figure 18.4. Fresh from the previous
14 %
15 % Author Info
16 % Replace with your company's name
17 % Replace with your name
18 % Replace with your email address
19 % Replace with your phone number
20 % Replace with the author notes that you would like to
appear just after
21 % the author info for every file in this class
22 % Replace with your standard copyright notice
23 % Replace with a string recognized by your revision control
software
24 % A Class Wizard v.3 assembled file, generated: 20-Dec-2005
13:23:23
25
26 % piece-meal create to avoid object and cell problems
27 this = struct([]);
28 this(1).mColorHsv = rgb2hsv([0 0 1])';
29 this(1).mLineWidth = 1;
30 this(1).mLineHandle = [];
31 this(1).mDisplayFunc = []; % class-wizard reserved field
32 % Construct the parent classes, if any
33 parents = cell(0, 1);
34 % Initialize parent_list
35 parent_list(parents{:});
36 % Return desired superior and inferior arguments
37 superior = {};
38 inferior = {};
39 % Replace with something like UNCLASSIFIED
C911X_C018.fm Page 253 Friday, March 2, 2007 9:06 AM