Apress pro Silverlight 3 in C# phần 7 pptx
Bạn đang xem bản rút gọn của tài liệu. Xem và tải ngay bản đầy đủ của tài liệu tại đây (5.56 MB, 83 trang )
CHAPTER 10 ■ ANIMATION
381
Thus, if you have animations that perform scaling, rotation, or fading on an element,
you’ll get a benefit from hardware acceleration. However, if you have animations that do
anything else to change the way an element looks–for example, skewing an element, changing
its color, rotating it in 3D space with a perspective transform, applying a pixel shader, and so
on, you should definitely not use bitmap caching. In this sort of situation, Silverlight will be
forced to keep passing an updated copy of the bitmap back to the video card, updating its cache
several times a second. This process will actually decrease performance.
To switch on bitmap caching, you set the CacheMode property of the corresponding
element to BitmapCache. Every element provides this property, which means you have a fine-
grained ability to choose exactly which elements use this feature.
■ Note If you cache an element that contains other elements, like a layout container, all the elements will be
cached in a single bitmap. Thus, you need to be extremely careful about adding caching to something like a
Canvas—only do it if all the children are limited to the allowed transformations in the list above.
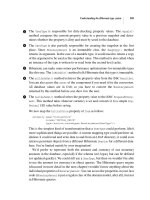
To get a better understanding, it helps to play with a simple example. Figure 10-15
shows a project that’s included with the downloadable samples for this chapter. Here, two
animations are at work. The first rotates an Image element that contains the picture of a phone
booth. The second one changes the size of a button using a ScaleTransform, endlessly
expanding and shrinking it. Both animations are clear candidates for bitmap caching.
Figure 10-15. A test page with two animated elements
CHAPTER 10 ■ ANIMATION
382
Here’s the markup that switches on bitmap caching for both:
<Canvas>
<Image x:Name="img" Source="phone_booth.jpg" Stretch="None"
CacheMode="BitmapCache">
<Image.RenderTransform>
<RotateTransform x:Name="rotateTransform"></RotateTransform>
</Image.RenderTransform>
</Image>
<Button x:Name="cmd" Content="I GROW and SHRINK." Canvas.Top="70" Canvas.Left="10"
CacheMode="BitmapCache">
<Button.RenderTransform>
<ScaleTransform x:Name="scaleTransform"></ScaleTransform>
</Button.RenderTransform>
</Button>
</Canvas
>
And here’s the markup that declares the animations:
<Storyboard x:Name="storyboard">
<DoubleAnimation Storyboard.TargetName="rotateTransform"
Storyboard.TargetProperty="Angle" To="360" Duration="0:0:2"
RepeatBehavior="Forever"></DoubleAnimation>
<DoubleAnimation Storyboard.TargetName="scaleTransform"
Storyboard.TargetProperty="ScaleX" AutoReverse="True"
To="20" Duration="0:0:1.8" RepeatBehavior="Forever"></DoubleAnimation>
<DoubleAnimation Storyboard.TargetName="scaleTransform"
Storyboard.TargetProperty="ScaleY" AutoReverse="True"
To="20" Duration="0:0:1.8" RepeatBehavior="Forever"></DoubleAnimation>
</Storyboard>
Bitmap caching has one potential problem. Ordinarily, when you enable bitmap
caching Silverlight takes a snapshot of the element at its current size and copies that bitmap to
the video card. If you then use a ScaleTransform to make the bitmap bigger, you’ll be enlarging
the cached bitmap, not the actual element. In the current example, that means the button will
grow fuzzy and pixilated as it grows.
To solve this problem, you could switch on bitmap caching altogether (in which case
the effect disappears, because Silverlight treats buttons and other elements as fully resizable
vector images). However, another option is to explicitly indicate the size of bitmap that
Silverlight should cache on the video card, using the BitmapCache.RenderAtScale property.
Ordinarily, this property is set to 1, and the element is taken at its current size. But the markup
here takes a snapshot of the button at five times its current size:
<Button x:Name="cmd" Content="I GROW and SHRINK." Canvas.Top="70" Canvas.Left="10">
<Button.CacheMode>
<BitmapCache RenderAtScale="5"></BitmapCache>
</Button.CacheMode>
<Button.RenderTransform>
<ScaleTransform x:Name="scaleTransform"></ScaleTransform>
</Button.RenderTransform>
</Button>
CHAPTER 10 ■ ANIMATION
383
This resolves the pixilation problem. The cached bitmap is still smaller than the
maximum animated size of the button (which reaches 10 times its original size), but the video
card is able to double the size of the bitmap from 5 to 10 times size without any obvious scaling
artifacts. There are two potential only disadvantages to increasing the RenderAtScale property.
First, you’re forcing Silverlight to transfer more data to the video card (which slows the initial
rendering step). Second, you’re asking the video card to use more of its onboard video memory.
Different video cards have different amounts of memory, and when the available memory is
used up the video card won’t be able to cache any more bitmaps and Silverlight will fall back on
software rendering.
Evaluating Hardware Acceleration
The easiest way to evaluate the success of your bitmap caching is to run your application both
with and without hardware acceleration. In most cases, the difference won’t be obvious until
you check the CPU usage of your computer or the frame rate of your animation. To check the
CPU usage, load up Task Manager and watch the Performance tab. In an informal test with the
previous example, CPU usage on a single-processor computer dropped from about 50% to
about 20% when caching was switched on. The downloadable samples for this chapter include
an example that allows you to switch caching on and off using a checkbox. The change is
performed programmatically using code like this:
img.CacheMode = new BitmapCache();
Another useful tool is Silverlight’s built-in diagnostic support. Earlier, you learned
about the enableCacheVisualization and enableFrameRateCounter parameters, which you can
add to your test page to capture some extra diagnostic information. Figure 10-16 shows an
example where both parameters are switched on and caching is turned off.
CHAPTER 10 ■ ANIMATION
384
Figure 10-16. Using cache visualization and the frame rate counter
Here, the Image and Button elements are tinted red to indicate that they aren’t being
cached (thanks to enableCacheVisualization). The set of numbers in the top-left corner
provides frame rate information (thanks to enableFrameRateCounter), as follows:
• The first number shows the animation frame rate. In this example, switching off caching
drops it from 55 to 35. (Remember, the default maximum frame rate is 60.)
• The second number shows how many kilobytes of video card memory are used. This
increases when caching is turned on.
• The third number shows the total number of hardware-accelerated surfaces. Remember,
switching bitmap caching on for one element will usually affect several surfaces–even
in the case of the button, there is a TextBlock with content inside.
• The fourth number shows the number of implicit hardware-accelerated surfaces. In
some situations, switching caching on for one element may necessitate turning it on for
another (for example, if the second element overlaps the first one). In this case,
Silverlight will automatically perform caching for the additional element, which is
known as an implicit surface.
The bottom line is that you can quickly size up an example like this and determine that
bitmap caching makes sense. In this scenario, it both reduces the CPU load and improves the
frame rate.
CHAPTER 10 ■ ANIMATION
385
The Last Word
In this chapter, you explored Silverlight’s animation support in detail. Now that you’ve
mastered the basics, you can spend more time with the art of animation–deciding what
properties to animate and how to modify them to get your desired effect.
The animation model in Silverlight is surprisingly full-featured. However, getting the
result you want isn’t always easy. If you want to animate separate portions of your interface as
part of a single animated scene, you’re forced to take care of a few tedious details, such as
tracking animated objects and performing cleanup. Furthermore, none of the stock animation
classes accept arguments in their parameters. As a result, the code required to
programmatically build a new animation is often simple, but long. The future of Silverlight
animation promises higher-level classes that are built on the basic plumbing you’ve learned
about in this chapter. Ideally, you’ll be able to plug animations into your application by using
prebuilt animation classes, wrapping your elements in specialized containers, and setting a few
attached properties. The actual implementation that generates the effect you want–whether
it’s a smooth dissolve between two images or a series of animated fly-ins that builds a page–
will be provided for you.
387
CHAPTER 11
■ ■ ■
Sound, Video, and Deep Zoom
In this chapter, you’ll tackle one of Silverlight’s most mature features: audio and video support.
Since version 1.0, Silverlight has distinguished itself as a technology that brings high-
end multimedia support to the limited world of the browser. And though Silverlight can’t
support the full range of media codecs (because that would multiply the size of the Silverlight
download and increase its licensing costs), Silverlight still gives you everything you need to
incorporate high-quality audio and video in your applications. Even more remarkable is the
way that Silverlight allows you to use multimedia, particularly video. For example, you can use
video to fill thousands of elements at once and combine it with other effects, such as animation,
transforms, and transparency.
In this chapter, you’ll learn how to incorporate ordinary audio and video into your
applications, and you’ll consider the best way to encode and host video files for Silverlight.
Next, you’ll see how Silverlight’s VideoBrush class allows you to create impressive effects like
video-filled text and video reflections. Finally, you’ll look at Deep Zoom–a different interactive
multimedia technology that lets users zoom into massive images in real time.
■ What’s New Silverlight continues to refine its audio and video support. Although the programming
interface remains the same in Silverlight 3 (for example, there are no changes to the MediaElement or
VideoBrush), there are some impressive changes under the hood—most notably, support for H.264-encoded
video files. Silverlight 3 also introduces a new raw audio/video pipeline, which will allow third-party developers to
build custom encoders and design the infrastructure for advanced audio features.
Supported File Types
Because Silverlight needs to ensure compatibility on a number of different operating systems
and browsers, it can’t support the full range of media files that you’ll find in a desktop
application like Windows Media Player. Before you get started with Silverlight audio and video,
you need to know exactly what media types it supports.
For audio, Silverlight supports the following:
• Windows Media Audio (WMA) versions 7, 8, and 9
• MP3 with fixed or variable bit rates from 8 to 320 Kbps
CHAPTER 11 ■ SOUND, VIDEO, AND DEEP ZOOM
388
When it comes to video, Silverlight supports the follow standards:
• Windows Media Video 7 (WMV1)
• Windows Media Video 8 (WMV2)
• Windows Media Video 9 (WMV3)
• Windows Media Video Advanced Profile, non-VC-1 (WMVA)
• Windows Media Video Advanced Profile, VC-1 (WMVC1)
• H.264 video and AAC audio (also known as MPEG-4 Part 10 or MPEG-4 AVC)
Often, you can recognize Windows Media Video by the file extension .wmv. Other
video formats–for example, MPEG and QuickTime–need not apply.
The last two formats in this list–VC-1 and H.264–are widely supported industry
standards. Notable places where they’re used include Blu-ray, HD DVD, and the Xbox 360.
They’re also the most common choice for Silverlight applications. (Of course, these standards
support different bit rates and resolutions, so your Silverlight application isn’t forced to include
DVD-quality video just because it uses VC-1 or H.264.)
Silverlight doesn’t support other Windows Media formats (such as Windows Media
Screen, Windows Media Audio Professional, and Windows Media Voice), nor does it support
the combination of Windows Media Video with MP3 audio. Finally, it doesn’t support video
files that use frames with odd-number dimensions (dimensions that aren’t divisible by 2), such
as 127×135.
■ Note Adding audio to a Silverlight application is fairly easy, because you can throw in just about any MP3
file. Using a video file is more work. Not only must you make sure you’re using one of the supported WMV
formats, but you also need to carefully consider the quality you need and the bandwidth your visitors can
support. Later in this chapter, you’ll consider how to encode video for a Silverlight application. But first, you’ll
consider how to add basic audio.
The MediaElement
In Silverlight, all the audio and video functionality is built into a single class: MediaElement.
Like all elements, a media element is placed directly in your user interface. If you’re
using the MediaElement to play audio, this fact isn’t important, because the MediaElement
remains invisible. If you’re using the MediaElement for video, you place it where the video
window should appear.
A simple MediaElement tag is all you need to play a sound. For example, add this
markup to your user interface:
<MediaElement Source="test.mp3"></MediaElement>
Now, once the page is loaded, it will download the test.mp3 file and begin playing it
automatically.
Of course, in order for this to work, your Silverlight application needs to be able to find
the test.mp3 file. The MediaElement class uses the same URL system as the Image class. That
CHAPTER 11 ■ SOUND, VIDEO, AND DEEP ZOOM
389
means you can embed a media file in your XAP package or deploy it to the same website
alongside the XAP file. Generally, it’s best to keep media files separate, unless they’re extremely
small. Otherwise, you’ll bloat the size of your application and lengthen the initial download
time.
■ Note When you first add a media file like test.mp3 to a project, Visual Studio sets its Build Action setting to
None and its Copy To Output Directory setting to “Do not copy.” To deploy your media file alongside your XAP
file, you must change the Copy To Output Directory setting to “Copy always.” To deploy your media file inside
the XAP package, change Build Action to Resource. The downloadable code for this chapter uses the first of
these two approaches.
Controlling Playback
The previous example starts playing an audio file immediately when the page with the
MediaElement is loaded. Playback continues until the audio file is complete.
Although this example is straightforward, it’s also a bit limiting. Usually, you’ll want
the ability to control playback more precisely. For example, you may want it to be triggered at a
specific time, repeated indefinitely, and so on. One way to achieve this result is to use the
methods of the MediaElement class at the appropriate time.
The startup behavior of the MediaElement is determined by its AutoPlay property. If
this property is set to false, the audio file is loaded, but your code takes responsibility for
starting the playback at the right time:
<MediaElement x:Name="media" Source="test.mp3" AutoPlay="False"></MediaElement>
When using this approach, you must make sure to give the MediaElement a name so
that you can interact with it in code. Generally, interaction consists of calling the Play(),
Pause(), and Stop() methods. You can also use the SetSource() method to load new media
content from a stream (which is useful if you’re downloading media files asynchronously using
the WebClient class, as described in Chapter 6), and you can change the Position property to
move through the audio.
Here’s a simple event handler that seeks to the beginning of the current audio file and
then starts playback:
private void cmdPlay_Click(object sender, RoutedEventArgs e)
{
media.Position = TimeSpan.Zero;
media.Play();
}
If this code runs while playback is already under way, the first line resets the position
to the beginning, and playback continues from that point. In this case, the second line has no
effect because the media file is already being played.
CHAPTER 11 ■ SOUND, VIDEO, AND DEEP ZOOM
390
■ Note Depending on the types of media files you support, you may want to check the CanPause and
CanSeek properties before you attempt to pause playback or jump to a new position. Some types of streamed
media files don’t support pausing and seeking.
Handling Errors
MediaElement doesn’t throw an exception if it can’t find or load a file. Instead, it’s up to you to
handle the MediaFailed event. Fortunately, this task is easy. First, tweak your MediaElement tag
as shown here:
<MediaElement MediaFailed="media_MediaFailed"></MediaElement>
Then, in the event handler, you can use the
ExceptionRoutedEventArgs.ErrorException property to get an exception object that describes
the problem. Here’s an example that displays the appropriate error message:
private void media_MediaFailed(object sender, ExceptionRoutedEventArgs e)
{
lblErrorText.Text = e.ErrorException.Message;
}
Playing Multiple Sounds
The MediaElement is limited to playing a single media file. If you change the Source property
(or call the SetSource() method), any playback that’s currently taking place stops immediately.
However, this limitation doesn’t apply to Silverlight as a whole. Silverlight can quite easily play
multiple media files at once, as long as each one has its own MediaElement.
You can use two approaches to create an application with multiple sounds. Your first
option is to create all the MediaElement objects you need at design time. This approach is
useful if you plan to reuse the same two or three MediaElement objects. For example, you can
define two MediaElement objects and flip between them each time you play a new sound. (You
can keep track of which object you used last using a Boolean variable in your page class.) To
make this technique really effortless, you can store the audio file names in the Tag property of
the appropriate element, so all your event-handling code needs to do is read the file name from
the Tag property, find the right MediaElement to use, set its Source property, and then call its
Play() method. Because this example uses two MediaElement objects, you’re limited to two
simultaneous sounds, which is a reasonable compromise if you don’t think the user will be able
pick out a third sound out over the din anyway.
Your other option is to create every MediaElement object you need dynamically. This
approach requires more overhead, but the difference is minimal (unless you go overboard and
play dozens of simultaneous media files). When you create a MediaElement in code, you need
to remember to add it to a container in your application. Assuming you haven’t changed the
AutoPlay property, the MediaElement will begin playing as soon as you add it. If you set
AutoPlay to false, you’ll need to use the Play() method. Finally, it’s also a good idea to handle
the MediaEnded event to remove the MediaElement after playback is finished.
Here’s some code for a button that starts a new playback of the same sound file each
time it’s clicked:
CHAPTER 11 ■ SOUND, VIDEO, AND DEEP ZOOM
391
private void cmdPlay_Click(object sender, RoutedEventArgs e)
{
MediaElement media = new MediaElement();
media.Source = new Uri("test.mp3", UriKind.Relative);
media.MediaEnded += new RoutedEventHandler(media_MediaEnded);
LayoutRoot.Children.Add(media);
}
private void media_MediaEnded(object sender, RoutedEventArgs e)
{
LayoutRoot.Children.Remove((MediaElement)sender);
}
To make it easier to keep track of a batch of dynamically generated MediaElement
objects, you can add them all to a designated container (for example, an invisible stack panel).
This allows you to quickly examine all the currently playing media files and stop them all.
Figure 11-1 shows an example that uses this approach and displays the element count of the
invisible StackPanel every time a MediaElement is inserted or removed.
Figure 11-1. Playing media files simultaneously
Changing Volume, Balance, and Position
The MediaElement exposes a number of properties that allow you to control your playback.
The most fundamental are:
• Volume: Sets the volume as a number from 0 (completely muted) to 1 (full volume). The
default value is 0.5. To temporarily mute playback without pausing it or changing the
volume setting, set IsMuted to true.
• Balance: Sets the balance between the left and right speaker as a number from -1 (left
speaker only) to 1 (right speaker only). The default is 0, which splits the sound evenly.
CHAPTER 11 ■ SOUND, VIDEO, AND DEEP ZOOM
392
• CurrentState: Indicates whether the player is currently Playing, Paused, Stopped,
downloading a media file (Opening), buffering it (Buffering), or acquiring a license for
DRM content (AcquiringLicense). If no media file was supplied, CurrentState is Closed.
• Position: Provides a TimeSpan object that indicates the current location in the media
file. You can set this property to skip to a specific time position.
Figure 11-2 shows a simple page that allows the user to control playback.
Figure 11-2. Controlling more playback details
At the top of the window are three buttons for controlling playback. They use rather
unremarkable code–they call the Start(), Stop(), and Play() methods of the MediaElement
when clicked.
Underneath are two sliders for adjusting volume and balance. These sliders are set to
the appropriate ranges (0 to 1 and -1 to 1):
<Slider Grid.Column="1" x:Name="sliderVolume" Minimum="0" Maximum="1" Value="0.5"
ValueChanged="sliderVolume_ValueChanged" ></Slider>
<Slider Grid.Row="1" Grid.Column="1" x:Name="sliderBalance" Minimum="-1" Maximum="1"
ValueChanged="sliderBalance_ValueChanged"></Slider>
When the user drags the thumb in the slider, the change is applied to the
MediaElement:
private void sliderVolume_ValueChanged(object sender,
RoutedPropertyChangedEventArgs<double> e)
{
media.Volume = sliderVolume.Value;
}
CHAPTER 11 ■ SOUND, VIDEO, AND DEEP ZOOM
393
private void sliderBalance_ValueChanged(object sender,
RoutedPropertyChangedEventArgs<double> e)
{
media.Balance = sliderBalance.Value;
}
The third slider lets the user jump to a new position. It actually consists of two sliders
that are superimposed on top of one another. The slider in the background (the one defined
first) is the position slider that the user drags to jump to a new part of the audio file:
<Slider Minimum="0" Grid.Column="1" Grid.Row="2" x:Name="sliderPosition"
ValueChanged="sliderPosition_ValueChanged"></Slider>
In front is a slider that ignores mouse activity (because its IsHitTestVisible property is
set to false) and is partially transparent (because its Opacity property is set to 0.5). As a result,
the slider appears to be a faint image behind the position slider:
<Slider Minimum="0" Grid.Column="1" Grid.Row="2" x:Name="sliderPositionBackground"
IsHitTestVisible="False" Opacity="0.5"></Slider>
This slider (sliderPositionBackground) represents the current position of the audio file.
As the audio advances, the code moves the thumb in sliderPositionBackground along the track
to give the user a visual indication of how far playback has progressed. You could do much the
same trick by moving the sliderPosition slider, but this could become problematic because your
code would need to distinguish between user-initiated changes (when the user drags the slider,
at which point your code should change the current position of the MediaElement) and
playback synchronization (at which point your code should do nothing).
The code sets up the position sliders by reading the full running time from the
NaturalDuration property after the media file has been opened:
private void media_MediaOpened(object sender, RoutedEventArgs e)
{
sliderPosition.Maximum = media.NaturalDuration.TimeSpan.TotalSeconds;
sliderPositionBackground.Maximum = media.NaturalDuration.TimeSpan.TotalSeconds;
}
You can then jump to a specific position when the topmost slider tab is moved:
private void sliderPosition_ValueChanged(object sender, RoutedEventArgs e)
{
// Pausing the player before moving it reduces audio "glitches"
// when the value changes several times in quick succession.
media.Pause();
media.Position = TimeSpan.FromSeconds(sliderPosition.Value);
media.Play();
}
Incidentally, the MediaElement doesn’t fire any sort of event to notify you that
playback is underway. Thus, if you want to move the thumb for sliderPositionBackground along
the track, or you want to update the TextBlock with the current time offset at the bottom of the
page, you need to use a timer.
CHAPTER 11 ■ SOUND, VIDEO, AND DEEP ZOOM
394
The DispatcherTimer is a perfect solution. You can create one when the page loads,
use a short 0.1 second interval, and start and stop it along with your playback:
private DispatcherTimer timer = new DispatcherTimer();
public MediaPlayer()
{
InitializeComponent();
timer.Interval = TimeSpan.FromSeconds(0.1);
timer.Tick += timer_Tick;
}
private void cmdPlay_Click(object sender, RoutedEventArgs e)
{
media.Play();
timer.Start();
}
When the DispatcherTimer.Tick event fires, you can update your user interface by
displaying the current time position in a TextBlock and moving the position indicator (the
semi-transparent non-interactive thumb of the background slider):
private void timer_Tick(object sender, EventArgs e)
{
lblStatus.Text = media.Position.ToString().TrimEnd(new char[]{'0'});
sliderPositionBackground.Value = media.Position.TotalSeconds;
}
The two check boxes on the page are the last ingredient in this media player and one of
the simplest details. The Mute check box sets the corresponding IsMuted property of the
MediaElement:
private void chkMute_Click(object sender, RoutedEventArgs e)
{
media.IsMuted = (bool)chkMute.IsChecked;
}
The MediaElement has no built-in support for looping playback. If the Loop check box
is set, the code in the page restarts playback when the MediaEnded event fires:
private void media_MediaEnded(object sender, RoutedEventArgs e)
{
if ((bool)chkLoop.IsChecked)
{
media.Position = TimeSpan.Zero;
media.Play();
}
else
{
timer.Stop();
}
}
CHAPTER 11 ■ SOUND, VIDEO, AND DEEP ZOOM
395
Although relatively simple, this example could be the springboard for a more advanced
player–all you need is a heavy dose of animation, transparency, and eye candy. You’ll see some
examples of more stylized media players that have mostly the same functionality when you
consider Expression Encoder later in this chapter.
THE RAW AUDIO/VIDEO PIPELINE
One of the best kept secrets in Silverlight 3 is its support for raw audio and video. This support
allows a Silverlight application to decode chunks of audio and stream them to a MediaElement
for playback. Needless to say, the process is tedious, quite complex, and sometimes hampered
by latency issues. It’s also far beyond the scope of this chapter.
Although most developers are unlikely to ever deal directly with the raw audio and video
pipeline, you may well use other components that are based on this support. For example, third-
party developers can use the raw audio and video pipeline to create libraries for playing back
new media formats, implementing cutting-edge applications like a virtual synthesizer, or
supporting practical features like seamless audio looping, For an example, check out the free
MediaStreamSource that allows Silverlight to play PCM-encoded WAV audio at
Playing Video
Everything you’ve learned about using the MediaElement class applies equally well when you
use a video file instead of an audio file.
The key difference with video files is that the visual and layout-related properties of the
MediaElement are suddenly important. The original size of the video is provided through the
NaturalVideoHeight and NaturalVideoWidth properties of the MediaElement. You can also
scale or stretch a video to fit different page sizes using the Stretch property. Use None to keep
the native size (which is recommended for optimum performance), Uniform to stretch the
video to fit its container without changing its aspect ratio (which is the default), Fill to stretch it
to fit its container in both dimensions (even if that means stretching the picture), and
UniformToFill to resize the picture to fit the largest dimension of its container while preserving
its aspect ratio (which guarantees that part of the video page will be clipped out if the container
doesn’t have the same aspect ratio as the video).
■ Tip The MediaElement’s preferred size is based on the native video dimensions. For example, if you
create a MediaElement with a Stretch value of Uniform (the default) and place it inside a Grid row with a Height
value of Auto, the row will be sized just large enough to keep the video at its standard size, so no scaling is
required.
CHAPTER 11 ■ SOUND, VIDEO, AND DEEP ZOOM
396
Client-Side Playlists
Silverlight also supports Windows Media metafiles, which are essentially playlists that point to
one or more other media files. Windows Media metafiles typically have the file extension .wax,
.wvx, .wmx, .wpl, or .asx. Certain features of these files, such as script commands, aren’t
supported and cause errors if used. For the full list of unsupported features, refer to the
Silverlight documentation.
Here’s a basic playlist that refers to two video files:
<asx version="3.0">
<title>Two Video Playlist</title>
<entry>
<title>Video 1</title>
<ref href="Video1.wmv" />
</entry>
<entry>
<title>Video 2</title>
<ref href="Video2.wmv" />
</entry>
</asx>
If you point the Source property of the MediaElement to this file, it will begin playing
Video1.wmv (assuming it exists) and then play Video2.wmv immediately after. In this case, both
files are in the same location on the server (and in the same folder as the playlist), but you can
adjust the href attribute to point to files in other folders or servers.
Typically, .asx files are used with .asf streaming files. In this case, the .asx file includes a
link to the .asf streaming file.
Server-Side Playlists
If you’re streaming video using Windows Media Services, you can also create a server-side
playlist. Server-side playlists are processed on the server. They let you combine more than one
video into a single stream without revealing the source of each video to the user. Server-side
playlists offer one technique for integrating advertisements into your video stream: create a
server-side playlist that places an ad before the requested video.
Server-side playlists often have the file extension .wsx. As with client-side playlists,
they contain XML markup:
<?wsx version="1.0"?>
<smil>
<seq id="sq1">
<media id="video2" src="Video1.wmv" />
<media id="video1" src="Advertisement.wmv" />
<media id="video2" src="Video2.wmv" />
<seq>
</smil>
The root element is <smil>. Here, the <smil> element contains an ordered sequence of
video files represented by the <seq> element, with each video represented by the <media>
element. More sophisticated server-side playlists can repeat videos, play clips of longer videos,
and specify videos that will be played in the event of an error. For more information about the
CHAPTER 11 ■ SOUND, VIDEO, AND DEEP ZOOM
397
standard for .wsx files (and the elements that are supported and unsupported in Silverlight), see
Progressive Downloading and Streaming
Ordinarily, if you take no special steps, Silverlight plays media files using progressive
downloading. This means that the client downloads media files one chunk at a time, using the
standard HTTP protocol. When the client has accumulated enough of a buffer to provide for a
few seconds of playback, it begins playing the media file, and continues downloading the rest of
the file in the background.
Thanks to progressive downloading, the client can begin playing a media file almost
immediately. In fact, the total length of the file has no effect on the initial playback delay. The
only factor is the bit rate–how many bytes of data it takes to play 5 seconds of media.
Progressive downloading also has a second, not-so-trivial advantage: it doesn’t require any
special server software, because the client handles all the buffering. Thus, you can use
progressive downloading with any web server.
The same isn’t true of streaming, a technology that uses a specialized stateful protocol
to send data from the web server to the client. Streaming has the instant-playback ability of
progressive downloading, but it’s more efficient. There are numerous factors at work, but
switching from progressive downloading to streaming can net your web server a two- or three-
times improvement in scalability–in other words, it may be able to serve the same video
content to three times as many simultaneous users. This is the reason streaming is usually
adopted.
However, streaming also has one significant disadvantage: it needs dedicated server-
side software. (With Silverlight, this software is Windows Media Services, which is included with
Windows Server 2003 and available as a free download for Windows Server 2008.)
Unfortunately, it’s considerably more complex to configure and maintain a media streaming
server than it is to host an application that uses progressive downloading.
■ Note If you use a MediaElement with a URL that starts with http:// or https://, Silverlight begins a
progressive download. If you use a MediaElement with a URL that starts with mms://, Silverlight attempts to
stream it and falls back on a progressive download if streaming fails.
It’s worth noting that the word streaming isn’t always used in the technical sense
described here. For example, Microsoft provides a fantastic free Silverlight hosting service
called Silverlight Streaming. It provides 10 GB of hosting space for Silverlight applications and
media files. But despite its name, Silverlight Streaming doesn’t use streaming–instead, it
simply serves video files and allows the client to perform progressive downloading.
■ Tip If you’re looking for an efficient way to host large media files with your Silverlight application, be sure
to consider Silverlight Streaming (). It’s free, has no advertisements or
annoying branding requirements, and offers a staggering 5 terabytes per month of bandwidth for video viewing.
CHAPTER 11 ■ SOUND, VIDEO, AND DEEP ZOOM
398
IMPROVING PROGRESSIVE DOWNLOADING
If you don’t want the complexity of configuring and maintaining a server with Windows Media
Services, or you use a web host that doesn’t provide this service, your applications will use
progressive downloading. You’ll get the most out of progressive downloading if you follow these
best practices:
• Consider providing multiple versions of the same media file. If you have huge media files
and you need to support users with a wide range of connection speeds, consider including
an option in your application that lets users specify their bandwidth. If a user specifies a
low-speed bandwidth, you can seamlessly load smaller media files into the MediaElement.
(The only problem is that average users don’t always know their bandwidth, and the amount
of video data a computer can handle can be influenced by other factors, such as the current
CPU load or the quality of a wireless connection.)
• Adjust the BufferingTime property on the MediaElement. You can control how much content
Silverlight buffers in a progressive download by setting the BufferingTime property of the
MediaElement. The default is 5 seconds of playback, but higher-quality videos that will be
played over lower-bandwidth connections will need different rates. A longer BufferingTime
value won’t allow a slow connection to play a high–bit rate video file (unless you buffer
virtually the entire file), but it will smooth over unreliable connections and give a bit more
breathing room.
• Keep the user informed about the download. It’s often useful to show the client how much of
a particular media file has been downloaded. For example, websites like YouTube and
players like Media Player use a progress bar that has a shaded background, indicating how
much of the file is available. To create a similar effect in a Silverlight application, you can
use the DownloadProgressChanged event. It fires each time Silverlight crosses a 5%
download threshold (for example, when it downloads the first 5%, when it reaches 10%,
when it reaches 15%, and so on). It fires again when the file is completely downloaded.
When the DownloadProgressChanged event fires, you can read the DownloadProgress
property to determine how much of the file is currently available (as a value from 0 to 1).
Use this information to set the width of a rectangle, and you’re well on the way to creating a
download progress bar.
• Consider informing the user about the buffer. You can react as the buffer is filled using the
BufferingProgressChanged event and read the BufferingProgress property to find out how
much content is in the buffer (as a value from 0 to 1). For example, with a BufferingTime
value of 5 seconds, a BufferingProgress value of 1 means the client has its full 5 seconds of
media, whereas a BufferingProgress value of 0.5 means the buffer is half full, with just 2.5
seconds available. This may be too much information to display, or it may be a useful way to
show the user why a media file can’t be buffered successfully over the current connection.
• Use bit-rate throttling and IIS smooth streaming. Bit-rate throttling can improve the
scalability of your web server and smooth streaming can improve the performance of your
video—sometimes dramatically. Both features are described in the “Adaptive Streaming”
section that follows.
CHAPTER 11 ■ SOUND, VIDEO, AND DEEP ZOOM
399
Adaptive Streaming
In recent years, the tide has shifted from true streaming to adaptive streaming, which is really a
way to mimick the benefits of streaming while still using progressive downloading and ordinary
HTTP behind the scenes. Currently, about 65% of all web content is delivered by progressive
download, with YouTube leading the way as the single most popular deliverer of video content.
IIS now supports two features that make adaptive streaming work more efficiently, and help to
close the performance gap with traditional streaming:
• Bit-rate throttling: Bit-rate throttling prevents people with good connections from
downloading a video file really quickly, which can swamp the server if a large number of
people request the file simultaneously. Typically, when using bit-rate throttling, you
configure IIS to begin by sending a burst of content when a video file is requested. This
ensures that the user can start playback as quickly as possible. However, after this
burst–for example, after the user has downloaded 10 seconds of video–the rest of the
video data is sent much more slowly. Limiting the transfer rate has no real effect on the
client’s ability to play the media, as long as the client can download the content faster
than the application can play it. (In other words, a 700 Kbps transfer limit would be a
disaster if you had a high-quality video with a bit rate greater than 700 Kbps.)
■ Note Bit-rate throttling also saves bandwidth overall. That’s because most web surfers won’t watch a video
form start to finish. It’s estimated that 80% of users navigate to a new page before finishing a video, effectively
throwing away any extra unwatched video data they’ve downloaded in advance.
• IIS Smooth Streaming: With smooth streaming, the web server customizes the bit rate of
the media file to suit the client. If the situation changes–for example, the network starts
to slow down–the server deals with the issue seamlessly, automatically adjusting the bit
rate down, and bringing it back up again when the connection improves. The player
won’t have to stop and refill its buffer. Similarly, clients with more CPU resources are
given chunks higher-bit-rate video, while more limited clients are given reduced-bit-rate
video.
To use either of these features,, you need to download the IIS Media Services, which
Microsoft provides as a free download at To create video files that
support smooth streaming, you’ll also need the full version of Expression Encoder (rather than
the free version). To learn more about bit-rate throttling and how to configure it, read the
walkthrough at To learn more about smooth streaming and its
architecture, see
CHAPTER 11 ■ SOUND, VIDEO, AND DEEP ZOOM
400
Advanced Video Playback
You now know enough to play audio and video in a Silverlight application. However, a few finer
details can help you get the result you want when dealing with video. First, you need to start
with the right type of video–that means a file in the right format and with the right dimensions
and bit rate (the number of bytes of data required per second). You may also want to consider a
streamed video file for optimum network efficiency. Next, you may be interested in additional
features like markers. And finally, some of the most dazzling Silverlight effects depend on an
artful use of the VideoBrush, which allows you to paint an ordinary Silverlight element with live
video. You’ll explore all these topics in the following sections.
Video Encoding
To get the best results, you should prepare your files with Silverlight in mind. For example, you
should use video files that won’t overwhelm the bandwidth of your visitors. This is particularly
true if you plan to use large media files (for example, to display a 30-minute lecture).
Typically, the WMV files you use in your Silverlight application will be a final product
based on larger, higher-quality original video files. Often, the original files will be in a non-WMV
format. However, this detail isn’t terribly important, because you’ll need to re-encode them
anyway to reduce their size and quality to web-friendly proportions.
To get the right results when preparing video for the Web, you need the right tool.
Microsoft provides three options:
• Windows Movie Maker: Included with some versions of Windows (such as Windows
Vista) and aimed squarely at the home user, Windows Movie Maker is too limiting for
professional use. Although it can work in a pinch, its lack of control and its basic features
makes it more suitable for authoring home movies than preparing web video content.
• Windows Media Encoder: Available as a free download at
Windows Media Encoder is a straightforward tool for video conversion. It’s a reasonable
choice if you don’t have Expression Encoder.
• Expression Encoder: Available as a premium part of Microsoft’s Expression Suite,
Expression Encoder boasts some heavyweight features. Best of all, it’s designed for
Silverlight, which means it provides valuable features like automatic generation of
custom-skinned Silverlight video pages. Best of all, Expression Encoder is available in a
free version that you can download at
■ Note The premium version of Expression Encoder adds support for H.264 encoding, unlimited screen-
capture recording (the free version is capped at ten minutes), and IIS Smooth Streaming (a feature that lets your
web server adjust the quality of streamed video based on changing network conditions and the client’s CPU
resources). If you don’t need these features, the free version of Expression Encoder is a remarkably polished
and powerful tool.
CHAPTER 11 ■ SOUND, VIDEO, AND DEEP ZOOM
401
To learn more about video encoding, you can browse the product documentation,
website articles, or a dedicated book. The following sections outline the basics to get you started
with Expression Encoder.
Encoding in Expression Encoder
Expression Encoder gives you the same encoding ability as the basic Windows Media Encoder,
with a few nifty extra features:
• Simple video editing: You can cut out sections of video, insert a lead-in, and perform
other minor edits.
• Overlays: You can watermark videos with a still or animated logo that stays
superimposed over the video for as long as you want it to.
• A/B compare: To test the effect of a change or a new encoding, you can play the original
and preview the converted video at the same time. Expression Encoder keeps both
videos synchronized, so you can get a quick sense of quality differences.
• Silverlight-ready: Expression Encoder ships with suitable profiles for a Silverlight
application. Additionally, Expression Encoder allows you to create a fully skinned
Silverlight video player, complete with nifty features like image thumbnails.
To encode a video file in Expression Encoder, follow these steps:
1. To specify the source file, choose File
➤ Import. Browse to the appropriate media file,
select it, and click Open. There will be a short delay while Expression Encoder analyzes
the file before it appears in the list in the Media Content panel at the bottom of the
window. At this point, you can perform any other edits you want, such as trimming out
unwanted video, inserting a lead-in, or adding an overlay. (All these changes are made
through the Enhance tab on the right side of the window.)
2. To specify the destination file, look at the group of tabs on the right side of the window,
and select the Output tab. In the Job Output section, you can specify the directory where
the new file will be placed, and its name.
3. To choose the bit rate, look in the Presets tab (in the top-right corner of the window) and
expand the Encoding for Silverlight section. If you’re using progressive downloads, you
need to select a format from the Variable bitrate group. If you’re using streaming with
Windows Media Services, choose a format from the Constant bitrate group instead.
Different formats result in different bitrates, video quality, and video size–to get more
details, hover over a format in the list (as shown in Figure 11-3). When you’ve picked the
format you want (or if you just want to preview the effect it will have on your video), click
the Apply button at the bottom of the Presets tab.
CHAPTER 11 ■ SOUND, VIDEO, AND DEEP ZOOM
402
Figure 11-3. Choosing the type of encoding
SILVERLIGHT COMPRESSION: CBR AND VBR
Depending on whether you’re planning to use streaming or simple progressive downloads,
Silverlight chooses between two compression modes:
• Constant Bit-Rate Encoding (CBR): This is the best choice if you plan to allow video
streaming. With CBR encoding, the average bit rate and the peak bit rate are the same,
which means the data flow remains relatively constant at all times. Another way of looking
at this is that the quality of the encoding may vary in order to preserve a constant bit rate,
ensuring that the user gets smooth playback. (This isn’t necessary if your application is
using progressive downloading, because then it will cache as much of the media file as it
can.)
CHAPTER 11 ■ SOUND, VIDEO, AND DEEP ZOOM
403
• Variable Bit-Rate Encoding (VBR): This is the best choice if you plan to use progressive
downloading. With VBR encoding, the bit rate varies throughout the file depending on the
complexity of the video, meaning more complex content is encoded with a higher bit rate. In
other words, the quality remains constant, but the bit rate is allowed to change. Video files
are usually limited by their worst parts, so a VBR-encoded file generally requires a smaller
total file size to achieve the same quality as a CBR-encoded file. When you use VBR
encoding with Silverlight, the maximum bit rate is still constrained. For example, if you
choose the VC-1 Web Server 512k DSL profile, you create encoded video with an average
bit rate of 350 Kbps (well within the range of the 512 Kbps connection) and a maximum bit
rate of 750 Kbps.
4. After you choose an encoding, the relevant information appears in the Video section of
the Encode tab. Before you perform the encoding, you can tweak these details. For
example, you can adjust the dimensions of the video output using the Size box. You can
also preview what the file will look like by playing it in the video window on the left.
5. To encode your video, click the Encode button at the bottom of the window, in the
Media Content panel. If you want to, you can save your job when the encoding is
finished so you can reuse its settings later (perhaps to encode an updated version of the
same file).
Markers
Markers are text annotations that are embedded in a media file and linked to a particular time.
Technically, the WMV format supports text markers and script commands (used to do things
like launch web pages while playback is underway), but Silverlight treats both of these the same:
as timed bookmarks with a bit of text.
Markers provide some interesting possibilities for creating smarter Silverlight-based
media players. For example, you can embed captions as a set of markers and display them at
the appropriate times. (You could even use this technique to build a poor man’s subtitling
system.) Or, you can embed other types of instructions, which your application can then read
and act on.
Although it’s up to you to write the code that reacts to markers, Silverlight gives you
two tools: a MarkerReached event and the Markers collection in the MediaElement. But before
you can investigate these details, you first need to consider how to add markers to your media
file in the first place.
Adding Markers with Expression Encoder
Expression Encoder has a built-in feature for adding markers. Here’s how to use it:
1. After you’ve imported a media file, choose the Metadata tab at the left of the window.
2. Drag the playback bar under the video file to the position where you want to place the
marker.
3. In the Metadata tab, find the Markers box. At the bottom of the Markers box, click the
Add button to create a new marker, which is added to the list (see Figure 11-4).
CHAPTER 11 ■ SOUND, VIDEO, AND DEEP ZOOM
404
Figure 11-4. Adding a new marker in Expression Encoder
4. Adjust the time if necessary, and supply the marker text in the Value column.
5. If you want to use a marker for indexed navigation, you may want to select the Key
Frame and Thumbnail check boxes next to your new marker. If you create a key frame at
this location, playback can resume at precisely this location with minimal delay. If you
create a thumbnail, you can show that thumbnail to the user. The user can click that
thumbnail to tell your application to seek to the corresponding marker location. Both of
these features apply only if you use Expression Encoder to generate a Silverlight video
page (see step 7), although you can build similar features on your own.
6. Return to step 2, and repeat to add more markers. You can also edit existing markers and
click Remove to delete the currently selected marker.
CHAPTER 11 ■ SOUND, VIDEO, AND DEEP ZOOM
405
7. Expression Encoder can build a complete Silverlight-based media player to go along
with your encoded video. To use this feature, choose the Output tab at the far left, find
the Job Output box, and choose an item from the Template list that starts with Silverlight
3 (as in Silverlight 3 Gallery). The template determines the Silverlight version and the
visual skin that the Silverlight player page uses–you see a thumbnail preview when you
make your selection. If you choose (None), Expression Encoder doesn’t create a
Silverlight video player.
8. When you’re finished, click Encode to start encoding your video.
Using Markers in a Silverlight Application
The easiest way to show marker information is to handle the MarkerReached event of the
MediaElement. The TimelineMarkerRoutedEventArgs.Marker property provides a
TimelineMarker object. The TimelineMarker object includes the text of the marker (through the
Text property) and the exact time where it’s placed (through the Time property).
Here’s a simple event handler that copies the text from a marker to a TextBlock in the
Silverlight page, as shown in Figure 11-5:
private void media_MarkerReached(object sender, TimelineMarkerRoutedEventArgs e)
{
lblMarker.Text = e.Marker.Text + " at " + e.Marker.Time.TotalSeconds +
" seconds";
}
Rather than setting text, you can examine it and then determine the appropriate action
to perform.
Instead of waiting for the MarkerReached event, you can examine the Markers
collection of the MediaElement. This technique is particularly useful if you want to use markers
for navigation. For example, you can react to the MediaOpened event (at which point the
Markers collection has been populated) and then display the marker information in a list:
private void media_MediaOpened(object sender, RoutedEventArgs e)
{
foreach (TimelineMarker marker in media.Markers)
{
lstMarkers.Items.Add(marker.Text + " (" + marker.Time.Minutes + ":" +
marker.Time.Seconds + ":" + marker.Time.Milliseconds + ")");
}
}