Apress pro LINQ Language Integrated Query in C# 2008 phần 8 pps
Bạn đang xem bản rút gọn của tài liệu. Xem và tải ngay bản đầy đủ của tài liệu tại đây (1.65 MB, 57 trang )
■ ■ ■
PART 5
LINQ to SQL
Rattz_789-3.book Page 379 Tuesday, October 16, 2007 2:21 PM
Rattz_789-3.book Page 380 Tuesday, October 16, 2007 2:21 PM
381
■ ■ ■
CHAPTER 12
LINQ to SQL Introduction
Listing 12-1. A Simple Example Updating the ContactName of a Customer in the Northwind Database
// Create a DataContext.
Northwind db = new Northwind(@"Data Source=.\SQLEXPRESS;Initial Catalog=Northwind");
// Retrieve customer LAZYK.
Customer cust = (from c in db.Customers
where c.CustomerID == "LAZYK"
select c).Single<Customer>();
// Update the contact name.
cust.ContactName = "Ned Plimpton";
try
{
// Save the changes.
db.SubmitChanges();
}
// Detect concurrency conflicts.
catch (ChangeConflictException)
{
// Resolve conflicts.
db.ChangeConflicts.ResolveAll(RefreshMode.KeepChanges);
}
■Note This example requires generation of entity classes, which I will cover later in this chapter.
In Listing 12-1, I used LINQ to SQL to query the record whose CustomerID field is "LAZYK" from
the Northwind database Customers table and to return a Customer object representing that record.
I then updated the Customer object’s ContactName property and saved the change to the Northwind
database by calling the SubmitChanges method. That’s not much code considering it is also detecting
concurrency conflicts and resolving them if they occur.
Run Listing 12-1 by pressing Ctrl+F5. There is no console output, but if you check the database,
you should see that the ContactName for customer LAZYK is now "Ned Plimpton".
Rattz_789-3.book Page 381 Tuesday, October 16, 2007 2:21 PM
382
CHAPTER 12
■ LINQ TO SQL INTRODUCTION
■Note This example makes a change to the data in the database without changing it back. The original value of
the ContactName for customer LAZYK is "John Steel". You should change this back so that no subsequent
examples behave improperly. You could change it manually, or you could just change the example code to set it
back, and run the example again.
This book uses an extended version of the Northwind database. Please read the section in this chapter titled
“Obtaining the Appropriate Version of the Northwind Database” for details.
Introducing LINQ to SQL
At this point, I have discussed using LINQ with in-memory data collections and arrays, XML, and
DataSets. Now, I will move on to what many seem to feel is the most compelling reason to use LINQ,
LINQ to SQL. I say that because when I look at the MSDN forum for LINQ, the majority of the posts
seem to focus on LINQ to SQL. I think many developers are overlooking the significance of LINQ as
a general purpose query language and the multitude of ways it can be utilized. Hopefully, I have
convinced you of this already through the previous chapters.
LINQ to SQL is an application programming interface (API) for working with SQL Server data-
bases. In the current world of object-oriented programming languages, there is a mismatch between
the programming language and the relational database. When writing an application, we model
classes to represent real-world objects such as customers, accounts, policies, and flights. We need a
way to persist these objects so that when the application is restarted, these objects and their data are
not lost. However, most production-caliber databases are still relational and store their data as records in
tables, not as objects. A customer class may contain multiple addresses and phone numbers stored
in collections that are child properties of that customer class; once persisted, this data will most likely be
stored in multiple tables, such as a customer table, an address table, and a phone table.
Additionally, the data types supported by the application language differ from the database data
types. Developers left to their own devices are required to write code that knows how to load a customer
object from all of the appropriate tables, as well as save the customer object back to the appropriate
tables, handling the data type conversion between the application language and the database. This
is a tedious, and often error-prone, process. Because of this object-relational mapping (ORM) problem,
often referred to as the object-relational impedance mismatch, a plethora of prewritten ORM software
solutions have been designed through the years. LINQ to SQL is Microsoft’s entry-level LINQ-enabled
ORM implementation for SQL Server.
Notice that I said “for SQL Server.” LINQ to SQL is exclusive to SQL Server. LINQ, however, is
not, and hopefully, other database vendors are or will be at work implementing their own LINQ APIs.
I personally would like to see a LINQ to DB2 API, and I am sure many others would like to see LINQ
to Oracle, LINQ to MySQL, LINQ to Sybase, and perhaps others.
■Note LINQ to SQL only works with SQL Server or SQL Express. To use LINQ with other databases, additional
LINQ APIs will need to be written by the appropriate database vendors. Until then, or perhaps as an alternative,
consider using LINQ to DataSet.
You may have also noticed that I said LINQ to SQL is an entry-level ORM implementation. If you
find it is not powerful or flexible enough to meet your requirements, you may want to investigate
LINQ to Entities. While I do not cover LINQ to Entities in this book, it is alleged to be more powerful
and flexible than LINQ to SQL. Be aware, though, that the increase in power comes coupled with
additional complexity. Also, LINQ to Entities is not as mature as LINQ to SQL.
Rattz_789-3.book Page 382 Tuesday, October 16, 2007 2:21 PM
CHAPTER 12 ■ LINQ TO SQL INTRODUCTION
383
Most ORM tools attempt to abstract the physical database into business objects. With that
abstraction, we typically lose the ability to perform SQL queries, which is a large part of the attraction
to relational databases. This is what separates LINQ to SQL from many of its contemporaries. Not
only do we get the convenience of business objects that are mapped to the database, we get a full-
blown query language, similar to the already familiar SQL, thrown in to boot.
■Tip LINQ to SQL is an entry-level ORM tool that permits powerful SQL queries.
In addition to providing LINQ query capabilities, as long as your query returns LINQ to SQL
entity objects, as opposed to returning single fields, named nonentity classes, or anonymous classes,
LINQ to SQL also provides change tracking and database updates, complete with optimistic concur-
rency conflict detection and resolution, and transactional integrity.
In Listing 12-1, I first had to instantiate an instance of the Northwind class. That class is derived
from the DataContext class, and I will cover this class in-depth in Chapter 16. For now, consider it a
supercharged database connection. It also handles updating the database for us, as you can see when I
later call the SubmitChanges method on it. Next, I retrieved a single customer from the Northwind
database into a Customer object. That Customer object is an instantiation of the Customer class, which
is an entity class that either had to be written or generated. In this case, the Customer class was generated
for me by the SQLMetal utility, as was the Northwind class for that matter. After retrieving the customer,
I updated one of the Customer object’s properties, ContactName, and called the SubmitChanges method
to persist the modified contact name to the database. Please notice that I wrapped the call to the
SubmitChanges method in a try/catch block and specifically caught the ChangeConflictException
exception. This is for handling concurrency conflicts, which I will cover in detail in Chapter 17.
Before you can run this example or any of the others in this chapter, you will need to create entity
classes for the Northwind database. Please read the section in this chapter titled “Prerequisites for
Running the Examples” to guide you through creation of the necessary entity classes.
LINQ to SQL is a complex subject, and to provide any example requires involving many LINQ to
SQL elements. In the first example at the beginning of this chapter, I am utilizing a derived DataContext
class, which is the Northwind class; an entity class, which is the Customer class; concurrency conflict
detection and resolution; and database updates via the SubmitChanges method. I can’t possibly explain
all these concepts simultaneously. So, I need to give you some background on each of these compo-
nents before I begin so that you will have a basic understanding of the foundation of LINQ to SQL.
Rest assured that I will cover each of these concepts in agonizing detail later in the subsequent LINQ
to SQL chapters.
The DataContext
The DataContext is the class that establishes a connection to a database. It also provides several
services that provide identity tracking, change tracking, and change processing. I’ll cover each of
these services in more detail in Chapter 16. For now, just know that it is the DataContext class that is
connecting us to the database, monitoring what we have changed, and updating the database when
we call its SubmitChanges method.
It is typical with LINQ to SQL to use a class derived from the DataContext class. The name of the
derived class typically is the same as the database it is mapped to. I will often refer to that derived
class in the LINQ to SQL chapters as [Your]DataContext, because its name is dependent on the data-
base for which it is being created.
In my examples, my derived DataContext class will be named Northwind, because it was gener-
ated by the SQLMetal command-line tool, and SQLMetal names the generated, derived DataContext
class after the database for which it is generated.
Rattz_789-3.book Page 383 Tuesday, October 16, 2007 2:21 PM
384
CHAPTER 12
■ LINQ TO SQL INTRODUCTION
This derived DataContext class, [Your]DataContext, will typically have a Table<T> public prop-
erty for each database table you have mapped in the database, where T will be the type of the entity
class that is instantiated for each retrieved record from that particular database table. The data type
Table<T> is a specialized collection. For example, since there is a Customers table in the Northwind
database, my Northwind class derived from the DataContext class will have a Table<Customer> named
Customers. This means that I can access the records in the Customers database table by directly accessing
the Customers property of type Table<Customer> in my Northwind class. You can see an example of this
in the first example in this chapter, Listing 12-1, where I coded db.Customers. That code is querying
the records in the Customers table of the Northwind database.
Entity Classes
LINQ to SQL involves using entity classes, where each entity class is typically mapped to a single
database table. However, using entity class inheritance mapping, it is possible to map an entire class
hierarchy to a single table under special circumstances. You can read more about this in Chapter 18.
So, we have entity classes mapping to database tables, and the entity class properties get mapped to
table columns. This entity class-to-table and property-to-column mapping is the essence of LINQ
to SQL.
■Note The essence of LINQ to SQL is mapping entity classes to database tables and entity class properties to
database table columns.
This mapping can occur directly in class source files by decorating classes with the appropriate
attributes, or it can be specified with an external XML mapping file. By using an external XML mapping
file, the LINQ-to-SQL-specific bits can be kept external to the source code. This could be very handy
if you don’t have source code or want to keep the code separated from LINQ to SQL. For the majority
of examples in the LINQ to SQL chapters, I will be using entity classes that have been generated by
the SQLMetal command-line tool. SQLMetal generates the entity classes with the LINQ to SQL mapping
bits right in the source module it generates. These mapping bits are in the form of attributes and
attribute properties.
You will be able to detect the existence of entity classes in my examples when you see classes or
objects that have the singular form of a Northwind database table name. For example, in Listing 12-1, I
use a class named Customer. Because Customer is the singular form of Customers and the Northwind
database has a table named Customers, this is your clue that the Customer class is an entity class for
the Northwind database’s Customers table.
The SQLMetal command- line tool has an option called /pluralize that causes the entity classes
to be named in the singular form of the database table name. Had I not specified the /pluralize
option when generating my entity classes, my entity class would be named Customers, as opposed to
Customer, because the name of the table is Customers. I mention this in case you get confused reading
other writings about LINQ to SQL. Depending on how the author ran the SQLMetal tool and what
options were specified, the entity class names may be plural or singular.
Associations
An association is the term used to designate a primary key to foreign key relationship between two
entity classes. In a one-to-many relationship, the result of an association is that the parent class, the
class containing the primary key, contains a collection of the child classes, the classes having the
Rattz_789-3.book Page 384 Tuesday, October 16, 2007 2:21 PM
CHAPTER 12 ■ LINQ TO SQL INTRODUCTION
385
foreign key. That collection is stored in a private member variable of type EntitySet<T>, where T will
be the type of the child entity class.
For example, in the Customer entity class generated by the SQLMetal command-line tool for the
Northwind database, there is a private member of type EntitySet<Order> named _Orders that contains
all of the Order objects for a specific Customer object:
private EntitySet<Order> _Orders;
SQLMetal also generated a public property named Orders to be used for accessing the private
_Orders collection.
On the other end of the relationship, the child, which is the class containing the foreign key,
contains a reference to the parent class, since that is a many-to-one relationship. That reference is
stored in a private member variable of type EntityRef<T>, where T is the type of the parent class.
In the generated Northwind entity classes, the Order entity class contains a private member variable
of type EntityRef<Customer> named _Customer:
private EntityRef<Customer> _Customer;
Again, the SQLMetal tool also generated a public property named Customer to provide access to
the parent reference.
The association, primary and foreign keys, as well as the direction of the relationship are all defined
by attributes and attribute properties in the generated entity classes’ source module.
The benefit gained by the association is the ability to access a parent’s child classes, and there-
fore database records, as easily as accessing a property of the parent class. Likewise, accessing a
child’s parent class is as easy as accessing a property of the child class.
Concurrency Conflict Detection
One of the valuable services that the DataContext is performing for you is change processing. When
you try to update the database by calling the DataContext object’s SubmitChanges method, it is auto-
matically performing optimistic concurrency conflict detection.
If a conflict is detected, a ChangeConflictException exception is thrown. Any time you call
the SubmitChanges method, you should wrap that call in a try/catch block and catch the
ChangeConflictException exception. This is the proper way to detect concurrency conflicts.
You can see an example of this in Listing 12-1. I will go into painstaking detail about concur-
rency conflict detection and resolution in Chapter 17. Many of the examples in this and the following
LINQ to SQL chapters will not provide concurrency conflict detection or resolution for the sake of
brevity and clarity. In your real code, you should always do both.
Concurrency Conflict Resolution
Once a concurrency conflict has been detected, the next step will be to resolve the concurrency
conflict. This can be done in multiple ways. In Listing 12-1, I do it the simplest way by calling the
ResolveAll method of the ChangeConflicts collection of the derived DataContext class when the
ChangeConflictException exception is caught.
Again, in many of the examples in the LINQ to SQL chapters, I will not have code to either detect
the concurrency conflicts or to resolve them, but you should always have code handling this in your
real production code.
As I mentioned in the previous section, I will cover concurrency conflict resolution in detail in
Chapter 17.
Rattz_789-3.book Page 385 Tuesday, October 16, 2007 2:21 PM
386
CHAPTER 12
■ LINQ TO SQL INTRODUCTION
Prerequisites for Running the Examples
Since virtually all of the examples in this and the following LINQ to SQL chapters use Microsoft’s
sample extended Northwind database, we will need entity classes and mapping files for the North-
wind database.
Obtaining the Appropriate Version of the Northwind Database
Unfortunately, the standard Microsoft Northwind database is missing a few things I will need to fully
show off LINQ to SQL, such as table-valued and scalar-valued functions. Therefore, instead of using
the standard Northwind database, I will use an extended version of it that Microsoft initially distrib-
uted to demonstrate LINQ.
You may obtain the extended version of the Northwind database in the Book Extras section of
this book’s page at the Apress web site:
/>Or, you may obtain it at my site, LINQDev.com. Look for the section titled Obtain the Northwind
Database:
If you download it from LINQDev.com, make sure you download the extended version.
To run all the examples in the LINQ to SQL chapters of this book, you will need to download this
extended version of the Northwind database.
Generating the Northwind Entity Classes
Because I have not yet covered how to generate entity classes in detail, I am going to tell you how to
generate them without providing much explanation. However, I will cover the details thoroughly in
Chapter 13.
To generate the entity classes, you must have the extended version of the Northwind database
that I discussed in the previous section.
Open a Visual Studio command prompt. To do so, look in your Microsoft Visual Studio 2008
menu for a submenu named Visual Studio Tools for an item named Visual Studio 2008 Command
Prompt, and select it. Once the command prompt opens, change your current directory to whatever
directory in which you desire to create your entity classes and external mapping file. I am going to
change my directory to the root of the C: drive:
cd \
If you are going to generate your entity classes using the Northwind database files without first
attaching the database to them, use the following command:
sqlmetal /namespace:nwind /code:Northwind.cs /pluralize /functions /sprocs /views
<path to Northwind MDF file>
■Caution Pay particular attention to the MDF file name and its casing, as you specify it on the command line.
The name and case of the DataContext derived class that is generated will match the file name that is passed on
the command line, not the physical file name itself. If you deviate from a DataContext derived class name of
Northwind, none of the examples will work without modification. Therefore, it is critical that you pass the North-
wind database file name as [path]\Northwind.mdf, not northwind.mdf, NorthWind.mdf, or any other variation
of the name.
Rattz_789-3.book Page 386 Tuesday, October 16, 2007 2:21 PM
CHAPTER 12 ■ LINQ TO SQL INTRODUCTION
387
To create entity classes from a file named Northwind.mdf, enter the following command:
sqlmetal /namespace:nwind /code:Northwind.cs /pluralize /functions /sprocs /views
"C:\Northwind.mdf"
Running this command will cause an entity class module named Northwind.cs to be created for
you in the current directory.
If you are going to generate your entity classes from the Northwind database that is already
attached to your SQL Server, use the following command:
sqlmetal /server:<server> /user:<user> /password:<password> /database:Northwind
/namespace:nwind /code:Northwind.cs /pluralize /functions /sprocs /views
To create entity classes from an attached database named Northwind, enter the following
command:
sqlmetal /server:.\SQLExpress /database:Northwind /namespace:nwind
/code:Northwind.cs /pluralize /functions /sprocs /views
■Note Depending on your environment, you may need to specify a user with the /user:[username] option and
a password with the /password:[password] option on the command line in the preceding example. Please read
the section titled “SQLMetal” in Chapter 13 for more details.
The command entered using either of these approaches tells SQLMetal to generate the source
code into a file named Northwind.cs in the current directory. I will cover all the program’s options in
the next chapter. Copy the generated Northwind.cs file into your project by adding it as an existing
item.
You may now utilize LINQ to SQL on the Northwind database using the entity classes contained
in the Northwind.cs file.
■Tip Be cautious of making changes to the generated entity class source file. You may find you need to regenerate
it at some later point, causing you to lose any changes. You may desire to add business logic by adding methods to
the entity classes. Instead of modifying the generated file, consider taking advantage of C# 2.0 partial classes to
keep the added properties and methods in a separate source module.
Generating the Northwind XML Mapping File
I will also need to generate a mapping file that some of the examples will use. Again, I will use SQLMetal
for this purpose. So, from the same command line and path, execute the following command:
sqlmetal /map:northwindmap.xml "C:\Northwind.mdf" /pluralize /functions /sprocs
/views /namespace:nwind
Again, pay close attention to the casing used to specify the MDF file. This will generate a file
named northwindmap.xml into the current directory.
■Note This command will echo code to the screen as well as generating the XML mapping file, so don’t be
alarmed when you see the code on the screen.
Rattz_789-3.book Page 387 Tuesday, October 16, 2007 2:21 PM
388
CHAPTER 12
■ LINQ TO SQL INTRODUCTION
Using the LINQ to SQL API
In order to use the LINQ to SQL API, you will need to add the System.Data.Linq.dll assembly to your
project if it is not already there. Also, if they do not already exist, you will need to add using directives
to your source module for the System.Linq and System.Data.Linq namespaces like this:
using System.Data.Linq;
using System.Linq;
Additionally, for the examples, you will need to add a using directive for the namespace the
entity classes were generated into, nwind:
using nwind;
IQueryable<T>
You will see that in many of the LINQ to SQL examples in this chapter and the subsequent LINQ to
SQL chapters, I work with sequences of type IQueryable<T>, where T is the type of an entity class.
These are the type of sequences that are typically returned by LINQ to SQL queries. They will often
appear to work just like an IEnumerable<T> sequence, and that is no coincidence. The IQueryable<T>
interface implements the IEnumerable<T> interface. Here is the definition of IQueryable<T>:
interface IQueryable<T> : IEnumerable<T>, IQueryable
Because of this inheritance, you can treat an IQueryable<T> sequence like an IEnumerable<T>
sequence.
Some Common Methods
As you will soon see, many of the examples in the LINQ to SQL chapters become complex very quickly.
Demonstrating a concurrency conflict requires making changes to the database external to LINQ to
SQL. Sometimes, I need to retrieve data externally of LINQ to SQL too. To highlight the LINQ to SQL
code and to eliminate as many of the trivial details as possible, while at the same time providing real
working examples, I have created some common methods to use in many of the examples.
Be sure to add these common methods to your source modules as appropriate when testing the
examples in the LINQ to SQL chapters.
GetStringFromDb()
A common method that will come in handy is a method to obtain a simple string from the database
using standard ADO.NET. This will allow me to examine what is actually in the database, as opposed
to what LINQ to SQL is showing me.
GetStringFromDb: a Method for Retrieving a String Using ADO.NET
static private string GetStringFromDb(
System.Data.SqlClient.SqlConnection sqlConnection, string sqlQuery)
{
if (sqlConnection.State != System.Data.ConnectionState.Open)
{
sqlConnection.Open();
}
Rattz_789-3.book Page 388 Tuesday, October 16, 2007 2:21 PM
CHAPTER 12 ■ LINQ TO SQL INTRODUCTION
389
System.Data.SqlClient.SqlCommand sqlCommand =
new System.Data.SqlClient.SqlCommand(sqlQuery, sqlConnection);
System.Data.SqlClient.SqlDataReader sqlDataReader = sqlCommand.ExecuteReader();
string result = null;
try
{
if (!sqlDataReader.Read())
{
throw (new Exception(
String.Format("Unexpected exception executing query [{0}].", sqlQuery)));
}
else
{
if (!sqlDataReader.IsDBNull(0))
{
result = sqlDataReader.GetString(0);
}
}
}
finally
{
// always call Close when done reading.
sqlDataReader.Close();
}
return (result);
}
To call the GetStringFromDb method, a SqlConnection and a string containing a SQL query are
passed into the method. The method verifies that the connection is open, and if the connection is not
open, the method opens it.
Next, a SqlCommand is created by passing the query and connection into the constructor. Then, a
SqlDataReader is obtained by calling the ExecuteReader method on the SqlCommand. The SqlDataReader is
read by calling its Read method, and if data was read and the returned first column’s value is not null,
the returned first column value is retrieved with the GetString method.
Finally, the SqlDataReader is closed, and the first column’s value is returned to the calling method.
ExecuteStatementInDb()
Sometimes, I will need to execute nonquery SQL statements such as insert, update, and delete in
ADO.NET to modify the state of the database external to LINQ to SQL. For that purpose, I have created
the ExecuteStatementInDb method:
ExecuteStatementInDb: a Method for Executing Insert, Updates, and Deletes in ADO.NET
static private void ExecuteStatementInDb(string cmd)
{
string connection =
@"Data Source=.\SQLEXPRESS;Initial Catalog=Northwind;Integrated Security=SSPI;";
System.Data.SqlClient.SqlConnection sqlConn =
new System.Data.SqlClient.SqlConnection(connection);
Rattz_789-3.book Page 389 Tuesday, October 16, 2007 2:21 PM
390
CHAPTER 12
■ LINQ TO SQL INTRODUCTION
System.Data.SqlClient.SqlCommand sqlComm =
new System.Data.SqlClient.SqlCommand(cmd);
sqlComm.Connection = sqlConn;
try
{
sqlConn.Open();
Console.WriteLine("Executing SQL statement against database with ADO.NET ");
sqlComm.ExecuteNonQuery();
Console.WriteLine("Database updated.");
}
finally
{
// Close the connection.
sqlComm.Connection.Close();
}
}
To call the ExecuteStatementInDb method, a string is passed containing a SQL command. A
SqlConnection is created followed by a SqlCommand. The SqlConnection is assigned to the SqlCommand.
The SqlConnection is then opened, and the SQL command is executed by calling the SqlCommand
object’s ExecuteNonQuery method. Finally, the SqlConnection is closed.
Summary
In this chapter, I have introduced you to LINQ to SQL and some of its most basic terminology, such
as DataContext objects, entity classes, associations, and concurrency conflict detection and resolution.
I also showed you how to generate your entity classes and external mapping file for the extended
Northwind database. These entity classes will be used extensively throughout the LINQ to SQL examples.
Last, I provided a couple of common methods that many of the examples in the subsequent
LINQ to SQL chapters will rely on.
The next step is to arm you with some tips and show you how to use the necessary tools to
leverage LINQ to SQL, and this is exactly what the next chapter is about.
Rattz_789-3.book Page 390 Tuesday, October 16, 2007 2:21 PM
391
■ ■ ■
CHAPTER 13
LINQ to SQL Tips and Tools
In the previous chapter, I introduced you to LINQ to SQL and most of its terminology. I showed you
how to generate the entity classes that most of the examples in the LINQ to SQL chapters will require.
I also provided some common methods that many of the examples in these chapters will leverage.
In this chapter, I will present some tips that I hope you will find useful while working with LINQ
to SQL. I will also show you some of the tools that make LINQ to SQL such a pleasure to use.
Introduction to LINQ to SQL Tips and Tools
Now would be a good time to remind you that before you can run the examples in this chapter, you
must have met the prerequisites. First, you must have the extended Northwind database and already
generated the entity classes for it. Please review the section in Chapter 12 titled “Prerequisites for
Running the Examples” to ensure that you have the appropriate database and generated entity classes.
In this chapter, because I will be demonstrating code that utilizes entity classes generated by
both SQLMetal and the Object Relational Designer, I will not specify a using directive for the nwind
namespace in the examples. Instead, I will explicitly specify the namespace where it’s needed for the
nwind classes. This is necessary in this chapter to control which Customer entity class is getting referenced
in each specific example. Since, by default, the Object Relational Designer generates a namespace
that is the same as your project, and since the examples will already exist in your project’s namespace,
you will not need to specify the namespace for the designer-generated entity classes, but you will for
the SQLMetal-generated entity classes.
■Note Unlike most of the LINQ to SQL chapters, do not specify a using directive for the nwind namespace for
the examples in this chapter.
Tips
It’s early in the LINQ to SQL chapters, and keeping with my style, I am going to jump the gun and
give you some tips requiring information I have yet to discuss. So if this section makes little sense to
you, my work is done! After all, I want you to know about these tips before you need them, not after
you have learned them the hard way.
Use the DataContext.Log Property
Now would be a good time to remind you of some of the LINQ-to-SQL-specific tips I provided in
Chapter 1. One of those tips titled “The DataContext Log” discussed how you could use the DataContext
Rattz_789-3C13.fm Page 391 Tuesday, October 16, 2007 2:15 PM
392
CHAPTER 13
■ LINQ TO SQL TIPS AND TOOLS
object’s Log property to display what the translated SQL query will be. This can be very useful for not
only debugging purposes but for performance analysis. You may find that your LINQ to SQL queries
are getting translated into very inefficient SQL queries. Or, you may find that due to deferred
loading of associated entity classes, you are making many more SQL queries than is necessary.
The DataContext.Log property will reveal this type of information to you.
To take advantage of this feature, you merely assign the DataContext.Log property to a System.IO.
TextWriter object, such as Console.Out.
Listing 13-1 contains an example.
Listing 13-1. An Example Using the DataContext.Log Property
nwind.Northwind db =
new nwind.Northwind(@"Data Source=.\SQLEXPRESS;Initial Catalog=Northwind");
db.Log = Console.Out;
var custs = from c in db.Customers
where c.Region == "WA"
select new { Id = c.CustomerID, Name = c.ContactName };
foreach (var cust in custs)
{
Console.WriteLine("{0} - {1}", cust.Id, cust.Name);
}
Since I will be demonstrating both SQLMetal- and Object-Relational-Designer-generated entity
classes in this chapter, there will be two Customer classes that exist for the examples. As I mentioned
earlier, I did not include a using directive for the examples so that the entity classes such as Customer
would not be ambiguous. Therefore, I have to specify the namespace nwind for the Northwind class in
Listing 13-1, since I am using the SQLMetal-generated entity class code for this example.
As you can see, in Listing 13-1, I simply assign Console.Out to my Northwind DataContext object’s
Log property. Here are the results of Listing 13-1:
SELECT [t0].[CustomerID], [t0].[ContactName]
FROM [dbo].[Customers] AS [t0]
WHERE [t0].[Region] = @p0
@p0: Input String (Size = 2; Prec = 0; Scale = 0) [WA]
Context: SqlProvider(Sql2005) Model: AttributedMetaModel Build: 3.5.20706.1
LAZYK - John Steel
TRAIH - Helvetius Nagy
WHITC - Karl Jablonski
This allows us to see exactly what the generated SQL query looks like. Notice that the generated
SQL statement is not merely formatting a string, it is using parameters. So by using LINQ to SQL, we
automatically get protection from SQL injection attacks.
■Caution If you see in your results that the name associated with customer LAZYK is Ned Plimpton instead of
John Steel as I show in the preceding example, you probably ran Listing 12-1 without setting the data back as I
recommended. You may want to resolve this now before any further examples are affected.
Rattz_789-3C13.fm Page 392 Tuesday, October 16, 2007 2:15 PM
CHAPTER 13 ■ LINQ TO SQL TIPS AND TOOLS
393
In later chapters, I will demonstrate how to use this logging feature to detect and resolve potential
performance issues.
Use the GetChangeSet() Method
You can use the DataContext object’s GetChangeSet method to obtain all entity objects containing
changes that need to be persisted to the database when the SubmitChanges method is called. This is
useful for logging and debugging purposes. This method is also fully documented in Chapter 16.
Consider Using Partial Classes or Mapping Files
Without a doubt, one of the bigger hassles of using any ORM tool is going to be managing changes to
the database. If you keep all your business class logic and LINQ to SQL logic in the same modules,
you may be creating a maintenance headache for yourself down the road once the database changes.
Consider leveraging partial classes by adding your business logic to a separate module than the
generated entity class modules. By using partial classes to keep your LINQ to SQL database attributes
separate from your business logic, you will minimize the need to add code back to any generated
entity class code.
Alternatively, you could have your business classes and your LINQ to SQL entity mapping
decoupled by using an external XML mapping file. This is an XML file that maps business objects to
the database without relying on LINQ to SQL attributes. You can read more about mapping files in the
section titled XML External Mapping File Schema in Chapter 15 and in the DataContext constructor
section of Chapter 16.
Consider Using Partial Methods
Partial methods were added late to the C# language feature set, but that doesn’t mean you should
ignore them. Partial methods are lightweight events that allow you to hook into certain events that
occur in entity classes. The beauty of partial methods is that if you do not take advantage of them
by implementing the body of a partial method, there is no overhead and no code is emitted by the
compiler to call them.
I will discuss how partial methods are used in entity classes in the section named “Calling the
Appropriate Partial Methods” in Chapter 15.
Tools
Just as there are some tips I want to make you aware of before you actually need them, there are
some tools that can make your life easier. Again, I may be bringing these up before they make sense
to you, but I want you to be aware of them and how they can facilitate and accelerate your adoption
of LINQ to SQL.
SQLMetal
While I have yet to discuss the different ways to create the entity classes necessary to use LINQ to
SQL with a database, you should know that the easiest way to generate all entity classes for an entire
database, if you do not already have business classes, is with the SQLMetal program. You can find
this tool in your %windir%\Microsoft.NET\Framework\v3.5 directory. SQLMetal allows you to specify
a database, and it will generate all the necessary and nifty parts of LINQ to SQL entity classes. SQLMetal
is a command-line tool, and there is no user interface for it.
Rattz_789-3C13.fm Page 393 Tuesday, October 16, 2007 2:15 PM
394
CHAPTER 13
■ LINQ TO SQL TIPS AND TOOLS
To see the options available for the SQLMetal program, open a Visual Studio command prompt.
To do so, look in your Microsoft Visual Studio 2008 menu for a submenu named Visual Studio Tools
for an item named Visual Studio 2008 Command Prompt, and select it.
Once the command prompt is open, type sqlmetal, and press Enter:
sqlmetal
This command will cause the program’s template and options to be displayed:
Microsoft (R) Database Mapping Generator 2008 Beta 2 version 1.00.20706
for Microsoft (R) .NET Framework version 3.5
Copyright (C) Microsoft Corporation. All rights reserved.
SqlMetal [options] [<input file>]
Generates code and mapping for the LINQ to SQL component of the .NET framework.
SqlMetal can:
- Generate source code and mapping attributes or a mapping file from a database.
- Generate an intermediate dbml file for customization from the database.
- Generate code and mapping attributes or mapping file from a dbml file.
Options:
/server:<name> Database server name.
/database:<name> Database catalog on server.
/user:<name> Login user ID (default: use Windows Authentication).
/password:<password> Login password (default: use Windows Authentication).
/conn:<connection string> Database connection string. Cannot be used with
/server, /database, /user or /password options.
/timeout:<seconds> Timeout value to use when SqlMetal accesses the
database (default: 0 which means infinite).
/views Extract database views.
/functions Extract database functions.
/sprocs Extract stored procedures.
/dbml[:file] Output as dbml. Cannot be used with /map option.
/code[:file] Output as source code. Cannot be used with /dbml
option.
/map[:file] Generate mapping file, not attributes. Cannot be used
with /dbml option.
/language:<language> Language for source code: VB or C# (default: derived
from extension on code file name).
/namespace:<name> Namespace of generated code (default: no namespace).
/context:<type> Name of data context class (default: derived from
database name).
/entitybase:<type> Base class of entity classes in the generated code
(default: entities have no base class).
/pluralize Automatically pluralize or singularize class and member
names using English language rules.
/serialization:<option> Generate serializable classes: None or Unidirectional
(default: None).
/provider:<type> Provider type: SQLCompact, SQL2000, or SQL2005.
(default: provider is determined at run time).
Rattz_789-3C13.fm Page 394 Tuesday, October 16, 2007 2:15 PM
CHAPTER 13 ■ LINQ TO SQL TIPS AND TOOLS
395
<input file> May be a SqlExpress mdf file, a SqlCE sdf file, or a
dbml intermediate file.
Create code from SqlServer:
SqlMetal /server:myserver /database:northwind /code:nwind.cs /namespace:nwind
Generate intermediate dbml file from SqlServer:
SqlMetal /server:myserver /database:northwind /dbml:northwind.dbml
/namespace:nwind
Generate code with external mapping from dbml:
SqlMetal /code:nwind.cs /map:nwind.map northwind.dbml
Generate dbml from a SqlCE sdf file:
SqlMetal /dbml:northwind.dbml northwind.sdf
Generate dbml from SqlExpress local server:
SqlMetal /server:.\sqlexpress /database:northwind /dbml:northwind.dbml
Generate dbml by using a connection string in the command line:
SqlMetal /conn:"server='myserver'; database='northwind'" /dbml:northwind.dbml
As you can see, it even provides a few examples too. Most of the options are fairly self-explanatory,
but for those that aren’t, Table 13-1 provides a summary.
Table 13-1. SQLMetal Command Line Options
Option / Example Description
/server:<name>
/server:.\SQLExpress
This option allows you to specify the name of the database
server to connect to. If omitted, SQLMetal will default to
localhost/sqlexpress.
To have SQLMetal generate entity classes from an MDF file,
omit this option and the /database option, and specify the
pathed MDF file name at the end of the command.
/database:<name>
/database:Northwind
This is the name of the database on the specified server for
which to generate entity classes.
To have SQLMetal generate entity classes from an MDF file,
omit this option and the /server option, and specify the
pathed MDF file name at the end of the command.
/user:<name>
/user:sa
This is the user account used to login to the specified data-
base when connecting to create the entity classes.
/password:<password>
/password:1590597893
This is the password used for the specified user account to
login to the specified database when connecting to create
the entity classes.
/conn:<connection string>
/conn:"Data
Source=.\SQLEXPRESS;Initial
Catalog=Northwind;Integrated
Security=SSPI;"
This is a connection string to the database. You may use this
instead of specifying the /server, /database, /user, and
/password options.
Rattz_789-3C13.fm Page 395 Tuesday, October 16, 2007 2:15 PM
396
CHAPTER 13
■ LINQ TO SQL TIPS AND TOOLS
/timeout:<seconds>
/timeout:120
This option allows you to specify the timeout value in
seconds to use for database commands.
Omitting this option will cause SQLMetal to default to 0,
which means never timeout.
At this time, this option is not supported, and no changes will
exist in the generated code because of this option. You may
want to check to see if this option works in your installation
of Visual Studio 2008. If this option does not work, consider
setting the CommandTimeout property of the DataContext class,
or for even more granular control, call the DataContext.
GetCommand method to set the timeout for a specific query.
See Listing 16-29 in Chapter 16 for an example doing this.
/views
/views
Specify this option to have SQLMetal generate the necessary
Table<T> properties and entity classes to support the specified
database’s views.
/functions
/functions
Specify this option to have SQLMetal generate methods to
call the specified database’s user-defined functions.
/sprocs
/sprocs
Specify this option have SQLMetal generate methods to call
the specified database’s stored procedures.
/dbml[:file]
/dbml:Northwind.dbml
This option specifies the file name for a DBML intermediate
file. The purpose of generating this file is so that you control
class and property names of the generated entity classes.
You would generate the dbml intermediate file with this
option, edit the file, and then create a source code module
by calling SQLMetal on the intermediate dbml file and
specifying the /code option.
Alternatively, you could load the DBML intermediate file
created with this option into the Object Relational Designer,
edit the file in the designer using its GUI, and allow the
designer to generate the necessary source code.
This option cannot be used with the /map option.
/code[:file]
/code:Northwind.cs
This is the file name for SQLMetal to create containing the
derived DataContext and entity classes in the specified
programming language.
This option cannot be used with the /dbml option.
Interestingly, if you specify both the /code and /map options
in the same invocation of SQLMetal, you will get code
generated without LINQ to SQL attributes. Of course, you
would use the also generated map with the generated code
to be able to use LINQ to SQL.
Table 13-1. SQLMetal Command Line Options (Continued)
Option / Example Description
Rattz_789-3C13.fm Page 396 Tuesday, October 16, 2007 2:15 PM
CHAPTER 13 ■ LINQ TO SQL TIPS AND TOOLS
397
/map[:file]
/map:northwindmap.xml
This option specifies that SQLMetal should generate an
XML external mapping file, as opposed to a source code
module specified by the /code option.
This XML external mapping file can then be loaded when
instantiating the DataContext. This allows LINQ to SQL to
be used without any actual LINQ to SQL source code being
compiled with your code.
Interestingly, if you specify both the /code and /map options
in the same invocation of SQLMetal, you will get code
generated without LINQ to SQL attributes. Of course, you
would use the also generated map with the generated code
to be able to use LINQ to SQL.
/language:<language>
language:C#
This option defines for which programming language
SQLMetal is to generate the code. The valid options are
currently csharp, C#, and VB.
Omitting this option will cause SQLMetal to derive the
language from the specified code file name’s extension.
/namespace:<name>
/namespace:nwind
This dictates the namespace that the generated derived
DataContext and entity classes will live in.
/context:<type>
/context:Northwind
This specifies the name of the generated class that will be
derived from the DataContext class.
If this option is omitted, the class name will be the same as
the database for which the code was generated.
/entitybase:<type>
/entitybase:MyEntityClassBase
This specifies the name of a class for SQLMetal to specify as
the base class for all generated entity classes.
If this option is omitted, the generated entity classes will
not be derived from any class.
/pluralize
/pluralize
This option causes SQLMetal to retain the plural names for
tables but to singularize the entity class names mapped to
those tables. So, for a database table named Customers, the
entity class generated will be named Customer (singular),
and a Table<Customer> will be generated named Customers
(plural). In this way, a Customer object exists in a Customers
table. Grammatically speaking, this sounds correct.
Without specifying this option, the entity class will be
named Customers (plural), and the Table<Customers> will
be named Customers (plural). This means a Customers
object will exist in the Customers table. Grammatically
speaking, this sounds incorrect.
/serialization:<option>
/serialization:None
This option specifies whether SQLMetal should generate
serialization attributes for the classes. The choices are None
and Unidirectional.
If this option is not specified, SQLMetal will default to None.
Table 13-1. SQLMetal Command Line Options (Continued)
Option / Example Description
Rattz_789-3C13.fm Page 397 Tuesday, October 16, 2007 2:15 PM
398
CHAPTER 13
■ LINQ TO SQL TIPS AND TOOLS
Notice that the /dbml, /code, and /map options may be specified without providing a file name.
If a file name is not specified, the generated code or XML will be output to the console.
XML Mapping File Vs. DBML Intermediate File
One of the confusing aspects of using SQLMetal is that it allows you to specify two different types of
XML files to produce. One is created by specifying the /map option, and the other is created by specifying
the /dbml option.
The difference between these two files is that the /map option creates an XML external mapping
file intended to be loaded when the DataContext is instantiated. The /map option is an alternative to
generating, or writing by hand, a source module containing LINQ to SQL attributes that you compile.
With this approach, your source code never has any database-specific LINQ to SQL code compiled
with or linked to it. This allows for somewhat dynamic consumption of a database, since you do not
need any pregenerated and compiled code. I say it is “somewhat dynamic,” because your code has
to know the names of tables and fields; otherwise, it wouldn’t even know what to query. The XML
external mapping file instructs LINQ to SQL as to what tables, columns, and stored procedures exist
with which it can interact and to what classes, class properties, and methods they should be mapped.
The /dbml option creates an intermediate DBML (XML) file for the purpose of allowing you to
edit it to control class and property names for the soon-to-be-generated entity classes. You would
then generate a source code module by running SQLMetal again, this time against the DBML file
instead of the database, and specifying the /code option. Or, you can load the DBML intermediate file
into the Object Relational Designer, edit it in the designer, and allow the designer to generate the
necessary entity class source code.
Another reason that the two XML files that SQLMetal can produce, the XML mapping file and
the DBML intermediate file, are confusing is that their schemas are fairly similar. So don’t be surprised
when you see just how similar they are. The schema for the XML mapping file will be discussed in
Chapter 15.
Working with DBML Intermediate Files
As I said, the purpose of the DBML intermediate file is to allow you the opportunity to insert yourself
between the database schema extraction and the entity class generation so that you can control
class and property names. Therefore, if you have no need to do that, you have no need to generate a
DBML intermediate file. That said, let’s continue as though you have the need.
/provider:<type>
/provider:SQL2005
This option is used to specify the database provider class.
The valid values are SQLCompact, SQL2000, and SQL2005.
SQLMetal will generate a Provider attribute that specifies
the class you specify with this option.
In Visual Studio 2008 Beta 2, the valid choices are
Sql2000Provider, Sql2005Provider, and SqlProvider. All of
these provider classes are in the System.Data.Linq.SqlClient
namespace and the namespace must be specified for
the option.
Table 13-1. SQLMetal Command Line Options (Continued)
Option / Example Description
Rattz_789-3C13.fm Page 398 Tuesday, October 16, 2007 2:15 PM
CHAPTER 13 ■ LINQ TO SQL TIPS AND TOOLS
399
Assuming you have the extended Northwind database attached to your SQL Server database,
here is how you would create the intermediate DBML file:
sqlmetal /server:.\SQLExpress /database:Northwind /pluralize /sprocs /functions
/views /dbml:Northwind.dbml
■Note Specifying the /server and /database options when running SQLMetal requires that the extended
Northwind database be attached to SQL Server.
Additionally, you may need to specify the appropriate /user and /password options so that
SQLMetal can connect to the database.
Or, if you prefer, you can generate the DBML intermediate file from an MDF file:
sqlmetal /pluralize /sprocs /functions /views /dbml:Northwind.dbml
"C:\Northwind.mdf"
■Note Generating the DBML intermediate file from an MDF file may cause the MDF database file to be attached to SQL
Server with the name C:\NORTHWIND.MDF or something similar. You should rename the database to “Northwind” inside
SQL Server Enterprise Manager or SQL Server Management Studio so that the examples work properly.
Either of these two approaches should produce an identical DBML intermediate file. I specified
only those options relevant for reading the database and producing the DBML file. Options such as
/language and /code are only relevant when creating the source code module.
Once you have edited your intermediate XML file, here is how you would produce the source
code module:
sqlmetal /namespace:nwind /code:Northwind.cs Northwind.dbml
The options I specified in that execution of SQLMetal are relevant when generating the source code.
DBML Intermediate File Schema
If you decide to take the route of creating the DBML intermediate file so that you can edit it and then
generate your entity class mappings from that, you will need to know the schema and what the element
and attribute names mean.
Because the schema is subject to change, please consult the Microsoft documentation for the
DBML intermediate file schema for the most recent schema definition and explanation. Once you
understand the schema, you could choose to manually edit the DBML intermediate file to control
entity class and property names and then generate the entity class source code with SQLMetal from
your edited DBML intermediate file.
Or, even better, you can load the generated DBML intermediate file into Visual Studio’s Object
Relational Designer and edit it there. This will give you a GUI interface for maintaining your O/R
model and free you from the necessity of knowing and understanding the schema. I will describe
how to edit your O/R model in the next section.
Rattz_789-3C13.fm Page 399 Tuesday, October 16, 2007 2:15 PM
400
CHAPTER 13
■ LINQ TO SQL TIPS AND TOOLS
The Object Relational Designer
In addition to the SQLMetal tool, there is also a graphical user tool for generating entity classes that
runs inside of Visual Studio. This tool is called the Object Relational Designer, but you will commonly
see it referred to as the LINQ to SQL Designer, the O/R Designer, or even DLinq Designer. SQLMetal
is designed to generate entity classes for all tables in a database, despite the fact that you do have the
ability to be selective by generating an intermediate DBML file, modifying it, and generating entity
classes from it. Furthermore, SQLMetal is a command-line utility. For a more selective approach
with a graphical user interface, the Object Relational Designer is just the ticket. I will refer to the
Object Relational Designer as “the designer” in this chapter.
The designer gives the developer drag and drop design-time entity class modeling. You needn’t
worry; the designer does most of the difficult work for you. You get the easy parts of selecting the
database tables you want modeled and, if it suits you, editing entity class and entity class property
names. Of course, you still have the option of doing all the modeling manually in the designer if you
desire ultimate control.
Creating Your LINQ to SQL Classes File
The first step to use the designer is to create a LINQ to SQL Classes file by right-clicking your project
and selecting Add/New Item from the pop-up context menu. After doing that, the Add New Item
dialog box will open. Select the LINQ to SQL Classes template from the list of installed templates.
Edit the name to whatever you choose. The name of the database you will be modeling is typically a
good choice for the LINQ to SQL Classes file name. The extension for a LINQ to SQL Classes file is
.dbml. For this example, I will use Northwind.dbml for the name of the file.
■Caution If you create a file named Northwind.dbml in a project you have already created for the samples in this
book, be careful that you don’t end up with a name collision between the designer-generated code and your already
existing code.
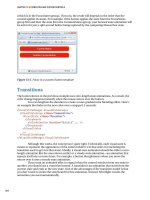
Click the Add button once you have named the file. You will then be presented with a blank
window. This is your designer canvas. Figure 13-1 shows the designer canvas.
If you click the canvas and examine the Properties window, you will see a property named Name.
The value of the Name property will be the name of the generated DataContext class. Because I
named my LINQ to SQL Classes file Northwind.dbml, the Name property’s value will default to
NorthwindDataContext, which is just fine. You could change it if you wanted to, but for this discussion,
I will leave it as it is.
If you examine the Solution Explorer, you will see that you now have a file nested under
Northwind.dbml named Northwind.designer.cs. If you open this file, you will see that it contains very
little code at this point. Basically, it will contain the constructors for the new DataContext class it is
deriving for you named NorthwindDataContext.
Rattz_789-3C13.fm Page 400 Tuesday, October 16, 2007 2:15 PM
CHAPTER 13 ■ LINQ TO SQL TIPS AND TOOLS
401
Figure 13-1. The Object Relational Designer canvas
Connecting the DataContext to the Database
The next step is to add a connection to the appropriate database server containing the Northwind
database in the Server Explorer window if one does not already exist.
■Tip If you do not see the Server Explorer window, select Server Explorer from the Visual Studio View menu.
To add a connection to the database, right-click the Data Connections node in the Server Explorer
window, and choose the Add Connection menu item to open the Add Connection dialog box, shown
in Figure 13-2. The “Data source” entry field will default to Microsoft SQL Server (SqlClient), which
is what we want.
Configure the appropriate settings for your Northwind database in the Add Connection dialog
box. You may want to click the Test Connection button to make sure you have properly configured
the connection.
Rattz_789-3C13.fm Page 401 Tuesday, October 16, 2007 2:15 PM
402
CHAPTER 13
■ LINQ TO SQL TIPS AND TOOLS
Figure 13-2. The Add Connection dialog box
Once you have the connection properly configured, click the OK button. You should now have
a node representing your Northwind database connection under the Data Connections node in the
Server Explorer. You may now access the Northwind database in the designer.
Before proceeding, make sure you are viewing the Northwind.dbml file in the Visual Studio editor.
Adding an Entity Class
Find your Northwind database in the list of Data Connections in the Server Explorer window. Expand the
Tables node, and you should be presented with a list of tables in the Northwind database. Entity classes
are created by dragging tables from the Table list in the Server Explorer window to the designer canvas.
From the Server Explorer, drag the Customers table to the designer canvas. You have just instructed
the designer to create an entity class for the Customers table named Customer. Your canvas should
look like Figure 13-3.
You may have to resize some of the panes to be able to see everything clearly. By dragging the
Customers table to the designer canvas, the source code for the Customer entity class is added to the
Northwind.designer.cs source file. Once you build your project, which we will do in a few moments,
you can begin using the Customer entity class to access and update data in the Northwind database.
It’s just that simple!
Rattz_789-3C13.fm Page 402 Tuesday, October 16, 2007 2:15 PM
CHAPTER 13 ■ LINQ TO SQL TIPS AND TOOLS
403
Figure 13-3. The designer after dragging the Customers table to the canvas
However, before I build the project and write code utilizing the generated entity classes, I want
to create a few more bits necessary to reap all the benefits of LINQ to SQL. Now, from the Server
Explorer, drag the Orders table to the canvas. You may need to move it around the canvas to get it to
a desirable location. You have now instructed the designer to create an entity class for the Orders
table named Order. Your canvas should look something like Figure 13-4.
You may notice that in Figure 13-4 there is no longer a pane on the right side of the canvas that
existed in the previous figures of the designer. This window is the Methods pane. I closed that pane
by right-clicking the canvas and selecting the Hide Methods Pane context menu item. To open the
Methods pane, right-click the canvas, and select the Show Methods Pane context menu item. I will
leave the Methods pane closed so that more of the canvas is visible.
Looking at the canvas, you will see a dashed line connecting the Customer class to the Order class.
That dashed line represents the relationship, referred to as an association in LINQ to SQL, between
the Customers and Orders tables, as defined by the FK_Orders_Customers foreign key constraint
that exists in the Northwind database. That line being there indicates that the designer will also be
creating the necessary association in the entity classes to support the relationship between those two
entity classes. The existence of that association will allow you to obtain a reference to a collection of
a customer’s orders by referencing a property on a Customer object and to obtain a reference to an
order’s customer by referencing a property on an Order object.
Rattz_789-3C13.fm Page 403 Tuesday, October 16, 2007 2:15 PM