Programming Linux Games phần 9 pdf
Bạn đang xem bản rút gọn của tài liệu. Xem và tải ngay bản đầy đủ của tài liệu tại đây (296.33 KB, 42 trang )
GAMING WITH THE LINUX CONSOLE 327
Personally I think this design is seriously misguided (a program can
easily leave the console in an unusable state), but it’s entrenched at this
point. It might be a good idea to create a script to restore the
framebuffer’s state, in case you find yourself without a working display
after a failed program run.
Some programs partially overcome the problem by opening a new
virtual terminal before setting the video mode and then switching back
to the old one when they exit.
How Video Scanning Works
A video mode can be described by several key properties. Users and even
programmers usually just speak of video modes in terms of resolution and color
depth, with an occasional mention of refresh rate.
A more precise way of describing a video mode is to list the various time
intervals involved in the video scanning process. This information has to be
provided at some point, regardless of how it is presented to the user or
programmer; the CRTC unit needs it in order to scan an image on the display.
Although these numbers may seem mysterious at first, they’re pretty simple to
work with once you understand what they mean.
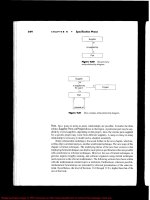
Figure 8–1 illustrates the different components involved in a single video refresh.
The monitor’s electron beam (see the beginning of Chapter 4) starts in the
upper left corner, sweeping from left to right repeatedly as it moves from the top
of the screen to the bottom. Each horizontal sweep is called a scanline. The
process begins with a few wasted sweeps. This period is called the upper margin,
and it serves to get the electron beam in position for the actual image-drawing
process. The upper margin is measured in scanlines.
Now that the beam is positioned at the upper left corner of the visible portion of
the monitor, it can start producing pixels. It proceeds to generate a complete
image by performing a number of sweeps equal to the vertical resolution of the
display mode (480 scanlines, in the case of Figure 8–1). Each sweep begins with
a blanking period (dead zone) called the left margin and ends with another
blanking period called the right margin. These two margins are measured in
pixels, and actual drawing takes place between them. Immediately after the
right margin, a brief horizontal sync pulse from the video card instructs the
328 CHAPTER 8
Upper margin (33 hidden scanlines)
Left margin (48 hidden pixels)
Right margin (16 hidden pixels)
Lower margin (10 hidden scanlines)
X resolution (640 pixels)
Y resolution (480 pixels)
Vertical retrace pulse (time equiv. to 2 scanlines)
Horizontal retrace pulse (time equiv. to 96 pixels)
Electron beam scanning direction
Figure 8–1: Components used to describe video timings
monitor to begin a new scanline. The interval between the sync pulse and the
start of the next scanline is known as the horizontal retrace.
A complete refresh ends with a lower margin and a final vertical sync pulse, both
timed in scanlines. After receiving the vertical sync pulse, the monitor prepares
for another refresh by moving the electron beam back to the upper left corner.
The time between the start of the lower margin and the end of the subsequent
upper margin is known as the vertical retrace. (This is an ideal time to update
video memory, since the video hardware isn’t updating the display.)
GAMING WITH THE LINUX CONSOLE 329
To fully describe a video mode, then, we need the following pieces of information:
dotclock Dotclock frequency (the time it takes to draw one pixel)
hres Horizontal resolution (in dotclocks)
vres Vertical resolution (in dotclocks)
hsync Horizontal sync pulse length (in dotclocks)
vsync Vertical sync pulse length (in dotclocks)
left Left margin (in dotclocks)
right Right margin (in dotclocks)
upper Upper margin (in scanlines)
lower Lower margin (in scanlines)
We can use this information to calculate another important attribute of a video
mode: its refresh rate. A high-quality video mode should refresh at least 75
times per second to reduce eye strain. Let’s calculate the refresh rate of the
video mode illustrated in Figure 8–1, which has a dotclock frequency of 25.175
MHz (an arbitrary value particular to this mode; these timings are from a
standard video mode database). If there are 25.175 million dotclocks per second,
each dotclock lasts for approximately 39,722 picoseconds (one picosecond is
10
−12
seconds). Each complete scanline (including both margins and the sync
pulse), then, takes (48 + 640 + 16 + 96) × 39, 722 = 31, 777, 600 picoseconds to
draw. The entire refresh consists of 33 + 480 + 10 scanlines plus 2 scanlines for
the vertical sync pulse, which comes to a total of 525 scanlines. If each scanline
lasts for 31,777,600 picoseconds, the entire process takes about 0.01668 seconds
to complete, for a refresh rate of 59.9 Hz (usually rounded up to 60 Hz in
documentation). This is not a very good refresh rate, but it’s acceptable for
some applications.
330 CHAPTER 8
The Mode Database
If the current framebuffer device is capable of mode switching and you know the
exact timings for the mode you’d like to set, changing video modes is a matter of
a single ioctl call. You’ll see that in the next example. But finding the right
timings can be a bit of a hassle.
As I already mentioned, the framebuffer device system (more specifically the
fbset utility) keeps a database of valid mode timings in the file /etc/fb.modes.
Although the structure of this file leaves a bit to be desired from a parser-writing
point of view, it’s easy enough to figure out. fb.modes is a plain text database
containing one or more mode sections. Here’s a sample mode section from my
copy of fb.modes:
mode "640x480-60"
# D: 25.175 MHz, H: 31.469 kHz, V: 59.94 Hz
geometry 640 480 640 480 8
timings 39722 48 16 33 10 96 2
endmode
Lines beginning with a hash (#) are comments, lines beginning with geometry
specify the mode’s geometry (physical resolution, virtual resolution, and color
depth), and lines beginning with timings specify the mode’s timing parameters.
It is the responsibility of the system administrator (or whoever installed the
fbset utility) to provide correct modes and timings for the local system. The
default mode database distributed with fbset is valid for most video cards, and
in all honesty most people don’t bother to change it. It contains reasonable
values for most video cards and monitors.
fbmodedb.c and fbmodedb.h contain code for parsing /etc/fb.modes. You
can find the code in the listings archive; it’s not interesting enough to include
here.
An Example
We’re ready to set a video mode. We’ll use fbmodedb.c to handle the
/etc/fb.modes database, and the FBIOPUT VSCREENINFO ioctl to convey our
desired mode to the framebuffer driver. Here’s the code:
GAMING WITH THE LINUX CONSOLE 331
Code Listing 8–2 (modeswitch.c)
/* An example of framebuffer mode switching. */
#include <stdio.h>
#include <stdlib.h>
#include <fcntl.h>
#include <errno.h>
#include <string.h>
#include <unistd.h>
#include <asm/page.h>
#include <sys/mman.h>
#include <sys/ioctl.h>
#include <asm/page.h>
#include <linux/fb.h>
#include "fbmodedb.h"
int main(int argc, char *argv[])
{
char *fbname;
int fbdev;
struct fb_fix_screeninfo fixed_info;
struct fb_var_screeninfo var_info, old_var_info;
FbModeline *modelist;
FbModeline *selected;
u_int8_t pixel_r, pixel_g, pixel_b;
int x, y;
u_int32_t pixel_value;
void *framebuffer;
int framebuffer_size;
int ppc_fix;
/* Let the user specify an alternate framebuffer
device on the command line. Default to
/dev/fb0. */
if (argc >= 2)
fbname = argv[1];
else
fbname = "/dev/fb0";
printf("Using framebuffer device %s.\n", fbname);
332 CHAPTER 8
/* Open the framebuffer device. */
fbdev = open(fbname, O_RDWR);
if (fbdev < 0) {
printf("Error opening %s.\n", fbname);
return 1;
}
/* Get the variable screen info. */
if (ioctl(fbdev, FBIOGET_VSCREENINFO, &var_info) < 0) {
printf("Unable to retrieve variable screen info: %s\n",
strerror(errno));
close(fbdev);
return 1;
}
/* Back up this info so we can restore it later. */
old_var_info = var_info;
/* Load the modes database. */
modelist = FB_ParseModeDB("/etc/fb.modes");
if (modelist == NULL) {
printf("Unable to load /etc/fb.modes.\n");
close(fbdev);
return 1;
}
/* Switch into a 640x480 mode. Take the first one we find. */
selected = modelist;
while (selected != NULL) {
if (selected->xres == 640 && selected->yres == 480)
break;
selected = selected->next;
}
if (selected == NULL) {
printf("No 640x480 modes found in /etc/fb.modes.\n");
FB_FreeModeDB(modelist);
close(fbdev);
return 1;
}
GAMING WITH THE LINUX CONSOLE 333
/* Copy the timing data into the variable info structure. */
var_info.xres = selected->xres;
var_info.yres = selected->yres;
var_info.xres_virtual = var_info.xres;
var_info.yres_virtual = var_info.yres;
var_info.pixclock = selected->dotclock;
var_info.left_margin = selected->left;
var_info.right_margin = selected->right;
var_info.upper_margin = selected->upper;
var_info.lower_margin = selected->lower;
var_info.hsync_len = selected->hslen;
var_info.vsync_len = selected->vslen;
/* Ask for 16bpp. */
var_info.bits_per_pixel = 16;
/* This is a bitmask of sync flags. */
var_info.sync = selected->hsync * FB_SYNC_HOR_HIGH_ACT +
selected->vsync * FB_SYNC_VERT_HIGH_ACT +
selected->csync * FB_SYNC_COMP_HIGH_ACT +
selected->extsync * FB_SYNC_EXT;
/* This is a bitmask of mode attributes. */
var_info.vmode = selected->laced * FB_VMODE_INTERLACED +
selected->doublescan * FB_VMODE_DOUBLE;
var_info.activate = FB_ACTIVATE_NOW;
/* Set the mode with an ioctl. It may not accept the exact
parameters we provide, in which case it will edit the
structure. If our selection is completely unacceptable,
the ioctl will fail. */
if (ioctl(fbdev, FBIOPUT_VSCREENINFO, &var_info) < 0) {
printf("Unable to set variable screen info: %s\n",
strerror(errno));
close(fbdev);
return 1;
}
printf("Mode switch ioctl succeeded.\n");
printf("Got resolution %ix%i @ %ibpp.\n",
var_info.xres,
334 CHAPTER 8
var_info.yres,
var_info.bits_per_pixel);
/* Retrieve the fixed screen info. */
if (ioctl(fbdev, FBIOGET_FSCREENINFO, &fixed_info) < 0) {
printf("Unable to retrieve fixed screen info: %s\n",
strerror(errno));
close(fbdev);
return 1;
}
/* Now memory-map the framebuffer.
According to the SDL source code, it’s necessary to
compensate for a buggy mmap implementation on the
PowerPC. This should not be a problem for other
architectures. (This fix is lifted from SDL_fbvideo.c) */
ppc_fix = (((long)fixed_info.smem_start) -
((long) fixed_info.smem_start & ~(PAGE_SIZE-1)));
framebuffer_size = fixed_info.smem_len + ppc_fix;
framebuffer = mmap(NULL,
framebuffer_size,
PROT_READ | PROT_WRITE,
MAP_SHARED,
fbdev,
0);
if (framebuffer == NULL) {
printf("Unable to mmap framebuffer: %s\n",
strerror(errno));
close(fbdev);
return 1;
}
printf("Mapped framebuffer.\n");
if ((fixed_info.visual == FB_VISUAL_TRUECOLOR) &&
(var_info.bits_per_pixel == 16)) {
/* White pixel. */
pixel_r = 0xFF;
pixel_g = 0xFF;
pixel_b = 0xFF;
GAMING WITH THE LINUX CONSOLE 335
/* We used this same pixel-packing technique
back when we were working with SDL. */
pixel_value = (((pixel_r >> (8-var_info.red.length)) <<
var_info.red.offset) +
((pixel_g >> (8-var_info.green.length)) <<
var_info.green.offset) +
((pixel_b >> (8-var_info.blue.length)) <<
var_info.blue.offset));
/* Draw a pixel in the center of the screen. */
x = var_info.xres / 2 + var_info.xoffset;
y = var_info.yres / 2 + var_info.yoffset;
*((u_int16_t *)framebuffer +
fixed_info.line_length/2 * y + x) =
(u_int16_t)pixel_value;
} else {
printf("Unsupported visual. (Asked for 16bpp.)\n");
pixel_value = 0;
}
/* Wait a few seconds. */
sleep(5);
/* Restore the old video mode. */
old_var_info.activate = FB_ACTIVATE_NOW;
if (ioctl(fbdev, FBIOPUT_VSCREENINFO, &old_var_info) < 0) {
printf("Warning: Unable to restore video mode: %s\n",
strerror(errno));
}
/* Close the fbdev. */
munmap(framebuffer, framebuffer_size);
close(fbdev);
return 0;
}
We start off by opening the framebuffer device and reading information about
the display, just as we did in Listing 8–1. Instead of trying to adapt to the
336 CHAPTER 8
existing video mode, however, we try to force a 640x480, 16-bit mode based on
the mode data in /etc/fb.modes.
The routines in fbmodedb.c make this easy.
1
FB ParseModeDB takes the name
of a framebuffer mode database file (almost always /etc/fb.modes) and returns
a linked list of FbModeline mode structures (defined in fbmodedb.h). To set
one of these modes, we simply have to copy the FbModeline values into a
fb var screeninfo structure and call an appropriate ioctl. If the ioctl
succeeds, we’re in business. If it fails, we might have better luck with a different
mode. In this program, though, we just exit on failure.
After we plot a pixel and wait a few seconds for the user to observe our
masterpiece, we restore the old mode by calling the FBIOPUT VSCREENINFO ioctl
on the original fb var screeninfo structure (with the FB ACTIVATE NOW flag
set). This should never fail, since those values were reported by the driver in the
first place, and they are known to be valid.
Note that this program is much simpler now that we support only 16-bit Hicolor
drawing. Writing cross-mode video code is tedious and time-consuming.
However, this restriction means that the user must have a framebuffer capable of
switching to a 16-bit mode; VESA framebuffers cannot switch modes at all.
You should compile this program together with fbmodedb.c:
$ gcc -W -Wall -pedantic fbmodedb.c modeswitch.c -o modeswitch
This whole process feels a bit “messy,” and truth be told, it has a rather high
failure rate. Another approach to mode switching is to shell to the fbset program
(with popen), passing the desired mode on the command line. For instance,
popen("fbset -g 1024 768 1024 768 16", "r") would attempt to set a
1024x768, 16-bit video mode. Be sure to close popen pipes with pclose. The
return code of the program is reported by pclose.
The only other problem is how to restore the original video mode when you’re
finished. One possible option is to invoke the fbset utility to enter a video mode
1
Permission is granted to use fbmodedb.c and fbmodedb.h in any program, so long as
credit is given in the source code. I originally wrote it for inclusion in SDL.
GAMING WITH THE LINUX CONSOLE 337
and to use a backed-up copy of the fb var screeninfo structure to restore the
original mode later on.
Use the Source, Luke!
The Linux framebuffer interface is not very well documented. In order to gain a
clear enough understanding of the API to write this section of the book, I had to
read through quite a bit of source code. It was actually rather enjoyable; blazing
a trail through uncharted and undocumented territory is what programming is
all about.
The best framebuffer reference I came across is the SDL source code. Its
framebuffer-handling routines are well written, widely tested, and fairly
comprehensive. Although it certainly is possible to pick up framebuffer
programming by studying the fb.h header and the small amount of
documentation included with the kernel, SDL made the overall structure of the
interface much easier to understand. If you find yourself in a difficult or obscure
coding situation, look for some code that already does what you’re trying to
accomplish. You just might save yourself a considerable amount of time.
Console Input Handling
In previous chapters we’ve used SDL to manage our input device handling. With
the framebuffer console, however, we’re distant from such creature comforts.
Therefore, we need to develop alternate means of accessing the keyboard and
other input devices.
First things first: keyboard input. We can accomplish this by putting the
terminal in raw mode and setting a few attributes. It’s ugly, but it works. The
next issue is mouse support, which comes from the GPM program (present on
nearly every Linux system as a standard console mouse interface). We’ll look at
each of these briefly and leave a longer dissertation on the subject to the kernel’s
header files and the SDL source code.
338 CHAPTER 8
Keyboard Input from a Terminal
When a program runs under the framebuffer console, it is really running under a
specially configured Linux virtual terminal (VT) and is therefore subject to
normal terminal keyboard handling. This is fine if we just want to read lines of
text (with fgets, for instance), but games require much more sophisticated
input processing than this. Fortunately, it is possible to reconfigure virtual
terminals (with ioctl calls) to gain nearly direct access to keyboard scancodes.
This can get hairy, so we’ll delve only into the basics here. If your
input-handling needs are more complex, you might try either SDL’s input code
or the libgii library (an input device interface meant to complement the GGI
graphics library).
Scancode Madness
At the hardware level, a keyboard is nothing but a set of buttons connected to a
grid, a small microcontroller for detecting button presses, and a serial cable to
talk to the computer. When you press a key, the microcontroller detects a short
in its grid and generates a kscan (keyboard scan) code. It sends this code over
the wire to the computer’s motherboard, where another microcontroller
translates it into one or more scancode bytes. The operating system reads
scancodes from the motherboard’s keyboard controller through port 60h.
The X Window System deals with scancodes directly (they’re easy to get from
the kernel if you’re so inclined), but the kernel can optionally take the process a
step further by translating scancodes into keycodes. Keycodes are eight-bit
values, in which the lower seven bits indicate the key (no problem, since most
keyboards contain fewer than 128 keys) and the eighth bit indicates a press or a
release.
So far this seems quite easy to handle; where does the madness come in? The
problem lies in associating values in the local character set (ASCII, for instance)
with keycodes. Even though we may not need to generate text in response to key
presses,
2
we probably do need to know which of the 128 possible keycodes
2
If you do need to generate text in response to key presses, it might be a good idea to set the
GAMING WITH THE LINUX CONSOLE 339
corresponds to, say, the left arrow key. This is a particular hassle because the
keyboard’s modifier keys (Shift, Alt, Ctrl, etc) can affect the generated symbol.
There are eight possible modifiers, and any combination of them can result in a
different symbol for a key press. Each of these keycode/modifier combinations is
associated with a keymap that contains the character to generate for that key
press. In the general case, we have to deal with 2
8
= 256 possible keymaps if we
want to generate local character set codes for each keycode (though most games
can get away with using only the first keymap, since they usually just need to
uniquely identify each key, not generate printable text). The kernel provides an
ioctl for looking up the symbol associated with a particular key on a particular
map.
The Raw Deal
The kernel provides three main keyboard operating modes: xlate, mediumraw,
and raw. The xlate mode is the default mode, which is completely unsuitable for
gaming because it reports only key presses and ignores releases (thus making it
impossible to maintain a keyboard state table `a la SDL GetKeyState).
Mediumraw mode reports keycode data for both presses and releases. Finally,
raw mode provides direct scancode data. The best mode for gaming is probably
mediumraw mode, since it informs us of both presses and releases and saves us
from having to interpret scancode sequences (which are a bit obtuse). If you’re
trying to port an old DOS game to Linux, raw mode might be a better bet (since
it’ll give you the same scancodes as these games used to read from the hardware
directly).
To put the keyboard in mediumraw mode, we first need its file descriptor. This
is actually the file descriptor of the current TTY (which needs to be a virtual
terminal) or system console. After we locate a suitable file descriptor (see the
example code), we can send the KDSKBMODE ioctl with an argument of
K MEDIUMRAW (for raw mode, you’d use K RAW). Note that this doesn’t affect the
keyboard itself in any way—it just adjusts the kernel’s reporting of key events.
keyboard back into xlate mode (leaving line buffering disabled; see the tcsetattr call in
Listing 8–3). You can do full translation yourself, but there are lots of annoying quirks to
deal with.
340 CHAPTER 8
In mediumraw mode, each key on the keyboard (including the left and right
Shift, Ctrl, and Alt keys) generates a unique keycode on both presses and
releases. We can read this data as bytes from the terminal’s file descriptor.
Listing 8–3 demonstrates putting the keyboard driver into mediumraw mode and
reading keycode data. This program is very similar to the showkey program
included with most Linux distributions. (In fact, the source to showkey was
helpful to me in figuring out how this mess works.)
Code Listing 8–3 (keycodes.c)
/* Simple keycode viewer, very similar to the showkey program.
Run it from a virtual terminal. If something goes wrong and
you can’t use your console, press Alt-SysRq-R to get the
keyboard out of raw mode (this assumes Magic SysRq is
compiled into your kernel it’s very useful!)
This code was not derived from showkey, but credit goes to
its authors for guidance. */
#include <unistd.h>
#include <fcntl.h>
#include <stdio.h>
#include <stdlib.h>
#include <termios.h>
#include <sys/ioctl.h>
#include <linux/keyboard.h>
#include <linux/kd.h>
/* Checks whether or not the given file descriptor is associated
with a local keyboard.
Returns 1 if it is, 0 if not (or if something prevented us from
checking). */
int is_keyboard(int fd)
{
int data;
/* See if the keyboard driver groks this file descriptor. */
data = 0;
if (ioctl(fd, KDGKBTYPE, &data) != 0)
return 0;
GAMING WITH THE LINUX CONSOLE 341
/* In current versions of Linux, the keyboard driver always
answers KB_101 to keyboard type queries. It’s probably
sufficient to just check whether the above ioctl succeeds
or fails. */
if (data == KB_84) {
printf("84-key keyboard found.\n");
return 1;
} else if (data == KB_101) {
printf("101-key keyboard found.\n");
return 1;
}
/* Sorry, this didn’t check out. */
return 0;
}
int main()
{
struct termios old_term, new_term;
int kb = -1; /* keyboard file descriptor */
char *files_to_try[] = {"/dev/tty", "/dev/console", NULL};
int old_mode = -1;
int i;
/* First we need to find a file descriptor that represents the
system’s keyboard. This should be /dev/tty, /dev/console,
stdin, stdout, or stderr. We’ll try them in that order.
If none are acceptable, we’re probably not being run
from a VT. */
for (i = 0; files_to_try[i] != NULL; i++) {
/* Try to open the file. */
kb = open(files_to_try[i], O_RDONLY);
if (kb < 0) continue;
/* See if this is valid for our purposes. */
if (is_keyboard(kb)) {
printf("Using keyboard on %s.\n", files_to_try[i]);
break;
}
342 CHAPTER 8
close(kb);
}
/* If those didn’t work, not all is lost. We can try the
3 standard file descriptors, in hopes that one of them
might point to a console. This is not especially likely. */
if (files_to_try[i] == NULL) {
for (kb = 0; kb < 3; kb++) {
if (is_keyboard(i)) break;
}
printf("Unable to find a file descriptor associated with "\
"the keyboard.\n" \
"Perhaps you’re not using a virtual terminal?\n");
return 1;
}
/* Find the keyboard’s mode so we can restore it later. */
if (ioctl(kb, KDGKBMODE, &old_mode) != 0) {
printf("Unable to query keyboard mode.\n");
goto error;
}
/* Adjust the terminal’s settings. In particular, disable
echoing, signal generation, and line buffering. Any of
these could cause trouble. Save the old settings first. */
if (tcgetattr(kb, &old_term) != 0) {
printf("Unable to query terminal settings.\n");
goto error;
}
new_term = old_term;
new_term.c_iflag = 0;
new_term.c_lflag &= ~(ECHO | ICANON | ISIG);
/* TCSAFLUSH discards unread input before making the change.
A good idea. */
if (tcsetattr(kb, TCSAFLUSH, &new_term) != 0) {
printf("Unable to change terminal settings.\n");
}
GAMING WITH THE LINUX CONSOLE 343
/* Put the keyboard in mediumraw mode. */
if (ioctl(kb, KDSKBMODE, K_MEDIUMRAW) != 0) {
printf("Unable to set mediumraw mode.\n");
goto error;
}
printf("Reading keycodes. Press Escape (keycode 1) to exit.\n");
for (;;) {
unsigned char data;
if (read(kb, &data, 1) < 1) {
printf("Unable to read data. Trying to exit nicely.\n");
goto error;
}
/* Print the keycode. The top bit is the pressed/released
flag, and the lower seven are the keycode. */
printf("%s: %2Xh (%i)\n",
(data & 0x80) ? "Released" : " Pressed",
(unsigned int)data & 0x7F,
(unsigned int)data & 0x7F);
if ((data & 0x7F) == 1) {
printf("Escape pressed.\n");
break;
}
}
/* Shut down nicely. */
printf("Exiting normally.\n");
ioctl(kb, KDSKBMODE, old_mode);
tcsetattr(kb, 0, &old_term);
if (kb > 3)
close(kb);
return 0;
error:
344 CHAPTER 8
printf("Cleaning up.\n");
fflush(stdout);
/* Restore the previous mode. Users hate it when they can’t
use the keyboard. */
if (old_mode != -1) {
ioctl(kb, KDSKBMODE, old_mode);
tcsetattr(kb, 0, &old_term);
}
/* Only bother closing the keyboard fd if it’s not stdin, stdout,
or stderr. */
if (kb > 3)
close(kb);
return 1;
}
We begin by searching for a file descriptor that can talk to the keyboard driver.
For each candidate, we query the keyboard type with the KDGKBTYPE ioctl. This
will fail if the file descriptor does not represent a local keyboard. Once we have a
usable file descriptor, we use tcgetattr and tcsetattr to turn off buffering,
echoing, and signal generation. This puts the terminal into a much simpler
mode—anything that comes in will show up as input immediately (whereas the
input system would normally provide a simple line editing mode and print each
character to the terminal automatically). We complete our setup phase by
switching the keyboard driver into mediumraw mode with the KDSKBMODE ioctl.
Now we simply read and print data from the terminal’s file descriptor, using a
mask of 0x80 (10000000 in binary) to distinguish key presses from releases. We
can’t really infer anything about the meaning of any particular key, except that
the Escape key is in all likelihood mapped as 1. Users can remap their keyboards
to their liking, but in almost all cases the nonletter keys will have the same
keycodes as ASCII mappings. Letters are a bit of a challenge, though, since
standard ASCII doesn’t account for accents, umlauts, and other
language-specific variations of characters. I’ll demonstrate one approach to the
problem in the next example.
When the user presses the Escape key (or whatever keycode 1 has been
remapped to), we exit mediumraw mode, restore the old terminal attributes, and
GAMING WITH THE LINUX CONSOLE 345
exit. That’s all there is to reading keycodes! In a game, you might want to
collect input in a separate thread, or perhaps use select to avoid blocking on
the read call. But the mechanics of input collection are quite simple.
Avoiding Console Lockups
At some point in your game development forays, you’ll have a program
crash without cleanly restoring the keyboard’s state. It happens to
everyone. Fortunately, Linux recently (as of version 2.2, at least) added
a “magic SysRq” feature for regaining control of the system in such
emergencies. If this feature is compiled into your kernel (and I strongly
recommend it), you can switch your keyboard driver back to xlate mode
by pressing Alt-SysRq-R. You can get a list of other SysRq functions
with Alt-SysRq-Q.
The only real reason to not enable the Magic SysRq feature is local
security, but this is not a problem for most workstations. If someone
can get physical access to your machine, security is already defeated.
Interpreting Keycodes
Keycodes are of little use if we don’t know which keys they correspond to on the
actual keyboard. It’s easy to just write down the codes for whatever keymap you
happen to be using, but chances are they’ll be different on a foreign keymap.
Fortunately, the kernel has a record of what goes where, and we can query this
with (yet another) ioctl. The next example extends Listing 8–3 with key
identification. It doesn’t handle everything on the keyboard, but the rest should
be simple enough to add. This code should work in any locale that doesn’t
require Unicode (UTF-8). It would be possible to add that translation as well,
but it would make the code considerably more complex. SDL performs Unicode
translation, if you’re in need of a reference.
Code Listing 8–4 (keynames.c)
/* Our key-mapping table. This will contain printable characters
for some keys. */
char keymap[NR_KEYS];
346 CHAPTER 8
/* We’ll assign names to certain keys. */
char *keynames[NR_KEYS];
/* Locates the arrow keys and the Escape key in the kernel’s keymaps.
Fills in the appropriate globals. */
void init_keymap(int kb)
{
struct kbentry entry;
int keycode;
for (keycode = 0; keycode < NR_KEYS; keycode++) {
keymap[keycode] = ’ ’;
keynames[keycode] = "(unknown)";
/* Look up this key. If the lookup fails, ignore.
If it succeeds, KVAL(entry.kb_value) will be the
8-bit representation of the character the kernel
has mapped to this keycode. */
entry.kb_table = 0;
entry.kb_index = keycode;
if (ioctl(kb, KDGKBENT, &entry) != 0) continue;
/* Is this a printable character?
NOTE: we do not handle Unicode translation here.
See the SDL source (SDL_fbevents.c) for
an example of how this can be done.
Add in KT_LATIN and KT_ASCII if you want a wider
range of characters. They’re omitted here because
some characters do not print cleanly. */
if (KTYP(entry.kb_value) == KT_LETTER) {
keymap[keycode] = KVAL(entry.kb_value);
keynames[keycode] = "(letter)";
}
/* Since the arrow keys are useful in games, we’ll pick
them out of the swarm. While we’re at it, we’ll grab
Enter, Ctrl, and Alt. */
if (entry.kb_value == K_LEFT)
keynames[keycode] = "Left arrow";
GAMING WITH THE LINUX CONSOLE 347
if (entry.kb_value == K_RIGHT)
keynames[keycode] = "Right arrow";
if (entry.kb_value == K_DOWN)
keynames[keycode] = "Down arrow";
if (entry.kb_value == K_UP)
keynames[keycode] = "Up arrow";
if (entry.kb_value == K_ENTER)
keynames[keycode] = "Enter";
if (entry.kb_value == K_ALT)
keynames[keycode] = "Left Alt";
if (entry.kb_value == K_ALTGR)
keynames[keycode] = "Right Alt";
}
/* Manually plug in keys that the kernel doesn’t
normally map correctly. */
keynames[29] = "Left control";
keynames[97] = "Right control";
keynames[125] = "Left Linux key"; /* usually mislabelled */
keynames[126] = "Right Linux key"; /* with a Windows(tm) logo */
keynames[127] = "Application key";
}
The main addition to this program is the init keymaps function, so we haven’t
reprinted the rest of the program. This function uses the KDGKBENT ioctl to
look up information about every keycode in the first keymap. (If we were doing
Unicode translation, we’d need to look at the other 255 keymaps as well and
perform lookups in the context of which modifiers were currently pressed.) For
characters we identify as printable (letters), we record the kernel-provided
character value in a table. We also attempt to identify a few other important
keys and label them with strings. The kernel inexplicably fails to differentiate
the left and right Ctrl keys (it treats them as a single keysym, even though they
have different keycodes), so we handle these and other oddball keys by hand.
Hopefully, you’ve now seen enough of the Linux console keyboard interface to
implement keyboard input for framebuffer console games. As a closing remark,
I’ll suggest that locking up the user’s keyboard is a very bad idea, and so it
would probably be wise to install signal handlers and an atexit callback to
return the keyboard to xlate mode in a pinch. If you’re going to write buggy
code at any point, please try to keep it out of your console input subsystem!
348 CHAPTER 8
Warning
When the keyboard driver is in the raw or mediumraw modes, it does
not recognize the Alt+Fn combinations normally used for switching
between virtual terminals. Since games often run for a long time, it’s
essential that you implement this ability yourself. This is left as an
exercise to the reader. (Hint: Use the VT ACTIVATE ioctl to switch
between virtual terminals, and VT WAITACTIVE to wait for the user to
switch back to your console. The kernel will handle video mode
switching, but it won’t necessarily preserve the contents of the screen or
the color palette. If you get stuck, take a look at SDL fbevents.c in
the SDL source.)
Mouse Input with GPM
Keyboard input is sufficient for getting your feet wet with fbcon game
programming, but more advanced projects usually require mouse input as well.
There are two options: implement a complete mouse driver yourself (reading and
processing data packets for multiple types of mice) or require the user to run the
GPM console mouse server. I recommend the latter—it comes with nearly every
Linux distribution, and it supports almost every common type of mouse. SDL
does both, and so it can support GPM’s wide variety of hardware and still work
on systems without GPM.
Programming mouse hardware is beyond our present scope. It’s simple enough
to implement in a dozen or so lines of code, but the details vary between mouse
types. If you’re interested in doing this, I refer you once again to SDL’s source
code. The GPM source might also be of interest.
GPM is a small daemon (detached background process) that’s usually loaded in
a system’s startup scripts. Once GPM is activated, it decodes mouse input and
makes this data available to other programs (GPM clients) through the libgpm
client library. Depending on your application’s needs, GPM can operate at two
levels of abstraction. The lower-level interface provides simple mouse event
polling. In this mode the application uses Gpm GetEvent to retrieve Gpm Event
structures that contain information about the mouse’s current state.
Gpm GetEvent blocks until data is available, but an application can use the
select system call to check for data before it enters the blocking read.
GAMING WITH THE LINUX CONSOLE 349
In case this simple event interface doesn’t fit your application’s needs, GPM also
provides a high-level callback interface based on regions of interest (ROIs). This
interface is primarily intended for adding mouse support to existing character
mode applications, and it’s not particularly relevant to game programming. The
mechanism is discussed in detail in the documentation distributed with GPM.
Both of these interfaces are supplied by the gpm.h header and the libgpm client
library.
Listing 8–5 shows how to read mouse input with GPM.
Code Listing 8–5 (mouse.c)
/* Very basic example of reading mouse data from GPM. */
#include <sys/time.h>
#include <sys/types.h>
#include <errno.h>
#include <string.h>
#include <signal.h>
#include <unistd.h>
#include <stdio.h>
#include <gpm.h>
/* Signal handler and a global variable for
detecting Ctrl-C and shutting down. */
int quit = 0;
void sighandler(int sig)
{
quit = 1;
}
int main(int argc, char *argv[])
{
int gpm;
Gpm_Connect gpm_connect;
Gpm_Event gpm_event;
char spinner[] = "|/-\\";
350 CHAPTER 8
int spinner_pos = 0;
/* Exit on Ctrl-C. */
signal(SIGINT, sighandler);
/* This specifies the events we’re interested in. */
gpm_connect.eventMask = GPM_MOVE | GPM_UP | GPM_DOWN;
/* Don’t give a "default" treatment to any events. */
gpm_connect.defaultMask = 0;
/* These are used for multiple clients on a single console. */
gpm_connect.minMod = 0;
gpm_connect.maxMod = 0xFFFF;
/* Connect to the GPM server. */
gpm = Gpm_Open(&gpm_connect, 0);
if (gpm < 0) {
printf("Unable to connect to GPM.\n");
return 1;
}
/* Now read mouse events until the user presses Ctrl-C. */
while (!quit) {
int result;
struct timeval tv;
fd_set fds;
/* The return value of Gpm_Open is a file descriptor,
and there’s no point in polling for input if there’s
no data waiting on this descriptor. We use select to
wait for data. */
FD_ZERO(&fds);
FD_SET(gpm, &fds);
tv.tv_sec = 0;
tv.tv_usec = 10000; /* Brief timeout to slow things down
a bit. This would be zero in a
game loop. */
result = select(gpm+1, &fds, NULL, NULL, &tv);
if (result < 0) {
GAMING WITH THE LINUX CONSOLE 351
if (errno == EINTR) continue; /* EINTR is not bad. */
printf("select failed: %s\n",
strerror(errno));
break;
}
if (result > 0) {
/* Get the next mouse event. */
if (Gpm_GetEvent(&gpm_event) != 1) {
printf("Unable to read an event.\n");
break;
}
/* Print out the event.
X and Y are the coordinates of the mouse pointer.
DX and DY are the relative motion of the mouse since
the last event. Games are probably more interested in
this than the actual position (especially since the
X and Y coordinates are constrained to an arbitrary
range).
Buttons gives a bitmask of pressed mouse buttons. */
printf("X: %4i Y: %4i DX: %4i DY: %4i Buttons: %3i\n",
gpm_event.x, gpm_event.y,
gpm_event.dx, gpm_event.dy,
gpm_event.buttons);
} else {
/* If no data is ready, burn time with a dumb little
spinning character. */
printf("%c\r", spinner[spinner_pos++]);
fflush(stdout);
if (spinner[spinner_pos] == ’\0’) spinner_pos = 0;
}
}
/* Shut down the GPM connection. */
Gpm_Close();
return 0;
}